Electric scooter from a gyro scooter or “porridge from an ax”
On summer days, urban mobility is at its peak. This is especially true for teenagers with a lot of free time during the holidays. Freedom of movement erases the distance between separated friends. One solution is to rent a scooter, but rental points and parking requirements often make this method impractical. During his next vacation, tired of “idleness”, a strong-willed decision was made to spend leisure time on increasing mobility in the family. For the last couple of years, a gyro scooter has been lying around, according to the assurance of the household, “broken”. So the stars converged and showed the direction …
First of all, the gyro scooter was disassembled, and it turned out, like most, 3 paid: central – controller, two side – gyroscopes. The central board is assembled on an analogue of the STM32F103 microcontroller. Previously, I was already interested in these controllers and I had a ST-link programmer / debugger lying around (never used).
Next, an analysis of ready-made solutions for flashing the board was carried out, because. time was allotted for the whole task – a week of the rest of the vacation. A mature project has been selected Emanuel Ferou
The firmware of the board was successful, the accelerator and brake simulators also responded adequately, so the time has come for the first material investments. Avito bought two triggers for 450 rubles each. When reworking the board, it was necessary to cut off the 15V power supply in the trigger connector on the board, and turn on the 3.3 V power supply. The cutting was successful. Throwing a jumper by soldering to the 3.3 V supply too, but when positioning the wiring to the connector pin, it jumped out, straightened up and touched the power capacitor contact. The spark was so juicy that I thought 220V had shorted out. Realizing that the residual charge in the capacitor (presumably 36 V) on the board, which had lain overnight without power, got into the 3.3 V power supply lines of the controller, I immediately lost interest in the undertaking, turned off the light at my desk, went and lay down on the sofa to watch vidosiki.
An hour has passed. As a rule, this is enough for the wave of demotivation to subside, I reached into my bins and found a debug board with STM. And purely on the wave and the realization that luck has not left me, I transplanted the controller. After the flashing, nothing started up. I spent an hour and a half looking at, calling and comparing contacts in two GD32 and STM32 datasheets. Didn’t find any problems. But there is a way out …. videos. Another hour, and I returned to work, and noticed that the problem was in the 9th character of the chip designation. This is the size of the controller’s memory and is smaller in the new one. Search. In the city in radio shops today there is no necessary controller. Finished products for transplantation are inadequate for the price of the donor. As a result, Avito 500r is a very similar fee, and today it’s fate! The board was sold as not working and it was indicated that it was beeping. For me, this meant that the controller was alive.
After assembling the electronics and when testing on the table, the board worked with only one wheel, and rearranging the wheels showed that the same wheel was not working. The board’s beeper signal and firmware error codes were deciphered, among other things, as Halls in the wheel. Continuity … yes, one sensor does not respond.
Buying a sensor -150r. Replaced, pasted. All is good. At the same time, on the purchased board, I replaced the broken input mosfet. Everything works on the table and all the electronics are ready.
And then I remembered how I ridiculed my wife when I announce my new projects to her, and she, showing participation, asks something like: Honey, I will build a rocket! Dear, what is the case made of?
Yes, the corps …. Everyone will see only him. For half a day I applied aluminum profiles to the wheels. I looked at the existing fork bearings. Realizing that there is not enough material available, and the purchase of an aluminum profile (corner or channel) with a thickness of 5 mm will be more than 1000 rubles. a strong-willed decision was made … to lose heart and buy a ready-made frame.
Avito. 2000r analogue of Kugo S4. Great! A rocket can be built.
Fitting to the deck cavity and… Nothing fits!!! The payment doesn’t come in.

I really did not want to change the presentation, but after half a day of reflection: Saw, Shura, saw …


The battery from the hoverboard does not fit in any dimension. That’s not news. After the board, I already realized that the battery would have to be sorted out.

We understand, we revise.

The battery is going down! But the protection board is not. And this is a surprise, because I did not know its form factor until I removed the heat shrink from the battery. Search. Fierce bidding on Avito for 3300r battery from a Trident scooter. Trying on… Doesn’t fit! Refresh the battery, wrap it in Kapton thermal tape. Gets into a rut. Another mini win.
Further, non-trivial work with the wheel axis of the gyro scooter, because The wheel axle only comes out on one side. I machine the outer blind cover, opening access to the axis, I drill the axis, I cut the M8 internal thread. On the reverse side, I cut the long axis (with wire) to size, cut the external thread M14. I sharpen spacers, try them on… My 10′ wheel won’t fit even with flat tires! Well, already hardened by this project, this time without videos! We drill, we cut, we saw with a file.


The wheel is installed, and this is the first state of the project when it can be tested functionally in real conditions. With the frame, I got the native front wheel without a motor. So you can test the scooter on one wheel!
Last day of vacation. Already on the installed board, we connect the motors to the deck .. and one connector of the motor wire springs to the ground … a spark and again without a connected battery. Extinguishing indignation, I complete the hopeless project, turn it on … The controller beeps start, but both wheels do not spin. Well, skipping the stage with videos, we measure the force on the motors. There is a shim on the power wires. We call the control on the connectors. There is no brake, no gas, so it’s not the board. I remember the adapter board I made from one controller board connector to two trigger connectors, tightly wrapped in HB tape. Yes, the common connector just fell out! I connect everything, tie it with threads and wrap it tightly. Everything is working. I take my son and go to the test on two scooters. We drove off 200m. Immediately, it does not pull uphill. Disappointment. Then the rear wheel came loose and turned. The wires laid inside the axle survived. We return, the scooter on itself uphill. I tighten the rear wheel in a heroic way, take my son, we drive 300m. The front native wheel has come off the bearings and is hanging on the axle. It turns out that the seller did not add the distance bushings that burst the wheel inside the fork. We sharpen ourselves, we set. The son refuses the third time with “a wreck to ride.” I’m going by myself. The dynamics are weak. Uphill on yourself. We need to make a second wheel.
The procedures for preparing the second wheel are similar to the rear. Of course, it doesn’t fit in a fork. Without thinking twice and feeling the time trouble in the project, we cook a fork from a 50x50x5 corner (it was available).


We paint (paint 500r spray). We fill the wires of the front wheel into the car corrugation (100r meter). Cut out the cover for the electronics compartment.

Trials! On two drive wheels, the dynamics are excellent, start with a drift, if not loaded. Under load uphill 300m and the battery sags, the board beeps discharge. Need battery diagnostics. I embed a pre-ordered voltage indicator 400r. for on-the-go diagnostics.
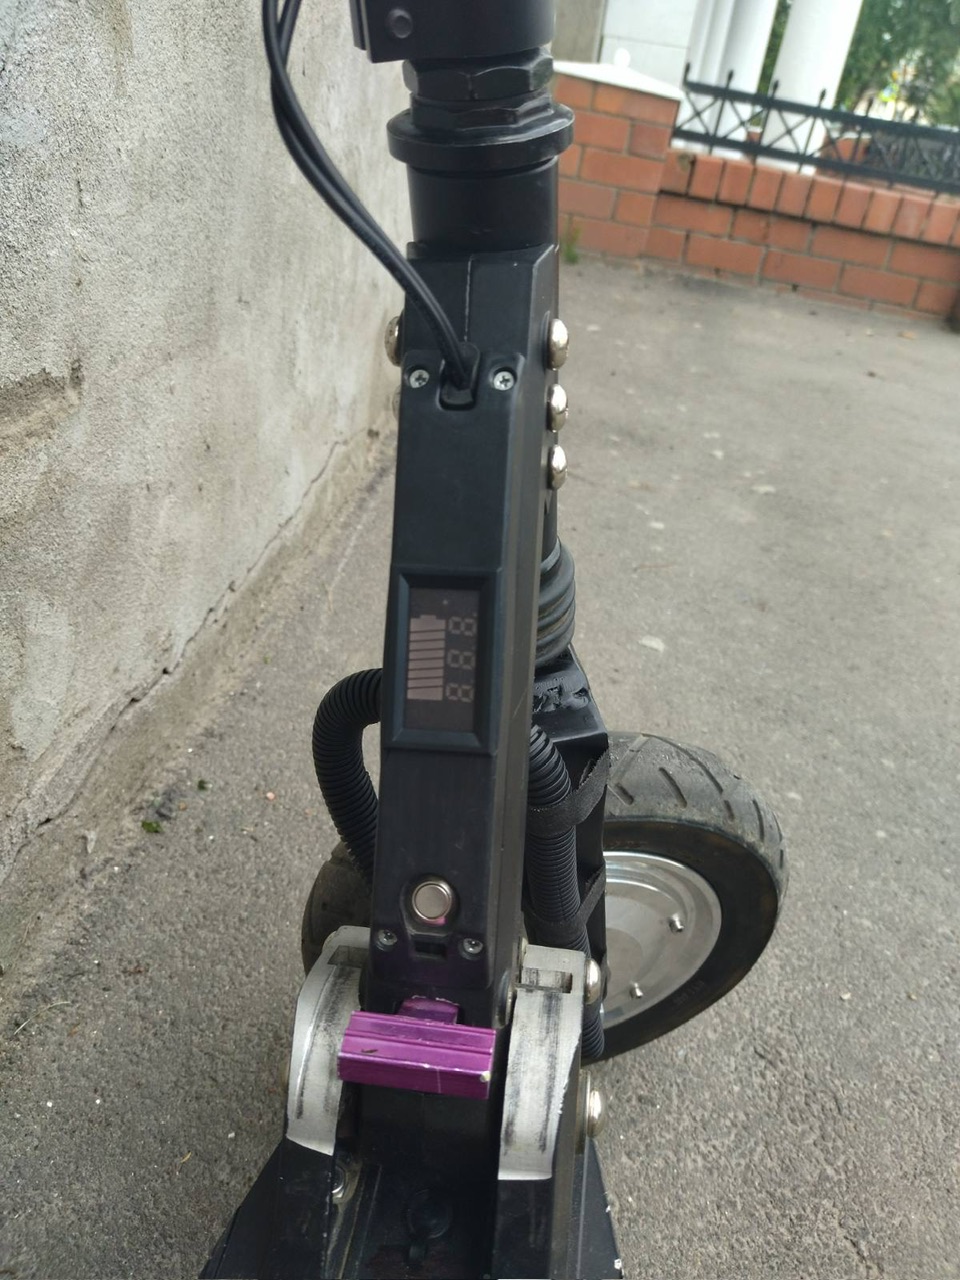

A long test with voltage control shows that the battery is not actually discharged, but the voltage sags under maximum load (in the firmware 15A per wheel and 17A total), then it is restored. I’ll sort out the battery, I think that a couple of cans in the trash. The operating mode in the firmware is TRQ with free rolling when the gas is released.

Finally got to ride with my son. More than an hour. Why else would they do all this!
That’s all! All the best!
,