setting up an XRay server and client with XTLS-Reality is quick and easy
But there are some things we didn’t talk about. In the second article, I casually mentioned the most advanced and undetectable lock bypass technology called XTLS Realityand it’s time to talk about it in more detail, namely, how to configure the client and server for it.
In addition to the fact that this protocol is even more resistant to detection, the pleasant fact is that setting up an XRay server for XTLS-Reality is much easier than the options described earlier – after previous articles, I received quite a lot of comments like “What is so difficult, you need domain, you need certificates, and a bunch of everything” – now everything will be much easier.
XTLS Reality
Briefly about XTLS Reality. This is the latest invention from the authors of XRay. I talked about XRay (and its progenitor V2Ray, aka V2Fly) in a previous article. XTLS-Reality is supported in the latest releases of XRay, Sing-box and many clients.
It is designed to protect against detection by method active probing. Unlike the old protocols (Shadowsocks, VMess, VLESS, and the XTLS-Vision transport), the definition of “friend/foe” here occurs at the stage of the TLS handshake at the time of reading the ClientHello. If the client is recognized as “own”, the server works as a proxy, and if not, wow! – and the TLS connection is transmitted to some other absolutely real host with TLS (for example, google.com or gosuslugi.ru), and thus the client (or the censor who wants to check by active probing what is hiding on the other end) will receive real TLS certificate from google.com or gosuslugi.ru and real data from this server. Full compliance. The mechanism for determining “friend/foe” is in many ways similar to how Cloak works, and allows you to reliably determine the authenticity of the client, but at the same time does not arouse suspicion among censors and is resistant to replay attacks – from the side of traffic analysis systems it looks like a connection to a real popular site, the server gives a real TLS certificate of this site, and in general everything (including the TLS fingerprint of the server) looks authentic to the limit and does not arouse suspicion. As a bonus, XTLS-Reality is usually used in tandem with XTLS-Vision, that is, we have very authentic-looking traffic patterns due to the lack of double TLS-in-TLS encryption (and at the same time still very high performance, I have between hosts in Moscow and in Central Europe XRay easily outputs >100 megabits).
The only disadvantage of such a solution is that, unlike older protocols (VLESS without XTLS), there is no way to work through a websocket transport, and, accordingly, through a CDN like Cloudflare.
Installing the XRay Server
And now it’s time to set it all up. Given: VPS on Linux (Debian or Ubuntu, plus or minus the same on other distributions) with an IPv4 or IPv6 address.
I already described the installation of XRay in a previous article, so I will be brief here.
You can install XRay manually:
wget https://github.com/XTLS/Xray-core/releases/download/v1.8.1/Xray-linux-64.zip
mkdir /opt/xray
unzip ./Xray-linux-64.zip -d /opt/xray
chmod +x /opt/xray/xray
nano /usr/lib/systemd/system/xray.service
systemctl enable xray
xray.service
[Unit]
Description=Xray Service
Documentation=https://github.com/xtls
After=network.target nss-lookup.target

[Service]
User=nobody
CapabilityBoundingSet=CAP_NET_ADMIN CAP_NET_BIND_SERVICE
AmbientCapabilities=CAP_NET_ADMIN CAP_NET_BIND_SERVICE
NoNewPrivileges=true
ExecStart=/opt/xray/xray run -config /opt/xray/config.json
Restart=on-failure
RestartPreventExitStatus=23
LimitNPROC=10000
LimitNOFILE=1000000

[Install]
WantedBy=multi-user.target
And you can install it with a script from the developers (for some reason, by default, it installs the old version 1.7.5, which does not support Reality, so you need to explicitly specify a more recent one):
bash -c "$(curl -L https://raw.githubusercontent.com/XTLS/Xray-install/046d9aa2432b3a6241d73c3684ef4e512974b594/install-release.sh)" @ install --version 1.8.1 The script will install XRay and create a systemd unit for it.
Configuring the XRay Server
To configure, we need a number of parameters. Some of them can be generated by XRay itself:
/usr/local/bin/xray uuid # /opt/xray/xray если устанавливали вручную
/usr/local/bin/xray x25519 # /opt/xray/xray если устанавливали вручную
You will get a UUID (User ID for VLESS Authentication Protocol) as output, as well as private and public keys – write them down, you will need them.
Another parameter that is needed is short ID, it is just a hexadecimal number (characters 0-9, ag) up to 8 bytes long (16 characters) – you can type any abracadabra like “aabbccdd” or run openssl rand -hex 8
And here the most interesting begins further. We need to find a site to masquerade as.
The requirements are pretty simple:
it must be a foreign server (outside the Russian Federation), not banned by the domain by Roskomnadzor, supporting connections via TLSv1.3 and HTTP / 2, having a main page that Not redirects to some other domain. If you really want to go wrong, it would be nice if the IP address was from the range of the same cloud host as yours, and that the server supported the Online Certificate Status Protocol (OCSP). If you don’t know what all this bullshit means – don’t bother, choose something simple, for example
The server has been selected, it’s time to edit the config. If you installed XRay manually, then it will be in /opt/xray/config.json, if using a script, then in /usr/local/etc/xray/config.json.
We bring it to the following form:
{
  "log": {
    "loglevel": "info"
  },
  "routing": {
    "rules": [],
    "domainStrategy": "AsIs"
  },
  "inbounds": [
    {
      "port": 23,
      "tag": "ss",
      "protocol": "shadowsocks",
      "settings": {
        "method": "2022-blake3-aes-128-gcm",
        "password": "aaaaaaaaaaaaaaaabbbbbbbbbbbbbbbb",
        "network": "tcp,udp"
      }
    },
    {
      "port": 443,
      "protocol": "vless",
      "tag": "vless_tls",
      "settings": {
        "clients": [
          {
            "id": "4c3fe585-ac09-41df-b284-70d3fbe18884",
            "email": "user1@myserver",
            "flow": "xtls-rprx-vision"
          }
        ],
        "decryption": "none"
      },
      "streamSettings": {
        "network": "tcp",
        "security": "reality",
		"realitySettings": {
			"show": false,
			"dest": "www.microsoft.com:443",
			"xver": 0,
			"serverNames": [
				"www.microsoft.com"
			],
			"privateKey": "GOTPj_klK7_j_IvjxiCtyBL80RYotYSOdBBBSfFOMH4",
			"minClientVer": "",
			"maxClientVer": "",
			"maxTimeDiff": 0,
			"shortIds": [
				"aabbccdd"
			]
		}
      },
      "sniffing": {
        "enabled": true,
        "destOverride": [
          "http",
          "tls"
        ]
      }
    }
  ],
  "outbounds": [
    {
      "protocol": "freedom",
      "tag": "direct"
    },
    {
      "protocol": "blackhole",
      "tag": "block"
    }
  ]
}
What to pay attention to: “serverNames” contains the domain you are masquerading as (in this case, www.microsoft.com), “id” in the “clients” section is the same UUID that we generated above. “privateKey” and the first element in the “shortIds” array is the private key and short ID that we also generated above. Do not lose the public key, it will be needed on the client.
In this config, Shadowsocks-2022 is also configured on port 23, just in case, it will suddenly come in handy. If you don’t need it, or if you want complete masking, you can remove this element from “inbounds”.
Restart xray again:
$ systemctl restart xrayWe check that everything started normally:
$ journalctl -u xrayFor example, XRay may swear that it is not possible to parse the JSON file, usually this is due to extra commas at the end of the {} block, in which case it will indicate which line the error is on. We fix the errors, restart again, and proceed to setting up clients.
Setting up clients
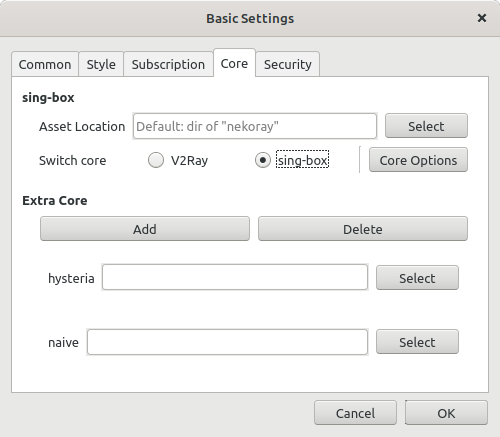
At first Nekobox on desktop (Windows, Linux, macOS).
If you have not used it before, you need to switch it to use the sing-box engine, Preferences -> Basic Settings -> Core:
Go to Server -> New profile and fill everything like this:

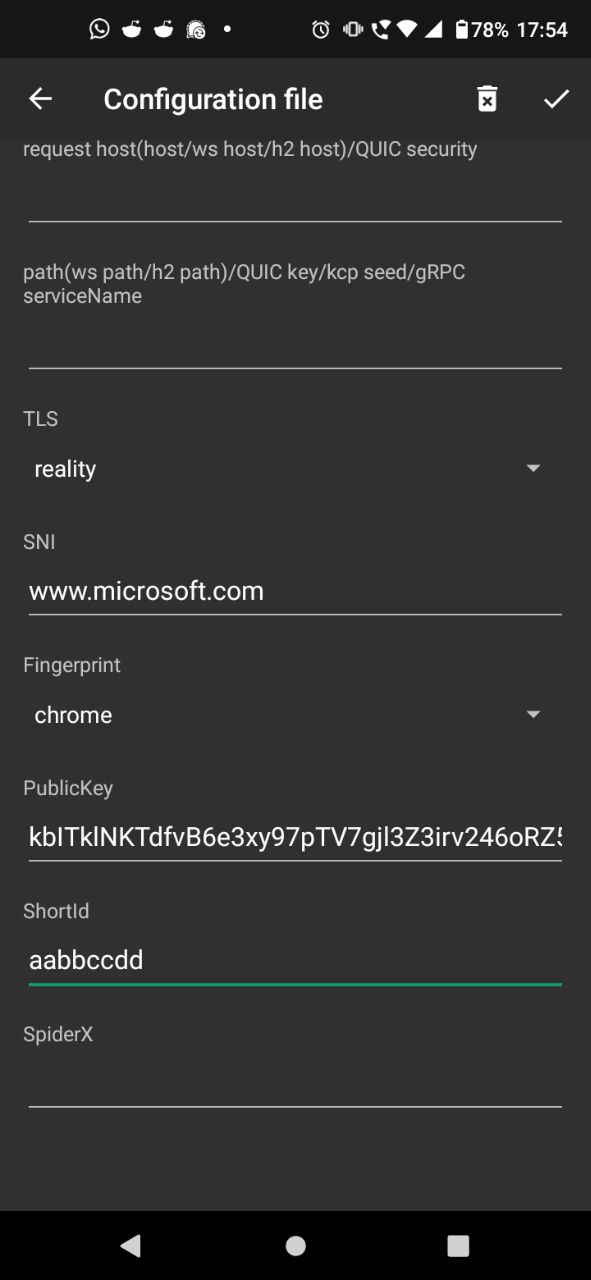
Address – the IP address of your server, UUID – respectively, UUID, SNI must match the domain you are masquerading as (one of the “serverNames” list from the server config), uTLS – I choose Chrome (this is client disguise as a regular browser), Reality Pbk – public key (not private, but second, public), Reality Sid – shortId from the config above.
We save, right-click on the new server in the list, click Start, and test the connection by selecting Current Select -> URL test in the same place.
If everything is fine, then with the “VPN Mode” or “System proxy” checkboxes, you can turn the traffic of all applications to the proxy.
Setting v2rayN under Windows it is similar, the set of parameters is the same, here is a screenshot (not mine, from Google):

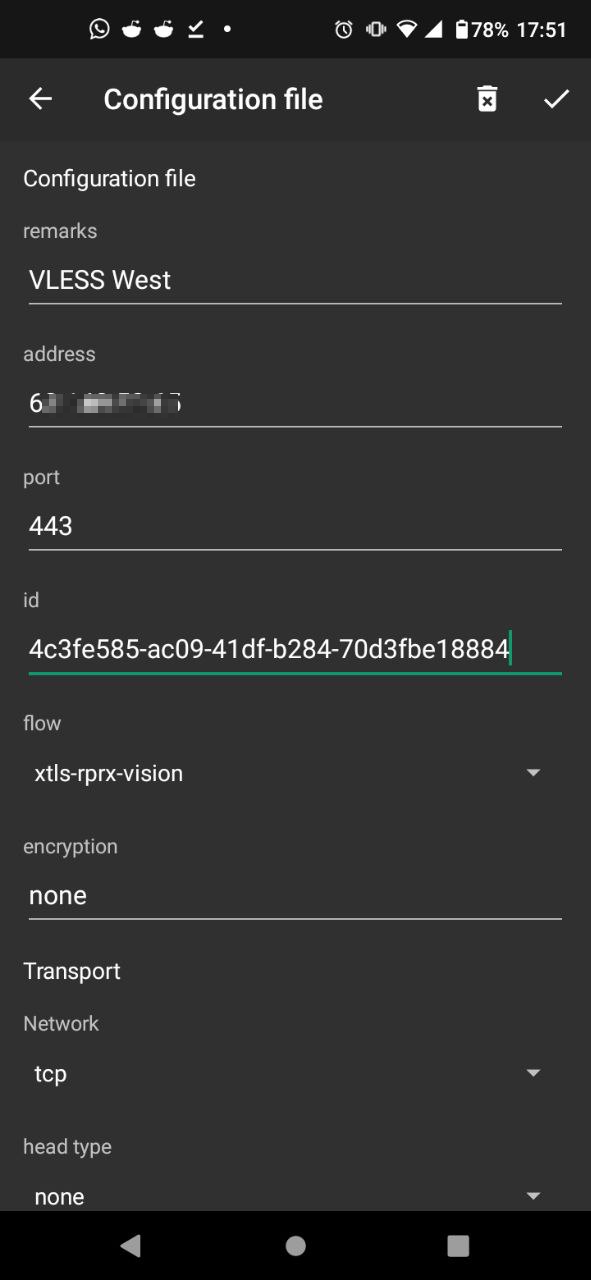
Next, mobile clients. Option one: in Nekobox or in v2ray, right-click on your server from the list, select Share -> QR code or Link, and get a link or QR code, which can then be scanned / pasted into mobile clients. Or enter all the same data with your hands, this is how it looks in android v2rayNG (the version from Google Play has not yet been updated and cannot work with Reality, download apk from github):

Under iOS I recommend using Shadowrocket ($3) or Wings X (it’s free). The connection settings are completely the same as described above.
Experienced Tips
It is highly recommended to configure routing rules on clients so that traffic to .ru domains and hosts with Russian IPs goes directly, and not through a proxy (a GeoIP database is supplied in clients for this).
Be sure to use uTLS on clients by setting the correct TLS fingerprint (like Chrome).
If for some reason you cannot connect when using XTLS, an error like “failed to use xtls-rprx-vision, found outer tls version 771” is visible in the server logs, try changing the uTLS version. For example, when I select “android”, the client does not connect, but when I select “chrome”, everything is OK.To increase performance, you can configure the Bottleneck Bandwidth and Round-trip propagation time (BBR) congestion control algorithm on the server:
echo “net.core.default_qdisc=fq” >> /etc/sysctl.conf
echo “net.ipv4.tcp_congestion_control=bbr” >> /etc/sysctl.conf
sysctl -pTo test that masquerading is working properly, add your server’s IP address and the domain you’re masquerading as to your hosts file (on Linux it’s /etc/hosts, on Windows it’s c:\windows\system32\drivers\etc\ hosts), for example, “38.25.63.10 www.microsoft.com”, and after that try to go to this address with a browser – the real page of this domain should open with a real TLS certificate: