Setting a password on an SD card using a jQuery web application, Azure RTOS web server and Synergy
In embedded devices there is a risk of removing the SD card and using it for other purposes. In this case, the hardware password of the SD card helps. Setting a password does not allow you to perform any operations with the card. Ordinary PCs simply do not see such a card.
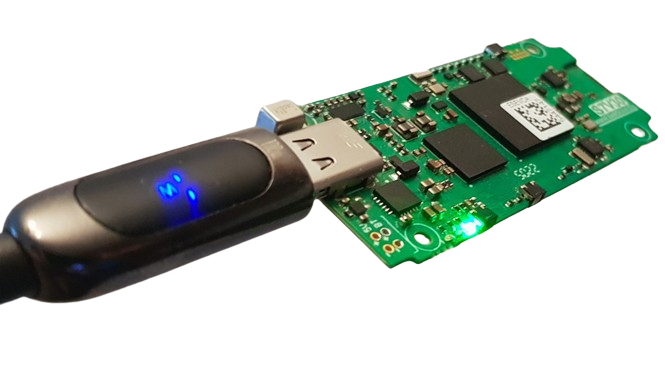
The bootloader of the S7V30 module with the Synergy S7G2 microcontroller based on Azure RTOS implements a mechanism for setting and removing passwords from SD cards. In this article I will show you how to use the built-in Azure RTOS web server with TLS for operations with an SD card.
How to set a password on an SD card
In the physical layer specification of SD cards(Physical Layer Simplified Specification) in paragraph 4.3.7 Card Lock/Unlock operation There is a description of setting and removing a password. Setting/removing a password is done with the command CMD42. The password can contain up to 16 bytes. The password is recorded in the non-volatile memory of the card. The CMD42 command performs both writing and erasing a password, as well as removing protection and installing protection.
If a password is written to the card, then after turning on the power it must be entered using the CMD42 command for the card to start functioning normally. Data on the card after entering the password with the unprotected flag remains available until the power is turned off. If the password for the card is lost, the same CMD42 command still allows you to completely erase the card with loss of formatting. However, there are cards that can contain a separate password for the complete erase command.
The Azure RTOS SD card driver on Synergy in the S7V30 module has been modified in such a way that every time the power is turned on, it checks for setting a password on the SD card and removing protection from the card if it is password-protected. An option has been added to the bootloader to store the SD card password. The project's source code is available at bootstrap repositories. The bootloader parameters are stored in the internal EEPROM of the chip in JSON format, compressed and duplicated.
Why do you need a WEB application?
During development of the S7V30 module, the VT100 terminal emulator is typically used for diagnostics and operations. Therefore, setting/removing a password and completely erasing the card were initially implemented in terminal mode. But working with the terminal requires appropriate qualifications. For greater accessibility, it was decided to implement operations with an SD card through a WEB application. To prevent password leaks to the network, our web server is protected by an encryption protocol and additional authorization.
The difficulty is that all WEB application files are located on the same protected SD card (a stripped-down version of the module without SPI Flash is used). Because of this, there is no command to completely erase the card in the WEB application, but it is in the terminal.
The features of implementing a secure web server from the Azure RTOS NetX Duo package are described in this article. The web server built into the module works with fast hardware encryption and TLS 1.2 or 1.3 protocols (configurable during compilation). In addition, basic authentication is enabled in the http server of the NetX Duo stack, i.e. When entering the application you need to enter a password. The project in the repository is stored with a self-signed certificate. To prevent browsers on PCs from constantly throwing out warnings about this, the certificate must be explicitly installed on the computer system.
Why was JQuery mobile chosen again for the WEB application?

Since the first publication about the use jQuery mobile on the module with Synergy, versions of the framework have already gone far ahead. In this case we use version 1.4.5.
JQuery mobile allows you to develop single-file applications with a modern, responsive style adapted for mobile devices.
The entire application in one file makes the work of the embedded web server easier, since it eliminates a lot of repeated requests when moving between pages.
jQuery mobile itself is implemented in several relatively small .js and .css files. This is important because it saves traffic and memory of embedded devices. On the jQuery mobile project website it is possible to create custom style and script files with an even smaller size.
Attracts the ability to style your applications using style builder jQuery mobile. I took advantage of this opportunity and created my own style file S7V30_theme.min.css, which is only 18 kilobytes in size.
jQuery mobile is still well supported in Dreamweaver. In this development environment, single-file jQuery mobile applications can be developed and rendered page by page. Unlike conventional editors, where application pages merge into one continuous jumble of widgets.
Recently, an additional advantage of jQuery mobile and the basic jQuery framework itself has appeared – it is good support from ChatGPT. In ChatGPT you can find answers to all questions related to jQuery mobile development. True, ChatGPT is still doing poorly in the field of embedded development.
Since the S7V30 module is not so weak, I did not compress the jQuery mobile files to a minimum and place them in the internal Flash of the microcontroller, but this is not difficult to do if desired.
How it works
The contents of the application html file can be viewed Here. In jQuery mobile, everything is done using AJAX, so there are a lot of special classes and forms do not use regular submit buttons.
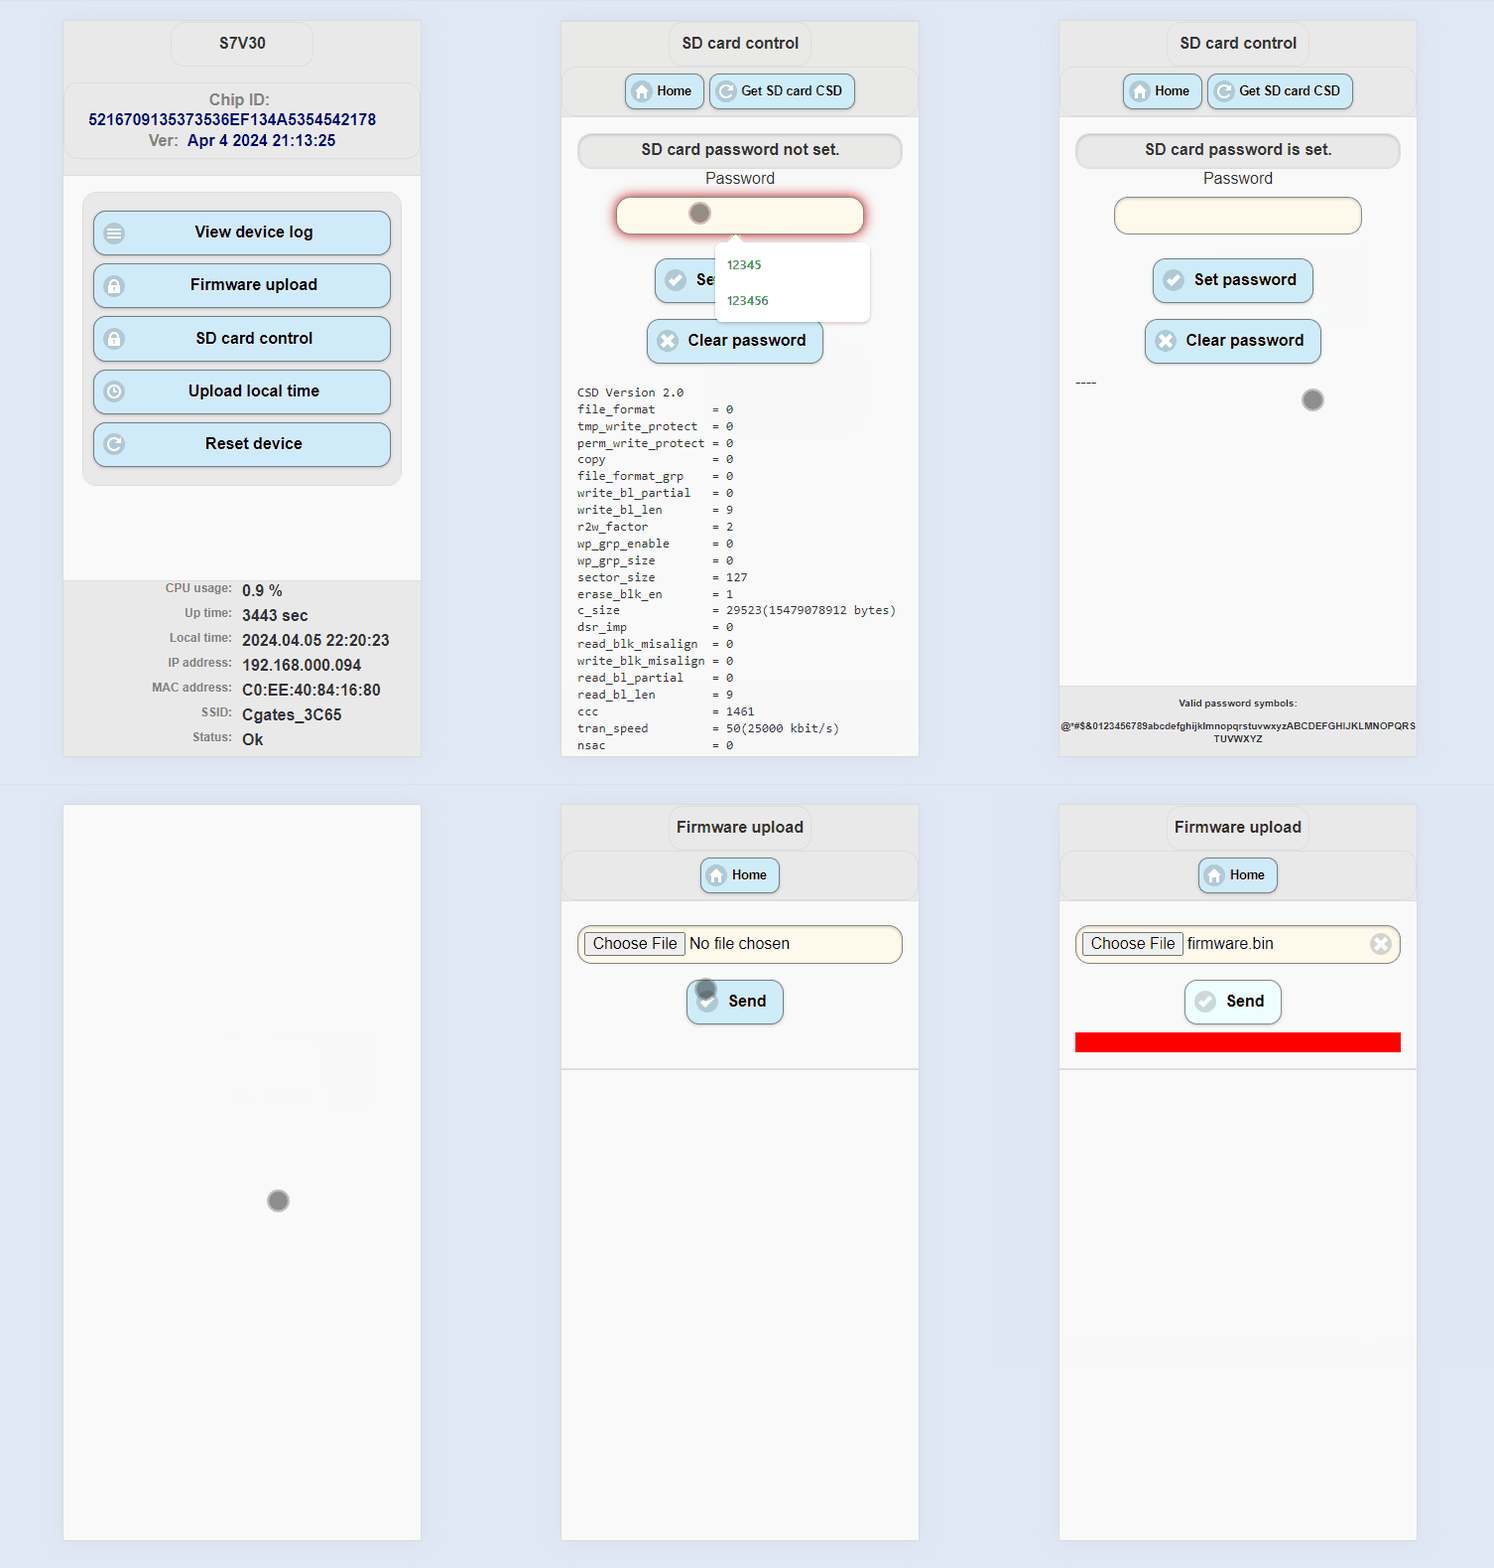
Reception and processing of POST and GET methods by the server is carried out in this file. Working directly with an SD card is implemented Here. Setting a password or changing the password does not immediately block the card. The card will be blocked when the power is removed and reconnected. When performing a software restart, the bootloader forcibly turns off and on the power of the SD card. Thus, by issuing a restart command from the application, you can check the correctness of the card’s cold start and unlocking. The password can be any length from 1 to 16 characters from the list of acceptable characters (I came up with the list myself for reasons of convenience)
For a more complete analysis of the SD card, the Get SD card CSD button displays the contents of the CSD card structure on the screen. This structure encodes the main physical characteristics of the card. Setting and resetting the password does not affect the contents of the CSD.
In addition to the function of working with an SD card, through this application you can download new firmware to the device. As mentioned in the previous article, firmware must be packaged in a special secure format.
For debugging purposes, you can disable TLS encryption on the WEB server in the settings. Settings are available via the terminal. Access to the terminal is possible via the VCOM USB port or via Telnet. Telnet allows connections via Wi-Fi, RNDIS, CDC ECM.
Since the bootloader is equipped with the mDNS protocol, the module on the local network can be accessed directly using the S7V30 domain name without the need to know the IP address of the device.
The S7V30 module project repository is located Here
