No pro-v-ode. We raise a trap access point, test networks for penetration

Introduction
Once again I am glad to welcome all readers of the article! I continue the “No pro-v-ode” section in which I talk about wireless technologies, networks, devices, their operation and security testing. Today I would like to consider with you some tools for security testing, as well as an interesting tool against freebie lovers.
Disclaimer: All data provided in this article is taken from open sources, does not call for action and is only data for information and study of the mechanisms of the technologies used.
Fluxion
What is this?
Fluxion is an effective tool for hacking the security of Wi-Fi networks, which allows you to attack and gain access to the password of a secure wireless network. This tool provides a variety of Wi-Fi hacking methods, including phishing attacks, WPA/WPA2 handshake interception, vulnerability detection in the authentication process, and other ways to hack Wi-Fi security.
Installation and use
We clone the repository, go to its directory and launch our installer.
git clone https://github.com/FluxionNetwork/fluxion
cd fluxion
bash fluxion.sh -i
After we have installed all the necessary tools, Fluxion itself will start.
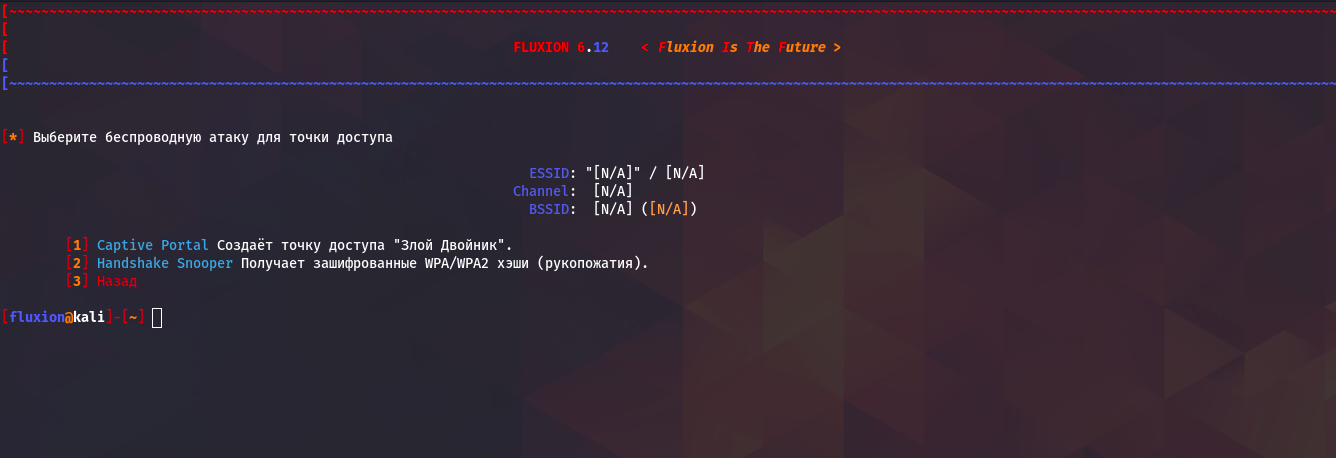
Here we are given a choice of two attacks evil twin and classic handshake grab. But in order to take advantage In any case, with the first attack we need to capture the handshake of the access point we needso we select the second item.
Next let's look at the attack setup, I use Wi-Fi adapter Alfa and it is designated by the wlan1 interface.

Here I choose alpha, because it has a larger scanning range.

Here I choose all channels for maximum efficiency.

The tool will then begin scanning, to complete you will need to press Ctrl+C.

As we see here, he scanned us 18 access points and those that are highlighted in turquoise, those have users through whom you can get our handshake file. Enter the number under which there is the access point we need and move on.

For target tracking, I choose alpha.

Here we must choose either the second or third option, I will choose the second.

Here I also choose alpha.

We choose the second option.

We choose what is recommended.

This point depends on how your PC performance is goodmy performance is not very good, so I choose the second option.

Next we perform handshake grip. The upper left window shows what devices are connected to the access pointin the lower left is produced examination capturing a handshake, and the bottom right shows the process of deauthenticating users from the network.

At successfully capturing a handshake You will see a window like this.
Next we select the attack of the evil twin, in all points I chose also alpha, what is recommended, captured handshake, created a new SSL certificate and selected 19 portal. After all these steps we will have 6 windows.

Here all the windows are signed, display deauthentication of clients, which and how many devices are connected to your access point, logs of the Captive Portal you installed.
What actually happens during this attack? The main access point is blocked and Only our access point becomes available under the same name as the original one only without a passwordas soon as the user connects to it and wants to use the browser, he Our Captive Portal will be displayed, which will allegedly require confirmation of connection to the access point via a passwordas soon as the user enters the password, it is checked against our handshake file and if the verification is successful, the attack ends and the user becomes available to his access pointand we become available password from his access point.
Wifipumpkin3
What is this?
WiFiPumpkin3 is a tool for intercepting and analyzing network traffic in wireless networks. It provides capabilities to create fake access points, intercept data, traffic analysis and many other functions.
Installation and use
Installation is carried out in a few simple steps:
git clone https://github.com/P0cL4bs/wifipumpkin3
cd wifipumpkin3
sudo make install
sudo apt install python3-pyqt5
sudo python3 setup.py install
Next we launch using one command wifipumpkin3.

Our tool has a lot of functionality and many different options and functions, but within the framework of the article I want to show you let’s say “fast start”.
Our tool understands and works with script files with .pulp extension in which we can write any script and it will be automatically executed in the toollet's create a test.pulp file with the following content:
# configure the interface
set interface wlan1
# set name of access point will be created
set ssid demo
# set noproxy plguin
set proxy noproxy
# ignore all log from pydns_server
ignore pydns_server
# start the Access Point
start
And let's run it all using the command:
wifipumpkin3 --pulp test.pulp
As we can see, our access point has started and all plugins are activated, for this attack it is necessary you need a third-party Wi-Fi adapter or if you have an Ethernet connection, you can use the built-in adapter because the Internet is for our access point will be supplied through the main network connection via NAT. Let's now try to connect to our point and simulate activity.

We can watch all connected devices and their online requests.

This tool is very extensive, you can connect various modules like phishing or the same Captive Portal.
Conclusion
In this article, I presented to your attention the methods and tools with which you can create “evil” access points yourself, with the help of which you can either very cunningly take over the password from the desired Wi-Fi point, or monitor all traffic acting as a free access point.