Lookup table – DAG generator? And what was possible?

Table of contents
Prehistory
Here it will be told why it all worked out and briefly about the business case, if you are not interested, then go straight to the next section 🙂
There are metrics that look simple, but very well reflect the essence of the business at some point.
Such metrics as: MAU, DAU, amount of sales, etc. give the stakeholder a good understanding of what is happening with the business.
For a data analyst, it looks like this: date, metric name, value.
For a data engineer, this looks like seven circles of hell: extracting from the source, cleaning, enriching, aggregation, calculating business logic, aggregating again, cleaning again, and only then is the metric ready to get on the table. (the number of circles of hell varies from team to team and from business task, but you get the idea :))
I am constantly trying to somehow automate my work and make life easier for myself and for people.
And then there was a good chance to do it.
A business came with something like this: “We have more than a hundred metrics that look like: date, metric name, value. We would like to automate all this, because it is assembled partly by hand, partly by some scripts, and this is all different owners. And we want to store everything in one place. And most importantly, we want to version all our metrics so that we know when, why and why this or that metric has changed” – in fact, this request sounded like this: “we need to store metrics and know when, what and why happened to them” 🙂
And I began to think.
The idea immediately came to mind – to use SCD.
I immediately wanted to create such a table with the “II” type, in which there will be a metric, logic, comments, and so on. Each row will have a creation date, a “deleted” date.
And I really wanted not only to create such a table, but also to be able to generate DAG through this table
And I did it.
This will be discussed further.
If so, then all code, all commits, etc. are in this git repositories.
Used technologies:
MacBook Air (M1, 2020)
Docker 4.22.0
docker resources:
CPUs: 2
Memory: 4 Gb
Swap: 4 Gb
Python3.11
Stand preparation
To get started, let’s download docker-compose.yaml from Airflow official website:
curl -LfO 'https://airflow.apache.org/docs/apache-airflow/2.6.3/docker-compose.yaml'If we run it, we will get Python3.7 there. But I would like something faster, so let’s make ourselves Python3.11. To do this, you need to create a Dockerfile with the following command:
FROM apache/airflow:2.6.3-python3.11Then in docker-compose.yaml change the standard image to ours (line 53):
  # image: ${AIRFLOW_IMAGE_NAME:-apache/airflow:2.6.3}
  build: .
All is ready. Now let’s build our project. To do this, run the command:
docker-compose up -d* If you have already run the command docker-compose up -dthen you must first execute the command docker-compose build and then again docker-compose up -d.
We are waiting for all the images to download and all the containers to rise. Once Airflow is built, it will be available at http://0.0.0.0:8080/home
Creating a virtual environment
Now we need to create a virtual environment so that syntax highlighting and all hints work correctly.
To do this, you need to run the command:
python3.11 -m venv venv && \                                                                                                                                                     ~/_code/github/scd_dag_factory
source venv/bin/activate && \
pip install --upgrade pip && \
pip install -r requirements.txt
All the dependencies that are necessary for the operation of this project will be installed in our virtual environment.
Creating a service with a database in docker-compose
For our project, we need a database (DB). Classically, I chose PostgreSQL (in the original project, a GreenPlum 6 instance was deployed).
In order for the database to work correctly in our assembly, we will add at the end docker-compose.yaml the following command:
  test_db:
    image: postgres
    restart: always
    ports:
      - "1:5432"
    environment:
      POSTGRES_USER: postgres
      POSTGRES_PASSWORD: postgres
After adding this command, you must restart the assembly with the command:
docker-compose up -dNow everything is ready to work on the project
To begin with, let’s write a simple DAG that will allow us to test the connection to our previously created database.
DAG that checks the connection to the database in the docker assembly
from datetime import datetime, timedelta

import pendulum

from airflow import DAG

from airflow.operators.empty import EmptyOperator
from airflow.operators.python import PythonOperator

from airflow.providers.postgres.hooks.postgres import PostgresHook

# Конфигурация DAG
OWNER = 'korsak0v'
DAG_ID = 'check_pg'
LOCAL_TZ = pendulum.timezone('Europe/Moscow')

# Описание возможных ключей для default_args
# https://github.com/apache/airflow/blob/343d38af380afad2b202838317a47a7b1687f14f/airflow/example_dags/tutorial.py#L39
args = {
    'owner': OWNER,
    'start_date': datetime(2023, 1, 1, tzinfo=LOCAL_TZ),
    'catchup': True,
    'retries': 3,
    'retry_delay': timedelta(hours=1),
}


def check_pg_connect(**context):
    """"""
    pg = PostgresHook('test_db')

    df = pg.get_pandas_df('SELECT 1 AS one')

    if len(df) == 1:
        print(True)

with DAG(
        dag_id=DAG_ID,
        schedule_interval="10 0 * * *",
        default_args=args,
        tags=['check_pg_connect', 'test'],
        concurrency=1,
        max_active_tasks=1,
        max_active_runs=1,
) as dag:

    start = EmptyOperator(
        task_id='start',
    )

    check_pg_connect = PythonOperator(
        task_id='check_pg_connect',
        python_callable=check_pg_connect,
    )

    end = EmptyOperator(
        task_id='end',
    )

    start >> check_pg_connect >> end
Let’s run it and take a look at it. If the wounds are burning green, then everything is going according to plan.
Next, let’s write our typical DAG, which will collect metrics by type: date, metric, value.
A typical DAG that will collect some kind of metric (simple_dag)
from datetime import datetime, timedelta

import pendulum

from airflow import DAG

from airflow.operators.empty import EmptyOperator
from airflow.providers.postgres.operators.postgres import PostgresOperator


# Конфигурация DAG
OWNER = 'korsak0v'
DAG_ID = 'simple_dag'
LOCAL_TZ = pendulum.timezone('Europe/Moscow')

# Названия коннекторов к PG
PG_CONNECT = 'test_db'

# Используемые таблицы в DAG
PG_TARGET_SCHEMA = 'dm'
PG_TARGET_TABLE = 'fct_sales'
PG_TMP_SCHEMA = 'stg'
PG_TMP_TABLE = f'tmp_{PG_TARGET_TABLE}_{{{{ data_interval_start.format("YYYY_MM_DD") }}}}'
INDEX_KPI = 1

sql_query = '''
SELECT
	('2023-'||((random()*11+1)::int)::varchar||'-'||((random()*27+1)::int)::varchar)::date AS date,
	(random()*100)::int AS value,
	1 AS kpi_id
'''

LONG_DESCRIPTION = '# LONG_DESCRIPTION'

SHORT_DESCRIPTION = 'SHORT_DESCRIPTION'


args = {
    'owner': OWNER,
    'start_date': datetime(2023, 1, 1, tzinfo=LOCAL_TZ),
    'catchup': True,
    'retries': 3,
    'retry_delay': timedelta(hours=1),
}

with DAG(
        dag_id=DAG_ID,
        schedule_interval="10 0 * * *",
        default_args=args,
        tags=['dm'],
        description=SHORT_DESCRIPTION,
        concurrency=1,
        max_active_tasks=1,
        max_active_runs=1,
) as dag:
    dag.doc_md = LONG_DESCRIPTION

    start = EmptyOperator(
        task_id='start',
    )

    drop_tmp_before = PostgresOperator(
        task_id='drop_tmp_before',
        sql=f'''DROP TABLE IF EXISTS {PG_TMP_SCHEMA}.{PG_TMP_TABLE}''',
        postgres_conn_id=PG_CONNECT
    )

    create_tmp = PostgresOperator(
        task_id='create_tmp',
        sql=f'''
        CREATE TABLE {PG_TMP_SCHEMA}.{PG_TMP_TABLE} AS
        {
            sql_query.format(
                start_date="{{ data_interval_start.format('YYYY-MM-DD') }}",
                end_date="{{ data_interval_end.format('YYYY-MM-DD') }}"
            )
        };
        ''',
        postgres_conn_id=PG_CONNECT
    )

    delete_from_target = PostgresOperator(
        task_id='delete_from_target',
        sql=f'''
        DELETE FROM {PG_TARGET_SCHEMA}.{PG_TARGET_TABLE}
        WHERE
            date IN (
                SELECT
                    date
                FROM
                    {PG_TMP_SCHEMA}.{PG_TMP_TABLE}
                )
        ''',
        postgres_conn_id=PG_CONNECT
    )

    insert_from_tmp_to_target = PostgresOperator(
        task_id='insert_from_tmp_to_target',
        sql=f'''
        INSERT INTO {PG_TARGET_SCHEMA}.{PG_TARGET_TABLE}("date", value, kpi_id)
        SELECT
            "date",
            value,
            kpi_id
        FROM
            {PG_TMP_SCHEMA}.{PG_TMP_TABLE}
        ''',
        postgres_conn_id=PG_CONNECT
    )

    drop_tmp_after = PostgresOperator(
        task_id='drop_tmp_after',
        sql=f'''DROP TABLE IF EXISTS {PG_TMP_SCHEMA}.{PG_TMP_TABLE}''',
        postgres_conn_id=PG_CONNECT
    )

    end = EmptyOperator(
        task_id='end',
    )

    start >> drop_tmp_before >> create_tmp >> delete_from_target >> insert_from_tmp_to_target >> drop_tmp_after >> end
There is already a column in the generated values kpi_id. Until we pay attention to it. About her a little later.
Before starting the DAG, let’s create a table in which the metrics will be written.
DDL code to create a fact table
CREATE SCHEMA dm;

CREATE SCHEMA stg;

DROP TABLE IF EXISTS dm.fct_sales;

CREATE TABLE dm.fct_sales (
	id bigserial PRIMARY KEY,
	"date" date NOT NULL,
	kpi_id int2 NOT NULL,
	value int4 NOT NULL
);
After that, we can run the DAG and we will see how the data appears in our table.
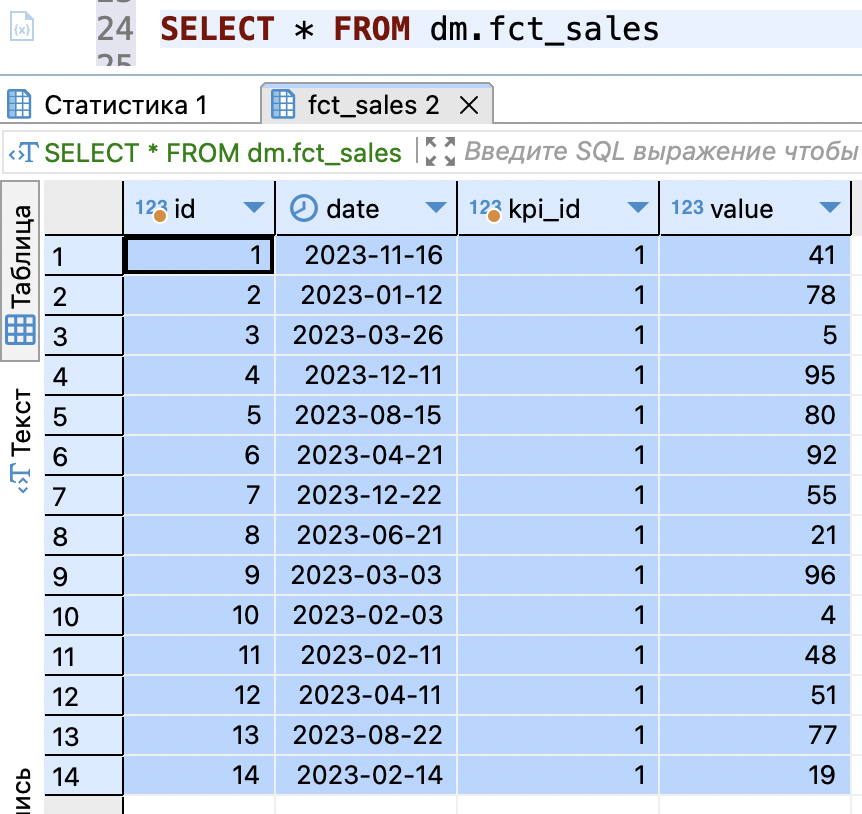
Already good. We, at the moment, have a DAG that collects some kind of metric (let’s take it as a convention that the metric is actually collected, although random values are generated).
Now we can move on to creating an SCD table with metrics.
Creating an SCD table
I repeat a little, I want to store all the information related to metrics in this table. Accordingly, I would like to have complete information about it: the name, business logic, analysts’ comments, data engineers’ comments, and so on.
And most importantly, I want to generate a DAG from this information, so I need to define values that cannot be empty (NOT NULL).
Let’s create such a table with the following script:
DDL code for SCD table
CREATE TABLE public.dim_kpi_dag_gen_config (
	id serial4 NOT NULL,
	kpi_id int4 NOT NULL,
	dag_id varchar(255) NOT NULL,
	"owner" varchar(30) NOT NULL,
	start_date varchar(40) NOT NULL,
	metric_name_en varchar(255) NOT NULL,
	sql_query text NOT NULL,
	short_description_md varchar(255) NULL,
	long_description_md text NULL,
	cron varchar(50) NOT NULL,
	sensors varchar(255) NULL,
	tags varchar(255) NOT NULL,
	metric_line varchar(255) NULL,
	"source" varchar(255) NULL,
	bi_logic varchar(255) NULL,
	comment_pa text NULL,
	comment_de text NULL,
	is_actual bool NULL DEFAULT TRUE,
	created_at timestamptz NULL DEFAULT now(),
	changed_at timestamptz NULL,
	pg_environment varchar(10) NOT NULL DEFAULT 'prod'::character varying,
	airflow_environment varchar(10) NOT NULL DEFAULT 'dev'::character varying,
	CONSTRAINT dim_kpi_dag_gen_config_pkey PRIMARY KEY (id)
)
And let’s immediately create a table that will store all our collected metrics:
DDL code for fact table (table for all collected metrics)
CREATE TABLE public.fct_dm_kpi (
	"date" date NULL,
	value float8 NULL,
	kpi_id int4 NULL
);
Creating a tool for filling the SCD table
Below I will show an MVP option that can populate an SCD table. On our project, with the help of another team, we screwed a web interface to it.
SCD tool that allows you to update and fill in the table
from connectors_to_databases import PostgreSQL


pg = PostgreSQL(
    port=1
)


TABLE = 'dim_kpi_dag_gen_config'


def gen_insert_sql_for_kpi_id(dict_kpi: dict = None) -> str:
    """
    Генерирует скрипт для вставки данных в SCD.

    Определяет есть ли такой ключ.
    Если нет, то делает вставку с нужными данными, указанными в dict_kpi.
    Если есть, то делает вставку с нужными данными, указанными в dict_kpi и дублирует информацию из прошлых строк.

    @param dict_kpi: Словарь с описанием kpi.
    @return: Строку для вставки значений в SCD.
    """

    # Проверка наличия kpi_id в таблице
    df_check = pg.execute_to_df(f'''
    SELECT
        kpi_id
    FROM
        {TABLE}
    WHERE
        kpi_id = {dict_kpi['kpi_id']}
    ''')

    # Проверяем есть ли такой kpi_id в таблице
    if len(df_check) >= 1:
        # В запросе исключаем те поля, которые генерируется сами через `DEFAULT`
        query = f'''
            SELECT
                column_name
            FROM
                information_schema.columns
            WHERE
                table_name="{TABLE}"
                AND column_name NOT IN (
                    'id', 'created_at', 'changed_at', 'is_actual',
                    {', '.join(f"'{i}'" for i in dict_kpi)}
                )
        '''

        df = pg.execute_to_df(query)  # noqa: PD901

        insert_sql_column_current=", ".join(value for value in df.column_name)
        insert_sql_column_modified = insert_sql_column_current + f''', {', '.join(i for i in dict_kpi)}'''

        list_values = []

        for value in dict_kpi.values():
            # Обработка одинарных кавычек в значениях. Они встречаются при указании дат.
            if "'" in str(value):
                value = value.replace("'", "''")
                list_values.append(f"'{value}'")
            elif value is None:
                list_values.append('NULL')
            else:
                list_values.append(f"'{value}'")

        insert_sql_column_values = insert_sql_column_current + f''', {', '.join(list_values)}'''

        sql_insert = f'''
        INSERT INTO {TABLE}
        (
            {insert_sql_column_modified}
        )
        SELECT
            {insert_sql_column_values}
        FROM
            {TABLE}
        WHERE
            is_actual IS TRUE
            AND kpi_id = {dict_kpi['kpi_id']};
        '''
    else:
        # Если нет такого kpi_id в таблице, то генерируем вставку значений из словаря
        columns=", ".join(value for value in dict_kpi)

        list_values = []

        for value in dict_kpi.values():
            if "'" in str(value):
                value = value.replace("'", "''")
                list_values.append(f"'{value}'")
            elif value is None:
                list_values.append('NULL')
            else:
                list_values.append(f"'{value}'")

        values=", ".join(list_values)

        sql_insert = f'''
            INSERT INTO {TABLE}({columns})
            VALUES ({values});
            '''

    return sql_insert


def scd_dim_kpi(dict_kpi: dict = None) -> None:
    """
    Основная функция, которая принимает на вход словарь с описанием kpi.

    Каждый ключ – это поле в таблице SCD.
    Каждое значение – это значение поля в таблице SCD.

    @param dict_kpi: Словарь с описанием kpi по выбранным колонкам.
    @return: Ничего не возвращает, выполняет SQL-скрипт на вставку данных в SCD.
    """

    # Обновление changed_at в предыдущей актуальной записи
    update_changed_at_for_kpi_id = f'''
    UPDATE {TABLE}
    SET
        changed_at = NOW()
    WHERE
        kpi_id = {dict_kpi['kpi_id']}
        AND is_actual IS TRUE;
    '''

    # Вставка новой записи с обновленными значениями полей
    insert_new_values_for_kpi_id = gen_insert_sql_for_kpi_id(dict_kpi=dict_kpi)

    # Обновление is_actual для каждого kpi_id
    update_is_actual_for_kpi_id = f'''
    UPDATE {TABLE}
    SET
        is_actual = false
    WHERE
        kpi_id = {dict_kpi['kpi_id']}
        AND id <> (
            SELECT MAX(id)
            FROM {TABLE}
            WHERE kpi_id = {dict_kpi['kpi_id']}
        );
    '''

    # Собираем SQL-скрипт из разных кусков, чтобы он прошел в одной транзакции
    sql_query = update_changed_at_for_kpi_id + insert_new_values_for_kpi_id + update_is_actual_for_kpi_id

    print(sql_query)  # noqa: T201
    pg.execute_script(sql_query)
And now let’s call our main function scd_dim_kpito get the first record with the metric in our table.
# Пример использования
new_values = {
    'kpi_id': 1,
    'dag_id': 'test_1',
    'metric_name_en': 'test_1',
    'owner': 'korsak0v',
    'start_date': '2021-01-01',
    'cron': '10 0 * * *',
    'tags': '''['dm', 'pg', 'gen_dag', 'from_pg']''',
    'sql_query': '''
    SELECT
        date,
        count(values) AS value
    FROM
        fct_some_table_with_random_values
    WHERE
        date BETWEEN '{start_date}' AND '{end_date}'
    GROUP BY
        1
    ''',
}


# Вызов функции
scd_dim_kpi(
    dict_kpi=new_values
)
Here is what we will see in the database:

Great, the metric is in the database and from that moment we can say its versioning begins. Each change will be recorded in the database as a separate line and we will be able to track all changes.
Let’s change the field for example comment_de:
new_values = {
    'kpi_id': 1,
    'comment_de': 'Сделали так, потому что потому'
}

# Вызов функции
scd_dim_kpi(
    dict_kpi=new_values
)
We get the following information in the database: kpi_id has not changed, information has changed in dim_kpi_dag_gen_config and you can also see when the metric was changed, and most importantly, the flag is_actual moved to the last entry for this kpi_id.

We are now ready to generate a DAG from this table.
DAG generation via SCD table
Let’s leave simple_dag unchanged, but we will take it as a basis and make a function out of it that will return a DAG based on the received attributes.
dag generator dag
from datetime import datetime, timedelta

import pendulum

from airflow import DAG

from airflow.sensors.external_task import ExternalTaskSensor

from airflow.operators.empty import EmptyOperator
from airflow.providers.postgres.operators.postgres import PostgresOperator

from airflow.providers.postgres.hooks.postgres import PostgresHook


def create_kpi_of_dag(
        owner: str = None,
        dag_id: str = None,
        pg_target_schema: str = None,
        pg_target_table: str = None,
        index_kpi: str = None,
        pg_environment: str = None,
        airflow_environment: str = None,
        long_description: str = None,
        short_description: str = None,
        start_date: str = None,
        cron_expression: str = None,
        tags: str = None,
        sensors: str = None,
        sql_query: str = None,
) -> DAG:
    """
    Функция, которая генерирует типовой DAG для получения метрики.

    Вся логика описана и прокомментирована внутри функции.

    Некоторые моменты обработаны исключительно для функции, чтобы обработать какие-то атрибуты и получить желаемый
    эффект.

    @param owner: Владелец DAG.
    @param dag_id: Название DAG.
    @param pg_target_schema: Целевая схема в PostgreSQL.
    @param pg_target_table: Целевая таблица в PostgreSQL.
    @param index_kpi: ID показателя.
    @param pg_environment: Окружение PostgreSQL.
    @param airflow_environment: Окружение Airflow.
    @param long_description: Полное описание отчета.
    @param short_description: Короткое описание отчета.
    @param start_date: Дата начала работы DAG.
    @param cron_expression: Cron.
    @param tags: Tags.
    @param sensors: Sensors.
    @param sql_query: SQL-запрос для получения метрики.
    @return: Возвращает DAG.
    """
    # Конфигурация DAG
    local_tz = pendulum.timezone('Europe/Moscow')

    # Используемые таблицы в DAG
    pg_target_schema = pg_target_schema
    pg_target_table = pg_target_table
    pg_tmp_schema="stg"
    pg_tmp_table = f'tmp_{dag_id}_{{{{ data_interval_start.format("YYYY_MM_DD") }}}}'

    # Названия коннекторов к GP
    pg_connect="test_db_dev" if pg_environment == 'dev' else 'test_db'

    # Сделана заглушка атрибута. Это можно использовать для указания разных сценариев в зависимости от окружения
    airflow_environment = airflow_environment

    # Дата приходит в формате str и после парсинга, мы можем получить дату и любые элементы даты
    parse_date = pendulum.parse(start_date)

    args = {
        'owner': owner,
        'start_date': datetime(parse_date.year, parse_date.month, parse_date.day, tzinfo=local_tz),
        'catchup': True,
        'depends_on_past': True,
        'retries': 3,
        'retry_delay': timedelta(hours=1),
    }

    # Tags приходят в str формате, поэтому нужно их правильно "разобрать" и превратить в list
    raw_tags = list(tags.split(','))
    tags_ = []

    for i in raw_tags:
        tags_.append(  # noqa: PERF401
            i.replace("'", "")
            .replace(" ", '')
            .replace("[", "")
            .replace("]", "")
        )

    # Sensors приходят в str формате, поэтому нужно их правильно "разобрать" и превратить в list
    if sensors:
        raw_sensors = list(sensors.split(','))
        sensors_ = []
        for i in raw_sensors:
            sensors_.append(  # noqa: PERF401
                i.replace("'", "")
                .replace(' ', '')
                .replace("[", "")
                .replace("]", "")
            )
    else:
        sensors_ = None

    with DAG(
            dag_id=dag_id,
            schedule_interval=cron_expression,
            default_args=args,
            tags=tags_,
            description=short_description,
            concurrency=1,
            max_active_tasks=1,
            max_active_runs=1,
    ) as dag:
        dag.doc_md = long_description

        start = EmptyOperator(
            task_id='start',
        )

        # Если есть sensors, то мы создаем задачи с сенсорами, иначе создаем одну пустышку
        if sensors_:
            sensors_task = [
                ExternalTaskSensor(
                    task_id=f'sensor_{dag}',
                    external_dag_id=dag,
                    allowed_states=['success'],
                    mode="reschedule",
                    timeout=360000,  # длительность работы сенсора
                    poke_interval=600  # частота проверки
                ) for dag in sensors_
            ]
        else:
            sensors_task = [EmptyOperator(task_id=f'empty_{value}') for value in range(1)]

        drop_tmp_before = PostgresOperator(
            task_id='drop_tmp_before',
            sql=f'''DROP TABLE IF EXISTS {pg_tmp_schema}.{pg_tmp_table}''',
            postgres_conn_id=pg_connect
        )

        create_tmp = PostgresOperator(
            task_id='create_tmp',
            sql=f'''
            CREATE TABLE {pg_tmp_schema}.{pg_tmp_table} AS
            {
                sql_query.format(
                    start_date="{{ data_interval_start.format('YYYY-MM-DD') }}",
                    end_date="{{ data_interval_end.format('YYYY-MM-DD') }}"
                )
            };
            ''',
            postgres_conn_id=pg_connect
        )

        delete_from_target = PostgresOperator(
            task_id='delete_from_target',
            sql=f'''
            DELETE FROM {pg_target_schema}.{pg_target_table}
            WHERE
                date IN (
                    SELECT
                        date
                    FROM
                        {pg_tmp_schema}.{pg_tmp_table}
                    WHERE
                        kpi_id = {index_kpi}
                    )
            AND kpi_id = {index_kpi}
            ''',
            postgres_conn_id=pg_connect
        )

        insert_from_tmp_to_target = PostgresOperator(
            task_id='insert_from_tmp_to_target',
            sql=f'''
            INSERT INTO {pg_target_schema}.{pg_target_table}("date", value, kpi_id)
            SELECT
                "date",
                value,
                {index_kpi} AS kpi_id
            FROM
                {pg_tmp_schema}.{pg_tmp_table}
            ''',
            postgres_conn_id=pg_connect
        )

        drop_tmp_after = PostgresOperator(
            task_id='drop_tmp_after',
            sql=f'''DROP TABLE IF EXISTS {pg_tmp_schema}.{pg_tmp_table}''',
            postgres_conn_id=pg_connect
        )

        end = EmptyOperator(
            task_id='end',
        )

        start >> sensors_task >> drop_tmp_before >> create_tmp >> delete_from_target >>\
        insert_from_tmp_to_target >> drop_tmp_after >> end

    return dag


# build a dag from dag config
def generator_of_morning_kpi_dag_to_gp() -> None:
    """
    Функция получает список config из БД и генерирует DAG's на основании функции `create_kpi_of_dag`.

    Итерируется по config и каждый раз выполняет функцию `create_kpi_of_dag`, которая возвращает DAG.

    @return: None
    """
    pg_hook = PostgresHook(postgres_conn_id='test_db')

    df = pg_hook.get_pandas_df(  # noqa: PD901
        '''
        SELECT
            kpi_id,
            dag_id,
            "owner",
            sql_query,
            start_date,
            pg_environment,
            airflow_environment,
            short_description_md,
            long_description_md,
            cron,
            sensors,
            tags
        FROM
            dim_kpi_dag_gen_config
        WHERE
            is_actual IS TRUE
        ORDER BY
            id;
        '''
    )

    for i in range(len(df)):
        create_kpi_of_dag(
            owner=df.iloc[i].owner,
            dag_id=df.iloc[i].dag_id,
            pg_target_schema="public",
            pg_target_table="fct_dm_kpi",
            index_kpi=df.iloc[i].kpi_id,
            pg_environment=df.iloc[i].pg_environment,
            airflow_environment=df.iloc[i].airflow_environment,
            long_description=df.iloc[i].long_description_md,
            short_description=df.iloc[i].short_description_md,
            start_date=df.iloc[i].start_date,
            cron_expression=df.iloc[i].cron,
            tags=df.iloc[i].tags,
            sensors=df.iloc[i].sensors,
            sql_query=df.iloc[i].sql_query,
        )


generator_of_morning_kpi_dag_to_gp()
After adding this DAG, we immediately see the result – a DAG with a previously created metric appeared in our web interface:

Let’s run our generated DAG and look at the result, but first we edit the SQL query to the format we need.
Change sql_query for DAG test_1
new_values = {
    'kpi_id': 1,
    'sql_query': '''
    SELECT
        ('2023-'||((random()*11+1)::int)::varchar||'-'||((random()*27+1)::int)::varchar)::date AS date,
        (random()*100)::int AS value
    ''',
}


# Вызов функции
scd_dim_kpi(
    dict_kpi=new_values
)
Everything, DAG works and collects something. Let’s make a few more DAGs as an example.
I created five additional DAGs with the following template (for demonstration purposes):
hidden text
# Пример использования
new_values = {
    'kpi_id': 6,
    'dag_id': 'test_6',
    'metric_name_en': 'test_6',
    'owner': 'korsak0v',
    'start_date': '2000-01-01',
    'cron': '15 14 1 * *',
    'tags': '''['dm', 'pg', 'gen_dag', 'from_pg']''',
    'sql_query': '''
    SELECT
        ('2023-'||((random()*11+1)::int)::varchar||'-'||((random()*27+1)::int)::varchar)::date AS date,
        (random()*100)::int AS value
    ''',
}


# Вызов функции
scd_dim_kpi(
    dict_kpi=new_values
)
Everything works correctly. The database entry contains:

In Airflow DAGs are correctly displayed and working.

Let’s add some more sensors to demonstrate. I added a new DAG and if we look at its graph, we can see EmptyOperator – empty_0. Now it’s just a stub in case we don’t have sensors for other DAGs. With dagran, it will execute in less than a second and our pipeline will continue to work correctly.

Let’s add a list of sensors:
Adding a list of sensors to change the graph DAG test_7
new_values = {
    'kpi_id': 7,
    'sensors': '''['test_1', 'test_2', 'test_3', 'test_4', 'test_5', 'test_6']''',
}


# Вызов функции
scd_dim_kpi(
    dict_kpi=new_values
)
And we get such a graph. Now, instead of our stub, we have a list of sensors that will check whether some DAGs have worked or not.

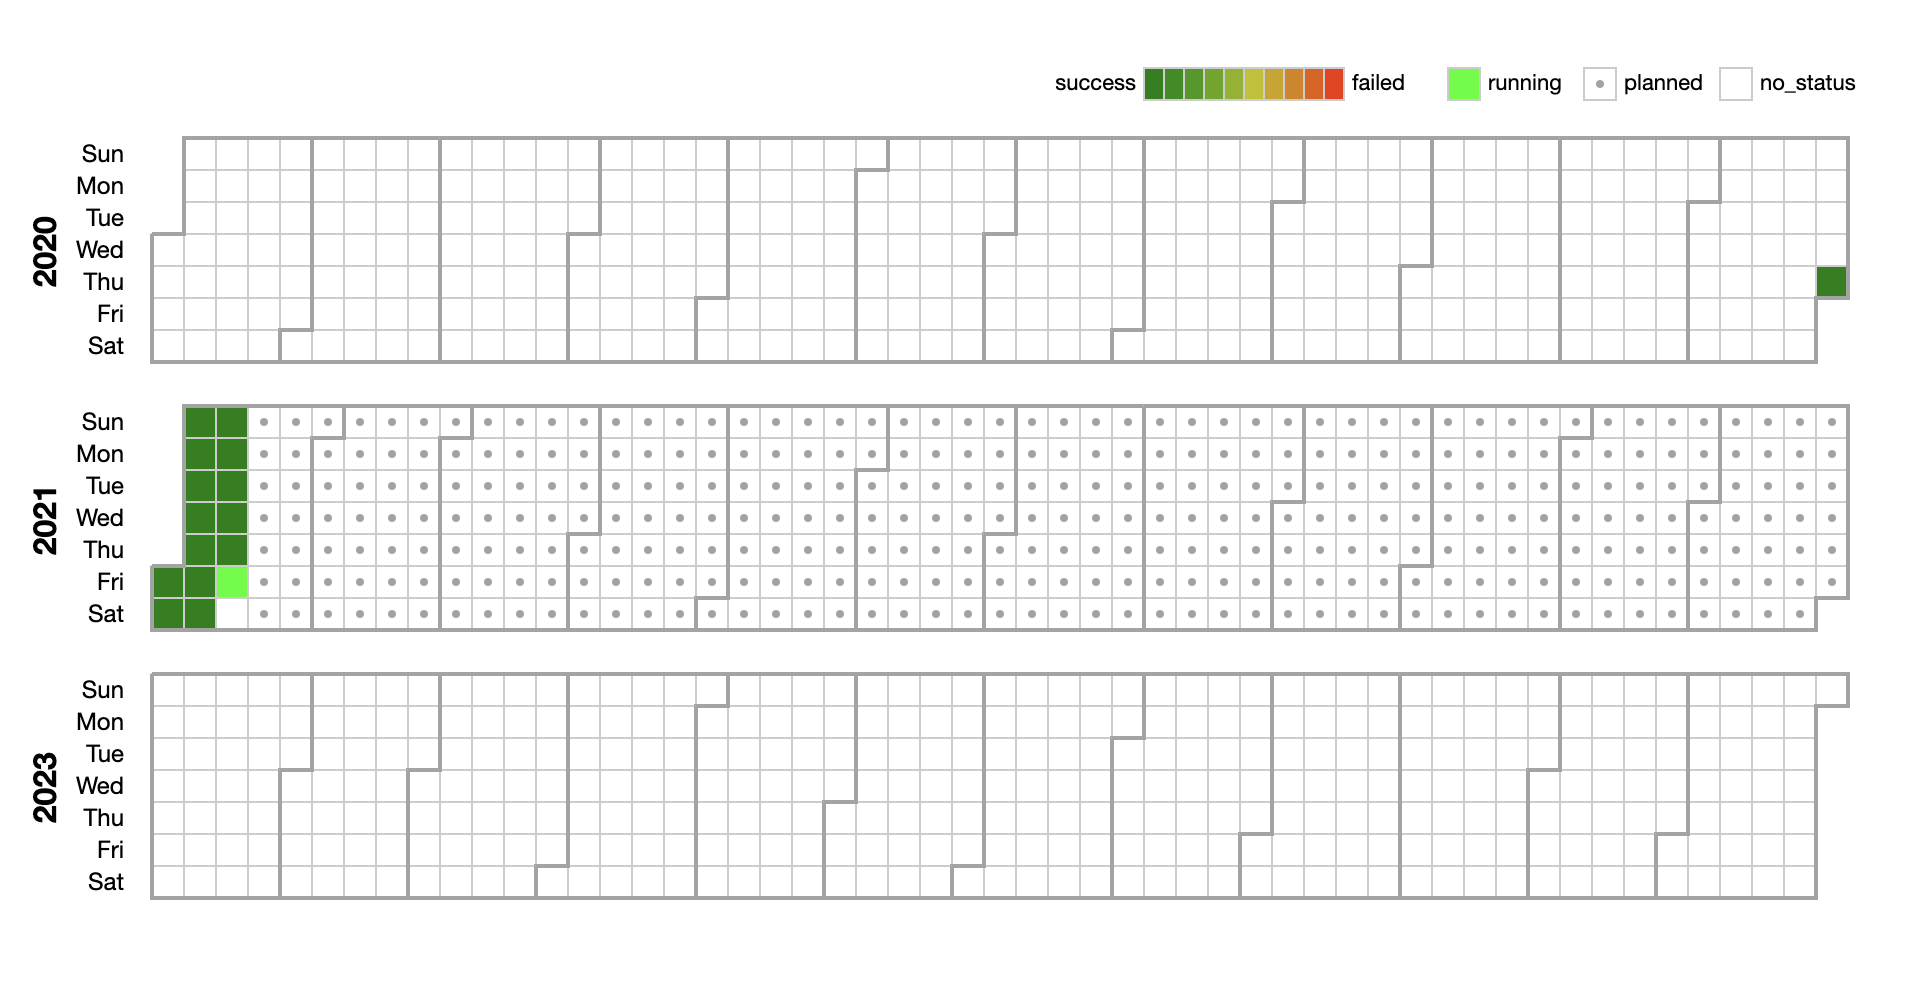
Well, in the end, let’s see what our generated DAGs have collected:

In the future, we will be able to do a JOIN between the fact table and the reference to get information on each of the metrics.
Conclusion
I have tried to describe my case in as much detail as possible. Perhaps it is narrowly focused, but here I talked about the next DAG generator.
Also, I do not deny that it is not ideal, but there is no ideal either 😉
I could miss / simplify / not describe some points in detail. You can ask for all this in the comments.
Important points to pay attention to:
This implementation does not generate a file, but only generates objects, so all DAGs will have the source code of our DAG, in which all generation takes place. If you need physically created DAGs, you can read my previous article.
If it is incorrect to pass some attributes to the function, then all DAGs will break. If, for example, some string gets instead of a date, then an exception will occur, the function will not work, and no DAG will be created. But you can improve that with exception handling and more.
In this implementation
kpi_idyou have to put it in yourself. In my version, auto-increment is not implemented. But as I said earlier, this product has been finalized and another team has already implemented it on the backend.I showed the simplest implementation of this tool. You can customize it for yourself, with the processing of each attribute, use frameworks, use self-written handlers and others.
You can do additional data normalization, make additional directories, bind ORM models and implement some kind of backend right away so as not to fill it out with your hands.
The demo DAG implements idempotency, which allows you to load metrics with snapshots for each day. You can also adjust this according to your needs.
My case solves a specific business problem. Business is happy and I’m happy 🙂