How to deploy a monolithic pet project in Java from 0 and not go crazy… Part 1
Foreword
The search for a new job made me think about the meaning of the expression “Shoemaker without boots.” As a Java Backend Developer with 3 years of experience, I don’t have a single completed Pet project on hand. Of course, on GitHub, like many others, I have small projects, but they have not been completed, and besides just hanging on the honor board, they can’t do anything else. With this thought, I went to the Internet to google “how do I deploy my Java application?”.
I will say right away that this article contains steps for deploying a Java application using GitHub Actions on AWS EC2 servers and this is my interpretation of those instructions that I found on the Internet. Actually, this article contains for beginners who simply have never deployed their application, but really want to show off their results in a short time.
In this article, I will tell you how you can add your project to the GitHub repository, so that later, based on it, you can make a CI / CD pipeline, which will deploy our application.
First steps
The first step is, accordingly, to write your Java application with Spring Boot. Let it be a statefull service, but while we will not add any database, we will deal with its connection in the next part. I think that you can do the service yourself, but just in case, it will be presented here example.
GitHub
After you have created an application in your idea, you need to commit it to GitHub. First you need to create a ready-made repository, for this, go to link and go through the authorization (if you are not registered yet). After authorization, you will be taken to the main screen. To create a repository on the left side of the main page, click on the green button (as in the picture).

On the repository creation page, specify the application name (the field in the picture) and click on the “Create repository” button.

In the window that opens, you will need to save a link to your project in GitHub somewhere in a text editor, so that later you can link your repository to your local project.

Now, in order to be able to work locally with the GitHub repository, you need to generate a token to access the project. To do this, click on your icon in the upper right corner and click on “Settings”.

Scroll down to the “Developer settings” button on the left side of the menu and click on it.

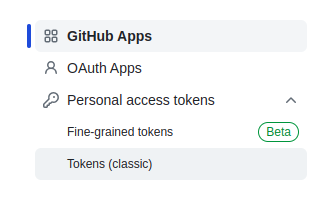
Next, on the left side of the screen, click on “Personal access tokens”->”Tokens (classic)”.

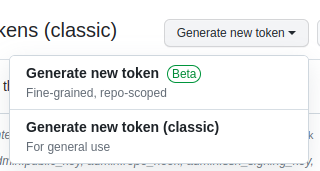
Next, in the middle panel, look for the “Generate new token” button and click on it and select “Generate new token (classic)”.

In the window that opens, enter the name of your token, indicate the number of days that your token will live, check all the boxes and click on the green “Generate token” button at the end of the page. After you will be transferred to the page where your token will be indicated. Be sure to save it somewhere, because you will not see it again and you will need to generate a new token.

Next, go to your project in idea (I develop in Intellij IDEA) and enter the following commands in the console from the root of your project.
// инициализирует репозиторий гит в вашем проекте
git init
// добавляем все измененные файлы в вашем проекте из корневой папки
git add .
// делаем первый коммит вашего приложения
git commit -m "first commit"
// привязываем ссылку проекта из GitHub к вашему локальному проекту
// (вместо add_url вставьте ссылку)
git remote add origin add_url
// создаем ветку main в вашем проекте
git branch -M main
// отправляем коммит в репозиторий на GitHub
git push -u origin main
// вам предложат ввести логин и пароль, вводим в логин юзера, под которым
// вы входите в GitHub, в качестве пароля вводите ранее сгенерированный токен
Everything, now by going to your project you can see your changes and when you make some kind of commit in your local project, the changes will immediately go to GitHub!
Probably this will be enough for the first part, in the second part I will describe what GitHub Actions are, describe how to create the first Docker image and how to upload your image to DockerHub.
Leave comments and good luck!

![[Научпоп с кодом] What is a “liquid” neural network and how to teach it to play in Atari?](https://prog.world/wp-content/uploads/2023/02/987e4e94d0f98450b4b6c5b4e88770aa-768x403.png)


