How to Build a C Program in OS Windows

Sometimes a situation arises when you need to calculate something according to a complex algorithm directly on LapTop/NetTop/DeskTop PC. Moreover, this algorithm is written in C. This could be a digital filter, a discrete Fourier transform, a QR code generator, a piece of linear algebra with vectors, some kind of trigonometric calculation, a software modulator, statistical processing of a random variable. Yes, anything! That is, you want to use the C language as a flexible and fast calculator in Windows. Here you need to write a program in C.
A computer is a universal computer
Or, for example, you program microcontrollers in C and want to make a firmware simulator as a console application. For example, you need to run unit tests of platform-independent code on a “large computer”. Then there is an 80% chance that you will need a firmware configurator via UART. Then you will need the Loader console application to load the firmware itself via UART via BootLoader.
Then you will need a tiny PC synchronization utility for the real time clock with the PC.
Why C?
1–This LapTop utility should be written in the same language as the firmware, if only for the reason that you can reuse the code base from microcontrollers for programming on DeskTop(e).
2–The fact is that the C programming language is the simplest programming language one that is still more or less used in industrial development. In fact, in C there are only functions and variables. There are no virtual functions, templates, delegates or other concepts here. In C, everything is extremely simple and specific.
—
Development for a PC is not cross compilation, as is the case with assembling artifacts for a microcontroller, and here on a PC everything is to some extent simpler. When building a C application, you don’t need to think about the linker configuration file, as we are used to doing for cross compilation of artifacts for microcontrollers (*.ld files).
First, let’s decide for which Target(s) we need to build a binary. We need to find out what microprocessor is installed on our motherboard. The CPUZ utility can show this information.

In this case, I have an Intel Celeron J4125 2Ghz, 4x cores, L1 32kByte, L2 4MByte, 10W on one computer. Another computer has a 64-bit AMD Ryzen 5 PRO 3400GE 3.30 GHz microprocessor installed.

But that’s not even that important. It is important what Instruction Set we have. In this case – x86-64. This means that we have a 64-bit processor. It turns out that we have a choice: either install a 64-bit C compiler, or roll out a 32-bit C compiler.
As a rule, we have to work on different processors, but in OS Windows we don’t even notice this.
Units: | text | bit | N | N | kByte | kByte | MByte |
No. | CPU | bitness | cores | Threads | L1 | L2 | L3 |
1 | AMD Ryzen 5 PRO 3400GE | 64 | 4 | 8 | 32 | 512 | 4 |
2 | Intel Celeron J4125 | 4 | 4 | 32 | |||
3 | Intel Core i7 8550U | 64 | 4 | 8 | 32 | 256 | 8 |
At the same time, our firmware simulator must be assembled and run on all desktop computer environments: at work, at home, in the garage.
As in any business, you first need to decide on the terminology.
Terminology
Compiler – a program that translates human-readable text written in a programming language into a set of machine codes (human-unreadable binary code). Programmers are people who are closer to abstractions than anyone else. Any programming language, in particular C, is a short level where you don’t have to think about the command set of a given microprocessor. The processor does not have any variables or functions. Variables exist only in the programmer’s mind. That’s why we need a C compiler. For each C file, the compiler produces a *.o file with machine code native to the given processor.
Linker– a utility that glues *.o binary files into one monolithic executable binary program file. In our case it is *.exe.
Artifact – the result of the ToolChain(a). In our case, this is a *.exe file with a binary program file.
What software do you need?
Text editor (Text Editor)
First of all, you need some kind of text editor to write this very source code of the C program. There are a lot of options here. NotePad++, Eclipse, MS VS Code.
Build Tools
In computers, nothing happens by itself. Computers are the most lazy and uninitiative creatures. Everything needs to be explained to them as thoroughly and clearly as possible. Therefore, we must explicitly indicate from which *.c files we want to compile the program. These files need to be listed and indexed somehow. For this purpose, a special utility was created called make. The idea is simple. A text file (Makefile) is created and the correct sequence of calling console utilities is written in it, which will lead to an executable file with the program appearing on the hard drive.
Preprocessor
This is a console utility (cpp.exe) that inserts and replaces pieces of text. It is needed purely for the sake of convenience of writing the text. The preprocessor allows you to completely eliminate such a bad phenomenon as duplication of program code. At the same time, the preprocessor absolutely does not care what programming language it works with (Ci, C++, DeviceTree, Graphviz, layout scripts, etc.). For a preprocessor, any programming language is just text.
Now let’s look at the practical aspects.
Which C code compiler to choose?
There are several free options to choose from.
No. | Compiler | width of the generated code |
1 | СygWin | 64 |
2 | MinGW | 32 |
3 | Mingw-w64 | 64 |
4 | clang | 64 |
For microcontroller programmers, I highly recommend choosing MinGW. The fact is that MinGW generates 32-bit code. This exactly corresponds to the fact that most microcontrollers (for example ARM Cortex Mx) are 32-bit. And this way you will achieve greater compatibility between the microcontroller firmware code and the console application in Windows.
The second reason why you need to use the C:\MinGW\bin\gcc.exe compiler is that the MinGW environment has a header file conio.h that defines the function kbhit(). We will need this to simulate a UART-CLI console text terminal on stdout/stdin on a PC.
>C:\MinGW\bin\gcc.exe  --version
gcc.exe (MinGW.org GCC-6.3.0-1) 6.3.0
Copyright (C) 2016 Free Software Foundation, Inc.
This is free software; see the source for copying conditions.  There is NO
warranty; not even for MERCHANTABILITY or FITNESS FOR A PARTICULAR PURPOSE.
The MinGW set of utilities can be easily downloaded and installed like any other program under OS Windows.
Linker
The layout is handled by the ld utility, which calls collect2. It is the collect2.exe utility that will generate errors if you call functions without defining their bodies.
What do you really need from software?
Here is the minimum gentleman’s kit for putting together a program in C.
No. | Purpose of the utility | Utility name |
1 | Text editor | NotePad++.exe |
2 | Preprocessor | cpp.exe |
3 | Compiler | gcc.exe |
4 | Console utility for deleting files or folders | rm |
5 | Linker | ld.exe |
6 | ToolChain management utility. She decides what to collect and in what order to get artifacts | make.exe |
7 | A utility for analyzing the resulting binary. An analogue of readelf.exe from the world of microcontroller programming | PE explore.exe |
Traditionally, C programs are compiled from make scripts. Here is a minimalist makefile for building a multi-file C project on Windows
MK_PATH:=$(dir $(realpath $(lastword $(MAKEFILE_LIST))))
#@echo $(error MK_PATH=$(MK_PATH))
INCDIR += -I$(MK_PATH)

WORKSPACE_LOC:= $(MK_PATH)../../
$(info  WORKSPACE_LOC= $(WORKSPACE_LOC))
INCDIR += -I$(WORKSPACE_LOC)

BUILDDIR := $(MK_PATH)/Build

SRC_PATH :=  $(dir $(abspath $(dir $$PWD) ))
#@echo $(error SRC_PATH=$(SRC_PATH))

OBJDIR := $(SRC_PATH)obj
# the compiler to use

OPT += -DHAS_GCC
CC = C:\MinGW\bin\gcc.exe

# compiler flags:
#  -g    adds debugging information to the executable file
#  -Wall turns on most, but not all, compiler warnings
CFLAGS += -g

#Generate code for 32-bit ABI
CFLAGS += -m32

CFLAGS += -std=c11 -fshort-enums
#CFLAGS += -Og
CFLAGS  += -O0
#CFLAGS  += -Wall
#CFLAGS  +=-pedantic
#CFLAGS += -ftime-report

#files to link:
LFLAGS += -static
#LFLAGS += -lm

EXECUTABLE=firmware_simulator_x86_m

include $(MK_PATH)config.mk

ifeq ($(CLI),Y)
    include $(MK_PATH)cli_config.mk
endif

ifeq ($(UNIT_TEST),Y)
    include $(MK_PATH)test_config.mk
endif

ifeq ($(UNIT_TEST),Y)
    include $(MK_PATH)diag_config.mk
endif

include $(WORKSPACE_LOC)code_base.mk


#@echo $(error SOURCES_C= $(SOURCES_C))
INCDIR := $(subst /cygdrive/c/,C:/, $(INCDIR))
#@echo $(error INCDIR= $(INCDIR))
OBJ := $(patsubst %.c, %.o, $(SOURCES_C))
OBJ := $(subst /cygdrive/c/,C:/, $(OBJ))
#@echo $(error OBJ= $(OBJ))

.PHONY:all

all:$(OBJ) $(EXECUTABLE)

$(EXECUTABLE): $(OBJ)
	$(CC) $(CFLAGS)  $(OBJ) $(LFLAGS) -o $(EXECUTABLE).exe

%.o: %.c
	$(CC) $(CFLAGS) $(INCDIR) $(OPT) -c $< -o $@

clean:
	rm -r $(EXECUTABLE) $(OBJ)
Here are the files config.mk, cli_config.mk, test_config.mk and diag_config.mk are simply files listing a set of environment variables for selectively building specific sources from a common code base. Here is the root makefile for connecting different software components code_base.mk
ifneq ($(CODE_BASE_MK),Y)
    CODE_BASE_MK=Y
    $(info CodeBase Config)

    #@echo $(error WORKSPACE_LOC=$(WORKSPACE_LOC))
    INCDIR += -I$(WORKSPACE_LOC)

    ifeq ($(THIRD_PARTY),Y)
        include $(WORKSPACE_LOC)/third_party/third_party.mk
    endif

    ifeq ($(APPLICATIONS),Y)
        include $(WORKSPACE_LOC)/applications/applications.mk
    endif

    ifeq ($(CONNECTIVITY),Y)
        include $(WORKSPACE_LOC)/connectivity/connectivity.mk
    endif

    ifeq ($(CONTROL),Y)
        include $(WORKSPACE_LOC)/control/control.mk
    endif

    ifeq ($(COMPUTING),Y)
        #@echo $(error COMPUTING=$(COMPUTING))
        include $(WORKSPACE_LOC)/computing/computing.mk
    endif

    ifeq ($(SENSITIVITY),Y)
        #@echo $(error SENSITIVITY=$(SENSITIVITY))
        include $(WORKSPACE_LOC)/sensitivity/sensitivity.mk
    endif

    ifeq ($(STORAGE),Y)
        #@echo $(error STORAGE=$(STORAGE))
        include $(WORKSPACE_LOC)/storage/storage.mk
    endif

    ifeq ($(UNIT_TEST),Y)
        include $(WORKSPACE_LOC)/unit_tests/unit_test.mk
    endif
endif
The final makefile might look like this: This is where the final *.c files are indexed and keywords for the preprocessor are defined (starting with HAS_XXXXX).
$(info SCHMITT_TRIGGER_MK_INC=$(SCHMITT_TRIGGER_MK_INC))
ifneq ($(SCHMITT_TRIGGER_MK_INC),Y)
    SCHMITT_TRIGGER_MK_INC=Y

    mkfile_path := $(abspath $(lastword $(MAKEFILE_LIST)))
    $(info Build  $(mkfile_path) )

    SCHMITT_TRIGGER_DIR = $(COMPUTING_DIR)/schmitt_trigger

    INCDIR += -I$(SCHMITT_TRIGGER_DIR)
    SOURCES_C += $(SCHMITT_TRIGGER_DIR)/schmitt_trigger.c

    SCHMITT_TRIGGER=Y
    OPT += -DHAS_SCHMITT_TRIGGER

    ifeq ($(DIAG),Y)
        OPT += -DHAS_SCHMITT_TRIGGER_DIAG
        SOURCES_C += $(SCHMITT_TRIGGER_DIR)/schmitt_trigger_diag.c
    endif

    ifeq ($(CLI),Y)
        ifeq ($(SCHMITT_TRIGGER_COMMANDS),Y)
            OPT += -DHAS_SCHMITT_TRIGGER_COMMANDS
            SOURCES_C += $(SCHMITT_TRIGGER_DIR)/schmitt_trigger_commands.c
        endif
    endif
endif
When building the project for the first time, this error will most likely pop up. This means that you need to reinstall MinGW.
C:\Users\username\AppData\Local\Temp\ccT9XWou.s:54: Error: invalid instruction suffix for `push'
C:\Users\username\AppData\Local\Temp\ccfvWBon.s:19: Error: invalid instruction suffix for `pop'
After installation, the gcc.exe -dumpmachine command should show mingw32
>C:\MinGW\bin\gcc.exe -dumpmachine
mingw32
The contents of that Makefile can be represented in the form of this simple block diagram ToolChain(a). Here you can visually trace the path the *.c file takes from the moment it is written to execution in Windows.
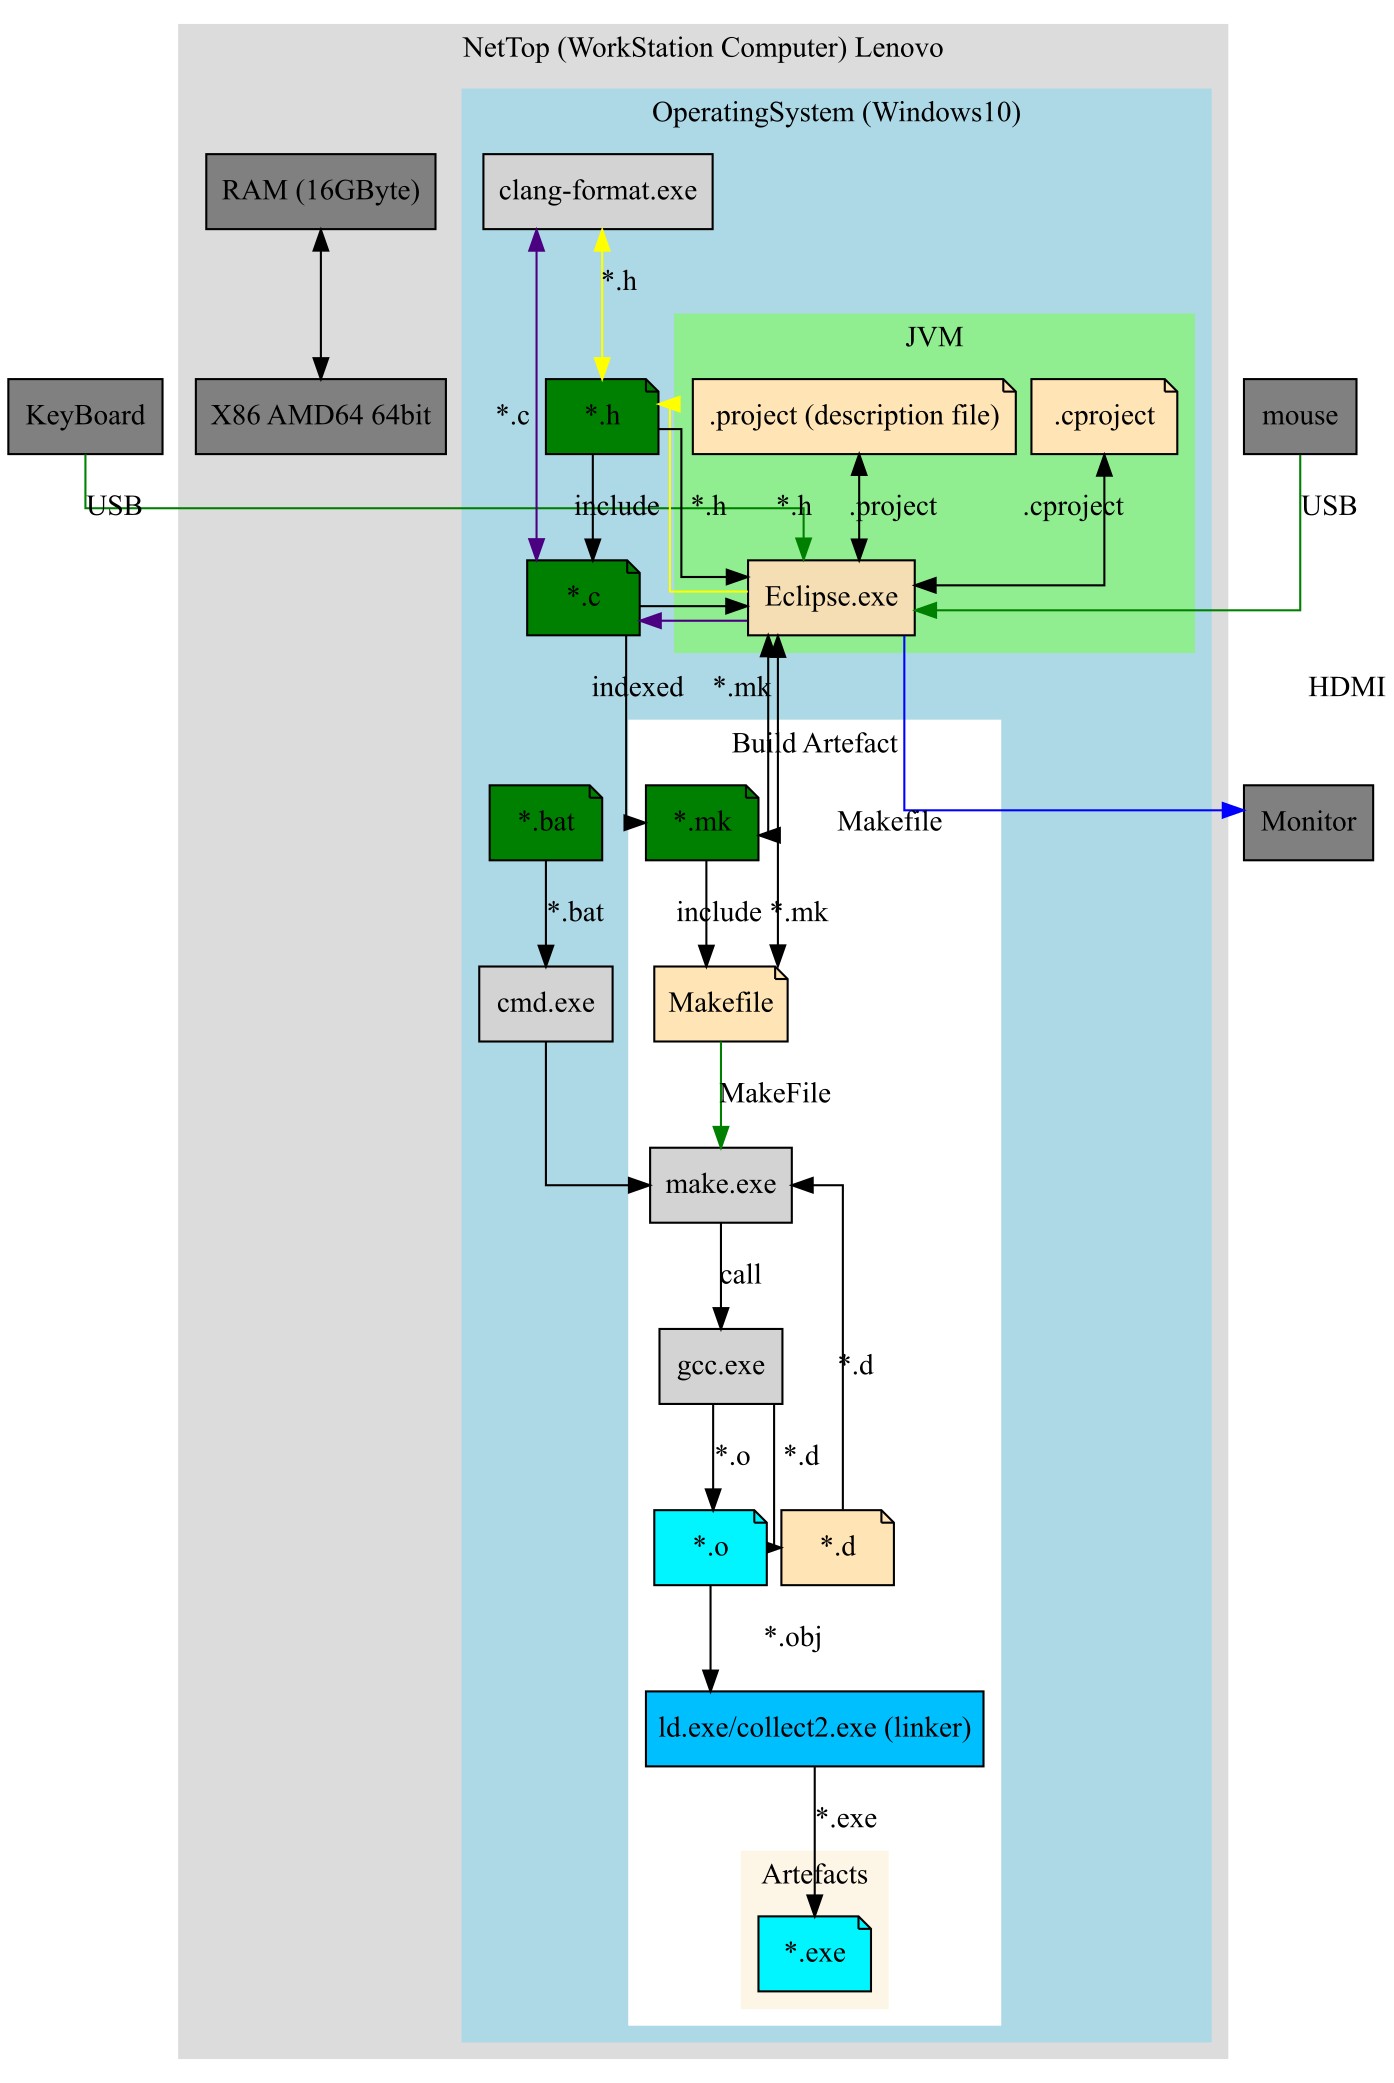
Otherwise, assembly on a PC is no different from assembly for a microcontroller. This is the advantage of building from Make. When working with make, the build for any processor looks plus/minus the same. It’s just that the environment variables are defined differently: CC LD, etc. All the same *.mk files will be matched as in the code base for the firmware.
You can read about how firmware is assembled from scripts in this text:
Setting up ToolChain(s) for Win10+GCC+C+Makefile+ARM Cortex-Mx+GDB https://habr.com/ru/articles/673522/
When the entire code base was assembled, the binary turned out to be only 1.9MByte

Debugging the firmware simulator
The assembly artifact is the *.exe file. It can be launched by calling it from the cmd command line.

Here an imitation of a UART-CLI terminal occurs, only instead of UART, the files stdin (analogous to UART-RX)/stdout (analogous to UART-TX) are used.
You can see that the execution speed of the application is simply crazy. In one second, the super-cycle manages to spin as many as 11,240,590 times! In microcontrollers this value was usually on the order of 7000 times. It turns out that on a PC the application runs 1600 times faster. Three orders of magnitude faster.

Conclusion
Building C code for DeskTop is a very useful skill when debugging microcontroller firmware. You can debug huge chunks of platform independent code: CRC, line processing, Schmitt trigger, binary protocols, etc.
You can also compile the project using different compilers: GCC, Clang. And thereby find and eliminate more errors in the code base.
As you can see, there is absolutely nothing complicated about assembling C programs on a PC. I hope this text will help more microcontroller programmers to debug their applications on DeskTop PC and thereby create excellent software products.
Links
https://metanit.com/c/tutorial/1.2.php
https://www.youtube.com/watch?v=SRMUJHY-0gA
https://www.youtube.com/watch?v=-lLctanPefY
https://sourceforge.net/projects/mingw/
Generating dependencies within a program
https://habr.com/ru/articles/765424/
Building firmware for CC2652 from Makefile
https://habr.com/ru/articles/726352/
Why is it Important to Collect Code from Scripts
https://habr.com/ru/articles/723054/
Setting up ToolChain(s) for Win10+GCC+С+Makefile+ARM Cortex-Mx+GDB
https://habr.com/ru/articles/673522/
Questions
1–Which path does the file take from the moment it is written to the moment it is executed?
2–What happens between pressing Enter when running a console utility in cmd and running the main() function?