Highlighting onboarding elements. SwiftUI. Spotlight onboarding
Greetings! Recently, new functionality appeared on the existing screen, the appearance of which the design decided to play with.
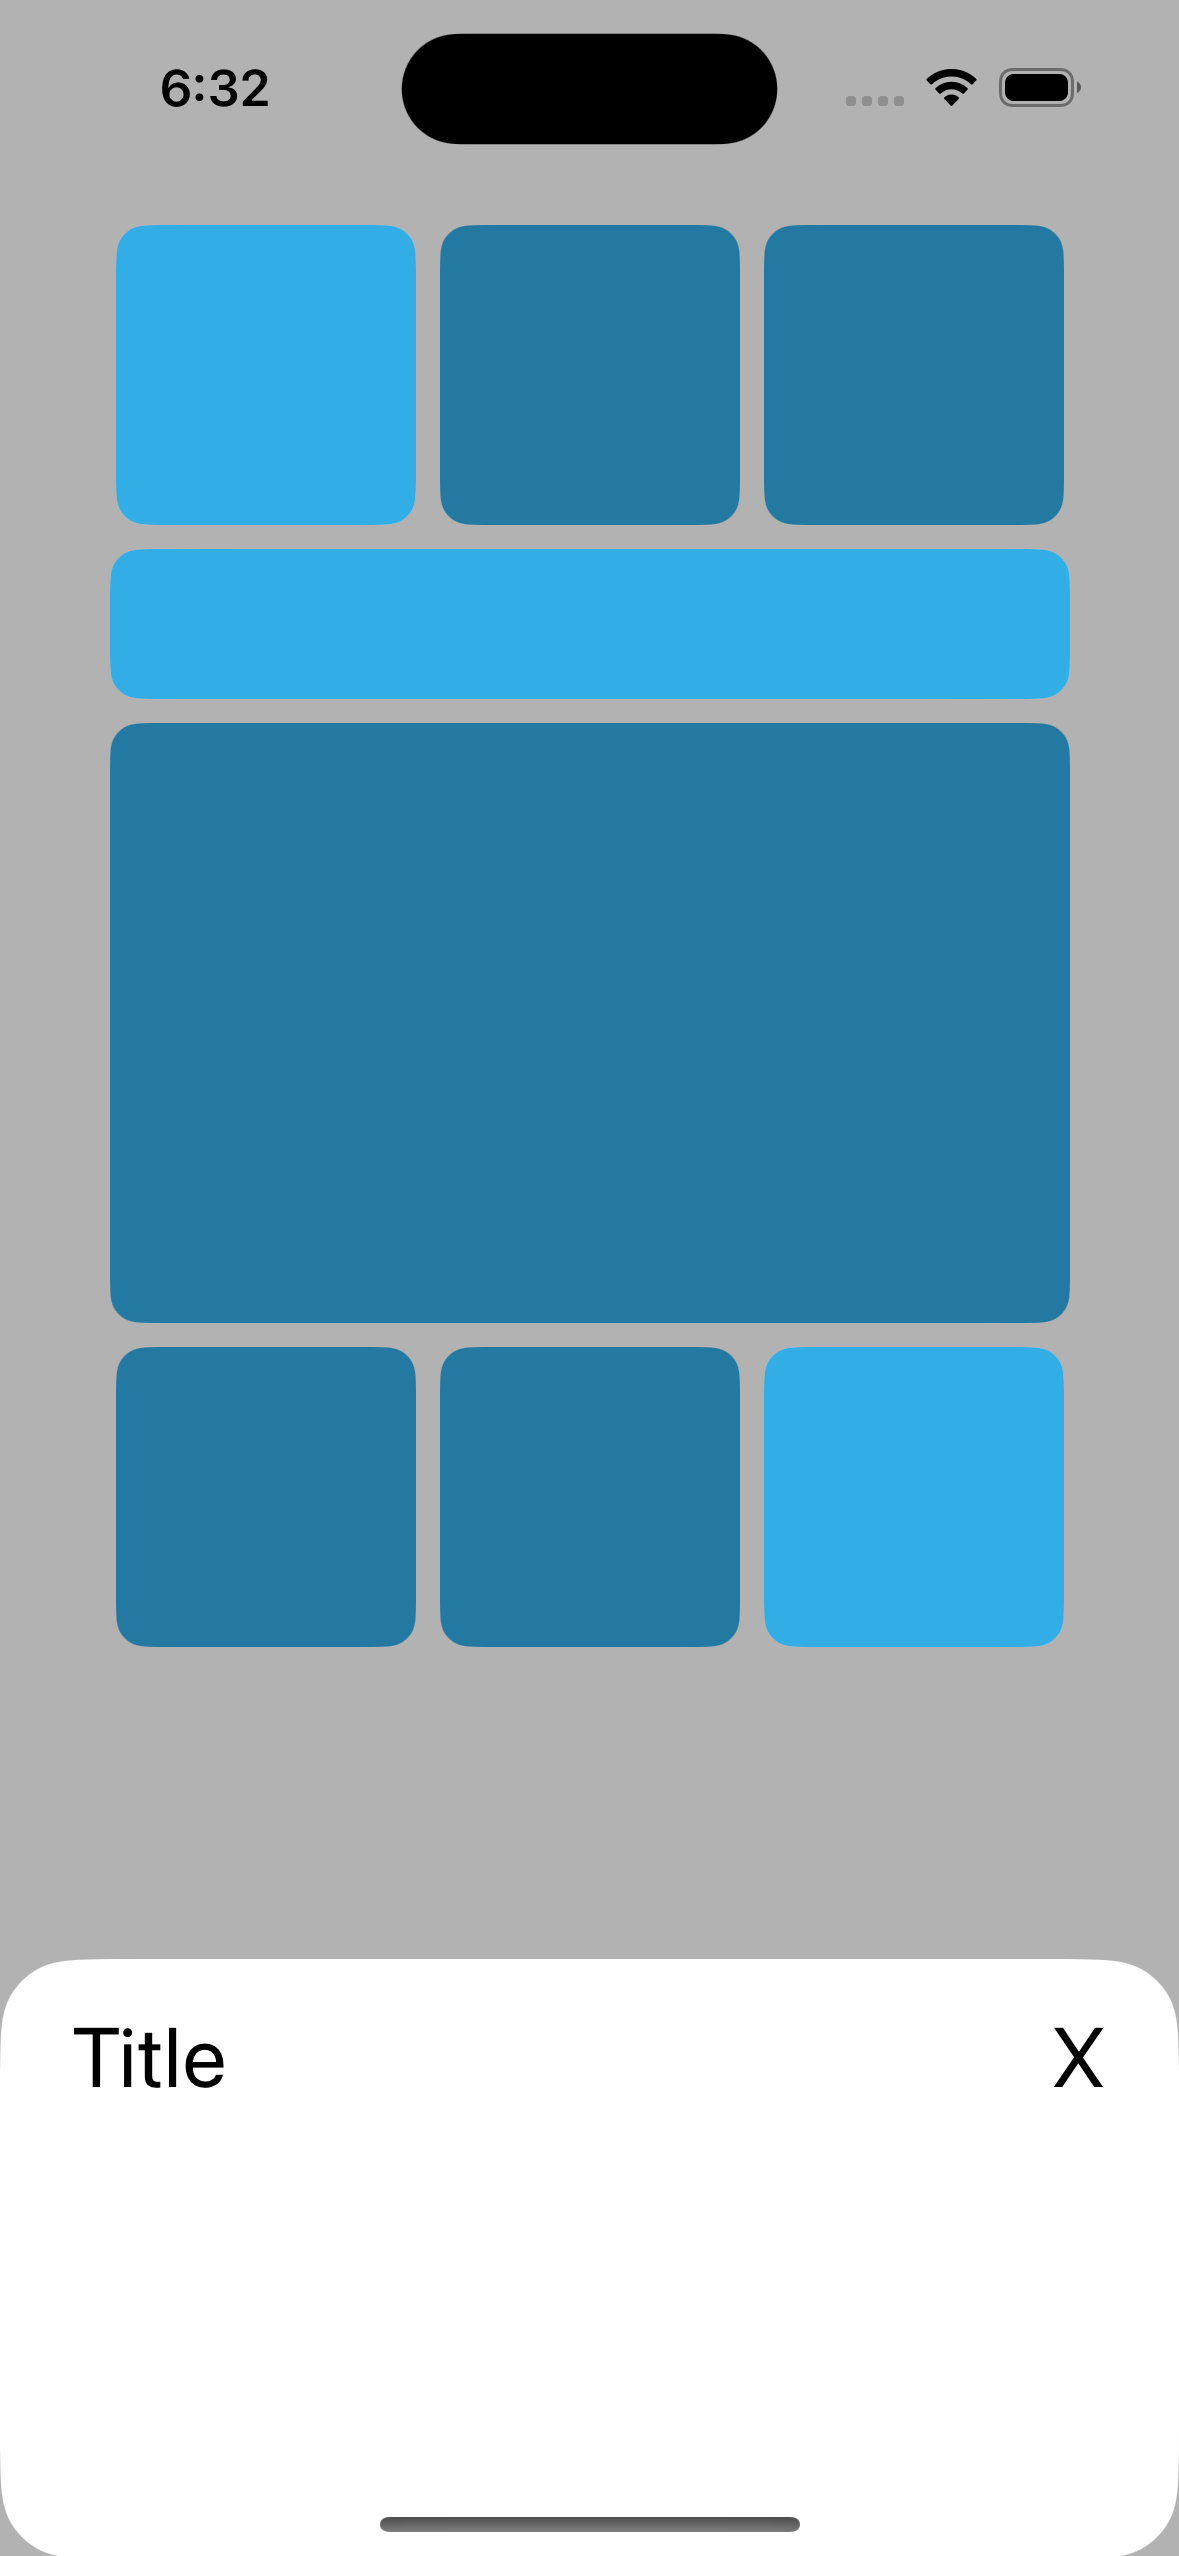
The point is this: we open the screen, a curtain appears with a description of the new functionality, and at the same time the backlight of the added elements is triggered. And so, let's turn it on lil peep – spotlightput on your favorite thrasher T-shirt and begin to solve the problem of illuminating the elements.
As I originally saw decomposition this task:
Get the area/boundaries of the desired element (which will be highlighted);
Use the data obtained to correctly highlight the content, and with minimal effort;
Pass the received data to the element that will be responsible for display;
Write a curtain that will trigger the display.
#1. Getting the view area of a selected element
I decided to do the receiving (and subsequent transfer) of the presentation area through preferenceKey. I wrote a structure for the onboarding element key, the value of which is a dictionary:
/// PreferenceKey элемента онбординга, который нужно подсветить
public struct OnboardingHighlightElementKey: PreferenceKey {
    // MARK: - Static Properties

    public static var defaultValue: [Int: OnboardingHighlightElement] = [:]

    // MARK: - Static Functions

    public static func reduce(
        value: inout [Int: OnboardingHighlightElement],
        nextValue: () -> [Int: OnboardingHighlightElement]
    ) {
        value.merge(nextValue()) { $1 }
    }
}

/// Модель данных элемента онбординга, которые нужно будет передать
public struct OnboardingHighlightElement: Identifiable {
    public let anchor: Anchor<CGRect>
    public let id: Int
    public let radius: CGFloat
}
Next, you need to collect data for transmission. And of course, what interests us most is geometry. Here we will use anchorPreference. Let's write extensions for View:
public extension View {
    /// Использование привязки для получения области границ представления
    func onboardingHighlightElement(_ id: Int, radius: CGFloat = .zero) -> some View {
        anchorPreference(
          key: OnboardingHighlightElementKey.self,
          value: .bounds
        ) { anchor in
            [id: OnboardingHighlightElement(
                    anchor: anchor,
                    id: id,
                    radius: radius)
            ]
        }
    }
}
Next you just need to hang our extension on the element that needs to be highlighted:
private enum Constants {
  enum HighlightElement {
    static let id = 1
    static let cornerRadius: CGFloat = 6
  }
}

struct SomeContentView: View {
  var body: some View {
    VStack {
      ...
      NewElementView()
        .onboardingHighlightElement(
          Constants.HighlightElement.id,
          radius: Constants.HighlightElement.cornerRadius
        )
      ...
    }
  }
}
I want to highlight (ha-ha) that the id must be unique, etc. We write it manually, there is an option to make a mistake and assign the same id to two elements, then the highlight will work only on one of them. Don't lose sight of this.
#2. Element highlighting – using the data received
We use the following sequence of actions:
Cover the content – in this case, with a dark background;
Apply mask mask – there will be some
Rectangle(since our screen is square);On this base we apply overlay;
In it with the help GeometryReader we apply our onboarding elements in relation to the received data;
Change the default blending mode to blendMode(.destinationOut).
view.mask {
  Rectangle()
    .ignoresSafeArea()
    .overlay {
       GeometryReader { proxy in
         ForEach(highlightElements) { property in
           let rect = proxy[property.anchor]
             RoundedRectangle(cornerRadius: property.radius)
               .frame(width: rect.width, height: rect.height)
               .position(x: rect.midX, y: rect.midY)
               .blendMode(.destinationOut)
          }
       }
    }
}
Dimming is a separate issue, because… we need to darken the entire View along with safeAreaand the element itself bottomSheetwhich will need to be hung at the top, can (and as a rule will) be located lower in the hierarchy, and the result will be a situation in which the dimming will not work on all content (for example, it will not touch the NavBar / TabBar or other similar situations).
Exit? – fullScreenCover, but an attentive viewer will say, “How can I blur his background?” To which I will say: “That’s why I said that this is a separate topic.” But we’ll still do it quickly so that we can check how this onboarding works in real combat. And so the scheme is as follows:
func clearBackground<Content: View>(
        isPresented: Binding<Bool>,
        isTransactionDisabled: Bool = false,
        onDismiss: (() -> Void)? = nil,
        content: @escaping () -> Content
) -> some View {
  fullScreenCover(isPresented: isPresented, onDismiss: onDismiss) {
    ZStack {
      content()
    }
    .background(ClearBackground())
  }
  .transaction { transaction in
      if isTransactionDisabled {
        transaction.animation = nil
        transaction.disablesAnimations = true
      }
  }
}
We don’t go into the details of the concealment; I think they are already clear. We are interested in the magic that happens in ClearBackground. And there, what you sometimes have to resort to in SwiftUI, even in 2024 – UIViewRepresentable. And so, the code:
public struct ClearBackground: UIViewRepresentable {
    // MARK: - Init

    public init() {}

    // MARK: - Functions

    public func makeUIView(context: Context) -> UIView {
        let view = UIView()
        let vc = UIApplication.shared.firstWindow?.visibleViewController()
        (vc?.presentedViewController ?? vc)?.view.backgroundColor = .clear
        return view
    }

    public func updateUIView(_ uiView: UIView, context: Context) {}
}

public extension UIApplication {
    // MARK: - Computed Properties

    @inlinable var firstWindow: UIWindow? {
        connectedScenes.lazy
            .compactMap { $0 as? UIWindowScene }
            .flatMap(\.windows)
            .first(where: \.isKeyWindow)
    }
}

public extension UIWindow {
    func visibleViewController() -> UIViewController? {
        var topController = rootViewController

        while topController?.presentedViewController != nil {
            topController = topController?.presentedViewController
        }

        if let navigationController = topController as? UINavigationController {
            topController = navigationController.topViewController
        }

        if let tabBarController = topController as? UITabBarController {
            let selectedViewController = tabBarController.selectedViewController

            if let navigationController = selectedViewController as? UINavigationController {
                topController = navigationController.topViewController
            } else if selectedViewController != nil {
                topController = selectedViewController
            }
        }

        return topController
    }
}
And let’s put everything together so that the person who came to copy this whole thing understands what needs to be highlighted:
EmptyView()
    /// Наш контейнер с прозрачным фоном, который принимает в себя контент
    .clearBackground(isPresented: $bindingПроперти на показ, onDismiss: действие при сокритии) {
        GeometryReader { geo in
            ZStack(alignment: .bottom) {
                /// Задний фон c нужным цветом opacity и прочим
                Background()
                    /// Подсветка элементов
                    .mask {
                        Rectangle()
                            .ignoresSafeArea()
                            .overlay {
                                GeometryReader { proxy in
                                    ForEach(highlightElements) { property in
                                        let rect = proxy[property.anchor]
                                        RoundedRectangle(cornerRadius: property.radius)
                                            .frame(width: rect.width, height: rect.height)
                                            .position(x: rect.midX, y: rect.midY)
                                            .blendMode(.destinationOut)
                                    }
                                }
                            }
                    }
                content()
            }
        }
    }
#3. Reading / Transmitting data to the element that will be responsible for display
We're going very well so far. Let's remember what we have:
We identified the onboarding element that needs to be highlighted, and even marked it using prefenceKey;
On the display side, if something comes to us, we will be ready to process it and show it.
So all that remains is to connect these two islands with a small and beautiful bridge. And it will fit perfectly as this bridge backgroundPreferenceValue.
backgroundPreferenceValue(OnboardingHighlightElementKey.self) { items in
    BottomSheet(highlightElements: Array(items.values))
}
Thus, the elements marked (ha ha) by us onboardingHighlightElement will transmit their data below, where they will be further processed by the code described (ha ha) above.
#4. Write a curtain that will display
Well, we can say that we are at the finish line. We implement the curtain quite trivially, omitting the aspects of hiding it (since this is not the purpose of the article, and I don’t want to add tons of unnecessary code that will only be distracting). And so, let's make an extension to display the curtain:
public extension View {
    @ViewBuilder
    func onboardingBottomSheet(
        item: Binding<BottomSheetData?>,
        onDismiss: (() -> Void)? = nil
    ) -> some View {
      backgroundPreferenceValue(OnboardingHighlightElementKey.self) { highlightElements in
        BottomSheet(
          highlightElements: Array(highlightElements.values),
          onDismiss: onDismiss,
          content: {
            BottomSheetOnboardingView(data: item)
          }
        )
      }
    }
}
Next, we use our extension on the desired screen. We have already made a mock screen where we attached an id to an element, let’s add a curtain there too:
private enum Constants {
  enum HighlightElement {
    static let id = 1
    static let cornerRadius: CGFloat = 6
  }
}

struct SomeContentView: View {

  @ObservedObject var viewModel: SomeContentViewModel

  var body: some View {
    VStack {
      ...
      NewElementView()
        .onboardingHighlightElement(
          Constants.HighlightElement.id,
          radius: Constants.HighlightElement.cornerRadius
        )
      ...
    }
    .onboardingBottomSheet(
      $viewModel.onboardingViewModel,
      onDismiss: viewModel.didDismissOnboarding
    )
  }
}
Conclusion
In what seems to me to be a rather simple way, we solved the problem of illuminating a specific screen element. But it’s worth paying attention to the following possible bug – if the design requests a delay before showing onboarding (even 0.4 seconds), then the user will have an “action window” and may have time to scroll your screen (if available) until the element onboarding will be behind safeArea. In this case, the backlight will process the same along the contour of the element, but will shine on top of the NavBar, which will be a pure bug. At this stage, I see several ways to solve this problem:
Refuse delay – highlight the technical difficulty of implementing the delay and ask the design to abandon it;
Reduce the time to a minimum – say 0.2 seconds and design the content for this period of time. In such a short period of time, the user will not have time to understand and will not understand that his actions are being blocked.
Animate the moment of showing onboarding – add a smooth dimming of the content with a smooth display of the curtain (just for these 0.4 seconds). During the display, you will also disable the content, but the user will have some nice animation and this will not be perceived as a bug. It will be necessary to disable the content so that the user does not accidentally skip our onboarding, but closes it when the display is finished.
Bibliography:
