We write an Excel add-in on Excel-DNA. Part 2
Introduction
This is a continuation of the article on building an Excel add-in using the Excel-DNA library about assembling a simple add-in with a custom formula. Here we will look at how to make your own panel with buttons, interact with the workbook, display notifications, and also access Excel interface elements.
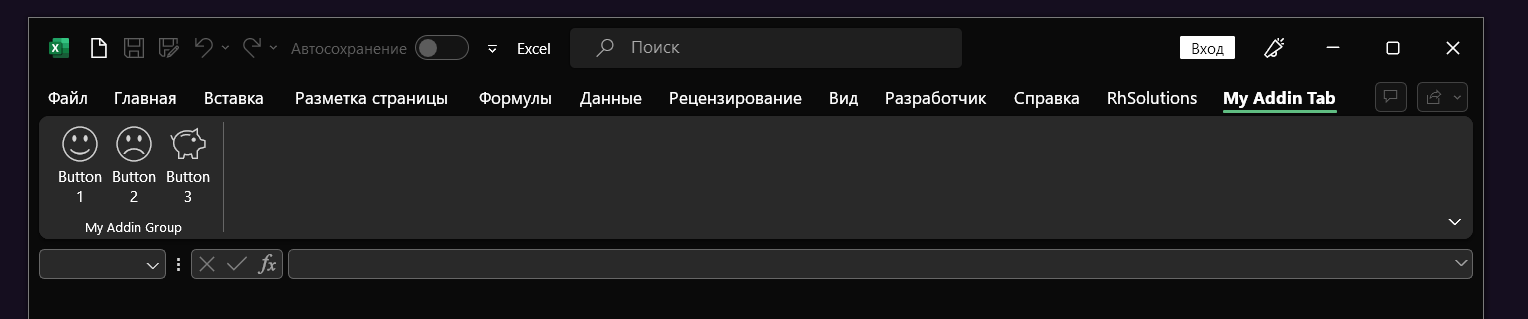
Create a panel
Ribbon panels are described in XML. The simplest one looks like this:
<customUI xmlns="http://schemas.microsoft.com/office/2006/01/customui">
    <ribbon>
        <tabs>
            <tab id='MyAddinTab' label="My Addin Tab">
                <group id='MyAddinGroup' label="My Addin Group">
                    <button id='Button1' label="Button 1" size="large" imageMso='HappyFace' />
                    <button id='Button2' label="Button 2" size="large" imageMso='SadFace' />
                    <button id='Button3' label="Button 3" size="large" imageMso='Piggy' />
                </group>
            </tab>
        </tabs>
    </ribbon>
</customUI>
Tag tab describes the tabs on the toolbar, group – groups of elements that are visually separated from each other by a vertical bar, button – button elements.
In order to display such a panel in Excel, you need to inherit the class ExcelRibbon and override the method GetCustomUI in which we return the XML of the panel.
using ExcelDna.Integration.CustomUI;

namespace ExcelAddIn.Controllers;

public class RibbonController : ExcelRibbon
{
    public override string GetCustomUI(string ribbonID)
    {
        return @"<customUI xmlns="http://schemas.microsoft.com/office/2006/01/customui">
      <ribbon>
        <tabs>
          <tab id='MyAddinTab' label="My Addin Tab">
            <group id='MyAddinGroup' label="My Addin Group">
                <button id='Button1' label="Button 1" size="large" imageMso='HappyFace' />
                <button id='Button2' label="Button 2" size="large" imageMso='SadFace' />
                <button id='Button3' label="Button 3" size="large" imageMso='Piggy' />
            </group>
          </tab>
        </tabs>
      </ribbon>
    </customUI>";
    }
}
Tool factory
Let’s define the abstract class of the tool that will be called by the button
namespace ExcelAddIn.Tools;

public abstract class Tool : IDisposable
{
    public abstract void Execute();

    public void Dispose()
    {
        Dispose(true);
        GC.SuppressFinalize(this);
    }

    protected abstract void Dispose(bool disposing);
}
And the factory of these tools
using ExcelDna.Integration.CustomUI;

namespace ExcelAddIn.Tools;

public static class ToolFactory
{
    public static Tool GetTool(IRibbonControl control)
    {
        return control.Id switch
        {
            "Button1" => new Button1Tool(),
            "Button2" => new Button2Tool(),
            "Button3" => new Button3Tool(),
            _ => throw new NotImplementedException(control.Id)
        };
    }
}
To make the button work, you need to add an attribute to its description onAction with the name of the method to be executed.
using ExcelDna.Integration.CustomUI;
using ExcelAddIn.Tools;

namespace ExcelAddIn.Controllers;

public class RibbonController : ExcelRibbon
{
    public override string GetCustomUI(string ribbonID)
    {
        return @"<customUI xmlns="http://schemas.microsoft.com/office/2006/01/customui">
      <ribbon>
        <tabs>
          <tab id='MyAddinTab' label="My Addin Tab">
            <group id='MyAddinGroup' label="My Addin Group">
                <button id='Button1' label="Button 1" size="large" imageMso='HappyFace' onAction='OnToolPressed'/>
                <button id='Button2' label="Button 2" size="large" imageMso='SadFace' onAction='OnToolPressed'/>
                <button id='Button3' label="Button 3" size="large" imageMso='Piggy' onAction='OnToolPressed'/>
            </group>
          </tab>
        </tabs>
      </ribbon>
    </customUI>";
    }

    public void OnToolPressed(IRibbonControl control)
    {
        using var tool = ToolFactory.GetTool(control);
        tool.Execute();
    }
}
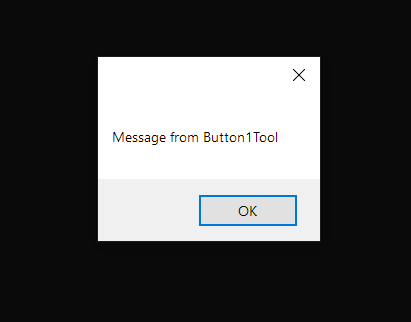
First tool
Let the first button just show us the message in MessageBox
In order for the add-in to work with Windows Forms, you need to add to .csproj string
  <PropertyGroup>
	...
    <UseWindowsForms>true</UseWindowsForms>
  </PropertyGroup>
Now let’s make a class-successor of the abstract class Tool
namespace ExcelAddIn.Tools;

public class Button1Tool : Tool
{
    public override void Execute()
    {
        MessageBox.Show($"Message from {nameof(Button1Tool)}");
    }

    protected override void Dispose(bool disposing)
    {
    }
}
Getting access to the workbook
Interaction with Excel – its workbooks, sheets, interface – is carried out through the interface Application
To get access to it, you need to install the package ExcelDna.Interop
dotnet add package ExcelDna.Interop
An object Application is a class property ExcelDnaUtil
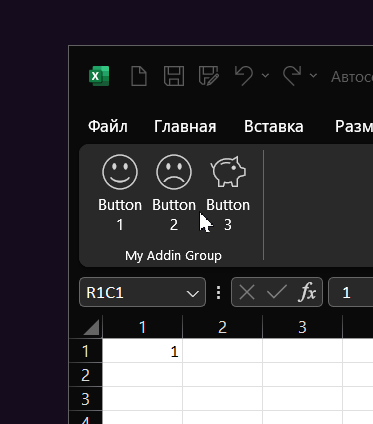
Let the second button increment the current cell
using Application = Microsoft.Office.Interop.Excel.Application;

namespace ExcelAddIn.Tools;

public class Button2Tool : Tool
{
    private readonly Application app;

    public Button2Tool()
    {
        app = (Application)ExcelDnaUtil.Application;
    }

    public override void Execute()
    {
        if (app.ActiveCell == null)
        {
            return;
        }
        double? cellValue = app.ActiveCell.Cells.Value2;
        if (cellValue != null)
        {
            app.ActiveCell.Cells.Value2 = ++cellValue;
        }
    }

    protected override void Dispose(bool disposing)
    {

    }
}
Status bar
At the bottom of the Excel window there is a status bar where you can display service information.
This is useful for displaying the progress of some resource-intensive task.
After finishing work, you need to reset the string by passing it the value false. This will return control of it to the Excel application, otherwise it will hang in the last message we transmitted.
using Application = Microsoft.Office.Interop.Excel.Application;

namespace ExcelAddIn.Tools;

public class Button3Tool : Tool
{
    private readonly Application app;

    public Button3Tool()
    {
        app = (Application)ExcelDnaUtil.Application;
    }

    public override void Execute()
    {
        for (int i = 0; i < 10;)
        {
            Thread.Sleep(400);
            app.StatusBar = $"Выполнено {++i * 10}%...";
        }
    }

    protected override void Dispose(bool disposing)
    {
        app.StatusBar = false;
    }
}
Conclusion
This article describes the basics of creating your own add-in toolbar and how it interacts with Excel.
The code for this and the previous article is in the repository https://gitea.cebotari.ru/chebser/ExcelAddIn