Using Yandex speech technologies on the example of Telegram audio messages or a chat bot for recognizing audio messages
In this article, we will consider the use of speech technologies provided by Yandex in the context of audio message recognition in Telegram, a popular messenger that unites millions of users around the world.

Table of contents
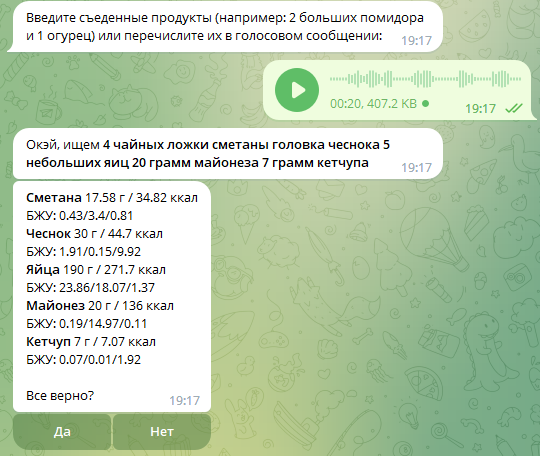
Initially, I needed the functionality of getting text from audio for a project that I wrote about here and here, where I wanted to implement food entry into the food diary not only by text, but by sending an audio message. For those who are interested, you can test this functionality here. It turned out pretty interesting:

This functionality was generously and altruistically (almost) provided to us by Yandex on their service Yandex.Cloud (Yandex.Cloud). At first glance, the name may remind you of some kind of cloud storage for endless streams of photos from your phone, but in fact everything is much more interesting:
Yandex.Cloud is a cloud computing service provided by Yandex. It allows people and companies to rent virtual servers and resources to store data, run applications, and perform computing over the Internet. It’s like renting virtual space on Yandex computers in order to use their power for your own purposes without the need to purchase and maintain your own equipment.
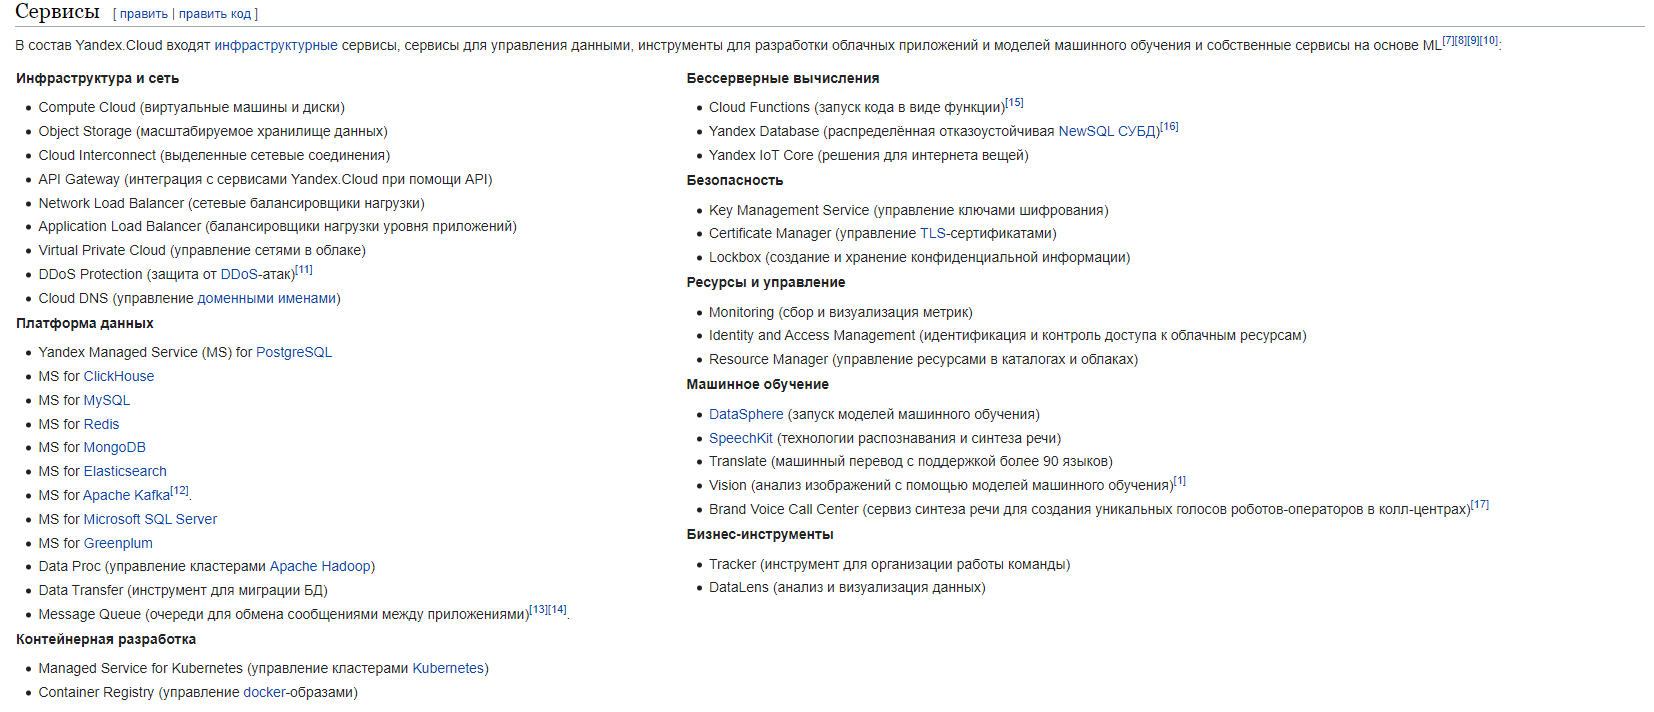
On Yandex.Cloud, you can find a bunch of different programming interesting things – audio recognition / generation, machine translation, neural networks, databases, etc. See the full list of current solutions Here or see their list taken from wikipedia below:

Yes, every paid servicebut their cost, in most solutions, is not so high, and Yandex provides test period And grant for new users. Detailed conditions for obtaining them can be viewed Here And Here. In short, if you have just registered with Yandex.Cloud, then here are 2 months of free access to test everything.
Theater begins with a hanger
Let’s go to Yandex.Cloud, log in and get into the console. Then we immediately create Here payment account. If you entered here for the first time, then we get a trial period / grant or don’t bother and replenish your account with a couple of tens of rubles by linking a bank card.
The next thing we need to do is create a service account. Service account in Yandex.Cloud, it is like a virtual identity for a program or service that can be created to allow it to use the resources and functions of cloud servers without the need to use a personal account. This allows applications and programs to run in the cloud, making them more secure and convenient to access, and isolating them from other users.
To do this, go to this tab:

Further in this section, click on the button “Create a service account“. Enter the name and choose a role. In this example, we will use the audio recognition functionality – Speech-To-Text (STT), so we will select “ai.speechkit-stt.user“.

Click “Create” and after a short loading we will see a new line in the list of service accounts on the same page. We click on this line and get to a new page, where in the upper right part of the screen we find the button “Create a new key“, click and select “API key”. A form will appear in which you can specify a description for this key – click “Create” and get a fresh key:

Ready! We save this key for ourselves or do not close this form, so that later we can copy it into the program.
Making a deal with BotFather
To test the functionality of the service, let’s build a simple chat bot for Telegram that will decode audio messages and send us text.
To start, let’s go to Bot Father and, bending the knee, ask for a token for the new chatbot:
Launching the BotFather Bot
We call the /newbot command
Enter a name for the new bot
Enter his username
We get token

Now let’s move on to the main part of the view and start writing the chatbot code.
Tyk tyk tyk do on the keys
To create a chat bot, we will use the library telebot (or pyTelegramBotAPI), which we will install in this way:
pip install pyTelegramBotAPILet’s first create a fileconfig.py“, where we will store all the received keys and an instance of the TeleBot class (imported from the telebot library), with the help of which all interactions with the chat bot will take place. In the constructor of this class, we pass only the token that we previously received and stored in the BOT_TOKEN variable .
from telebot import TeleBot

# Токен чат-бота
BOT_TOKEN = 'XXXXXXXXXXXXXXXXXXXXXXXXXXXXXXXXXXXXXXXXX'
# Экземпляр класса TeleBot, через который будет происходить все взаимодействия с ботом
bot = TeleBot(BOT_TOKEN)

# API-ключ сервисного аккаунта из Yandex.Cloud
YC_STT_API_KEY = 'YYYYYYYYYYYYYYYYYYYYYYYYYYYYYYYYYYYYYYY'
We replace the values of the BOT_TOKEN and YC_STT_API_KEY variables with our token and API key, respectively. Next, create a filemain.py“, where the functionality of the chatbot itself will be located. First, let’s define all imports:
from config import bot
from telebot.types import Message
Here we have imported the TeleBot class object from the previously created “config.py” and the Message class from the types submodule of the library. This class is a message sent to the chat and contains all the comprehensive information about it.
The first thing a chatbot should be able to do is respond to the /start command, which is called when the bot starts:
# Используем декоратор из объекта класса TeleBot,
# в который передаем параметр commands - список команд,
# при вызове которых будет вызываться данная функция
@bot.message_handler(commands=['start'])
# Определяем функцию для обработки команды /start, она принимает объект класса Message - сообщение
def start(message:Message):
    # Отправляем новое сообщение, указав ID чата с пользователем и сам текст сообщения
    bot.send_message(message.chat.id, "Йоу! Отправь мне аудиосообщение")
Here we have used a decorator from the bot object, which will let our program know that this start function should only be called when the user has entered the /start command.
The function itself takes only one argument – This an instance of the Message class, that is, in this case, it will be the same message with the /start command that the user sent himself or simply clicked “Start” when he entered our bot for the first time. In the latter case, it will be sent to the bot automatically for him.
message_handleris a decorator from the librarytelebot, designed to process incoming messages in the chatbot. It allows you to set a function that will be called automatically when the bot receives a message of a certain type or that meets certain conditions.
At the very end of the file, we place the following code, which will launch the bot when “main.py” is launched:
if __name__ == "__main__":
    bot.polling(non_stop=True)
So, now our bot reacts to its launch by the user and asks for an audio message:

Since he asks, let’s give him such an opportunity and write another function which will respond to sending a voice message:
First, let’s define a function with a different decorator that will no longer respond to a command, but to a message type – namely, a voice one:
@bot.message_handler(content_types=['voice'])
def handle_voice(message:Message):
Let’s import another class from the library that will represent the audio message:
from telebot.types import VoiceNow inside the function we need to get the sent/forwarded audio message. Since it is already stored on the Telegram servers, we can simply get the path to it.
# Определяем объект класса Voice, который находится внутри параметра message
# (он же объект класса Message)
voice:Voice = message.voice
# Получаем из него ID файла аудиосообщения
file_id = voice.file_id
# Получаем всю информацию о данном файле
voice_file = bot.get_file(file_id)
# А уже из нее достаем путь к файлу на сервере Телеграм в директории
# с файлами нашего бота
voice_path = voice_file.file_path
In this case, the variable voice_path will be kept in relative path to an audio file, for example: “voice/file_0.oga”. That is, there is a Telegram server, and in it is a directory with all the files of our bot – there is a voice folder where the sent audio message is located.
OGA is an audio file extension used on Telegram servers. This format, known as Ogg Vorbis, provides good sound quality and small file sizes, which allows you to send voice messages in the messenger with high definition and data savings.
However, there is no sense from such a path for us. Let’s use a little trick and get the absolute path to the saved audio message. To do this, we need the bot token, which we saved in “config.py”:
from config import BOT_TOKENAnd the relative path of the file stored in the variable voice_path:
file_base_url = f"https://api.telegram.org/file/bot{BOT_TOKEN}/{voice_path}"Thus, we will get the absolute path to the audio file on the Telegram server of the form:
https://api.telegram.org/file/botXXXXXXXXXXXXXXXXXXXXXXXXXXXXXXXXXXXXXXXXXX/voice/file_0.oga
Now we have a link to the audio file and we can send it to Yandex.Cloud, which will try to get text from this audio file.
Journey of audio messages
We create another file where we will interact with the Yandex.Cloud service. Let’s call it, for exampleyandex_cloud.py“. We could use some prebuilt libraries for this task, but for such a simple functionality it is easier to write an interaction using a classic module requests. Import it and the Yandex.Cloud API key from the config:
import requests
from config import YC_STT_API_KEY
Let’s define a variable with the address to which the request will go:
# URL для отправки аудиофайла на распознавание
STT_URL = 'https://stt.api.cloud.yandex.net/speech/v1/stt:recognize'
And we create a function that will take the address of the audio file on the Telegram servers as an argument and return the text recognized from it:
def get_text_from_speech(file_url):
    # Выполняем GET-запрос по ссылке на аудиофайл
    response = requests.get(file_url)

    # Если запрос к серверу Telegram не удался...
    if response.status_code != 200:
        return None

    # Получаем из ответа запроса наш аудиофайл
    audio_data = response.content

    # Создам заголовок с API-ключом для Яндекс.Облака, который пошлем в запросе
    headers = {
        'Authorization': f'Api-Key {YC_STT_API_KEY}'
    }

    # Отправляем POST-запрос на сервер Яндекс, который занимается расшифровкой аудио,
    # передав его URL, заголовок и сам файл аудиосообщения
    response = requests.post(STT_URL, headers=headers, data=audio_data)

    # Если запрос к Яндекс.Облаку не удался...
    if not response.ok:
        return None

    # Преобразуем JSON-ответ сервера в объект Python
    result = response.json()
    # Возвращаем текст аудиосообщения
    return result.get('result')
It remains only to refine the function handle_voice from “main.py“
Left just a little bit
Let’s return to the main module and import the created function:
from yandex_cloud import get_text_from_speechLet’s continue the function code handle_voice and add a couple of lines:
# Сохраняем текст аудиосообщения в перменную
speech_text = get_text_from_speech(file_base_url)
# Посылаем его пользователю в виде нового собщения
bot.send_message(message.chat.id, speech_text)
Run the bot again and look at the result:

Ready!
The full bot code can be downloaded from GitHub:


