The first game developed exclusively in CSS with swipe controls
I developed Desert Racer to showcase unique and innovative techniques that use only CSS, including swipe functionality and collision detection done entirely using CSS. In my opinion, these are the first solutions of their kind. You are free to challenge this statement. In this article, we will look at the mentioned techniques and discuss the general steps of creating a game with swipe controls.
As of this writing, March 27, 2024, I checked and Gemini still claims that implementing swipe using CSS alone is not possible:

Is CSS ideal for this task? At the moment, perhaps not. However, CSS is starting to replace some of the functionality of JavaScript event handlers. I hope this article will contribute to moving towards this goal. After all, as a creative person, I love using the wrong tools to create something considered impossible—it's a challenge I can't ignore. I had a hunch that this would work, and it came true.
This article will offer you an interactive and hopefully inspiring experience. Happy reading! (At least you can scroll down to see the cool GIFs)
Idea
On October 6, 2023, I became aware of a revolutionary feature in CSS – animations activated by scrollingthanks to the detailed article from Bramus. Late in the evening I recorded the following thought for myself on WhatsApp:

You can feel the excitement through all the typos, incorrect punctuation, dropped articles and missing prepositions. Is it possible to create a swipe detection function without using JavaScript? This idea evolved into the HTML and CSS game you see today. Try it in action, then come back to see how I did it:
To create the original CSS background, resources generated by AIand the musical accompaniment is taken from Pixabay.
Functional scroll-timeline supported by browsers based on the Blink/Chromium engine, such as Chrome and Edge for desktop computers and Chrome for Android. iPhone users should know that Chrome for iOS is essentially Safari with a different interface, so for the best experience, it's recommended to use Chrome on the MacBook you probably have.
Creating a game with a swipe function
This process involved many steps: testing prototypes, adapting, refactoring, and developing completely new CSS techniques that you may not have encountered before (and which may take you into the depths of research).
Please note that during the development of this game I was not familiar with trick, allowing you to change the state space. Consequently, all game logic is based on the use of CSS properties that take numeric values. So, I could adjust the duration of the animation, but not control its playback state.
Are we swiping or scrolling?
Our approach is based on using CSS scrolling properties in combination with an experimental feature scroll-timeline. However, when it comes to touch devices and trackpads, the key control is the swipe, hence the name – swipe detection. I designed this game to use swiping as the primary control method, with alternate controls via the mouse scroll wheel. If your mouse has horizontal scrolling capability, be sure to enable the mouse control option on the Desert Racer main screen.


Main challenges (testing ideas)
Initiating animation-driven two-way scrolling
The first step was to test the ability to control the timing of the animation by scrolling in both directions. I was initially confused by the property definition scroll-timeline-axissince it only supported unidirectional values (x, y, block And inline) to get around this limitation, I used two scrollable containers, each handling a different axis. This method is still relevant for mobile devices, as it limits movement and prevents unwanted horizontal movement when swiping vertically.
Halfway through the project, I discovered an elegant solution from Bramus to create bidirectional interaction using a single element: scroll time intervals separated by commas. This became obvious only after getting acquainted with it, because I had not previously taken into account that the new CSS property could support comma delimitation.
Return to the center
What makes this technique different from traditional scrolling-driven animation is two things: intent and repeatability.
Intent: Our goal is not to animate content using scrolling, but to recognize the swipe gesture. The DOM remains static, only the values change
--xAnd--y.Repeatability: thanks to the return to the starting position, we can repeat the swipe gesture as many times as necessary. We don't need a scroll block that returns to the beginning after every interaction; instead, what we care about is the ability to re-swipe.
Adam Argyle also combined scroll-based animation with frozen scrolling, mimicking the “swipe down to refresh” gesture on mobile devices in its work. Deserves admiration!
The main trick
We use two separate scrolling time ranges to control changes along the horizontal and vertical axes. For these ranges to work, the content needs to be larger than the scrollable container – this is a standard expectation. Depending on the goals of your game, you can use any size grid (though 3×3 is recommended). We also have the option to choose whether to return the element to its original position after interaction. In Desert Racer, for example, the jump axis (vertical y-axis) results in a return to the ground, while changing tracks (horizontal movement) does not result in a return to the starting position. We can also use Houdini's @property declaration to achieve interpolated values between 0 and 1, allowing the swipe to be noticeable even with slight movement. This makes it possible to create a variety of movements, for example, drawing circles.
You can use the settings to experiment with different swipe-sensitive configurations:
The settings menu was also written in pure CSS because “why not?”
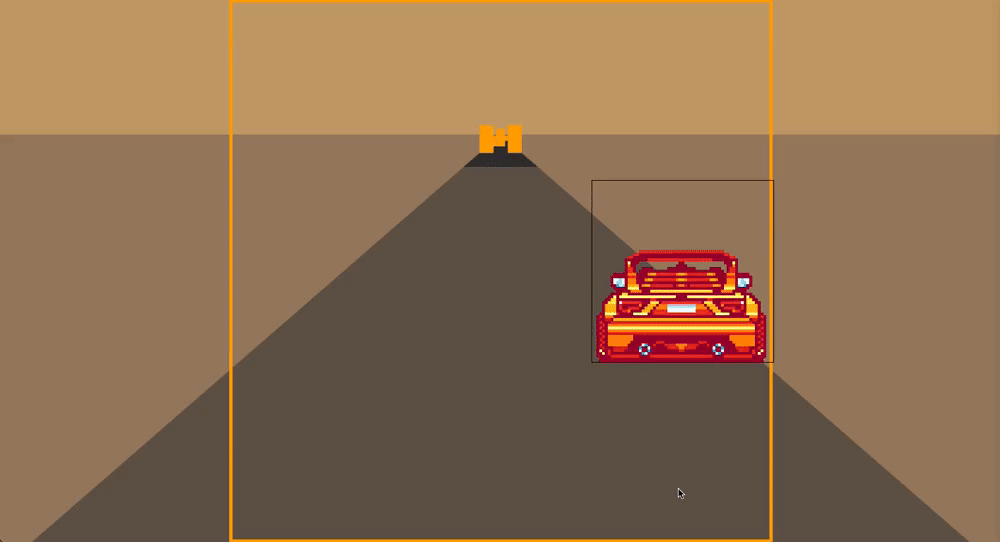
Collision detection
To detect collisions, I check if the current cell containing the vehicle matches the cell containing the obstacle.--collision-on-cell-4: calc(var(--vehicle-on-cell-4) * var(--obstacle-on-cell-4))
Step by step process:
Determining the current position of the vehicle by converting swipe coordinates --x And --y into the corresponding grid cells.
--cell-pattern-n represents --vehicle-on-cell-n. For example, if our swipe coordinates (-1, 0):
--vehicle-on-cell-4: 1;Arrange obstacles on a 3×3 grid. As an example, if you need to place a tree to the left of the road:
   --obstacle-on-cell-1: 1;
   --obstacle-on-cell-4: 1;
   --obstacle-on-cell-7: 1;
Collision detection when the current cell is also occupied by an obstacle:
--collision-on-cell-4: calc(
     var(--vehicle-on-cell-4) * var(--obstacle-on-cell-4)
   );
This logic can be seen in action below:
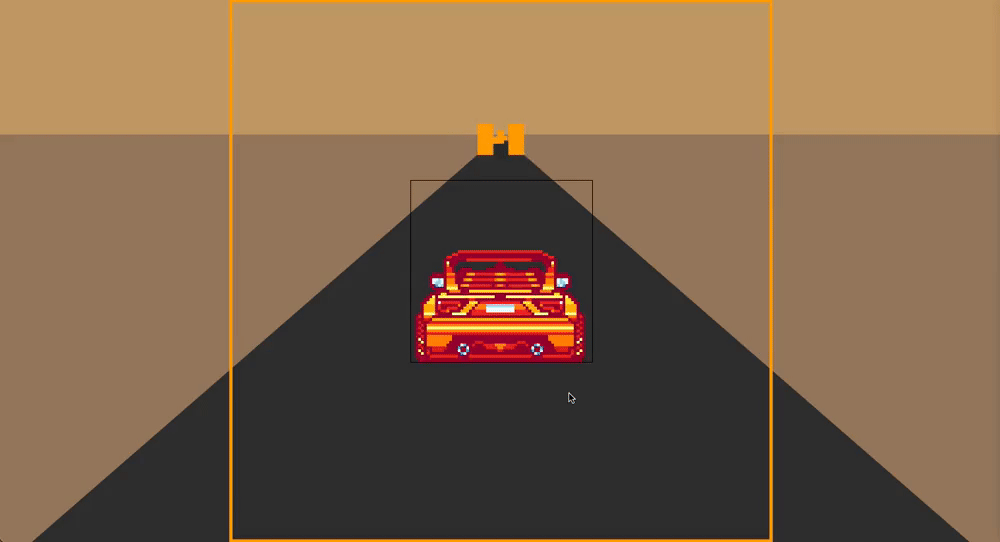
Animating a collision map over time
Start value animation --obstacle-on-cell-kWhere k takes values from 1 before 9.
To make things easier for myself, I created the animation in a declarative way using .SCSS.
$OBSTACLES: {
  (),
  (),
  (("tree", 1), ("tree-arch", 3)),
  (("tree-arch", 1), ("tree", 2), ("tree-arch", 3)),
  (),
  (),
  (("arch", 1), ("arch", 3)),
  (("rock", 1), ("rock", 3)),
  (("arch", 1), ("rock", 2), ("arch", 3)),
  (),
  (),
}
Each element corresponds to a specific animation keyframe.
Below you can see the animation sequence of obstacles in time:
The blue layer is to indicate obstacles and the red layer is to indicate collisions.
The transparent road provides the ability to see the location of underground obstacles designed to block the path.
Immediate termination of the game after any collision
I check each cell for collision and write the results to variables --collision-on-cell-kWhere k can take values from 1 before 9. If the total of all potential collisions is greater than zero, that means a collision has occurred!
Now we face our most difficult task.
When the animation moves to the next keyframe, the collision marks disappear. So how do you save the collision state? Given that I can't control non-numeric CSS properties, I can't just set the value animation-play-state on paused. Changing the animation duration using animation-duration: calc(var(--virtually-infinite) * 1s) also affects the current animation. (For example, if an animation is at 50% of its progress and I suddenly increase its duration by 10 times, then the overall progress of the animation will decrease to 5%).
What have I done?
I instantly bring up the “Game Over” screen and set its display time to 31.7 years! This means that unless you're willing to wait that long, the “Game Over” screen will be treated as a permanent state.
Code:
:root {
  --virtually-infinite: 1000000000s; // 31.7 years
}

.game-over {
  background: black;
  bottom: calc(var(--zero-collisions) * 200lvh);
  transition: bottom calc(
      var(--zero-collisions) * var(--virtually-infinite) + 1ms
    ) linear;
  z-index: 100;
}
At the moment when the variable --zero-collisions takes on the value 0the lower bound is set to 0and the transition time is only 1 миллисекунду. As a result, the trap is activated and falls. After that --zero-collisions returns to value 1, however, it takes as much as 31.7 years to restore the trap to its original position. If --zero-collisions resets to 0 in the background due to a repeated collision, we will not notice this, since the trap is already in the triggered state.
Recording victory
The process turned out to be simple. At the end of the round I assign to the variable --you-win meaning true. The victory screen appears on top of various “Game Over” screens and remains at the top.
@keyframes move-obstacles {
  // ...

  99.999% {
    --you-win: 0;
  }
  100% {
    --you-win: 1; // last keyframe
  }
}

.victory {
  transition: opacity 250ms ease-out;
  bottom: calc((1 - var(--you-win)) * 200lvh);
  opacity: calc(0.875 * var(--you-win));
  z-index: 99;
}
Carefully optimized UX on mobile devices with a priority on swipe functionality
Disable built-in swipe navigation.
As soon as you start developing a mobile web interface, focusing on swipes, you immediately come across the fact that the browser by default uses swipes for various functions: navigation between pages with a horizontal swipe, refreshing a page with a vertical swipe down, hiding or showing the address bar, and zooming pinch.
Here's how to prevent these actions:
html,
body {
  overscroll-behavior: contain;
}
Using the “contain” value blocks the browser's built-in navigation features, such as vertical page refreshes with a “pull down” gesture and navigation between pages using horizontal swipes.
Correction for layout changes due to vertical swipe
Vertical swipes cause the address bar to appear and disappear, which affects the size of the displayed interface.
Solution: Pin layout elements to the bottom of the visible screen:
.container {
  position: relative; // or absolute;
  height: 100lvh;
}

.game-view {
  position: absolute;
  height: 100svh;
  bottom: 0;
}
Lock zoom with two fingers
<meta
  name="viewport"
  content="width=device-width, initial-scale=1.0, maximum-scale=1.0, user-scalable=no"
/>
.view {
touch-action: pan-x pan-y;
}Secondary obstacles
Managing the loading of large CSS files
To effectively work with large CSS files, I used the MPA (multi-page application) approach, which involves loading a separate CSS file for each page. This allowed me to add new levels to the game without increasing the size of a single CSS file. However, when moving between pages, there was a problem with saving state, since the use of flags was not possible. I found a solution to save state via URL parameters and use a CSS selector :target:
body:has(
    :is(
        #color-1:target,
        #color-1--lowres:target,
        #color-1--mouse:target,
        #color-1--lowres--mouse:target,
        #color-1--muted:target,
        #color-1--lowres--muted:target,
        #color-1--mouse--muted:target,
        #color-1--lowres--mouse--muted:target
      )
  ) {
  --car-color: 1;

  .dynamic-link:nth-of-type(1) {
    display: inline-block;
  }
}
Animate up to 126 obstacles simultaneously in 3D
In fact, I don't animate all 126 obstacles in 3D space at once because it's too resource intensive for the GPU. Instead, I use a visual trick: all obstacles are initially hidden and located at a fixed distance. They are then animated towards the screen at different delay intervals animation-delay. As a result, only a few dozen obstacles are actively animated at any given time.
Additional techniques
Using Type Properties will-animate, contain: strict, backface-visibility: hidden also helps, but this is beyond the scope of this discussion.
Automatically play sounds
Automatic playback of sounds is achieved by inserting tags <audio> with attribute autoplay into HTML documents, while the elements themselves are hidden using CSS. To provide a mute option, you can create a separate version of the HTML document where the tags <audio> are missing.
Saving state between page transitions
Storing data such as the selected car color and game settings is done by including it in the URL and then extracting it using a CSS selector :target. However, to control the sound, I used a method of rendering pages with or without tags <audio>because without JavaScript there is no way to turn the sound on or off directly.
Lessons learned from experience
It's amazing how much you can achieve using modern CSS math and logic capabilities. GrahamTheDev is a clear confirmation of this!
One important lessonThe one I'd like to highlight is: keep CSS variables without specifying units until you actually need them in your code. I'm not the only one who notes this, but this rule deserves special attention.
width: calc(var(--complex-logic) * 1vw);Acknowledgments
I would like to express my gratitude to several developers whose educational materials had an invaluable impact on the implementation of this project.
Gratitude Brahmus
for his exquisite tutorials on scroll-driven animations.
for his techniques for setting up smooth, scroll-controlled, two-way animations.
Gratitude Jamie Coulter
Gratitude Amy Kaepernick
Gratitude Kevin Powell
.bento-box {
     grid-template-columns: [header-start display-start] 4fr [display-end share-start actions-start specs-start] 3fr [header-end share-end config-start] 1fr [config-end actions-end specs-end];
     grid-template-rows: [header-start config-start] 1fr [header-end display-start share-start] 0.75fr [config-end share-end actions-start] 1fr [actions-end specs-start] 1.5fr [display-end specs-end];
   }

   @media screen and (max-width: 1300px) {
     .bento-box {
       grid-template-columns: [header-start config-start display-start] 3.25fr [config-end display-end actions-start specs-start share-start] 3.875fr [header-end display-end actions-end specs-end share-end];
       grid-template-rows: [header-start] 0.875fr [header-end config-start actions-start] 0.625fr [config-end display-start] 0.125fr [actions-end specs-start] 1.5fr [specs-end share-start] 1fr [display-end share-end];
     }
   }

   @media screen and (max-width: 1000px) {
     .bento-box {
       grid-template-columns: [header-start config-start display-start specs-start] 2.75fr [config-end display-end specs-end actions-start share-start] 1.5fr [header-end actions-end share-end];
       grid-template-rows: [header-start] 1.125fr [header-end config-start actions-start] 0.75fr [config-end display-start] 2fr [actions-end share-start] 2fr [display-end specs-start] 2.5fr [share-end specs-end];
     }
   }
I express my gratitude to the game LEGO® Friends Heartlake Rush for the inspiration I took from its UI and gameplay!
Authorship and tools
Resource Design and User Interface
The earth and sky were created as CSS art warkentien2.
Road design with errors made in SVG format using Figmaauthorship warkentien2.
All obstacles are designed warkentien2.
Automatically created obstacles are generated AI Art Generator.
Removing the background of images was done using the tool remove.bg based on artificial intelligence.
Conversion of images into pixel art is done through the service Pixelated.
Sprite sheets were created using Pixlr Express.
The vehicle is designed warkentien2.
The generation of vehicle options is done through Recraft.
Background images processed by algorithms remove.bg.
Transforming images into pixel style is guaranteed Pixelated.
Editing details and cropping images is done through PixilArt.
Layout and improvement of visual materials are implemented in Pixlr Express.
Color variations and sprite creation are designed through Pixlr Express.
Dust animation adapted from educational materials Esteban Diaz on Youtube.
Landscape images provided warkentien2.
Man-made landscapes are designed using Recraft.
The initial sketches were made by hand:


Snippets and soundtracks
Homemade – revving – from warkentien2
All phases – driving noises – from warkentien2
Phase 1 – Dark Country Rock – from moodmode
Phase 2 – Western Cowboy – from Music_For_Videos
Phase 3 – Tumbleweed Tango – from moodmode
Phase 4 – Excess Voltage – from moodmode
Phase 5 – Spirit of the Road – from SergePavkinMusic
Phase X – Cowboy Redemption – from Music_Unlimited
Thanks for reading!