Preventing merge conflicts with XcodeGen
Hello, Habr! On the eve of the start of the course “iOS Developer. Professional” prepared for you a traditional translation of useful material. We also invite those who wish to online meeting with the course teacherwhere you can ask the teacher the questions you are interested in about the training.
And finally, we suggest watching the webinar recording “Writing an application in SwiftUI and Combine.”

I – Introduction
In this article, we will look at solution for instant resolution of merge conflicts in a file .xcodeprojwhich is one of the most time-consuming challenges facing iOS and macOS development teams today.

By the end of this article, you will have a work environment that enables conflict-free merging.

II – Before we begin
1. Introduction to XcodeGen
yonaskolb / XcodeGen
XcodeGen Is a console utility written in Swift that generates an Xcode project based on your folder structure and project specification.
For installation XcodeGen we will use Brew… Just run brew install xcodegen in terminal (more installation options and instructions can be found here).

2. Project
Most projects these days are not that simple. They have several configurations, dependencies (provided by third parties or developed as part of a project), scripts that run as part of the build process, CI, etc.
In this guide, you will learn how to set up step by step projectwhich is simple enough to explain the point XcodeGenwhile being complex enough to cover a wide enough range of use cases.
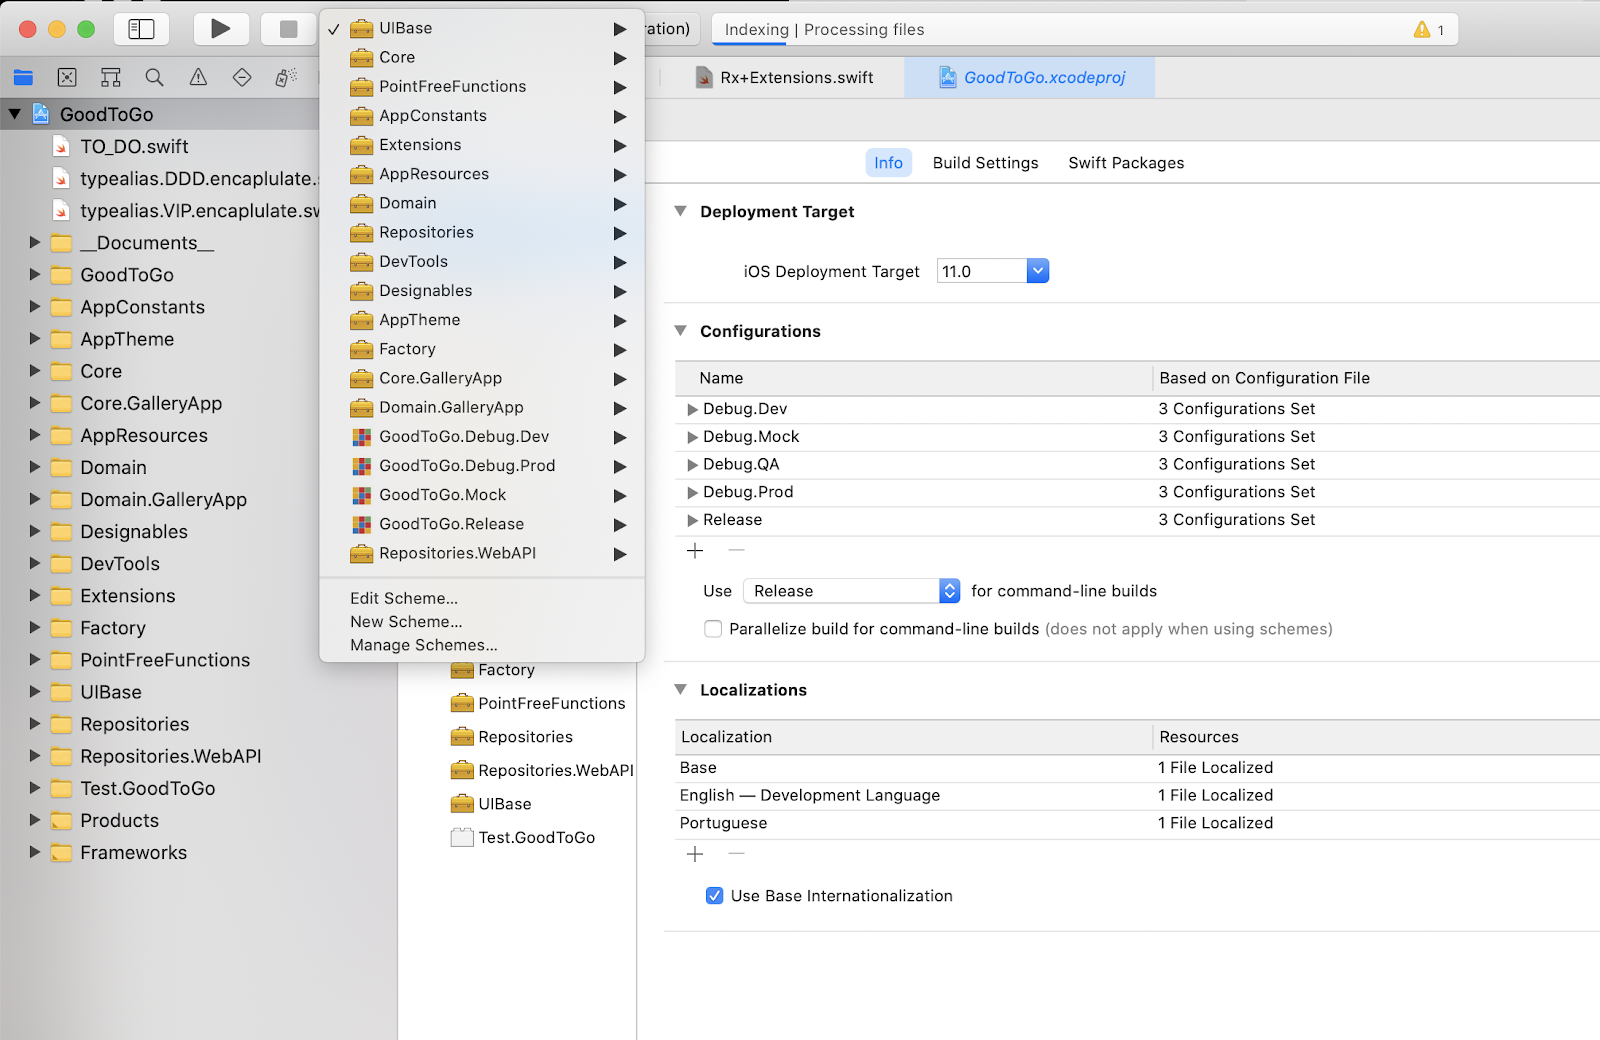
As we can see above, the project contains:
-
Framework Dependencies
-
Carthage-dependencies
-
Schemes and configuration
-
Build scripts

III – Setting

1. Setting up the project
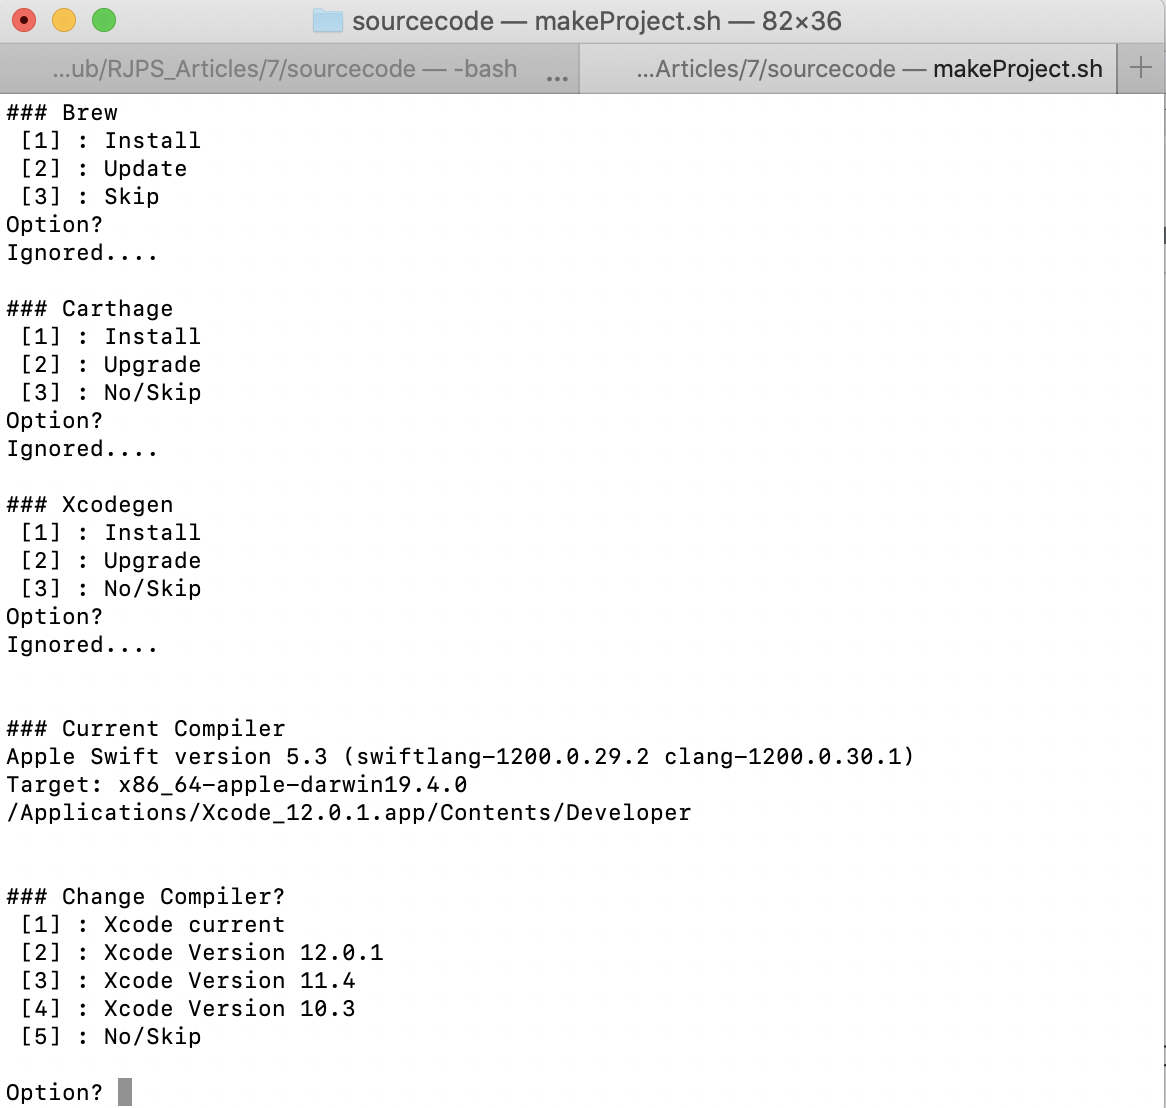
Project (sample project) which we will be using in this tutorial has carthage-dependencies. Just run makeProject.sh in the terminal. This will set up the project with all its dependencies and we can start the tutorial.

2. Creating the specification file of the XcodeGen project
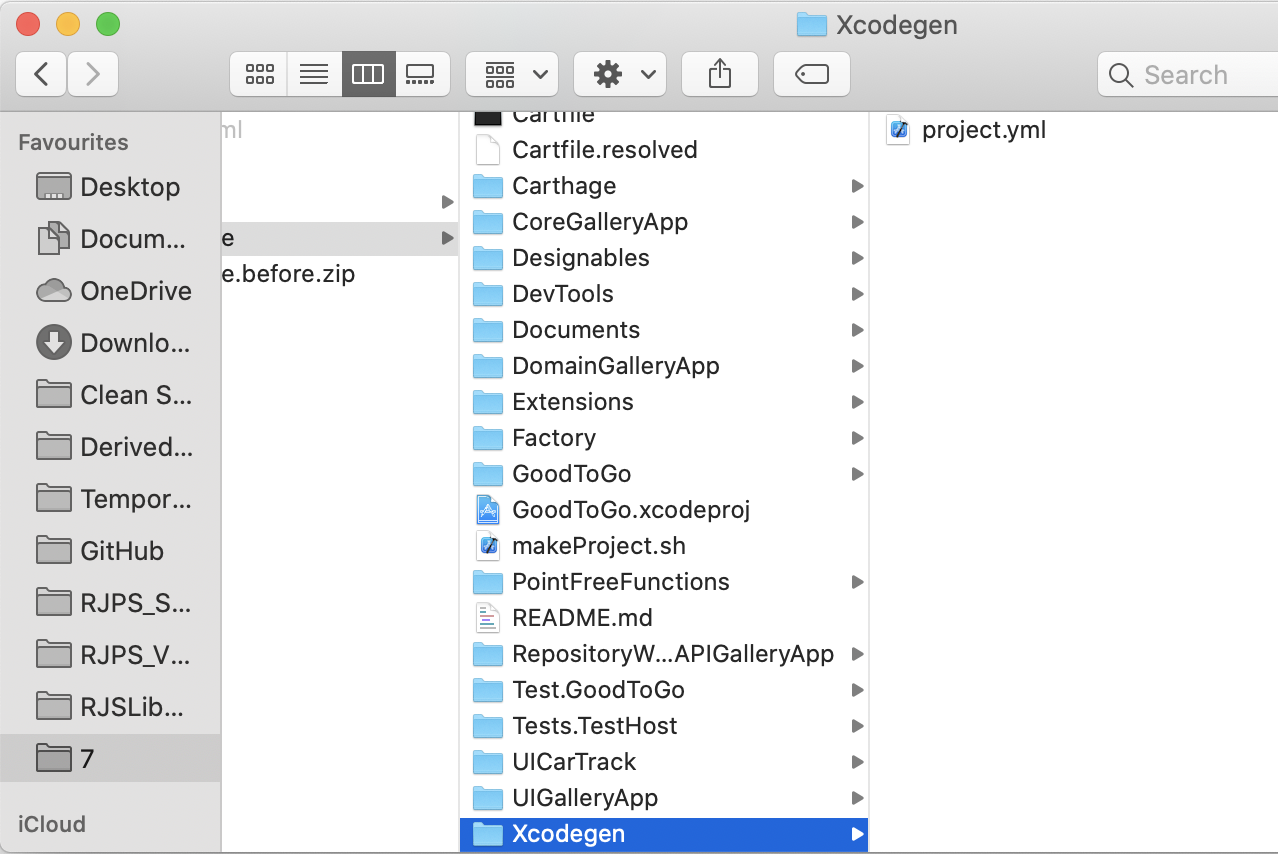
In the root of your project create a folder named XcodeGen (the folder name does not need to be like this) with a file named project.yml (this file name is also optional).
XcodeGen/project.yml: Initial setup:
name: GoodToGo
options:
  bundleIdPrefix: com.GoodToGo
  xcodeVersion: '12.0.1'
  deploymentTarget: '12.0'
  groupSortPosition: top
  generateEmptyDirectories: true
  findCarthageFrameworks: true
  minimumXcodeGenVersion: '2.18.0'
During our initial setup for the file .xcodeproj we choose name – GoodToGo -, package prefix – com.GoodToGo -, Xcode version, deployment target …

3. Starting XcodeGen for the first time
Using the above configuration, we can create our new project by running xcodegen -s ./XcodeGen/project.yml -p ./ in the terminal.
note that ./XcodeGen/project.yml Is the path to our project specification file. If you choose a different folder / file name, you will also need to correct them here.
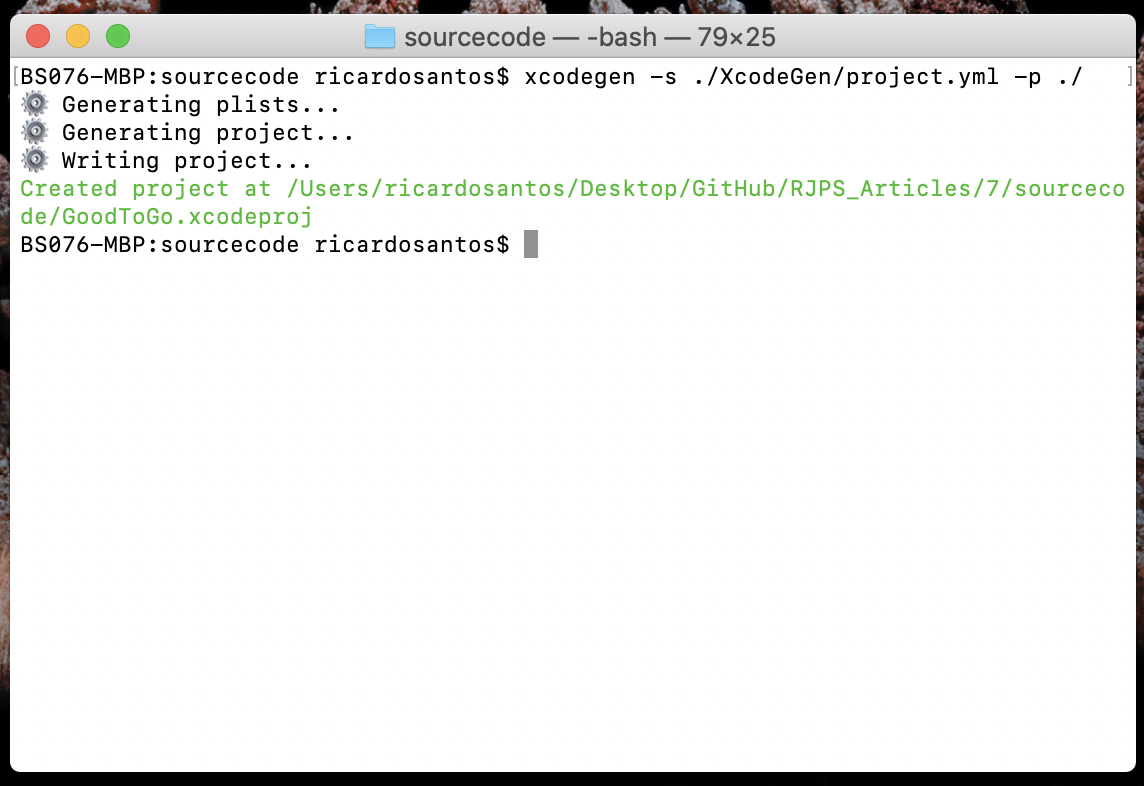
A green message indicates that the project has been created. Hooray, we have successfully created our project!
Now let’s open it up and see what it looks like:

Not what we expected … All our schemas are missing, all frameworks, everything. They are missing because we did not define them in our project.yml file.

4. Adding configurations and the main target of the project
XcodeGen/project.yml: Adding configurations. Just add this to your file project.yml:
configs:
  Debug.Dev: debug
  Debug.Prod: debug
  Release: release

targets:
  GoodToGo:
    type: application
    platform: iOS
    deploymentTarget: 12.0
    settings:
      base:
        MARKETING_VERSION: 1.0
    sources:
       - path: ../GoodToGo
Basically, we are creating 3 configurations – Debug.Dev, Debug.Prod and Release, and declare that the main target of our application will be called GoodToGo, with target platform iOS 12 (minimum version) and the source files are in the folder GoodToGo…
The folder must exist in the system folders, otherwise you will get the following error:
Spec validation error: Target “GoodToGo” has a missing source directory
“/Users/ricardosantos/Desktop/GitHub/RJPS_Articles/7/sourcecode/THE_FOLDER_THAT_DOES_NOT_EXISTS_NAME”
Try again with our updated configuration (previous image) and …

… now we have (previous image) schemas, configurations and application target!

5. Adding frameworks
The next thing we need to do is add the dependencies of our frameworks. For each of them, we need to select the platform, type, target and other parameters.
We know from the beginning that usually all frameworks have the same settings, so we’ll create a template and name it Framework.
Below you can see a simple template that we will refer to in our main project.yml file and then where needed.
XcodeGen/project.yml: Create a template:
targetTemplates:
  Framework:
    type: framework
    platform: iOS
    deploymentTarget: 11.0
    settings:
      base:
        MARKETING_VERSION: 1.0
This template states that all targets will have the following conditions:
-
a type framework,
-
platform iOS,
-
version 1.0,
-
a target platform for deployment equal to or higher than iOS 11.0…
In our sample project, we had the following framework dependencies (see below).

We’ll add a couple of things to test: AppTheme and AppResources.
Starting with our project.yml file in the targets section, we will add 2 new entries (AppTheme and AppResources). For these targets, we have to define the source folder and template name as explained in the previous step.
 AppTheme:
    templates:
      - Framework
    sources:
      - path: ../AppTheme
  AppResources:
    templates:
      - Framework
    sources:
- path: ../AppResourcesXcodeGen/project.yml: Adding Targets Using a Template

Let’s try again with our updated configuration (previous image) and …

… we now have the main target of our application and the 2 dependencies that we just added to our spec file.
Small summary: target section in our project.yml should look like this:
targets:
  GoodToGo:
    type: application
    platform: iOS
    deploymentTarget: 12.0
    settings:
      base:
        MARKETING_VERSION: 1.0
    sources:
       - path: ../GoodToGo
  AppTheme:
    templates:
      - Framework
    sources:
      - path: ../AppTheme
  AppResources:
    templates:
      - Framework
    sources:
      - path: ../AppResources
To complete the configuration, we need to add the rest of the frameworks, after which our file project.yml should look like this:
name: GoodToGo

## options section ##

options:
  bundleIdPrefix: com.GoodToGo
  xcodeVersion: '12.0.1'
  deploymentTarget: '12.0'
  groupSortPosition: top
  generateEmptyDirectories: true
  findCarthageFrameworks: true
  minimumXcodeGenVersion: '2.18.0'

## configs section ##

configs:
  Debug.Dev: debug
  Debug.Prod: debug
  Release: release

## targetTemplates section ##

targetTemplates:
  Framework:
    type: framework
    platform: iOS
    deploymentTarget: 11.0
    settings:
      base:
        MARKETING_VERSION: 1.0

## targets section ##

targets:
  GoodToGo:
    type: application
    platform: iOS
    deploymentTarget: 11.0
    settings:
      base:
        MARKETING_VERSION: 1.0
    sources:
       - path: ../GoodToGo
  AppTheme:
    templates:
      - Framework
    sources:
      - path: ../AppTheme
  AppResources:
    templates:
      - Framework
    sources:
      - path: ../AppResources
  AppConstants:
    templates:
      - Framework
    sources:
      - path: ../AppConstants
  Core:
    templates:
      - Framework
    sources:
      - path: ../Core
  Core.GalleryApp:
    templates:
      - Framework
    sources:
      - path: ../Core.GalleryApp
  Domain:
    templates:
      - Framework
    sources:
      - path: ../Domain
  Core.GalleryApp:
    templates:
      - Framework
    sources:
      - path: ../Core.GalleryApp
  Designables:
    templates:
      - Framework
    sources:
      - path: ../Designables
  DevTools:
    templates:
      - Framework
    sources:
      - path: ../DevTools
  Extensions:
    templates:
      - Framework
    sources:
      - path: ../Extensions
  Factory:
    templates:
      - Framework
    sources:
      - path: ../Factory
  PointFreeFunctions:
    templates:
      - Framework
    sources:
      - path: ../PointFreeFunctions
  Repositories:
    templates:
      - Framework
    sources:
      - path: ../Repositories
  Repositories.WebAPI:
    templates:
      - Framework
    sources:
      - path: ../Repositories.WebAPI
  UIBase:
    templates:
      - Framework
    sources:
      - path: ../UIBase

  Test.GoodToGo:
    type: bundle.unit-test
    platform: iOS
    sources:
       - path: ../Test.GoodToGo
scheme: {}XcodeGen/project.yml: Full configuration (for now)

At this point, after launching XcodeGen, we should have a project with all the frameworks!

When setting things like this, we always run into some bumps on the road. One of them is the missing link to the file .plist… This can be corrected in 2 ways: the first is to specify in project.yml file path .plistand the second option is to rename GoodToGo-info.plist in Info.plist.

6. Pulling up the framework dependencies
At this point, we have the basic project configuration, schematics and our frameworks. It’s time to pull up our dependencies and successfully compile our project.
For example, we noticed that Domain depends on RxCocoa and RxSwift, and these dependencies are resolved with carthage…

First, we need to find a target Domain in our file project.yml…XcodeGen/project.yml: Target Domain without dependencies:
  Domain:
    templates:
      - Framework
    sources:
      - path: ../Domain
… and then add the missing (carthage) dependencies. It’s that simple!XcodeGen / project.yml: Domain target with dependencies:
Domain:
    templates:
      - Framework
    sources:
      - path: ../Domain
    dependencies:
      - carthage: RxSwift
      - carthage: RxCocoa
To add dependencies we have several options, but in our project we use only 3:
-
Add to carthage-dependence,
-
Add project dependency with link (link: true),
-
Add project dependency without linking (link: false).
XcodeGen/project.yml: An example of three options for dependencies (carthage, with and without binding):
 dependencies:
      - carthage: RxSwift
      - carthage: RxCocoa
      - target: BaseUI
        link: false
      - target: DevTools
        link: true
      - target: UICarTrack
        link: false
You can read more about adding dependencies here…
It’s time to tighten up all the dependencies in our project, and in general everything is ready! “Overall” is just a way of saying that this task is probably the most time consuming. it consists of a cycle:
-
1. Creation
.xcodeprojectand its discovery,
-
2. Compilation of the project and definition of missing dependencies,
-
3. Adding missing dependencies to
project.yml,
-
4. Return to step 1.

7. Optional: build scripts
In the original project, we had several build scripts (as we can see in the image below):

We can achieve the same result by adding a child postCompileScript…
GoodToGo:
    type: application
    platform: iOS
    deploymentTarget: 12.0
    settings:
      base:
        MARKETING_VERSION: 1.0
    sources:
       - path: ../GoodToGo
    dependencies:
       ...
    postCompileScripts:
      - script: |
                if which swiftlint >/dev/null; then
                   swiftlint
                else
                   echo "warning: SwiftLint not installed, download from https://github.com/realm/SwiftLint"
                fi
        name: Run SwiftLint
8. Optional: Documents folder
We can also add a folder Documents… Files inside this folder will not be added to any target and therefore will not be processed as part of the build. Just add the path to your documents folder to the section fileGroups (more about fileGroups here).
fileGroups:
  - ../Documents

IV – Summary
-
We have added some project configurations (more here)
-
We have added all the targets we need
-
We tightened the dependencies of our targets (more here)
-
We have added a folder with documents (more here)
-
We have added build scripts
1. Problems you may face when setting up a project for the first time: Lost files

Sometimes this can happen to each of us. When removing some old / obsolete files from the project, we choose the option Remove Reference instead of moving the file to the trash. These files will appear again when we use XcodeGen (remember that all files inside the folder will be added to the target). If you really want to keep these files, put them in the folder Documents…

2. Problems you may face when setting up a project for the first time: Different files within folders
Sometimes there are different files inside our target folders. Again, remember that all files inside the target folder will be added to the target and therefore compiled. You can avoid this by placing these files in a folder Documents…

V – Links
-
The project before conversion can be found here…
-
The final project code can be found here…
-
The final project.yml can be found here…
-
More examples of similar projects can be found here…
Learn more about the course “iOS Developer. Professional”…
Watch the webinar recording “Writing an application in SwiftUI and Combine.”
