NTW3 Example Explanation
So, I completely changed the way the website development process works.
To begin with, there should be an ntw3 script file in the project root index.*where instead * must be any of the script extensions ntw3
Among them: ntws, nts, nws, ntw3, ns
So, it must declare paths and classes for site elements. Here is an example of such a file:

I'll explain it line by line:
line 1: import another script file where classes for interface elements are located
line 3: import the main page and link to the name main_page
line 5: declaring the root path and linking to the page main_page
Somewhat reminiscent of the code for templating engines in Python with their decorators, huh?)
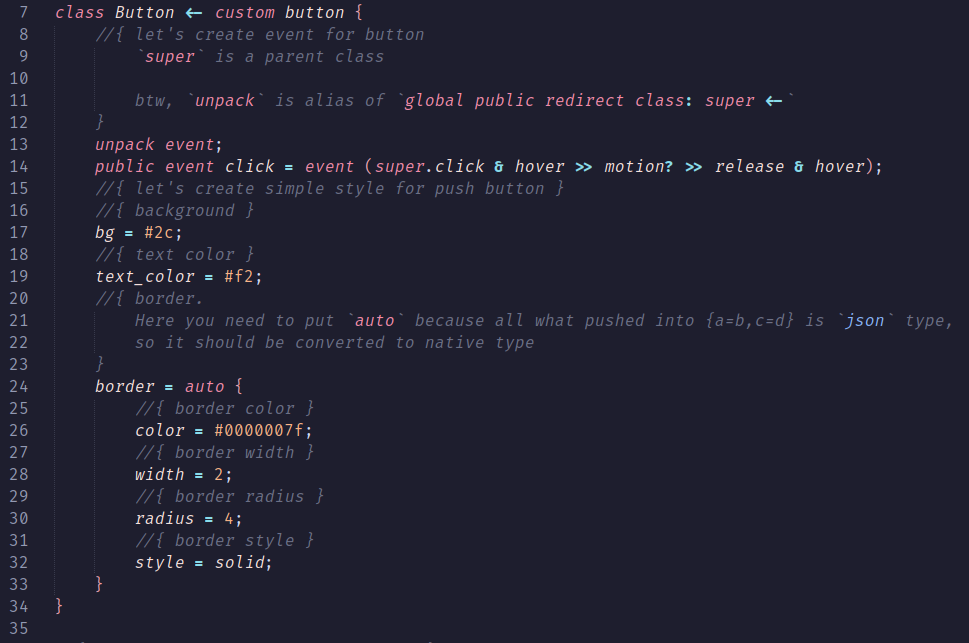
So, let's move on. Classes for interface elements. This is where everything takes on a basic meaning. they can contain styles, code, and even markup. For example, here is the code for a button in a dark theme:

I'll explain it line by line:
line 7: creating a class Buttonto which the built-in type is linked buttonso that it cannot be applied to another type. This is more necessary for the programmer’s self-control, because if he links this class to the wrong type, everything can break. This is not necessary, you can simply write class Button { ..., но это может усложнить код и отладку в будущем.
so, everything contained in //{ … } is just a comment. inside them you can use code highlighting by enclosing it in an odd number of ` characters.
line 13: unpacking all names from superwhich have type event. This is convenient because you don’t have to write further in the class body super.and write the attribute name right away.
line 14: linking to an event called click more complex event. in brackets is a scenario in which the event can be considered activated. symbol & requires simultaneous execution of previously known events, symbol >> the transition to the next stage is announced with the symbol ? explains that the condition is optional. in the future this system will be more developed.
lines 17 & 19: applying styles
lines 24-34: applying a “complex style” – a style consisting of many elements. why here auto? in order to bring json-component to native type $__backgroundStyle$inherit_from_parent_allowed. Such types are not available by name, this is how it is intended, and there are a huge number of such types. Explanation about json-components: This is also a hidden type that applies to all dictionaries (I hope there is no need to explain what it is)
So, what if I want to make a beautiful switcher, like in Android, for example? Let's say we have on and off state sprites. Then the code will look like this:

There are already a lot of possibilities opening up here. Using private you can indicate that the attribute is not available outside the class body. next comes the attribute type, and then the name. What doesn’t need to be explained further is intuitively clear. Methods are also declared intuitively. new is a special method that is called when a class is initialized, for each instance separately. then lines 78-85 come, this is where the juice comes in: link binds the handler to anything that can be “triggered” (from the English raise), be it an exception, an event, or anything else that has a method raise. anonfn this is an alias over a more complex construct that creates an anonymous function (yes, you can’t just do it like that 🙂), the function declaration looks like a cross between Honey and C. exists checks the name for availability or existence, this is clear. then comes the left arrow (part of the syntax for link) and what can be provoked.
Lastly, we want a red button. This can be changed in the markup, but why not make it a separate class to look at inheritance in more detail? So here's the code:

Well, there’s not much to explain here except the words global in line 90. No, it is not analogous public in the same place in C++. It only says that if there is some block with a class RedButtonthen it is assigned a class Button (This may be useful in the future for class selection)
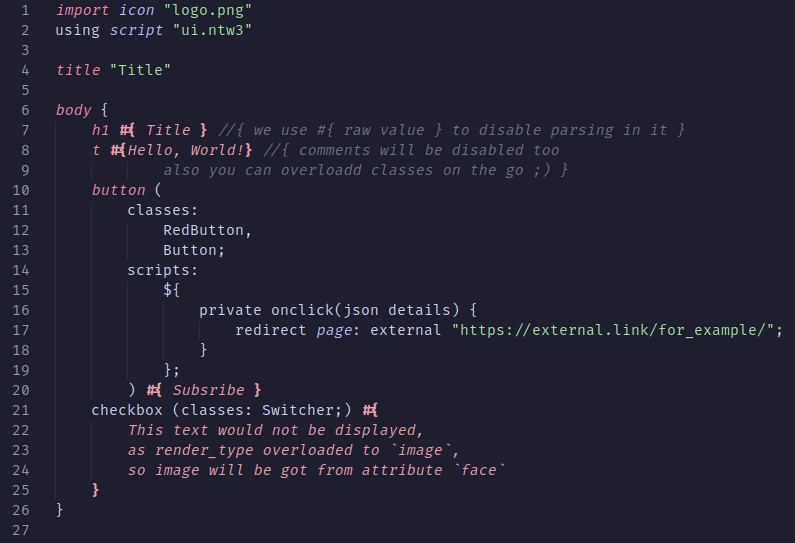
So we sorted out the script part. now to the file pages/index.nml!
Here is his code:

Almost everything is clear here, except for a few unintuitive moments
line 2: this simply gives a hint to the compiler that if this page is used, then the script should be loaded automatically ui.ntw3.
lines 11-19:
lines 11-13: here the classes to which the block belongs are declared (yes, these are no longer tags 🙂). It is not necessary to write a second class, because we wrote global in ui.ntw3.
lines 14-19: scripts are listed here (can be either inline or imported and attached to a name), the contents of the inline script must be surrounded
${ ... }. The content of the code in the example itself is intuitive.
I apologize in advance for the ugly lighting in many places, I just haven’t finished it yet 😀
I tried very hard to make everything clear, but if you have any questions, you can always ask them in the comments to the post.


