modular approach to iOS application development
Disclaimer: I don’t claim that this approach is ideal, I just want to share what works great for us and give others the opportunity to use their work. I know about TCA and MVVM, but they weren’t suitable for us due to insufficient flexibility.
Part 1. Theory
SwiftUI + VIPER is a refined architectural pattern for application development that provides a clean, modular and easily testable structure. In this article we will look at how the SwiftUI + VIPER architecture works and how to create applications, modules and services based on it.
Basic principles of the SwiftUI VIPER architecture
VIPER is an acronym that stands for View, Interactor, Presenter, Entity and Router. Each of these parts performs specific functions within the application structure. The slight complication here is that to use this with SwiftUI we need to add a thing called – ViewState and slightly modify the existing VIPER concepts.
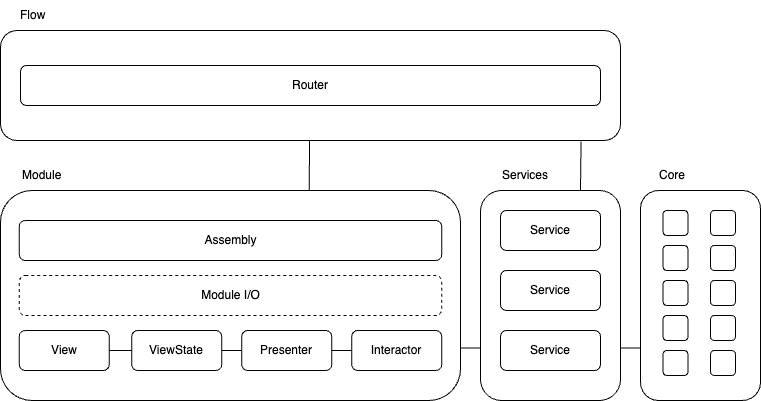
For clarity, I’ll show you the diagram right away, don’t be alarmed, we’ll look at everything in detail below.

Next, I will explain what role each part of the module plays, immediately showing the source codes for better understanding. For knowledgeable people, the main thing to understand here is why we need ViewState and View and how they help us, the rest can be skipped.
View – is responsible for displaying data to the user and interacting with him. Processes user input and passes it to the presenter for processing. When writing code for SUI, you may think of it as Storyboard and nothing else. Here we set up the Layout, paint the elements and bind our View to the display data.
struct MainView: View {
  var viewState: MainViewState

  var body: some View {
        Text("Hello iOS")
  }
}
ViewState is an abstraction that represents state for a View. It contains the data necessary to display the current state of the interface and handle events from the user. For simplicity, we can draw an analogy with ViewController. For example, here we can react to changes in input fields, or set animations. It also contains a presenter to transmit and receive some data changes.
final class MainViewState: ObservableObject, MainViewStateProtocol{
  private let id = UUID()
  private var presenter: MainPresenterProtocol?
}
Presenter – is responsible for processing data from the interactor and preparing it for display on the screen. Also controls the interaction between the interactor and the view.
final class MainPresenter: MainPresenterProtocol {
  private let router: MainRouterProtocol
  private let viewState: MainViewStateProtocol
  private let interactor: MainInteractorProtocol

  init(router: MainRouterProtocol, interactor: MainInteractorProtocol, viewState: MainViewStateProtocol) {
      self.router = router
      self.interactor = interactor
      self.viewState = viewState
  }
}
Entity – represents the data objects used in the application. Usually these are simple data structures without methods, containing only properties; here we will do without source codes, since I believe that Viper is the architecture that not exactly beginners come to.
Router – is responsible for navigation between application screens. Please note that we pass a service to the initializer, which will be responsible for the global navigation state.
final class MainRouter: MainRouterProtocol {
  let navigation: any NavigationServiceType

  init(navigation: any NavigationServiceType){
      self.navigation = navigation
  }
}
Assembly – This is the module assembler, responsible for creating all the necessary dependencies and initializing the module itself.
final class MainAssembly: Assembly {
  func build() -> some View {
      // Создаем необходимые компоненты модуля
      let navigation = container.resolve(NavigationAssembly.self).build()
      let router = MainRouter(navigation: navigation)
      let interactor = MainInteractor()
      let viewState = MainViewState()
      let presenter = MainPresenter(router: router, interactor: interactor, viewState: viewState)
      viewState.set(with: presenter)
      let view = MainView(viewState: viewState)
      return view
}
Great, we looked at the Viper module itself, but it won’t start without navigation; in our solution it is implemented through a service and will be presented here in a simplified but working form.
Services (SOA), using the example of NavigationService
Services are independent components that can be used by different application modules. They simplify code organization and enable reusability of functionality.
Here, as in the previous part, I will give a description of each part of the service and immediately give an example of code.
Views – this is the enumeration that we will use in our navigation service to understand which module is currently on the stack. In order for SwiftUI to observe the navigation state, we must mark it as Hashable.
enum Views: Equatable, Hashable {
  case main
}
Protocol – describes the contract for the navigation service. In other words, we will be able to communicate with our service using only the properties and methods described in the protocol. Just above we said that the navigation service will be responsible for the global navigation state, which is why we must subscribe it to an ObservableObject. This way we will inform SUI that a change has occurred in it.
protocol NavigationServiceType: ObservableObject, Identifiable {
    var items:[Views] { get set }
    var modalView: Views? { get set }
    var alert: CustomAlert? { get set }
}
Service – implementation of the service itself, here we must
import SwiftUI

public class NavigationService: NavigationServiceType  {

    public let id = UUID()

    @Published var modalView: Views?
    @Published var items: [Views] = []
    @Published var alert: CustomAlert?
}
Assembly is the service assembler, responsible for creating all the necessary dependencies and initializing the service itself.
final class NavigationAssembly: Assembly {
    //Only one navigation allowed in one app
    static let navigation: any NavigationServiceType = NavigationService()

    func build() -> any NavigationServiceType {
        return NavigationAssembly.navigation
    }
}
Great, now we know how to make modules and services, all we have to do is put it together and we will have a finished application. In order to tie all this logic together, we wrote several helper classes.
Connect and Conquer – everything else we need to make SUI friends with Viper and Services
RootApp – The application root class represents the entry point to your application. It also initializes all the necessary dependencies and sets the ViewBuilder, which will help us manage the creation of the View. Note that here we are binding our navigation service to SwiftUI by passing it as a parameter to the RootView.
@main
class RootApp: App {

    var appViewBuilder: ApplicationViewBuilder
    @ObservedObject var navigationService: NavigationService

    let container: DependencyContainer = {
        let factory = AssemblyFactory()
        let container = DependencyContainer(assemblyFactory: factory)

        // Services
        container.apply(NavigationAssembly.self)

        // Modules
        container.apply(MainAssembly.self)

        return container
    }()

    required init() {
        navigationService = container.resolve(NavigationAssembly.self).build() as! NavigationService
        appViewBuilder = ApplicationViewBuilder(container: container)
    }

    var body: some Scene {
        WindowGroup {
            RootView(navigationService: navigationService,
                     appViewBuilder: appViewBuilder)
        }
    }

}
RootView – root view of the application. It uses NavigationStack to manage navigation between our future pages, which we create using our appViewBuilder module builder.
struct RootView: View {
    @ObservedObject var navigationService: NavigationService
    var appViewBuilder: ApplicationViewBuilder

    var body: some View {
        NavigationStack(path: $navigationService.items) {
            appViewBuilder.build(view: .main)
                .navigationDestination(for: Views.self) { path in
                    switch path {
                    default:
                        fatalError()
                }
              }
        }
    }
}
ApplicationViewBuilder – is responsible for creating View in the application. Simply put, in the build method we should return a method that tells us how the Viper module should be created for a specific page.
@MainActor
final class ApplicationViewBuilder: Assembly {

    required init(container: Container) {
        super.init(container: container)
    }

    @ViewBuilder
    func build(view: Views) -> some View {
        switch view {
        case .main:
            buildMain()
        }
    }

    @ViewBuilder
    fileprivate func buildMain() -> some View {
        container.resolve(MainAssembly.self).build()
    }
}
An unexpected find – The ViewBuilder approach gives us the opportunity to display a preview immediately with initialized dependencies. To do this, we need to implement dependency injection logic into the static ViewBuilder that we will use for Preview. The way container is taken here may look a little scary, but we will use this code only for preview, so don’t worry about making your own static container.
extension ApplicationViewBuilder {

    static var stub: ApplicationViewBuilder {
        return ApplicationViewBuilder(
            container: RootApp().container
        )
    }
}
Using this logic, we can show a preview in this way: (as a bonus, all navigation through the application will work immediately in the preview)
struct MainPreviews: PreviewProvider {
    static var previews: some View {
        ApplicationViewBuilder.stub.build(view: .main)
    }
}
Well, that’s basically all we need to know to start writing an application in SwiftUI using Viper.
Part 2. Create your application using a ready-made template for XCode
To simplify the creation of applications, we have prepared a template that you can download from link.
After installing the template, we can start creating our project, modules and services for it.
Installing a template
You need to download a local copy of the project.
Open a terminal and go to the directory with the template repository.
Run the command in the console:
swift install.swiftAfter all that has been done, you should have a project template and module/service templates in the window for creating new projects (files) in XCode
Creating a Project
To start using the SwiftUI VIPER architecture, you need to create a new project:
Open Xcode.
Select “File” > “New” > “Project” or use the keyboard shortcut “⇧⌘N”.
Select “VIPER Architecture” as the project template.
Click “Next” and enter a project name.
Click “Create” and your project will be created with the basic structure of the VIPER architecture.
Creating a Module
To create a new module in a project, follow these steps:
Open the project in Xcode.
In the project navigator, select the “Modules” folder.
Create a new file by selecting “File” > “New” > “File…” or using the keyboard shortcut “⌘N”.
Select “Module” as the template and provide a name for the module.
After creating the module, remove the link to the module folder in the project navigator, and then bring it back by dragging the folder from the Finder into Xcode.
Add your module to DI Container in the RootApp.swift file
You can now retrieve your module from the container in ApplicationViewBuilder container.resolve(YOUR_NAME_MODULE_Assembly.self).build()
Creation of Services
To create module services, follow these steps:
Open the project in Xcode.
In the project navigator, select the “Services” folder.
Create a new file by selecting “File” > “New” > “File…” or using the keyboard shortcut “⌘N”.
Select “Service” as the template and provide a service name, such as “NetworkService” or “SettingsService”.
After creating the service, remove the link to the service folder in the project navigator, and then bring it back by dragging the folder from Finder into Xcode.
Add your service to DI Container in the RootApp.swift file
Now you can remove your module from a container in any Assembly by writing container.resolve(YOUR_NAME_SERVICE_Assembly.self).build()
Part 3. Results
Now you know that you don’t have to use UIKit to use Viper and SwiftUI. You’ve looked at all the parts of the application and how they are connected, this will allow you to continue to develop this direction with a great place to start. You also have a template for quickly creating projects, modules and services. You also have the ability to create a Preview with the dependencies you need and the ability to switch between screens in the preview window.
What we have achieved:
Using this approach, we have achieved avoidance of UIKit layers in our Viper. In production, we can test not only the application logic, but also the state of the pages after various business scenarios. There is an opportunity to move away from the inconvenient MVVM and the cumbersome and incomprehensible TCA towards something more understandable to developers. And most importantly, more than half of the code base is now shared between projects.
PS – If you liked the article, please support me by giving me a star template repositories.


