Migrating the ribbon, menu and toolbar to nanoCAD. Import CUIX
When moving from one CAD system to another, developed applications and menus need to be transferred to the new system. This article provides a procedure for adapting the ribbon, menus, and toolbars in CUIX format for use on the nanoCAD platform.
There are two main transition options: create a new menu or adapt an existing one. A CUIX file can be used for migration (for example, MyMenu.cuix), which is an archive containing menu options, ribbon and toolbar options, button icons.
The Cuix2Cfg console utility (works without installation on the Windows command line) allows you to extract the toolbar, menus and icons from the CUIX file and creates a new CFG file adapted for nanoCAD. The ribbon (ribbon) remains in the original CUIX file and is read by the platform when loaded.
When using the Cuix2Cfg utility, all icons from the source CUIX file are extracted to a separate folder, and a Visual Studio template is generated for further creation of a resource DLL file with icons. As icons, the utility uses images in ICO, BMP or PNG format.
Migrating ribbons, menus, and toolbars to nanoCAD may include the following steps:
extracting data from CUIX;
connecting menus, ribbons and toolbars;
connection icons.
Retrieving data from CUIX
1. Download the new version of the Cuix2Cfg utility.
Cuix2Cfg included SDK: SDK\samples\Menu\Cuix2Cfg.
2. Prepare the input data – for example, place the existing CUIX file in a separate folder: C:\Import\MyMenu.cuix.
Note. When manually editing a CUIX archive, only standard ZIP archivers should be used, without additional compression and other parameters.
3. Extract data from CUIX file.
Windows command line listing:
C:\SDK\samples\Menu\Cuix2Cfg>Cuix2Cfg.exe C:\Import\MyMenu.cuix
Nanosoft (R) CUIx to CFG converter v1.2
Copyright (C) Nanosoft 2021
Done: MyMenu.cfg
The result of the utility will be located in the folder with the source file:
C:\Import\MyMenu.cfg is a partial menu configuration file that should be connected to nanoCAD.
Note. In older versions of the utility, the resulting partial configuration file has the extension .cfgin new versions – extension .cfgx.
C:\Import\MyMenu_IconLib\*.ico – files with icons;
C:\Import\MyMenu_IconLib\resource.h – Visual Studio project file;
C:\Import\MyMenu_IconLib\IconCollection.rc – Visual Studio project file;
C:\Import\MyMenu_IconLib\IconCollection.vcxproj – Visual Studio project file;
C:\Import\MyMenu_IconLib\IconCollection.sln – Visual Studio project file;
C:\SDK\samples\Menu\Cuix2Cfg\Cuix2Cfg_YYYY-MM-DD_HH-mm-ss.txt – log file containing information about the processing process.
File IconCollection.sln contains a ready project for a resource DLL with icons.
Note. In new versions of the utility, you need to use the ‘-l’ switch to create a Visual Studio project.
The utility supports the operation of keys. If you encounter difficulties (for example, if you cannot connect the ribbon, menu, or toolbars), use the appropriate keys and repeat the procedure.
Keys:
‘-l’ – replaces references to individual icons in CFG with references to the resource DLL. For MyMenu.cuix in CFG the path to MyMenuIconCollection.dll. An icon resource DLL can be prepared using Visual Studio. Starting with version 1.3, this key is required when creating a Visual Studio resource DLL project.
Windows command line listing:
C:\SDK\samples\Menu\Cuix2Cfg>Cuix2Cfg.exe C:\Import\MyMenu.cuix -l
Nanosoft (R) CUIx to CFG converter v1.2
Copyright (C) Nanosoft 2021
Done: MyMenu.cfg
‘-x’ – adds only icons from CUIX to the library. The key is needed in case other icons are located in the folder with icons. By default, all icons that are in the folder created as a result of the conversion will be added to the resource DLL project.
Windows command line listing:
C:\SDK\samples\Menu\Cuix2Cfg>Cuix2Cfg.exe C:\Import\MyMenu.cuix -x
Nanosoft (R) CUIx to CFG converter v1.2
Copyright (C) Nanosoft 2021
Done: MyMenu.cfg
‘-b’ – performs bicubic scaling of icons (softer image). By default, a more contrasting algorithm is used – quantization. In general, the difference will be minimal.
Windows command line listing:
  C:\SDK\samples\Menu\Cuix2Cfg>Cuix2Cfg.exe C:\Import\MyMenu.cuix -b
  Nanosoft (R) CUIx to CFG converter v1.2
  Copyright (C) Nanosoft 2021
  Done: C:\Import\MyMenu.cfg
‘-c’ – Creates a new CUIX file that contains a ribbon compatible with nanoCAD. The tape is created as a sample for further refinement.
Windows command line listing:
  C:\SDK\samples\Menu\Cuix2Cfg>Cuix2Cfg.exe C:\Import\MyMenu.cuix -c
  Nanosoft (R) CUIx to CFG converter v1.2
  Copyright (C) Nanosoft 2021
  Done: C:\Import\MyMenu.cfg
In a folder next to the file MyMenu.cfg will be created MyMenu_new.cuix.
‘-m’ – adds a simple menu if it is not present in the imported CUIX. The menu is created as a sample for further refinement.
Windows command line listing:
C:\SDK\samples\Menu\Cuix2Cfg>Cuix2Cfg.exe C:\Import\MyMenu.cuix -m
  Nanosoft (R) CUIx to CFG converter v1.2
  Copyright (C) Nanosoft 2021
  Done: C:\Import\MyMenu.cfg
‘-t’ – adds a simple toolbar if it is not present in the imported CUIX. The toolbar is created as a template for further development.
Windows command line listing:
C:\SDK\samples\Menu\Cuix2Cfg>Cuix2Cfg.exe C:\Import\MyMenu.cuix -t
  Nanosoft (R) CUIx to CFG converter v1.2
  Copyright (C) Nanosoft 2021
  Done: C:\Import\MyMenu.cfg
Note. CFG is overwritten every time the utility is restarted and, accordingly, the last set of keys is taken into account.
Connecting Menus, Ribbons, and Toolbars
To connect menu CFG files, you should use the standard procedure for connecting a partial menu, presented in the article “Creating a custom menu, toolbar and ribbon in nanoCAD”.
Connecting icons
Files with icons can be connected in two ways:
method 1: use icons in ICO, BMP or PNG format.
Method 2: Use a resource DLL with icons.
For method 1
Copy the resulting folder with icons to C:\Users\nanoUser\AppData\Roaming\Nanosoft\nanoCAD x64 22.0\Configthen make sure that the icons are loaded and connected to the platform interface.
The result should be like this:
dir C:\Users\nanoUser\AppData\Roaming\Nanosoft\nanoCAD x64 22.0\Config\
...
MyMenu.cfg
MyMenu.cuix
MyMenu_IconLib\
...
Go to User Interface Settings (CUI): Service → Interface → Interface settings or use the command INTERFACE on the nanoCAD command line.
Specify the path to the icon (ICO/BMP/PNG) for each command in the field Resource DLL (Fig. 1).

Further in the same window User interface customization choose File → Save.
For method 2
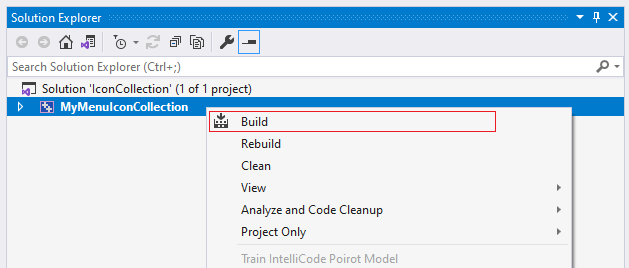
Load project into Visual Studio IconCollection.sln, obtained from the results of the utility, and build (Build / Rebuild). An example is shown in fig. 2.

Note. The DLL resulting from the build may be located in a different folder – this depends on the settings of Visual Studio.
Copy the resulting DLL file to C:\Users\nanoUser\AppData\Roaming\Nanosoft\nanoCAD x64 22.0\Config.
The result should be like this:
dir C:\Users\nanoUser\AppData\Roaming\Nanosoft\nanoCAD x64 22.0\Config\
...
MyMenu.cfg
MyMenu.cuix
MyMenuIconCollection.dll
...
Go to User Interface Settings (CUI): Service → Interface → Interface settings or use the command INTERFACE on the nanoCAD command line.
Specify the path to MyMenuIconCollection.dll for each team in the field Resource DLL (Fig. 3).

And in the field Icon select the desired icon from the drop-down list. The list is formed from the composition of the resource DLL (Fig. 4).

Further in the same window User interface customization choose File → Save.
Sergei Evseev,
API Support Specialist
Nanosoft Development LLC


