light bulb server
Hello everyone! I want to share my implementation of “smart” (in fact, very “stupid” but practical) lighting.
A long time ago, in the thirtieth kingdom, made repairs in the dwelling, and, as planned, excluded the chandelier from the situation. Instead, I attached 10 meters of LED strip under the ceiling along long walls (5 meters each). I used it, I was happy, but the idea did not go out of my head that the tape can be controlled not only with the help of an analog switch on the wall. So the years went by, the tapes changed to brighter ones and the power supplies to more powerful ones, but nothing changed in terms of control.
A separate digression about the “smart home”.
I still can’t think of a real application of the “smart home” system in an apartment. If in a separate private house it is even more clear (control of heating, irrigation, light on the site, temperature sensors, etc.), but in the apartment I see no reason to fence something more complicated than smart lighting in a single corner. Well, or some kind of temperature sensors (just to see what housing and communal services can’t cope with, and why it’s cold at home), or flood sensors (it’s useful, of course, but I don’t see any point in blocking something for this function alone, if there is no complex).
And then one day, hands got to a well-known Chinese store, where ESP8266-based NodeMCU modules were purchased, which lay in the back of a box after receiving for another year. I’ll make a reservation right away, the author is not a radio electronics engineer, not a programmer, but an ordinary system administrator. Therefore, in order to create something, some effort, enthusiasm and free time to study the topic are required.
And then one day that time came. I outlined a task for myself on a piece of paper, put a soldering iron to my nose, and actually created it.
So the task. Lighting control in one single room via Wi-Fi from any device in the home network, without third-party services, the Internet, separate applications and troubles. To start. Plus add control from the infrared remote control.
With my meager knowledge of Arduino and ESP programming, I took up the task, starting with the wonderful Flprog program, drawing in it a WEB interface for direct light control through a browser.
Screenshot of the interface.

Everything is simple here. Displaying the brightness level on a scale from 0 to 255 (byte variable for PWM), increasing / decreasing brightness in steps of 10 units. Button to activate the “sunset” – a smooth decrease in brightness for about 7 minutes (reserve for hygiene procedures, and putting yourself to bed). The “dawn” button – a smooth increase in brightness for 20 minutes (actually the main purpose of the light control, the function “Alarm clock-dawn”). And the “night lighting” button – activates the brightness of the light by about 10% of full power (to turn on at night to go to the refrigerator / bathroom without burning out your eyes), shines for about 3 minutes and goes out (just enough to fulfill your needs).
The actual interface and control through it is ready in Flprog, go to ArduinoIDE for finer tuning and adding control functions via HTTP.
Since one of the tasks was the universality of control from any device without problems, HTTP was chosen, simply, reliably, quickly. It can be controlled either simply through the address bar of the browser on any available device, or through commands from the Linux Terminal / Windows Command Line (and this is already the path to some kind of automation).
Yes, of course, the code generated by Flprog is cumbersome, redundant, but the main thing is to deal with writing your own interface in the ArduinoIDE there was neither desire nor need.
Therefore, I simply took the generated base and added several HTTP server functions for direct control without using the WEB-muzzle.
I don’t see the point in posting all the generated code, because there are a lot of lines and little information. I’ll post only my curves.
Variables:
 bool _gtv1 = 0; //статус ручного управления

byte _gtv2 = 255; //Уровень яркости

bool _gtv3 = 0; //Включить рассвет

bool _gtv4 = 0; //включить закат

bool _gtv5 = 0; //ночное освещение

int timerManage =0;

int valueGet =0;

uint32_t tmr1;

uint32_t tmr2;
GET commands to activate functions:
ESPControllerWifi_tspWebServer.on("/commands", runcommand);
//вызов функций через GET из сети

ESPControllerWifi_tspWebServer.on("/manual", ManualValue);
//вызов функций через GET из сети
Added features:
void rise(){ //Активация рассвета

  if (_gtv3==true && _gtv1==true){

    if (millis()-tmr1 > 5000){

      tmr1=millis();

      if (_gtv2<255) {

        _gtv2++;

      }

      else {

        timerManage =0;

        _gtv3=false;

        _gtv1=false;

      }

    }

  }

}

void getsleep(){ //Активация заката

  if (_gtv4==true && _gtv1==true){

    if (millis()-tmr2 > 2000){

      tmr2=millis();

      if (_gtv2>2) {

        _gtv2--;

      }

      else {

        _gtv2=0;

        _gtv4=false;

      }

    }

  }

}

void nightlight(){ //Активация ночного освещения

  if (_gtv5==true && _gtv1==true){

    _gtv2=50;

    if (millis()-tmr2 > 1000){

      tmr2=millis();

      timerManage++;

      if (timerManage>180){

      timerManage=0;

      _gtv5=false;

      _gtv2=0;//

      }

    }

  }

}

void runcommand(){ //Приём команд

String com = ESPControllerWifi_tspWebServer.arg("com");

  if (com == "rise") {

    _gtv3= true;

    ESPControllerWifi_tspWebServer.send(200, "text/plain", "rise");

  }

  if (com == "sleep") {

    _gtv4= true;

    ESPControllerWifi_tspWebServer.send(200, "text/plain", "sleep");

  }

  if (com == "light") {

    _gtv5= true;

    ESPControllerWifi_tspWebServer.send(200, "text/plain", "light");

  }

  if (com == "manon") {

    _gtv1= true;

    ESPControllerWifi_tspWebServer.send(200, "text/plain", "manual on");

  }

  if (com == "manoff") {

    _gtv1= false;

    ESPControllerWifi_tspWebServer.send(200, "text/plain", "manual off");

  }

  if (com == "reset") {

    _gtv3 = false;

    _gtv4 = false;

    _gtv5 = false;

    ESPControllerWifi_tspWebServer.send(200, "text/plain", "reset all task");

  }

  }

 void ManualValue() { //Прием команд для выставления уровня яркости

String valueHands = ESPControllerWifi_tspWebServer.arg("value");

  valueGet = valueHands.toInt();

  if (valueGet < 1) {

    _gtv2 = 0; //

     ESPControllerWifi_tspWebServer.send(200, "text/plain", "min");

  }

    if (valueGet > 254) {

    _gtv2 = 255;

     ESPControllerWifi_tspWebServer.send(200, "text/plain", "max");

    }

    if ((valueGet > 0) && (valueGet <255)) {

    _gtv2 = valueHands.toInt();

    ESPControllerWifi_tspWebServer.send(200, "text/plain", valueHands);

  }

 }
AlexGyver spied on how to work with millis and PWM, as well as about controlling MOSFETs and relays. As well as smooth control of the brightness of the LEDs.
Played around with the built-in LED on the board. Then we move on to the electronic part.
Here I had to smoke manuals, guides, datasheets and other literature and videos.
I definitely decided that the control board will have two modes. The first is a direct voltage supply from the power supply to the LED strip. In order not to strain the mosfets once again. And the second mode is the actual control via PWM. To do this, a switching relay is installed on one of the legs of the NodeMCU.
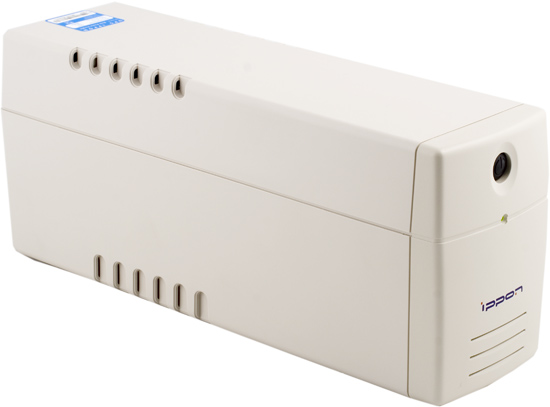
Relays and mosfets were successfully found in an old decommissioned IPPON Back Power Pro 600 UPS.
Yep, this is the guy.
One mosfet to control the relay. And two mosfets in parallel to control the tape (although it was indicated in the datasheet that they are capable of withstanding up to 10A at a control voltage of 3.3V, just in case, I was reinsured). Tape consumption – 8A. That is, two 5-meter segments of 4A. Initially, I wanted a separate mosfet for each segment, but then I gave up on it, because it didn’t even occur to me why I might need it. We do practical, not beautiful. Therefore, I simply paralleled it (I’ll say in advance that mosfets do not heat up at all. Not even warm).
Additionally, I brought out contacts on the board for connecting an IR receiver. This is so, for the future, so far there is not even a remote control from which control is planned. Then I’m going to buy some kind of IR remote control key fob. But apart from the function of activating night lighting, so far I can’t think of a wider application for it.
Plus a couple of resistors, terminal blocks and textolite.
I have always been at odds with LUT, and the scheme is now not so confused to bother even more, so we draw with a varnish marker. Drilling, etching in a solution of hydrogen peroxide, citric acid and common salt. We play and get drunk.
A few photos of the process and the result:
(and the first time I turned it on, I burned the voltage regulator and the ch340g converter on the NodeMCU board, since the board was not able to accept 12V as power, as indicated on the seller’s page. Therefore, a 3.3V step-down converter was soldered to the board for power ESP)
We cram all this miracle into a box with a power supply, and enjoy our success.
Box photo:
The hardest part is over. We play with the modes, show off in front of the guests.
get requests
http://ip/commands?com=rise //rise activation
http://ip/commands?com=sleep //activate sunset
http://ip/commands?com=light //night mode activation
http://ip/commands?com=manon //activate control mode
http://ip/commands?com=manoff //deactivate management mode
http://ip/commands?com=reset //reset ESP
http://ip/manual?value=0..255 //setting the brightness level
Immediately after turning on (and turning on / off remained the same, analog, through a banal switch on the wall), the control is deactivated. The relay is in the position of direct current supply to the LED strip. The control mode is activated either manually as needed, or when sunset is activated. (a slight click of the relay, as a side bonus, signals that it is time to pack the bainki already). The control is also turned off manually, or after the end of the dawn mode. Actually, when leaving the house, we simply flip the switch and de-energize the entire circuit, because why do I need it if I’m not at home. And I see remote control as both meaningless and unsafe in view of my paranoia and on the knee of the assembled circuit.
Outcome: Sunset
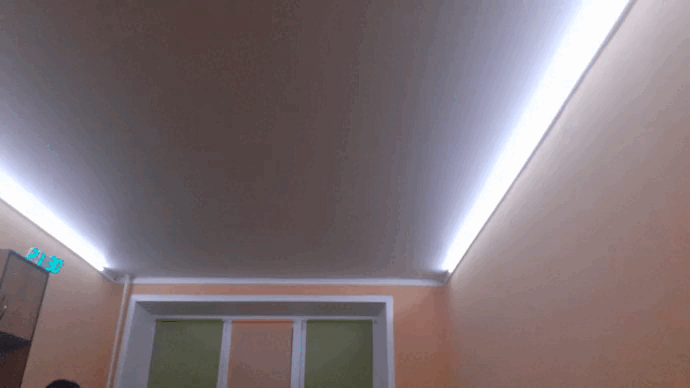
Outcome: Dawn

Now about automation. Actually, we return to the title and read “Server for a light bulb.”
Yes, ESP is quite a server on its own, but it will be used exclusively as a managed device. We will manage it manually or automatically from other devices on the network.
And since we have a “dawn” mode, it would be nice to attach an alarm clock to it. I’ve had this idea for a long time. But I didn’t know the best way to implement it. The same AlexGyver had a video with the creation of a similar lamp from a bathroom and Arduino, but it was just a lamp. But times smart controllable light is already there, then we will work with it without resorting to separate devices. Let’s add only a sound alarm clock. And to play not just anything, but your favorite Internet radio station. Actually, based on this Wishlist, a separate server has grown.
Initially, the Server was an old tablet with MacroDroid and PocketBell installed on it (a tablet with MarcoDroid is still sometimes used to activate night mode, it displayed a button on the main screen that sends a GET request to ESP), but it seemed to me too complicated and crutch. Firstly, you need to download applications and configure each one individually. Secondly, it is simply inconvenient and does not meet the requirements of universality.
Therefore, we allocate a separate piece of iron for the server and hide it out of sight.
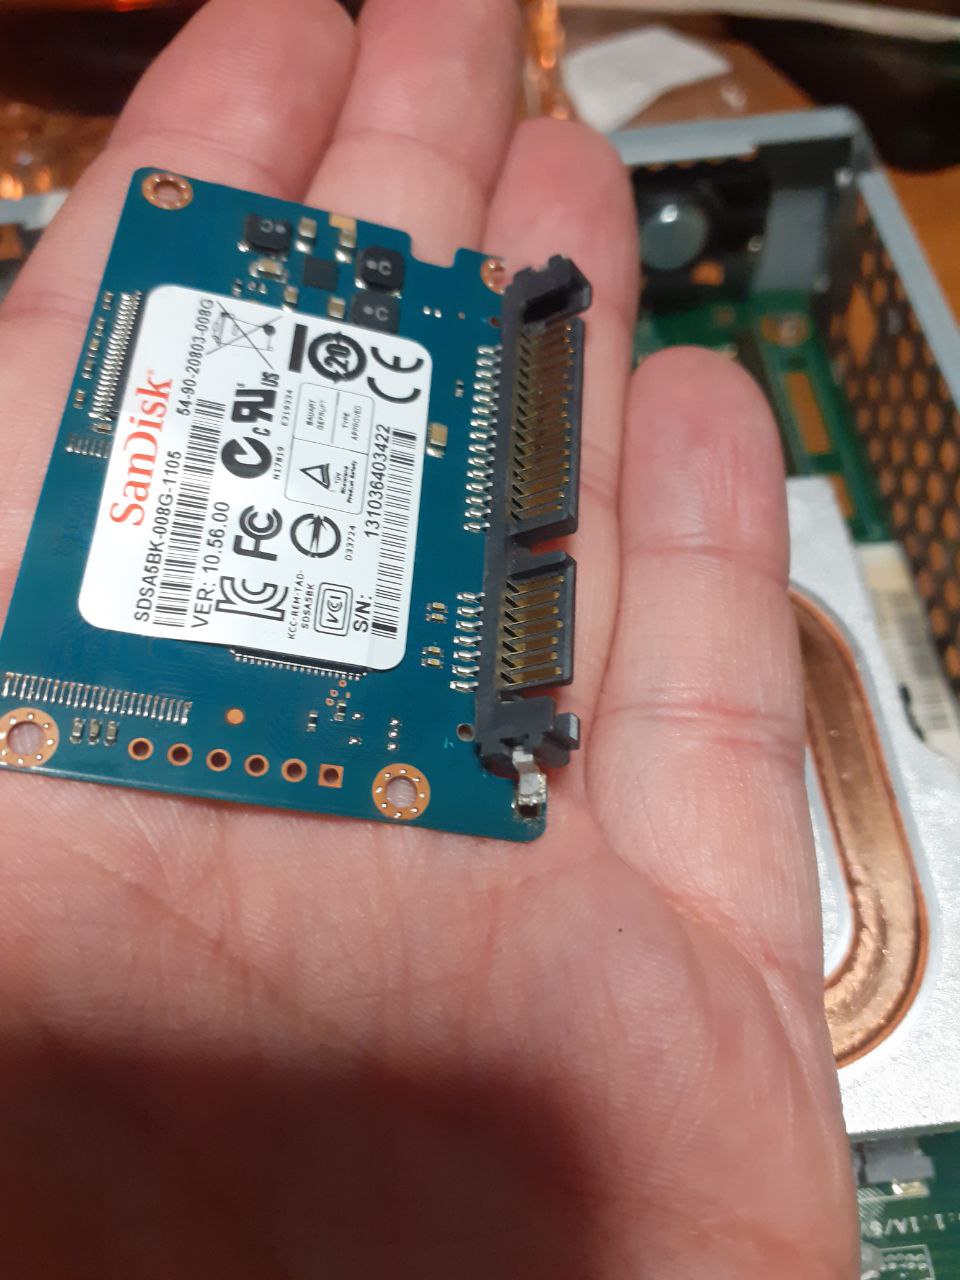
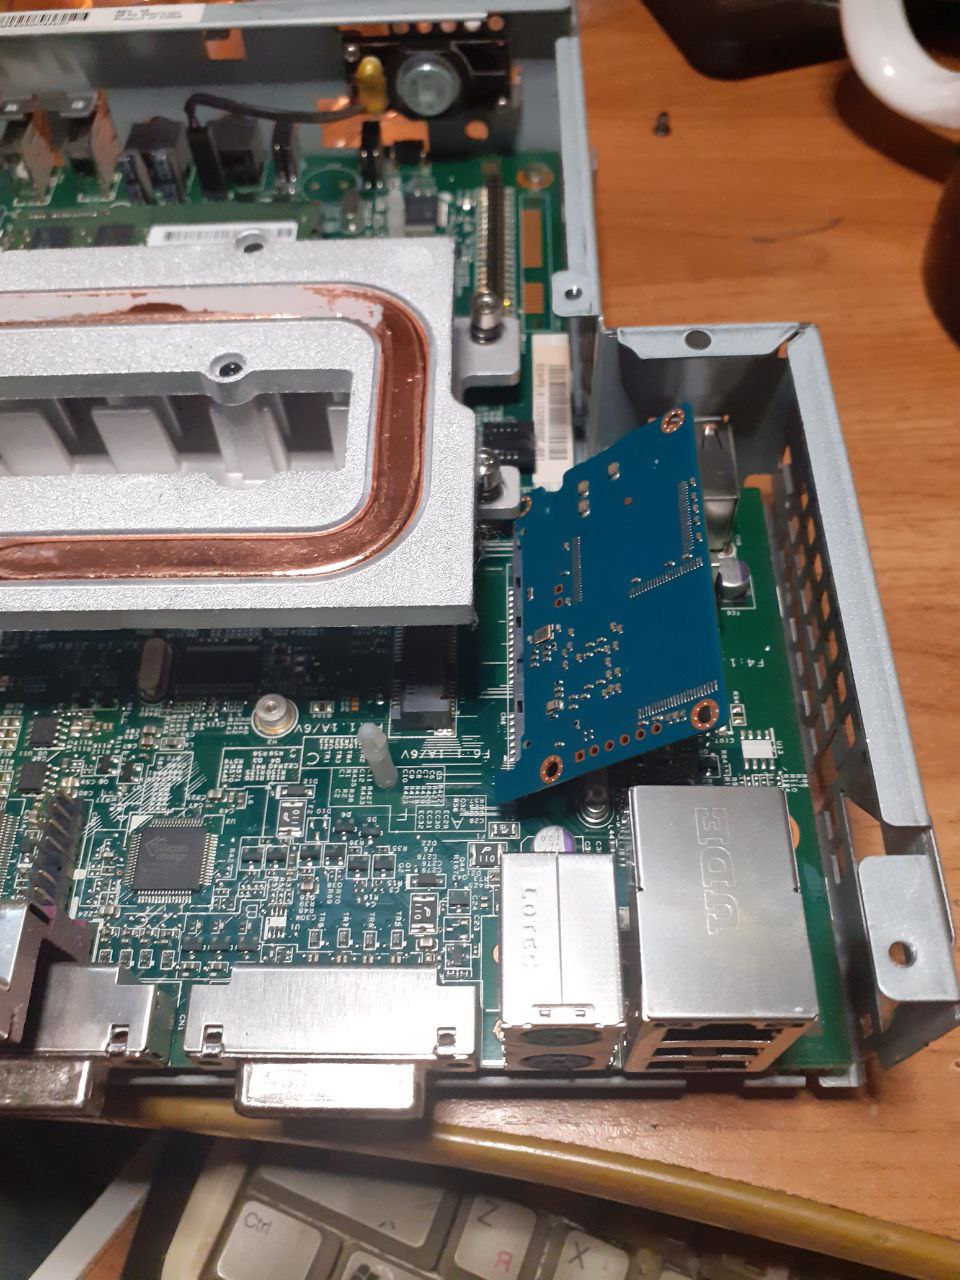
And at hand was an old thin client HP t510.
HP Thin Client T510

All unnecessary plastic body parts were removed from it, so it became even prettier in my opinion. Instead of the IDE drive installed there (which is already a whole Gigabyte !!!), a small 8 GB SSD was installed (once upon a time I ordered several pieces), since the thin client has a SATA connector. With the help of ingenuity and pliers, we shove the drive into the case, and now you can already work with it.
hidden text
We hang this device behind the monitor and hang speakers on it. The speakers were a faulty Bluetooth speaker, from which all the electronics were thrown out and a USB-powered amplifier board was installed instead. (actually, the strength to write this article was found after the comment under the article about reworking the column https://habr.com/en/post/724440/. Thanks sergey-antonov).
Unfortunately, I did not take pictures of the process, so only a photo of the final result.
Server type:

We install Debian 11 on this miracle without a GUI (we work with it via SSH), install MPD and MPC (and fill in the address of your favorite radio station)
Add a radio station to MPC:
mpc add https://radiorecord.hostingradio.ru/rmx96.aacp
And we write a few simple Bash scripts (which fully satisfies the condition of universality.
hidden text
Alarm:
 #!/bin/bash mpc volume 1 //устанавливаем громкость плеера на минимум

mpc play //включаем проигрывание

wget http://192.168.10.103/commands?com=rise -O /dev/null //кидаем команду на активацию рассвета

sleep 600  for vol in 5 10 15 20 25 // потихоньку прибавляем громкости музыке

   do

     sleep 30

      mpc volume $vol

   done
Let’s go to sleep:
#!/bin/bash  wget http://192.168.10.103/commands?com=manon -O /dev/null

sleep 5

wget http://192.168.10.103/commands?com=sleep -O /dev/null
Turn off (and move to work):
 #!/bin/bash


/sbin/shutdown now
Setting up Cron
0 6 * * 1-5 /usr/rise.sh
40 6 * * 1-5 /usr/shut.sh
0 9 * * 6.0 /usr/rise.sh
30 21 * * 0-4 /usr/sleep.sh
15 23 * * 5-6 /usr/sleep.sh
Actually, that’s all. Now we enjoy the warm dawn and pleasant music on cold winter mornings. And we show off even more in front of the guests. And we get a sense of satisfaction from success in the undertakings of creating a “smart home” (the main thing is that everything would not end there).
Thank you all for reading, comment, criticize!