JavaScript pattern CustomSwitch
Introduction
This article will discuss the CustomSwitch pattern, which can be used in various situations and programming languages. In this case, we implement CustomSwitch in the JavaScript programming language. However, it is worth remembering that this is far from the only possible language for its implementation.
Usage
The first two screenshots show the game engine code. In the second example, I will show the author’s code and my code, which uses the CustomSwitch pattern.
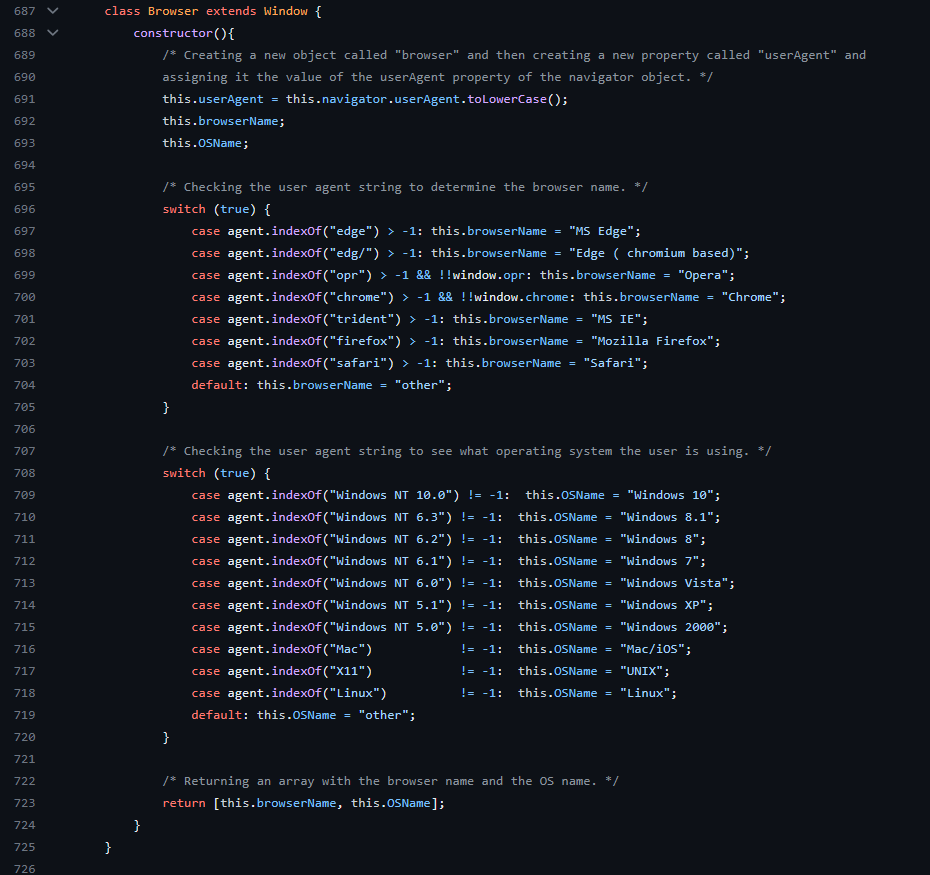
Author code:
nextPosition(initialX, initialY, direction) {
    let x = initialX;
    let y = initialY;
    let size = gameConfig.TILE_SIZE;

    if (direction == 'right') {
        x += size;
    } else if (direction == 'left') {
        x += -size;
    } else if (direction == 'up') {
        y += -size;
    } else if (direction == 'down') {
        y += size;
    }

    return { x, y };
}
My code:
// значения координат игрока/игрового обьекта и его направление.
nextPosition(initialX, initialY, direction) {
    // Что нам нужно изменить
    let change = {
        x: new Number(initialX).valueOf(),
        y: new Number(initialY).valueOf(),
        size: gameConfig.TILE_SIZE
    }

    // направления игрока, массив где первый элемент какую координату изменить в change обьекте, второй эелемент это размер тайла в положительно либо отрицательном значении
    let match = {
        left : ['x', -change.size],
        right: ['x', change.size],
        up   : ['y', -change.size],
        down : ['y', change.size]
    }

    // обращаемся к обьекту где мы изменяем значение что нам дает в массиве первого эелмента и прибавляем значение размера тайла в положительном либо отрицательном значении.
    change[match?.[direction][0]] += match?.[direction][1];
    return { x: change.x, y: change.y };
}
In both examples the function nextPosition takes initial coordinates (initialX and initialY) and direction (direction), and returns new coordinates.
The first code without the CustomSwitch pattern uses conditional statements if And else if to determine the value of the x and y coordinates depending on the direction. Here, each condition checks whether the value of direction is equal to a certain direction, and, if it matches, changes the corresponding coordinate.
The second code with the CustomSwitch pattern uses a change object, which contains the initial x, y coordinates and size. A match object is then created, which is an associative array where the keys are the directions and the values are arrays containing the coordinate being changed and the amount of change.
Next, using the shortened syntax of an optional chain and an optional operator, the appropriate pair of coordinates and magnitude of change are selected based on the direction. Then the corresponding coordinate is changed, the values from match are used, and the resulting new coordinate values are assigned to the change object.
As a result, the function returns the modified x and y coordinate values as an object.
Principle/mechanics
The principle and mechanics of the CustomSwitch pattern have the following structure:
The pattern is based on objects that represent custom cases (case blocks).
The code becomes more readable because it uses an object structure instead of conditions
if else.This pattern can be useful when you need to change or perform other actions in a task.
The CustomSwitch pattern can replace the use of conditions if else. If a standard one were used switch, this could lead to more lines of code and less readability. However, this pattern can simplify development, providing a more flexible alternative when solving a problem.
Implementation
Let’s create a changeArray function that will change the array using the passed functions and arguments.
/**
 * Изменяет входной массив с помощью переданных функций и аргументов
 * @param {array} list - входной массив
 * @param {string} func - имя функции для изменения массива
 * @param {any} argument - дополнительный аргумент для функции
 * @returns {array} - измененный массив
 * @throws {string} - если аргумент не является массивом
**/
function changeArray(list, func, argument) {
    if (!Array.isArray(list)) {
        throw `The argument is not an Array: ${list}`;
    }

    let [response, argumentsList] = [, [list, argument]];

    // код, выполняющий изменение массива

    return response;
}
Now let’s add callbacks to the callbacks object that will perform array operations.
let callbacks = {
    /**
     * Сливает два массива в один
     * @param {array} l1 - первый массив
     * @param {array} l2 - второй массив
     * @returns {array} - объединенный массив
    **/
    merge: (l1, l2) => l1.concat(l2),

    /**
     * Преобразует массив в вектор, заменяя значения на 0
     * @param {array} l - входной массив
     * @param {number} a1 - дополнительный аргумент
     * @returns {array} - массив-вектор со значениями 0
    **/
    vector: (l, a1) => callbacks.multiply(l, a1 ?? 0).map(v => [v]),

    /**
     * Преобразует массив в вектор, оставляя значения без изменений
     * @param {array} l - входной массив
     * @returns {array} - массив-вектор без изменений
    **/
    toVector: (l) => callbacks.vector(l, 1)
};

let args = {
    merge: argumentsList,
    vector: [list],
    toVector: [list]
};
We then call the appropriate callback, passing arguments if it exists, and return null if the callback does not exist.
let callback = callbacks?.[func];
response = callback ? args?.[func] ? callback(...args[func]) : callback() : null;
Finally, after defining the functions, we can perform operations on the array:
console.log(changeArray([1, 2], 'merge', [2, 3]));
console.log(changeArray([1, 2], 'vector'));
console.log(changeArray([1, 2], 'toVector'));
Result:
[ 1, 2, 2, 3 ]
[ [ 0 ], [ 0 ] ]
[ [ 1 ], [ 2 ] ]
full code
function changeArray(list, func, argument) {
    if (!Array.isArray(list)) throw `The argument is not a Array: ${list}`;
    let [response, argumentsList] = [, [list, argument]];

    let callbacks = {
        mul: (l, a1) => l.map(v => v * a1),
        sub: (l, a1) => l.map(v => v - a1),
        merge: (l1, l2) => l1.concat(l2),
        vector: (l, a1) => callbacks.mul(l, a1 ?? 0).map(v => [v]),
        toVector: (l) => callbacks.vector(l, 1)
    }

    let args = {
        mul: argumentsList,
        sub: argumentsList,
        merge: argumentsList,
        vector: [list],
        toVector: [list]
    }

    let callback = callbacks?.[func];
    response = callback ? args?.[func] ? callback(...args[func]) : callback() : null;

    return response;
}


console.log(changeArray([1, 2], 'merge', [2, 3]));
console.log(changeArray([1, 2], 'vector'));
console.log(changeArray([1, 2], 'toVector'));
Conclusion
This article examined the CustomSwitch pattern and its possible implementation. We looked at important aspects of working with this pattern and looked at examples of its application.
CustomSwitch is a useful tool for developers that allows you to create custom switches using custom controls. This pattern is especially useful in cases where complex switching logic needs to be implemented or where additional customization of the appearance of the switch is required.
We have discussed several important points to consider when implementing CustomSwitch. First, we need to properly define the interface for our switch so that the user can easily use it in their code. Secondly, it is necessary to provide the ability to customize the appearance of the switch through parameters or methods. Finally, to make the pattern easier to use, you can provide helper methods or classes that make working with CustomSwitch easier.
It is important to note that understanding the principles of working with CustomSwitch comes with coding experience. The more you use this pattern and apply it in your projects, the more you will be able to master its capabilities and customize it to suit your needs.
To conclude this article, I hope you enjoyed reading it and gained new knowledge about the CustomSwitch pattern. We hope you can successfully apply it to your projects and improve your software development skills.