installation, disadvantages and alternatives
Hello everyone. While reinstalling Ubuntu, I thought why not try Docker Desktop this time, since it should already be in an acceptable state for use. What can it be useful for, you ask? Once I created a bunch of volumes and different images of approximately the same thing, and cleaning it was not a pleasure, although there are special commands for this, but why bring it to this point, it would not be better to have some kind of UI to keep track after everything and if necessary, delete immediately?
It would seem that since there are no problems with Docker on Linux, then there should be no problems with Docker Desktop (hereinafter referred to as DD), but this was not the case. We will assume that you already have docker installed, if not, then here link to guide with all the commands and methods you need. Well, let’s get started.
UPD: It was corrected in the comments that docker is not needed for Docker Desktop to work, but since… (spoiler) I recommend demolishing it at the end and just connecting another UI to regular Docker, etc. even in the office The DD documentation implies its presence and mentions how to disable regular docker, then I’ll leave it as it is.

Requirements
Docker Desktop has a lot of demands so that it works fine on Ubuntu. Let’s start with them, in order.
CPU must be 64 bit and have virtualization support. You can find how to enable it in your UEFI on the Internet.
Must have KVM support virtualization. In practice, it should be if you have enabled virtualization in UEFI. Checked
modprobe kvm,kvm-okorlsmod | grep kvm. You also need to add yourself to the groupkvm udo usermod -aG kvm $USER.A bunch of requirements that are unimportant in practice. Such as QEMU version 5.2 or higher, systemd init system, GNOME/KDE/Mate Linux GUI, at least 4 GB of RAM. In fact, all this is already done if you have Ubuntu 22.04, which is what DD requires (it also allows 21.10, but I think everything is fine there too).
File sharing must be enabled. Another unknown thing (ID mapping), which in practice I already had in order on version 22.04. You can read more Here. I advise you to just check that the output of these commands is like this, if so, then you can move on.
$echo $USER
- exampleuser
$cat /etc/subuid
- exampleuser:100000:65536
$cat /etc/subgid
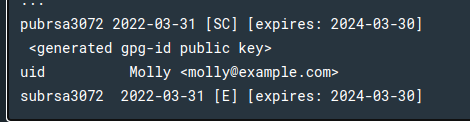
- exampleuser:100000:65536It is recommended to initialize password manager pass. Honestly, I’ve never used it, but I opened it for the guide. Write a command
gpg --generate-keyenter your data, copy id from the command response more details here.
Installation. Everything seems to be over, it’s time to start installation. Download deb package. Write a command
sudo apt-get install ./docker-desktop--...and you can open the application that appears in the application list. Accept the agreements, log in, enter passwords, everything is as usual, after that you should have a working application.How to use? Firstly, with the installation of DD it will install docker compose v2, which differs from the usual one in that there is no longer a dash in the command
docker-compose. If you now launch any compose or docker file, you will not see anything in the application. Why? Because DD and regular docker have different contexts. How to get started with DD context? Write a commanddocker context use desktop-linuxand after that you can enter your usual commands into the terminal and all actions will be displayed in DD.UPD: Corrected in the comments that when you start DD itself changes the context, although I remember exactly that I read earlier about the need to change it myself, but I probably typed the command into the terminal before the application fully started, I think in any case it wouldn’t hurt to know about it, just like and change it manually once again before running the command
Bottom line. A lot of dancing with tambourines, and for what? To use Docker’s GUI? Some kind of high price, considering also that enabling virtualization for the sake of this does not seem very reasonable (especially for those who made themselves a dual boot according to my previous guide and use Windows for games, then virtualization slows down the CPU and generally says it opens some security holes that hardly anyone cares about).
What to do? We’re going to hell with DD. For this you will also have to dance a little. First, enter the command
sudo apt remove docker-desktopthen a couple more commands:rm -r $HOME/.docker/desktop
sudo rm /usr/local/bin/com.docker.cli
sudo apt purge docker-desktopAnd after that we delete the fields
credsStoreAndcurrentContextin the file$HOME/.docker/config.json. Congratulations, you are successful got rid of from a DD you don’t need, you can disable virtualization (if you don’t need it) and install a more lightweight solution.Alternative. Unfortunately, before doing all this, I did not know that there was a more lightweight solution that works with the default context, which means there is no need to dance with diamonds. It’s called “Portainer”. Installed in 2 clicks: Create volume
docker volume create portainer_dataand download image:docker run -d -p 8000:8000 -p 9443:9443 --name portainer --restart=always -v /var/run/docker.sock:/var/run/docker.sock -v portainer_data:/data portainer/portainer-ce:latestThe only requirements are open ports 8000 and 9443, but even then they can be redirected in this command, and sudo access. Next we go to
https://localhost:9443and enter the username and password, then we will be transferred to the admin panel, which is in no way inferior to DD, at least at my first glance. It will start automatically when docker is launched, but this behavior can also be corrected in the same application by changing the “restart” field of the portainer container.
Portainer functionality Well, I hope this article will also be useful to someone, because now you can still call all commands from the terminal, periodically logging into portainer and checking that you haven’t created too many images and volumes, and that you don’t have unnecessary containers running .
 more details here.