How to write a Telegram bot in C#?
I welcome everyone to my lesson on writing a Telegram bot in the C# programming language. In this lesson I will try explain as simply and clearly as possible how to write your own bot from scratch. Certainly, there will be no difficult project hereI will give you necessary basewith which you can write your bots.
Start
First we need to register our bot. This is done throughBotobatyu” (clickable) in Telegram itself.
We follow the link and get into a dialogue with Bot Father and click “Start”. Bot Father – this is the official Telegram bot through which your bots are registered and configured.
A command should be sent on your behalf /start , to which the bot will respond with a large list of commands with descriptions. You can study each in detail yourself, and we are moving to step 3.
We use the command /newbot. At this step, you need to send the name of your future bot to the bot. For example, let it be Alexander Nikolaevich.
Next, we are asked to enter username bot, please note that it must be written strictly in Latin, and also contain bot or _bot at the end. username – this is a unique identifier for an account (yours or a bot), by which people can find an account in the search. In case username is already taken, you will be asked to use another one.
After all the actions have been completed, Botobatya sends us a small message saying that the bot has been successfully created. From this message we need token (unique key), with which we will authorize our bot in the future, it looks something like this: 13523457:AFAgd_SDFG6sd7f6asdf67asdf78. Please note that absolutely no one can send this token! This is your private key to access the bot.

Creating a project in the IDE
After we have created the bot, let’s move on to creating a project in your IDE. I have it rider from JetBrains. You can use the same IDE or visual studio from Microsoft, or all from the same company Visual Studio Code.
In fact, you can create any type of project, be it a console application or some kind of WinForms. I always create a console applicationsince in the future I’m doing a deployment on Linux, and somehow I don’t see the point in creating a bot with a software interface.
If you still don’t know what an IDE is, how to create projects, then it’s obviously too early for you to write bots, start learning the language first!
After we have created the project, we need to install the library Telegram.Bot (GitHub Libraries, Nuget package). You can do this either through the terminal in the IDE by writing the command
dotnet add Telegram.Botor use the graphical interface. At the time of writing, the latest and most up-to-date version of the package (19.0.0) was installed.
The library has its own documentation, you can see it Here.
Bot writing
Now let’s start writing a bot, first we’ll write a standard class program. Add an interface object there ITelegramBotClient and in the method Main Let’s create standard variables and assign appropriate values to them.
class Program
{
    // Это клиент для работы с Telegram Bot API, который позволяет отправлять сообщения, управлять ботом, подписываться на обновления и многое другое.
    private static ITelegramBotClient _botClient;

    // Это объект с настройками работы бота. Здесь мы будем указывать, какие типы Update мы будем получать, Timeout бота и так далее.
    private static ReceiverOptions _receiverOptions;

    static async Task Main()
    {

        _botClient = new TelegramBotClient("<token>"); // Присваиваем нашей переменной значение, в параметре передаем Token, полученный от BotFather
        _receiverOptions = new ReceiverOptions // Также присваем значение настройкам бота
        {
            AllowedUpdates = new[] // Тут указываем типы получаемых Update`ов, о них подробнее расказано тут https://core.telegram.org/bots/api#update
            {
                UpdateType.Message, // Сообщения (текст, фото/видео, голосовые/видео сообщения и т.д.)
            },
            // Параметр, отвечающий за обработку сообщений, пришедших за то время, когда ваш бот был оффлайн
            // True - не обрабатывать, False (стоит по умолчанию) - обрабаывать
            ThrowPendingUpdates = true,
        };

        using var cts = new CancellationTokenSource();

        // UpdateHander - обработчик приходящих Update`ов
        // ErrorHandler - обработчик ошибок, связанных с Bot API
        _botClient.StartReceiving(UpdateHandler, ErrorHandler, _receiverOptions, cts.Token); // Запускаем бота

        var me = await _botClient.GetMeAsync(); // Создаем переменную, в которую помещаем информацию о нашем боте.
        Console.WriteLine($"{me.FirstName} запущен!");

        await Task.Delay(-1); // Устанавливаем бесконечную задержку, чтобы наш бот работал постоянно
    }
  }
Now let’s write methods in the same class (it is possible in another one) UpdateHandler And ErrorHandler.
private static async Task UpdateHandler(ITelegramBotClient botClient, Update update, CancellationToken cancellationToken)
    {
        // Обязательно ставим блок try-catch, чтобы наш бот не "падал" в случае каких-либо ошибок
        try
        {
            // Сразу же ставим конструкцию switch, чтобы обрабатывать приходящие Update
            switch (update.Type)
            {
                case UpdateType.Message:
                {
                    Console.WriteLine("Пришло сообщение!");
                    return;
                }
            }
        }
        catch (Exception ex)
        {
            Console.WriteLine(ex.ToString());
        }
    }

private static Task ErrorHandler(ITelegramBotClient botClient, Exception error, CancellationToken cancellationToken)
    {
        // Тут создадим переменную, в которую поместим код ошибки и её сообщение
        var ErrorMessage = error switch
        {
            ApiRequestException apiRequestException
                => $"Telegram API Error:\n[{apiRequestException.ErrorCode}]\n{apiRequestException.Message}",
            _ => error.ToString()
        };

        Console.WriteLine(ErrorMessage);
        return Task.CompletedTask;
    }
Now let’s see if our code works? Click on the Debug button and check 🙂

As we can see, the bot started successfully, now let’s write a couple of messages to see if it receives messages

And everything is fine here too, now let’s complete our UpdateHandler method and write the bot’s echo. I’ll also talk a little bit about the Update types a little later.
private static async Task UpdateHandler(ITelegramBotClient botClient, Update update, CancellationToken cancellationToken)
    {
        // Обязательно ставим блок try-catch, чтобы наш бот не "падал" в случае каких-либо ошибок
        try
        {
            // Сразу же ставим конструкцию switch, чтобы обрабатывать приходящие Update
            switch (update.Type)
            {
                case UpdateType.Message:
                {
                    // эта переменная будет содержать в себе все связанное с сообщениями
                    var message = update.Message;

                    // From - это от кого пришло сообщение (или любой другой Update)
                    var user = message.From;

                    // Выводим на экран то, что пишут нашему боту, а также небольшую информацию об отправителе
                    Console.WriteLine($"{user.FirstName} ({user.Id}) написал сообщение: {message.Text}");

                    // Chat - содержит всю информацию о чате
                    var chat = message.Chat;
                    await botClient.SendTextMessageAsync(
                        chat.Id,
                        message.Text, // отправляем то, что написал пользователь
                        replyToMessageId: message.MessageId // по желанию можем поставить этот параметр, отвечающий за "ответ" на сообщение
                        );

                    return;
                }
            }
        }
        catch (Exception ex)
        {
            Console.WriteLine(ex.ToString());
        }
    }
Now we check.

As we can see, everything works perfectly. Now I’ll talk about the Update types, since we’ll write something more complicated next. So, Update types:
message – accepts all messages. Ordinary text, photo or video, audio or video messages (circles), stickers, contacts, geolocation, voting, and so on. Everything we send to the chat is all Message.
EditedMessage – everything is simple here: this type accepts any update of the message. Similar to message.
ChannelPost – as well as messagebut directed to channels.
EditedChannelPost – similar EditedMessagebut also directed to channels.
CallbackQuery – responsible for Inline buttons, they hang under the message, you may have already seen them in other bots.
Poll – receives everything related to voting.
PollAnswner – and this type only works when the user has changed their answer in the vote.
ChatMember – everything related to people in the chat/channel: logged in, logged out, promoted, demoted, muted, etc.
MyChatMember – everything related to the bot in the dialogue between the user and the bot, i.e. changes in private messages.
ChatJoinRequest – receiving information about the submitted application for joining the chat/channel.
InlineQuery – receiving incoming inline requests. An inline request is when you use @ and username of the bot in a chat and enter some kind of request, and the result of the execution is sent to the chat on your behalf with the inscription “done with ….”.
ChosenInlineResult – and this is what the user has just chosen. Those. InlineQuery it’s just like permission to use this feature, and ChosenInlineResult receives the user’s choice and processes it. I know what you’re thinking “Are they really idiots? Couldn’t they do it right?”, but get used to it, there will be plenty of this)
PreCheckoutQuery – here comes information about the payment that the user began to pay.
ShippingQuery – and it works when it successfully worked PreCheckoutQuery , i.e. this update already confirms successful payment by the user.
Fuh, well, everything seems to be, if you want to see the original, then it is Here.
Now let’s write something more complicated. Let’s add to AllowedUpdates CallbackQuery type:
AllowedUpdates = new[] // Тут указываем типы получаемых Update`ов, о них подробнее расказано тут https://core.telegram.org/bots/api#update
            {
                UpdateType.Message, // Сообщения (текст, фото/видео, голосовые/видео сообщения и т.д.)
                UpdateType.CallbackQuery // Inline кнопки
            },
Now in our UpdateHandler add command processing /start and we will make some keyboards there so that you understand how to work with different types of update, and also see another keyboard called Reply keyboard.
private static async Task UpdateHandler(ITelegramBotClient botClient, Update update, CancellationToken cancellationToken)
{
// Обязательно ставим блок try-catch, чтобы наш бот не "падал" в случае каких-либо ошибок
try
{
// Сразу же ставим конструкцию switch, чтобы обрабатывать приходящие Update
switch (update.Type)
{
case UpdateType.Message:
{
// эта переменная будет содержать в себе все связанное с сообщениями
var message = update.Message;
// From - это от кого пришло сообщение
var user = message.From;
// Выводим на экран то, что пишут нашему боту, а также небольшую информацию об отправителе
Console.WriteLine($"{user.FirstName} ({user.Id}) написал сообщение: {message.Text}");
// Chat - содержит всю информацию о чате
var chat = message.Chat;
// Добавляем проверку на тип Message
switch (message.Type)
{
// Тут понятно, текстовый тип
case MessageType.Text:
{
// тут обрабатываем команду /start, остальные аналогично
if (message.Text == "/start")
{
await botClient.SendTextMessageAsync(
chat.Id,
"Выбери клавиатуру:\n" +
"/inline\n" +
"/reply\n");
return;
}
if (message.Text == "/inline")
{
// Тут создаем нашу клавиатуру
var inlineKeyboard = new InlineKeyboardMarkup(
new List<InlineKeyboardButton[]>() // здесь создаем лист (массив), который содрежит в себе массив из класса кнопок
{
// Каждый новый массив - это дополнительные строки,
// а каждая дополнительная строка (кнопка) в массиве - это добавление ряда
new InlineKeyboardButton[] // тут создаем массив кнопок
{
InlineKeyboardButton.WithUrl("Это кнопка с сайтом", "https://habr.com/"),
InlineKeyboardButton.WithCallbackData("А это просто кнопка", "button1"),
},
new InlineKeyboardButton[]
{
InlineKeyboardButton.WithCallbackData("Тут еще одна", "button2"),
InlineKeyboardButton.WithCallbackData("И здесь", "button3"),
},
});
await botClient.SendTextMessageAsync(
chat.Id,
"Это inline клавиатура!",
replyMarkup: inlineKeyboard); // Все клавиатуры передаются в параметр replyMarkup
return;
}
if (message.Text == "/reply")
{
// Тут все аналогично Inline клавиатуре, только меняются классы
// НО! Тут потребуется дополнительно указать один параметр, чтобы
// клавиатура выглядела нормально, а не как абы что
var replyKeyboard = new ReplyKeyboardMarkup(
new List<KeyboardButton[]>()
{
new KeyboardButton[]
{
new KeyboardButton("Привет!"),
new KeyboardButton("Пока!"),
},
new KeyboardButton[]
{
new KeyboardButton("Позвони мне!")
},
new KeyboardButton[]
{
new KeyboardButton("Напиши моему соседу!")
}
})
{
// автоматическое изменение размера клавиатуры, если не стоит true,
// тогда клавиатура растягивается чуть ли не до луны,
// проверить можете сами
ResizeKeyboard = true,
};
await botClient.SendTextMessageAsync(
chat.Id,
"Это reply клавиатура!",
replyMarkup: replyKeyboard); // опять передаем клавиатуру в параметр replyMarkup
return;
}
return;
}
// Добавил default , чтобы показать вам разницу типов Message
default:
{
await botClient.SendTextMessageAsync(
chat.Id,
"Используй только текст!");
return;
}
}
return;
}
}
}
catch (Exception ex)
{
Console.WriteLine(ex.ToString());
}
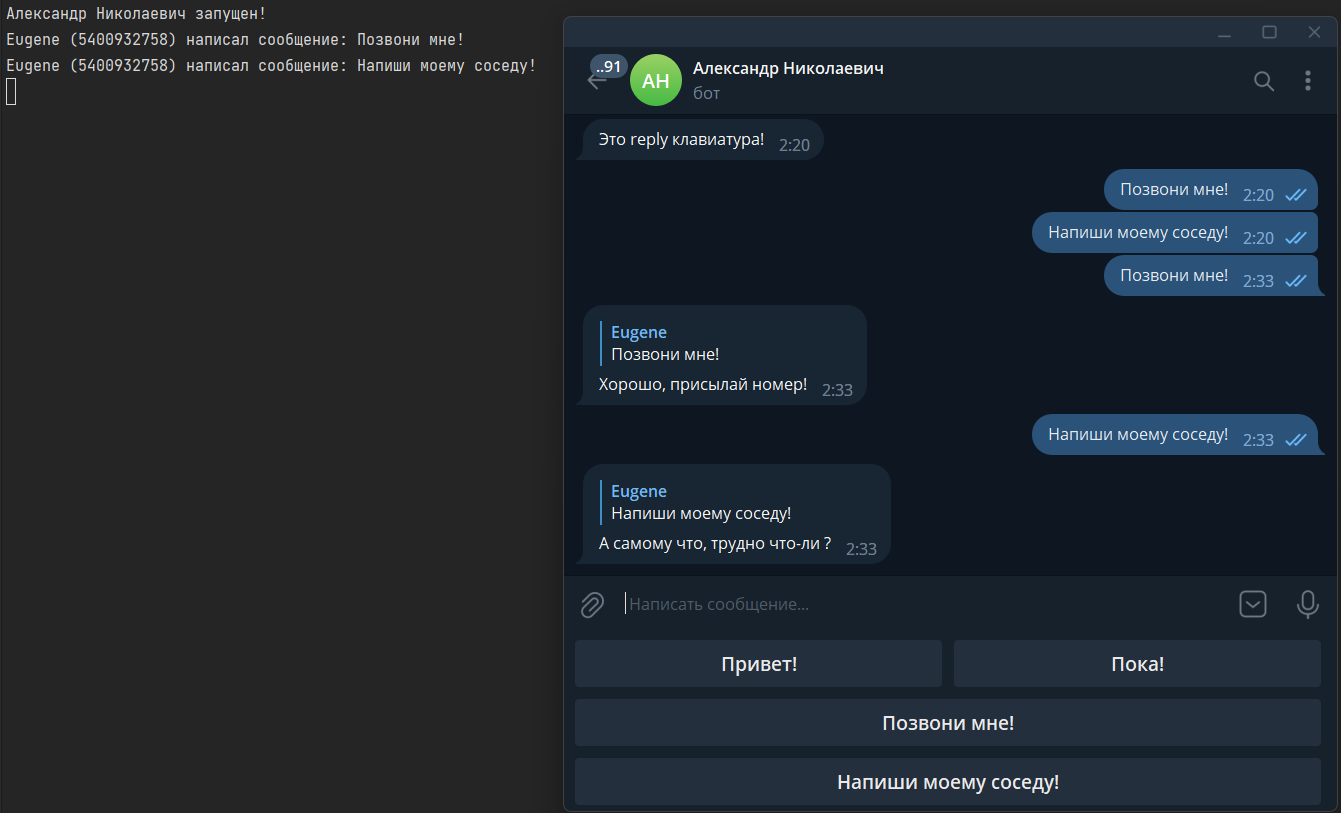
}As we can see, the bot now responds to /start:

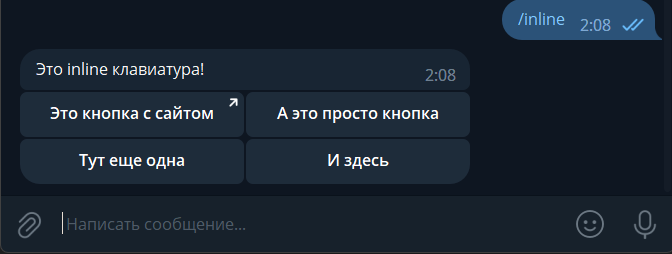
This is what it looks like inline keyboard:
And like this reply keyboard:

Moreover, if you press the buttons, then, as you already understood, nothing will happen 🙂

Of course, this is logical, because we did not add handlers for these buttons. As you may have noticed reply keyboard is just like prepared text for the user, so you shouldn’t have any problems handling these buttons. Because it’s just extra if in the case block MessageType.Text. But I will still show you how to do it, after we move on to the case with the Inline keyboard.
private static async Task UpdateHandler(ITelegramBotClient botClient, Update update, CancellationToken cancellationToken)
    {
        // Обязательно ставим блок try-catch, чтобы наш бот не "падал" в случае каких-либо ошибок
        try
        {
            // Сразу же ставим конструкцию switch, чтобы обрабатывать приходящие Update
            switch (update.Type)
            {
                case UpdateType.Message:
                {
                    // тут все переменные

                    // Добавляем проверку на тип Message
                    switch (message.Type)
                    {
                        // Тут понятно, текстовый тип
                        case MessageType.Text:
                        {
                            // а тут обработчики команд

                            if (message.Text == "Позвони мне!")
                            {
                                await botClient.SendTextMessageAsync(
                                    chat.Id,
                                    "Хорошо, присылай номер!",
                                    replyToMessageId: message.MessageId);

                                return;
                            }

                            if (message.Text == "Напиши моему соседу!")
                            {
                                await botClient.SendTextMessageAsync(
                                    chat.Id,
                                    "А самому что, трудно что-ли ?",
                                    replyToMessageId: message.MessageId);

                                return;
                            }

                            return;
                        }
                        // тут остальной код
                    }
                    return;
                }
            }
        }
        catch (Exception ex)
        {
            Console.WriteLine(ex.ToString());
        }
    }
Well, this is how it turned out:
Now let’s move on to the block with Inline keyboards. To process this keyboard, we need to add to
switch(update.Type)
{
  case UpdateType.Message:
  {
    // тут весь код из примеров выше
  }
}
the following code:
case UpdateType.CallbackQuery:
                {
                    // Переменная, которая будет содержать в себе всю информацию о кнопке, которую нажали
                    var callbackQuery = update.CallbackQuery;

                    // Аналогично и с Message мы можем получить информацию о чате, о пользователе и т.д.
                    var user = callbackQuery.From;

                    // Выводим на экран нажатие кнопки
                    Console.WriteLine($"{user.FirstName} ({user.Id}) нажал на кнопку: {callbackQuery.Data}");

                    // Вот тут нужно уже быть немножко внимательным и не путаться!
                    // Мы пишем не callbackQuery.Chat , а callbackQuery.Message.Chat , так как
                    // кнопка привязана к сообщению, то мы берем информацию от сообщения.
                    var chat = callbackQuery.Message.Chat;

                    // Добавляем блок switch для проверки кнопок
                    switch (callbackQuery.Data)
                    {
                        // Data - это придуманный нами id кнопки, мы его указывали в параметре
                        // callbackData при создании кнопок. У меня это button1, button2 и button3

                        case "button1":
                        {
                            // В этом типе клавиатуры обязательно нужно использовать следующий метод
                            await botClient.AnswerCallbackQueryAsync(callbackQuery.Id);
                            // Для того, чтобы отправить телеграмму запрос, что мы нажали на кнопку

                            await botClient.SendTextMessageAsync(
                                chat.Id,
                                $"Вы нажали на {callbackQuery.Data}");
                            return;
                        }

                        case "button2":
                        {
                            // А здесь мы добавляем наш сообственный текст, который заменит слово "загрузка", когда мы нажмем на кнопку
                            await botClient.AnswerCallbackQueryAsync(callbackQuery.Id, "Тут может быть ваш текст!");

                            await botClient.SendTextMessageAsync(
                                chat.Id,
                                $"Вы нажали на {callbackQuery.Data}");
                            return;
                        }

                        case "button3":
                        {
                            // А тут мы добавили еще showAlert, чтобы отобразить пользователю полноценное окно
                            await botClient.AnswerCallbackQueryAsync(callbackQuery.Id, "А это полноэкранный текст!", showAlert: true);

                            await botClient.SendTextMessageAsync(
                                chat.Id,
                                $"Вы нажали на {callbackQuery.Data}");
                            return;
                        }
                    }

                    return;
                }
In the end UpdateHandler should look like this:
private static async Task UpdateHandler(ITelegramBotClient botClient, Update update, CancellationToken cancellationToken)
    {
        // Обязательно ставим блок try-catch, чтобы наш бот не "падал" в случае каких-либо ошибок
        try
        {
            // Сразу же ставим конструкцию switch, чтобы обрабатывать приходящие Update
            switch (update.Type)
            {
                case UpdateType.Message:
                {
                    // Эта переменная будет содержать в себе все связанное с сообщениями
                    var message = update.Message;

                    // From - это от кого пришло сообщение (или любой другой Update)
                    var user = message.From;

                    // Выводим на экран то, что пишут нашему боту, а также небольшую информацию об отправителе
                    Console.WriteLine($"{user.FirstName} ({user.Id}) написал сообщение: {message.Text}");

                    // Chat - содержит всю информацию о чате
                    var chat = message.Chat;

                    // Добавляем проверку на тип Message
                    switch (message.Type)
                    {
                        // Тут понятно, текстовый тип
                        case MessageType.Text:
                        {
                            // тут обрабатываем команду /start, остальные аналогично
                            if (message.Text == "/start")
                            {
                                await botClient.SendTextMessageAsync(
                                    chat.Id,
                                    "Выбери клавиатуру:\n" +
                                    "/inline\n" +
                                    "/reply\n");
                                return;
                            }

                            if (message.Text == "/inline")
                            {
                                // Тут создаем нашу клавиатуру
                                var inlineKeyboard = new InlineKeyboardMarkup(
                                    new List<InlineKeyboardButton[]>() // здесь создаем лист (массив), который содрежит в себе массив из класса кнопок
                                    {
                                        // Каждый новый массив - это дополнительные строки,
                                        // а каждая дополнительная кнопка в массиве - это добавление ряда

                                        new InlineKeyboardButton[] // тут создаем массив кнопок
                                        {
                                            InlineKeyboardButton.WithUrl("Это кнопка с сайтом", "https://habr.com/"),
                                            InlineKeyboardButton.WithCallbackData("А это просто кнопка", "button1"),
                                        },
                                        new InlineKeyboardButton[]
                                        {
                                            InlineKeyboardButton.WithCallbackData("Тут еще одна", "button2"),
                                            InlineKeyboardButton.WithCallbackData("И здесь", "button3"),
                                        },
                                    });

                                await botClient.SendTextMessageAsync(
                                    chat.Id,
                                    "Это inline клавиатура!",
                                    replyMarkup: inlineKeyboard); // Все клавиатуры передаются в параметр replyMarkup

                                return;
                            }

                            if (message.Text == "/reply")
                            {
                                // Тут все аналогично Inline клавиатуре, только меняются классы
                                // НО! Тут потребуется дополнительно указать один параметр, чтобы
                                // клавиатура выглядела нормально, а не как абы что

                                var replyKeyboard = new ReplyKeyboardMarkup(
                                    new List<KeyboardButton[]>()
                                    {
                                        new KeyboardButton[]
                                        {
                                            new KeyboardButton("Привет!"),
                                            new KeyboardButton("Пока!"),
                                        },
                                        new KeyboardButton[]
                                        {
                                            new KeyboardButton("Позвони мне!")
                                        },
                                        new KeyboardButton[]
                                        {
                                            new KeyboardButton("Напиши моему соседу!")
                                        }
                                    })
                                {
                                    // автоматическое изменение размера клавиатуры, если не стоит true,
                                    // тогда клавиатура растягивается чуть ли не до луны,
                                    // проверить можете сами
                                    ResizeKeyboard = true,
                                };

                                await botClient.SendTextMessageAsync(
                                    chat.Id,
                                    "Это reply клавиатура!",
                                    replyMarkup: replyKeyboard); // опять передаем клавиатуру в параметр replyMarkup

                                return;
                            }

                            if (message.Text == "Позвони мне!")
                            {
                                await botClient.SendTextMessageAsync(
                                    chat.Id,
                                    "Хорошо, присылай номер!",
                                    replyToMessageId: message.MessageId);

                                return;
                            }

                            if (message.Text == "Напиши моему соседу!")
                            {
                                await botClient.SendTextMessageAsync(
                                    chat.Id,
                                    "А самому что, трудно что-ли ?",
                                    replyToMessageId: message.MessageId);

                                return;
                            }

                            return;
                        }

                        // Добавил default , чтобы показать вам разницу типов Message
                        default:
                        {
                            await botClient.SendTextMessageAsync(
                                chat.Id,
                                "Используй только текст!");
                            return;
                        }
                    }

                    return;
                }

                case UpdateType.CallbackQuery:
                {
                    // Переменная, которая будет содержать в себе всю информацию о кнопке, которую нажали
                    var callbackQuery = update.CallbackQuery;

                    // Аналогично и с Message мы можем получить информацию о чате, о пользователе и т.д.
                    var user = callbackQuery.From;

                    // Выводим на экран нажатие кнопки
                    Console.WriteLine($"{user.FirstName} ({user.Id}) нажал на кнопку: {callbackQuery.Data}");

                    // Вот тут нужно уже быть немножко внимательным и не путаться!
                    // Мы пишем не callbackQuery.Chat , а callbackQuery.Message.Chat , так как
                    // кнопка привязана к сообщению, то мы берем информацию от сообщения.
                    var chat = callbackQuery.Message.Chat;

                    // Добавляем блок switch для проверки кнопок
                    switch (callbackQuery.Data)
                    {
                        // Data - это придуманный нами id кнопки, мы его указывали в параметре
                        // callbackData при создании кнопок. У меня это button1, button2 и button3

                        case "button1":
                        {
                            // В этом типе клавиатуры обязательно нужно использовать следующий метод
                            await botClient.AnswerCallbackQueryAsync(callbackQuery.Id);
                            // Для того, чтобы отправить телеграмму запрос, что мы нажали на кнопку

                            await botClient.SendTextMessageAsync(
                                chat.Id,
                                $"Вы нажали на {callbackQuery.Data}");
                            return;
                        }

                        case "button2":
                        {
                            // А здесь мы добавляем наш сообственный текст, который заменит слово "загрузка", когда мы нажмем на кнопку
                            await botClient.AnswerCallbackQueryAsync(callbackQuery.Id, "Тут может быть ваш текст!");

                            await botClient.SendTextMessageAsync(
                                chat.Id,
                                $"Вы нажали на {callbackQuery.Data}");
                            return;
                        }

                        case "button3":
                        {
                            // А тут мы добавили еще showAlert, чтобы отобразить пользователю полноценное окно
                            await botClient.AnswerCallbackQueryAsync(callbackQuery.Id, "А это полноэкранный текст!", showAlert: true);

                            await botClient.SendTextMessageAsync(
                                chat.Id,
                                $"Вы нажали на {callbackQuery.Data}");
                            return;
                        }
                    }

                    return;
                }
            }
        }
        catch (Exception ex)
        {
            Console.WriteLine(ex.ToString());
        }
    }
Now let’s run the project and check the buttons!

Conclusion
Unfortunately, that’s all for now. Most likely there will be a second part of this article or a full-fledged video tutorial on Youtube, but for now, that’s it.
Please evaluate my article and leave a comment, since this is my first such work, before that I had no chance to write articles or anything like that.