How to install MikroTik CHR in the cloud? Crib

MikroTik Cloud Hosted Router (CHR) is a convenient solution for creating virtual routers in the cloud. With it, you can effectively manage network traffic, regulate security, and optimize work in a cloud environment.
My name is Kirill, in this article I will tell you in detail about installing and configuring MikroTik CHR using an example cloud platform. If you are interested in diving into the technical aspects of its configuration, welcome to the cat!
This is not an ultimate guide, but rather a cheat sheet that can be used as needed. You can’t do without working with virtual infrastructure – we will show this using the example of our own cloud platform. Therefore, the article will be especially relevant for clients.
Installing CHR on a virtual machine
First of all, you need to go to the official website of the MikroTik developers and download Cloud Hosted Router in any convenient format. In this article we will use RAW.

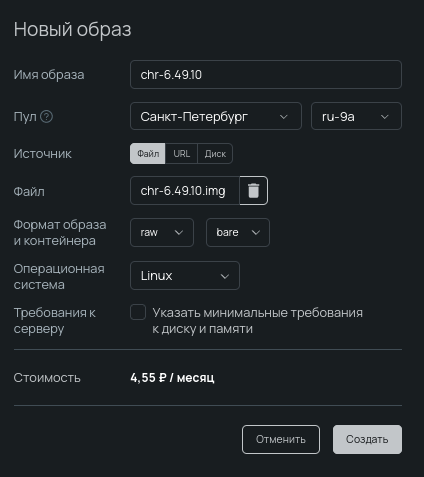
Afterwards, a zip archive with an operating system image will be downloaded to your device – you need to unpack it. Next, you need to create an image within the cloud platform. You can do it
. For example in
Image format
let's indicate raw/bare.
Next you need to create a virtual machine from the image. We wrote in detail about how to do this.
. By the way, the image is not demanding on resources, so you can safely choose a configuration with one vCPU, 1 GB of RAM and 5 GB of disk of any speed.
Next, it is important to select a subnet or public address to connect to the virtual machine. In our case, public IP will be used. For the private network where the server is located, we recommend enable DHCP. This way, the server's network interfaces will be configured automatically.
Immediately after creating the server, you need to go to the tab Console on the server page. The default login is admin, and the password is empty, so when entering it, just press Enter.
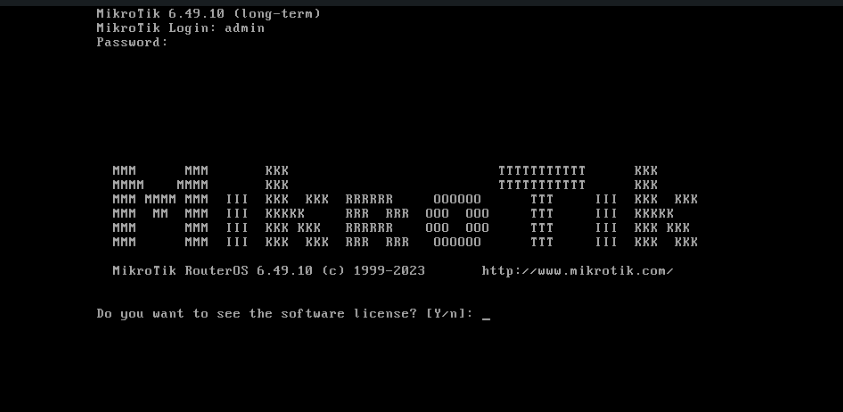
The system will prompt you to read the user agreement. Next, you need to change the password for the admin user. Create, enter and confirm it to continue setting up.

Setting up a network in Mikrotik CHR
To check which address has been assigned to your virtual machine, you can run the command:
/ip address print
If the network in which the server was created has DHCP enabled, the address will be forwarded automatically. If the required network address is missing from the command output, you must configure the network.
To view a list of all available interfaces, use the command:
/interface print
To assign an IP address to an interface, use the /ip address add command. Specify the address, subnet mask, interface to which the IP address will be assigned:
/ip address add address=192.168.1.1/24 interface=ether1
Replace 192.168.1.1/24 with the desired IP address and subnet, and ether1 with the name of the interface you want to configure. If necessary, add a default route via the command:
/ip route add dst-address=0.0.0.0/0 gateway=192.168.1.254 check-gateway=ping distance=1
Replace 192.168.1.254 with your network's gateway IP address. You also need to configure DNS on CHR:
/ip dns set servers=188.93.16.19,188.93.17.19
It is important to note that 188.93.16.19 and 188.93.17.19 are Selectel DNS servers.
Checking the configuration
Check the assigned IP addresses and routes using the following commands:
/ip address print
/ip route print
To save the settings so that they remain after a reboot, use the command:
/system backup save name=backup_name
And to save the configuration this command is suitable:
/export file=exported_config
Perhaps these texts will also interest you:
→ How to deploy a website to the cloud. Instructions for beginners
→ Rescuing the humidifier from Xiaomi networks
→ Backups for the smallest and most experienced
MikroTik CHR license levels and activation
Cloud Hosted Router (CHR) from MikroTik offers flexible licensing that is not tied to physical hardware as is the case with traditional RouterOS. This is especially useful for virtual environments where CHR may be deployed. The main difference between the different CHR license levels is the bandwidth limit on the interfaces, while there are no other limits such as the number of tunnels.
License levels
Let's briefly look at the description of the available license levels for CHR and their characteristics.
- Free license. This tier has no direct equivalent among RouterOS licenses and offers speeds of up to 1 Mbps, which is suitable for testing or very small tasks.
- P1. Comparing to RouterOS license tier 4, P1 provides speeds of up to 1 Gbps and costs approximately $45. Suitable for more serious projects.
- P10. Equivalent to the fifth license in RouterOS, P10 increases throughput to 10 Gbps for $95. Ideal for large projects.
- P-unlimited. The highest tier, similar to the Level 6 license in RouterOS, offers unlimited interface speeds for $250. Well suited for large-scale and bandwidth-intensive applications.
MikroTik also offers a 60-day trial of CHR with full access to the functionality. If a license is not purchased, the system will continue to operate, but without the possibility of updates.
Activation of the trial version of MikroTik CHR
To activate the license for CHR from Mikrotik, it is important to configure several key parameters:
- Device IP address;
- Internet access via routing;
- specify DNS servers.
Once these basic settings have been completed, you can proceed to license activation.
The first step is to register on the official MikroTik website if you do not already have an account. It is important to enable the option that allows you to use your account for activation through the Netinstall and Winbox tools.
Then, using Winbox, go to System and select License. In the window that opens there will be a button Renew Licensewhich you need to click on.
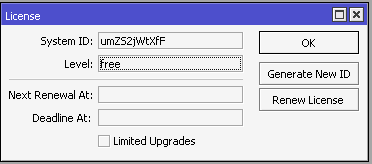
In the dialog box that appears after, enter your account information on the MikroTik website. You must also select the license level for activation, for example P1.
After successful activation, the Winbox interface will display updated information confirming the CHR. This way it will be ready to work with the selected license.
We reviewed the installation process and the main steps for setting up Cloud Hosted Router, and also reviewed the licensing terms. Perhaps you still have questions? Write about them in the comments!