installing Linux Armbian using the example of X96 Max+ 100W
With their appearance, single-board computers have taken on a huge number of tasks and are solving more and more of our problems every day. But many household devices around us are single-board computers with almost identical hardware, and set-top boxes are a classic example of this.
I once purchased an X96 Max Plus 100W TV set-top box on Android to test it far and wide and soon came to the conclusion that its classic use for watching cartoons and Android games was not interesting to me. I really wanted to install Linux and use the console as a regular mini-computer. For those enthusiasts who want to install Linux on a TV set-top box, turning it into a server or even a desktop computer, I will tell my story. The story differs from all other similar ones in its realistic nature, when the result according to the instructions cannot be achieved.
This experiment can be repeated without even affecting the performance of the installed Android system, just by preparing bootable media and booting from it.
If suddenly the reader does not know why such a mini-computer is needed, I will explain: such a quiet and economical gadget is excellent as a smart home server on HomeAssistant, a home web server on nginx, a telephony server on Asterisk, for collecting statistics from a weather station, a router, a game console on Retro-Pi, media center, for converting RTSP video stream from a camera into HLS for embedding on a web page, TorrServer for watching movies directly from torrents. Fortunately, modern consoles have more than enough resources for most such tasks.
Read more
Imagine how many of these set-top boxes are thrown away by providers at the end of the contract, because users are often contractually obligated to return it. But even buying a TV set-top box such as the Transpeed 6k (called H616 on Aliexpress by the name of the processor) is at least no more expensive than its single-board clone Orange Pi Zero 2 on the same processor. Such a computer will be in a beautiful case and with goodies like a remote control, HDMI cable and power supply. Here is a description of the minor differences between these devices: http://nskhuman.ru/allwinner/fdt/basefdt.php
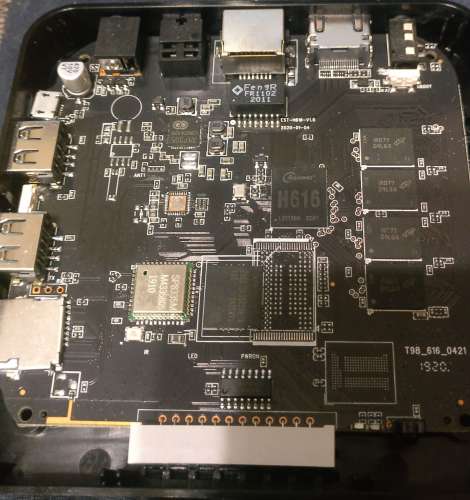
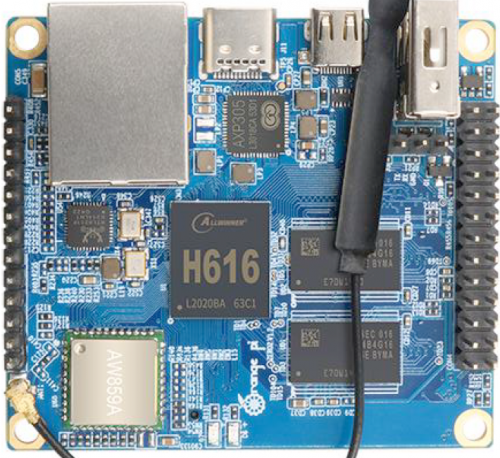
But let’s return to the console that I had and on which I conducted my experiments. Research and autopsy showed that inside the X96 Max Plus 100W console:
CPU: Amlogic S905X3 quad-core ARM Cortex A55
GPU: ARM Mali-G31MP
Radio module: W522A
Memory: DDR3 4GB, FLASH 64GB
Support 10/100M Ethernet, 2.4 and 5G WiFi, BT4.0;
USB3.0 x 1, USB2.0 x 1, TF Card
HDMI, AV, SPDIF
Photo from the Armbian forum of a similar console, with exactly the same name. Even on the board the code name is the same: Q53X_141 V4.1 20112. But my board is different in that it has 64 gigabytes of EMMC on board and there is no gigabit PHY chip near the ethernet interface. Instead of an external PHY chip, the SoC’s built-in capabilities are used for networking. This is important and we will return to this issue later.
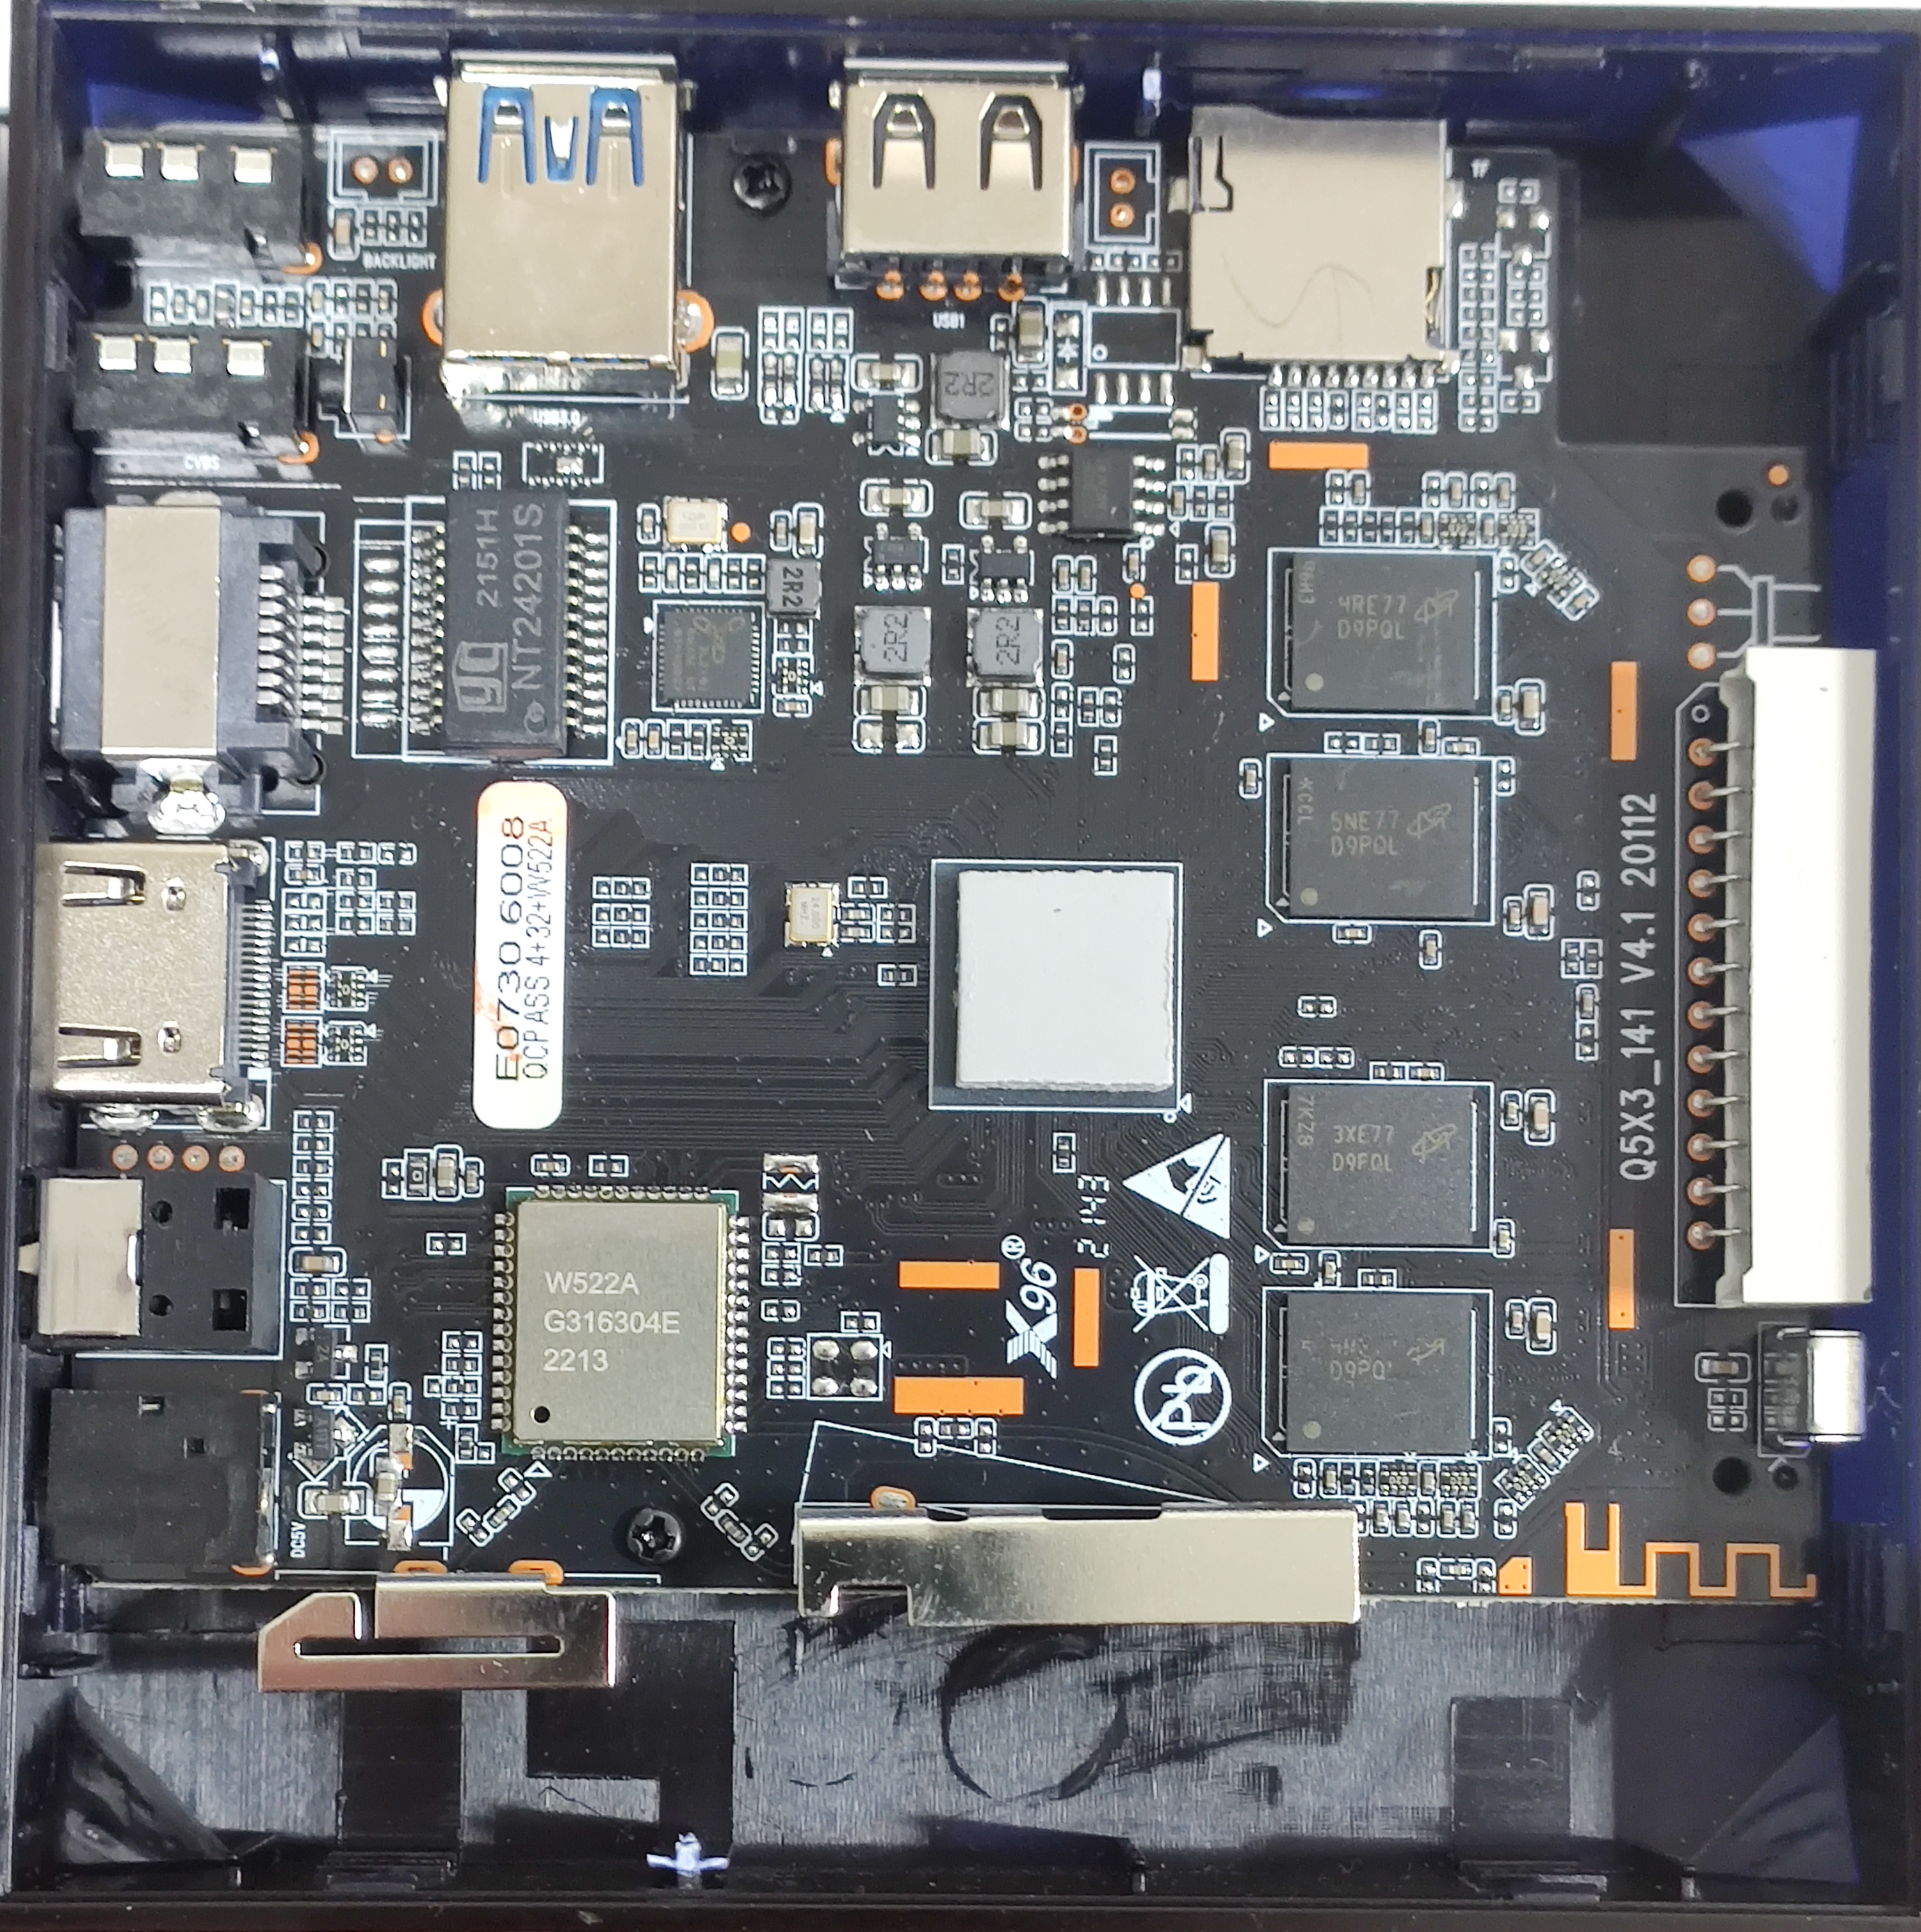
The reviewed set-top box is very close in characteristics to the single-board Banana Pi M2 Pro And Banana M5. But I didn’t even check the use of the official Armbian firmware for this platform on the console and went a different route. It would be interesting to know if anyone has tried this.
Armbian
Given the limited choice of OS, I settled on Armbian – Debian for ARM computers. I took the ready-made image for my processor, but of course it didn’t start “sparkly”:
https://github.com/ophub/amlogic-s9xxx-armbian/releases/
I had to understand all the nuances of the ARM platform, which is completely different from the x86 so familiar and familiar to us from childhood. The very first thing is the absence of the usual menu for setting up the BIOS/UEFI. But on such boards there are always RX/TX UART contacts, which can be soldered and connected with a USB UART adapter, gaining access to the device console. If you are lucky and the prepared bootable media works, then you will not have to solder the UART.
According to the instructions for installing Armbian on the set-top box, everything looks very simple: download the image, burn it to the media, insert the media into the slot of the set-top box, boot into Android and select the update from external media, reboot, connect via ssh to your new mini-computer on Armbian and start customize for yourself. Alas, in practice, following these instructions, my set-top box showed absolutely no signs of life either via HDMI or on its built-in display with a clock. Looks like brick.
To force the set-top box to boot from a flash drive, I used the following trick: turn off the power of the set-top box, use a toothpick to press the button inside the AV input (mini-jack 3.5), and turn on the power. But the official recommendation for installing Armbian says that you need to do this through the Android developer mode (later we will talk about how to do this).
I recognize an attempt to boot from a flash drive by the fact that Android stops loading. To make the media bootable, the scripts must find the u-boot.ext file. Initially, there is no such file, because the system image is universal: there is a collection of such files for various devices. I tried renaming the existing files u-boot-x96maxplus.bin and u-boot-x96max.bin, as the most appropriate for the name of the console. Looking ahead, I will say that these are suitable files. Any of them can be used to download this console. I tried connecting various DTB files. But the system did not appear on the network. Trying to nuzzle like a blind kitten was starting to seem like a dead end. It was necessary to see the logs to identify what the error was.
In general, I started these experiments a year ago and the experimental set-top box was a rather complex case due to a huge number of different revisions with new equipment and missing open drivers. At that time it was not yet supported in Armbian and we had to be smart. With many other consoles, things were somewhat simpler. If you are stupid to install Linux and do not delve into the insides of the bootloader and kernel, then you should choose something more proven like set-top boxes on the Amlogic S905X2 processor. In this case, you can simply download a ready-made system image and do everything according to the instructions, and you won’t even need my post. There are a million step-by-step instructions on the Internet. However, now my set-top box is already supported and, most likely, you will not encounter all the above rake. But my experience may well be useful.
Connecting the UART console
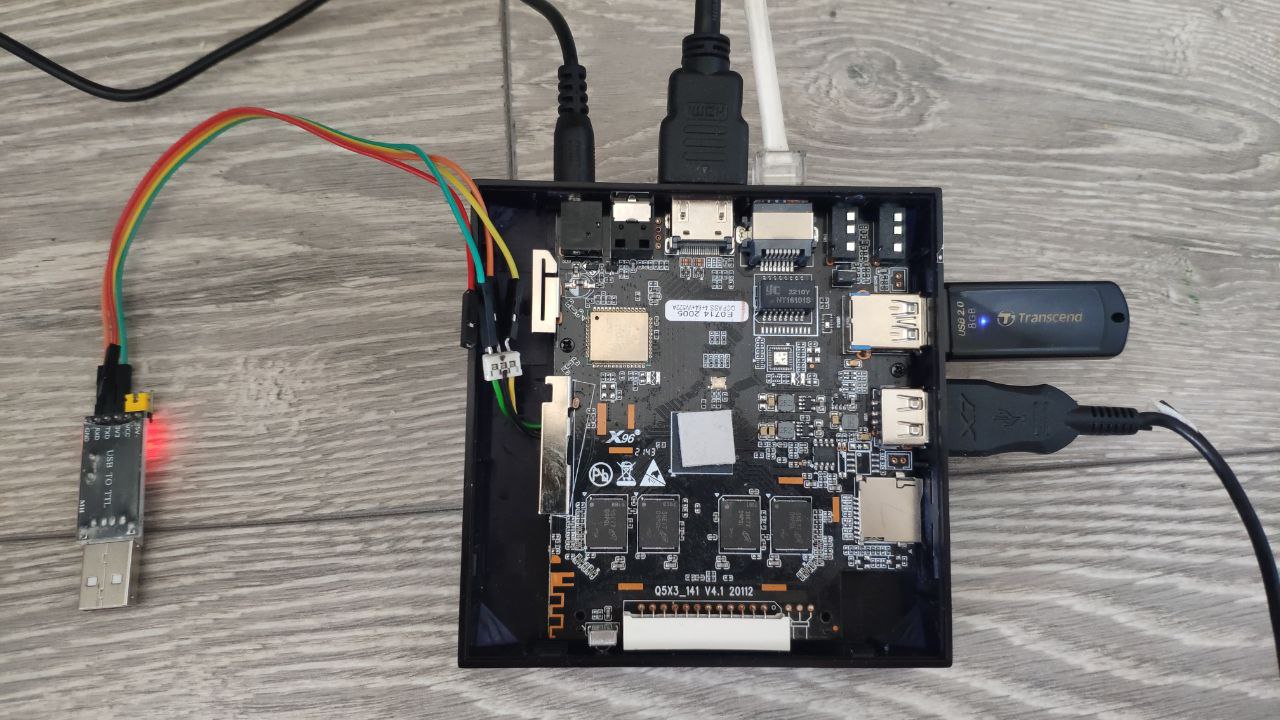
To find out the essence of the problem and see the logs, you need to connect to the console via the UART interface provided for this. To do this, you will need a UART USB adapter and a soldering iron to solder three wires: RX (receive), TX (transmit), GND. My CH340G adapter allows you to switch the signal level between 3.3V. or 5v. But any other 3.3V will do. You need to cross-connect: RX attachments to the TX adapter and TX attachments to the RX adapter. Contact 3.3v. We don’t connect anywhere. After connecting the adapter, the /dev/ttyUSB0 device should appear on your Linux desktop, indicating that the adapter has been recognized and is ready for use.
picocom -b 115200 -r -l /dev/ttyUSB0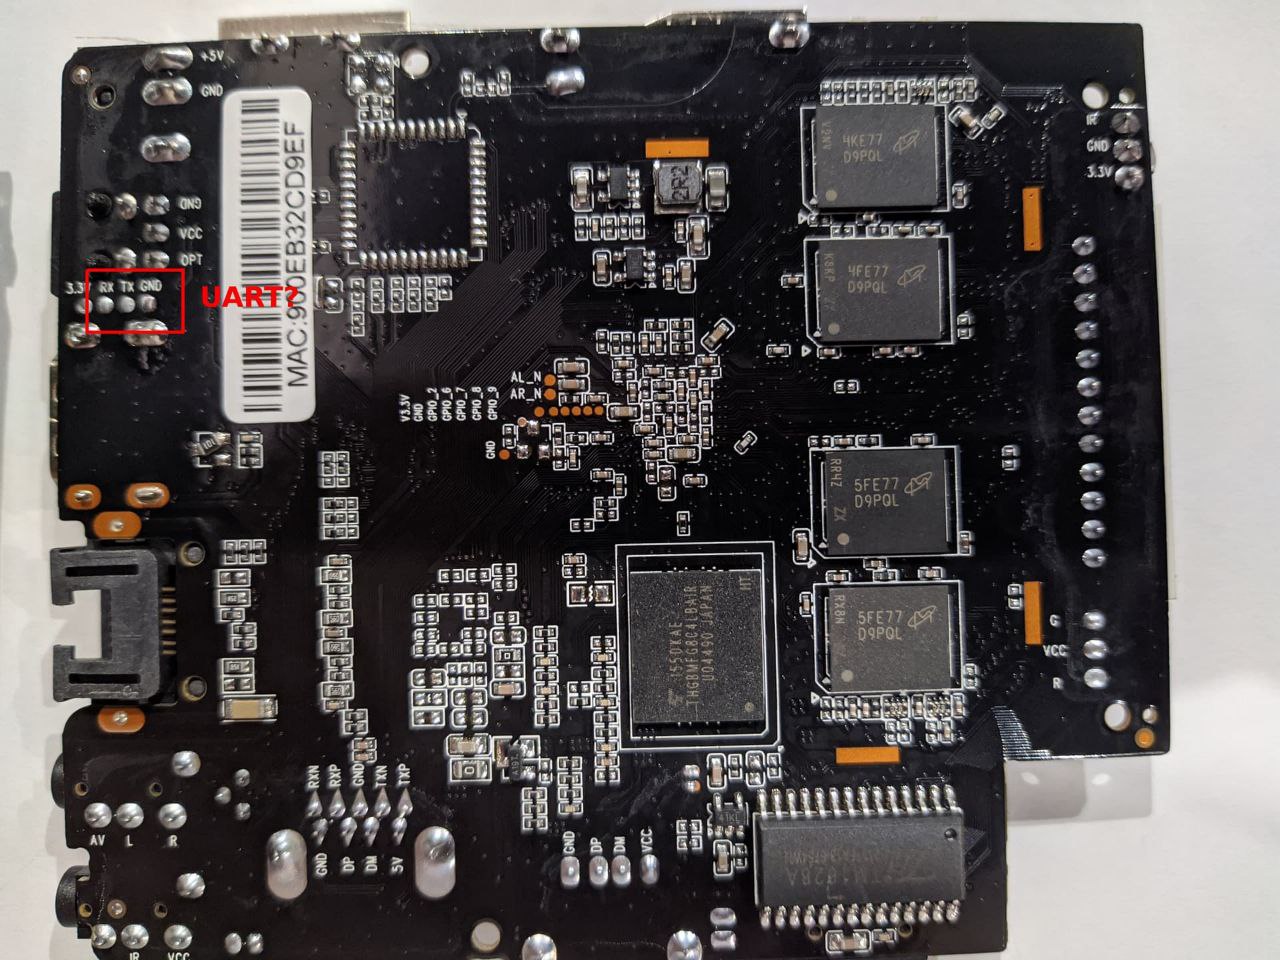
As soon as we turn on the power of the set-top box, the picocom window should show system boot logs. Here you need to read everything carefully and identify errors. Everything is complicated by the fact that most errors are the norm, since the scripts work through various loading options and dump out all the information about this.
It is also very useful to connect a UART console for those who want to get into the Android shell console. My firmware did not require a login or password: immediately after downloading I could write commands.
console:/ $ uname -a
Linux localhost 4.9.113 #3 SMP PREEMPT Fri Apr 15 18:28:24 CST 2022 armv7l

console:/ $ lsmod
lsmod
Module                  Size  Used by
sdio_bt                20480  0
vlsicomm             1576960  0
aml_sdio               28672  2 sdio_bt,vlsicomm
galcore               372736  0
aml_hardware_dmx      135168  0
amvdec_mavs            40960  0
vpu                    45056  0
encoder                49152  0
amvdec_avs2           192512  0
amvdec_vp9            110592  0
amvdec_vc1             57344  0
amvdec_real            40960  0
amvdec_mmpeg4          40960  0
amvdec_mpeg4           57344  0
amvdec_mmpeg12         40960  0
amvdec_mpeg12         102400  0
amvdec_mmjpeg          28672  0
amvdec_mjpeg           40960  0
amvdec_h265           135168  0
amvdec_h264mvc         53248  0
amvdec_mh264          155648  0
amvdec_h264           135168  0
amvdec_avs             65536  0
stream_input          159744  12 aml_hardware_dmx,amvdec_mavs,amvdec_avs2,amvdec_vp9,amvdec_real,amvdec_mmpeg12,amvdec_mpeg12,amvdec_h265,amvdec_h264mvc,amvdec_mh264,amvdec_h264,amvdec_avs
decoder_common        172032  18 amvdec_mavs,encoder,amvdec_avs2,amvdec_vp9,amvdec_vc1,amvdec_real,amvdec_mmpeg4,amvdec_mpeg4,amvdec_mmpeg12,amvdec_mpeg12,amvdec_mmjpeg,amvdec_mjpeg,amvdec_h265,amvdec_h264mvc,amvdec_mh264,amvdec_h264,amvdec_avs,stream_input
firmware               24576  19 amvdec_mavs,encoder,amvdec_avs2,amvdec_vp9,amvdec_vc1,amvdec_real,amvdec_mmpeg4,amvdec_mpeg4,amvdec_mmpeg12,amvdec_mpeg12,amvdec_mmjpeg,amvdec_mjpeg,amvdec_h265,amvdec_h264mvc,amvdec_mh264,amvdec_h264,amvdec_avs,stream_input,decoder_common
media_clock            36864  14 aml_hardware_dmx,amvdec_mavs,vpu,encoder,amvdec_avs2,amvdec_vp9,amvdec_mpeg12,amvdec_h265,amvdec_mh264,amvdec_h264,amvdec_avs,stream_input,decoder_common,firmware
tb_detect              20480  0
atbm8881_fe_32        122880  0
mali_kbase            471040  11
When I tried to boot from a flash drive, this console presented me with a huge pile of text, which at first shocked me. But after digging around for a while, I realized the essence of the first problem: The flash drive is not bootable only because it is stupidly incompatible with the bootloader. Later I found out that by changing the flash drive to a different one (the brand doesn’t matter), you can move on to solving subsequent problems, one of which was a non-working network adapter. But I came to this later. In the meantime, I wanted to understand what self-assembly of Armbian gives, what problems can be solved with its help.
Obtaining Armbian sources and compilation
Assembly of Armbian is incredibly simple and reliable. I didn’t have to install any third-party software because everything is assembled in a sandbox container, downloading all the necessary dependencies. I did the build on a Gentoo system, which lacks commands such as apt or deb, which are used in most installation scripts. The main thing is to allocate at least 35 gigabytes of space for this bacchanalia.
git clone https://github.com/armbian/build
cd build
/compile.sh EXPERT="yes"
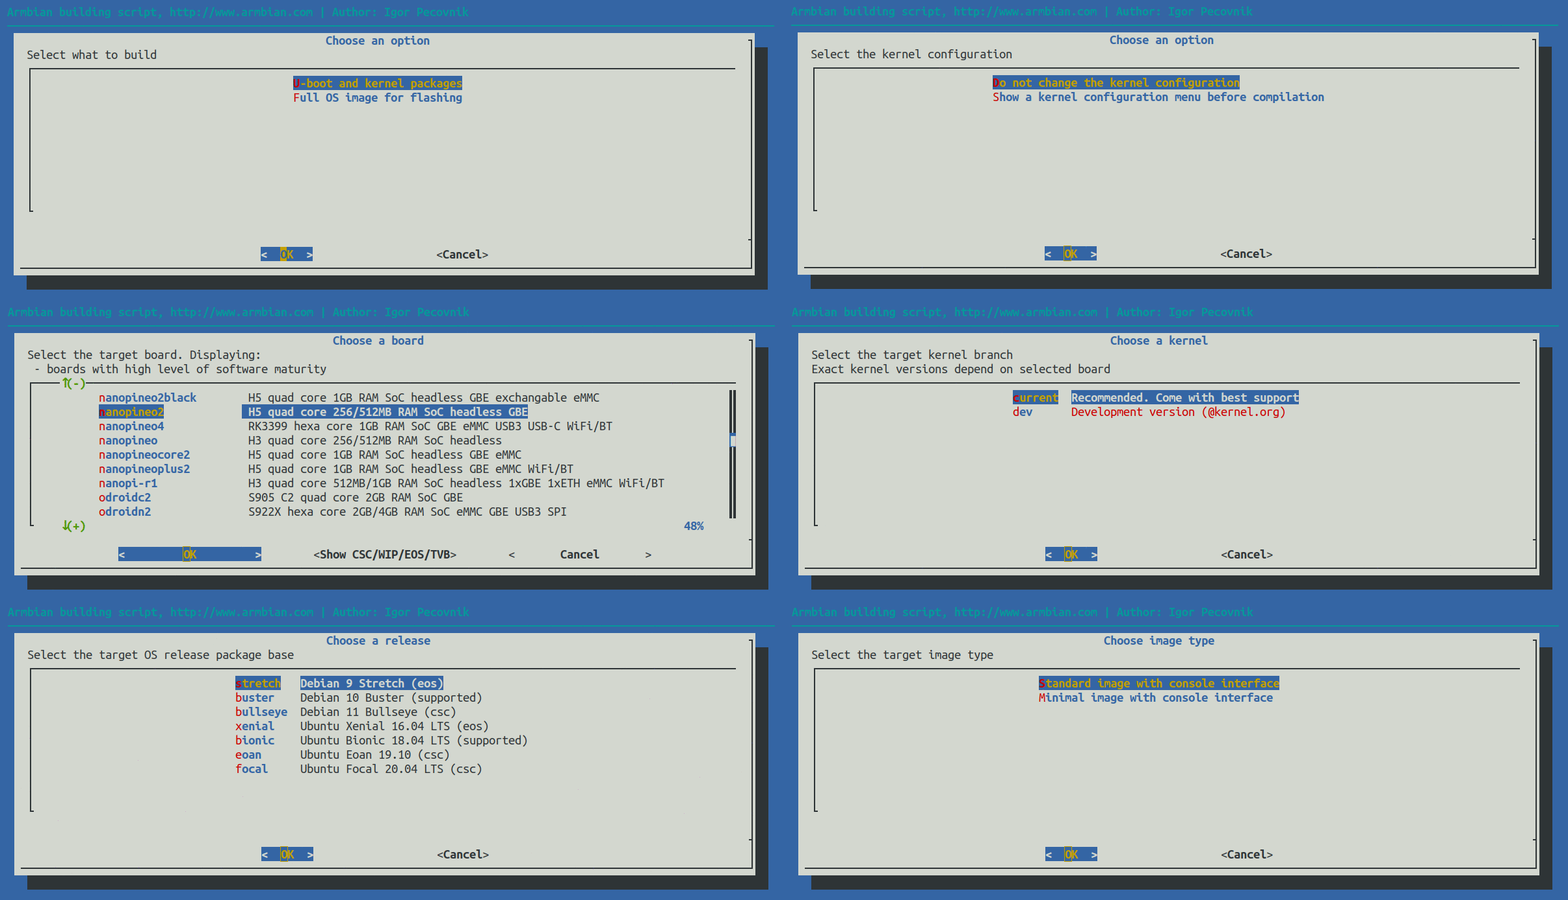
The EXPERT=”yes” parameter is needed so that we, as experts, can open experimental platforms that are inaccessible to noobs. I chose x96maxplus – “Amlogic S905X3 quad core 2-4GB RAM SoC eMMC GBE USB3 SPI“. Then we select one by one:
It’s not a sin to choose “Do not change the kernel configuration” if you are not a real expert. And a real expert at this stage will be able, for example, to include additional drivers in the compiled kernel.
x96maxplus – choose if you have an Amlogic s905x3 processor like me, otherwise figure out which platform is right for you.
current or edge (latest). I settled on current to choose not the most experimental base systems. But this does not mean at all that with this choice you can protect yourself from troubles that have been waiting for you for a long time, as soon as you called yourself an expert.
Select the base OS.
Only Ubuntu Jammy 22.04 LTS worked for me. I couldn’t get kde-plasma to work normally in Debian 11 and 12 because I didn’t try to remove it and install it again via apt (I was talking about similar troubles).Desktop Environment.
I chose kde-plasma. And yes, using kde-plasma on a console is a mistake (it’s terribly slow).config-base is just one option
Choose the software you need

Next comes the compilation process, which can be repeated without going through all the steps again through the menu. The configuration menu only generated the following command, the launch of which will create an image for the bootable media:
./compile.sh build BOARD=x96maxplus BRANCH=current BUILD_DESKTOP=yes BUILD_MINIMAL=no DESKTOP_APPGROUPS_SELECTED='3dsupport browsers' DESKTOP_ENVIRONMENT=kde-plasma DESKTOP_ENVIRONMENT_CONFIG_NAME=config_base EXPERT=yes KERNEL_CONFIGURE=no RELEASE=jammy Unfortunately, the compilation did not solve the problems of the eth0 network interface not working, but in the future it allowed us to try out different versions of various Debian and Ubuntu distributions, while the choice of ready-made builds is very limited. If you are not driven by difficulties to experiment like me, feel free to skip the self-assembly. One of these difficulties for me was installing kde-plasma via apt. I have no idea why this happens, but I noticed that sometimes programs compiled locally via the assembler work correctly, but those installed via apt are buggy. Specifically, KDE did not display icons and menus.
Writing an image to media
If there were no errors during compilation, then in the ./output/images/ directory the bootable disk image will wait to be written to the media. Use Rufus or Balena Etcher to write the image to a flash drive, and I’ll do it the old fashioned way:
dd if=output/images/Armbian_23.08.0_amlogic_s905x3_lunar_6.1.55_server_2023.10.02.img of=/dev/sde bs=1MYou can use either a USB flash drive or a MicroSD card as boot media. But keep in mind that the bootloader can be capricious, regardless of the brand. So it refused to work with my 32GB Samsung MicroSD. and Transcend 16GB, but it worked with an ancient 16GB noname card. with the inscription Taiwan and with a regular ancient Transcend 8GB USB flash drive. These errors look like this:
emmc/sd response crc error, cmd16, cmd->cmdarg=0x200, status=0x1ff2400
** Unrecognized filesystem type **
Edits of the received media
This stage was the most difficult for me and took the most time. In fact, at this stage you are as if you had downloaded a ready-made media image at the very beginning of the post. In order to achieve efficiency, I had to delve into the essence of the ongoing processes, which I will tell you about.
The fact is that this instruction is a hack. Of course, there is no provision for loading another operating system from a flash drive into the TV set-top box, nor are there any official alternative systems other than Android from the supplier. But it is possible to update from external media. This is the kind of media we need to make, and then switch to developer mode or use a toothpick to force the board to boot from it.
The main problem is that set-top boxes, even on the same processor, can differ without warning from manufacturers (after all, identical models are produced in different Chinese basements, as we guess). They will replace the Realtek network chip with Ampak or decide not to solder the external PHY, they will make changes in the drivers to their firmware, but they will not focus on this. And you need to know this in order to select the appropriate bootloader and configure these devices.
So, for correct loading, we need to find a u-boot bootloader suitable for our platform and, specific to the ARM platform, a DTB (device tree blob) file.
The situation is complicated by the fact that the name on the console is not written in full. For example, mine says X96 Max+. But to find out that it is “100W” I had to work hard. After all, this particular model has on board the radio module chip responsible for BT and Wifi, the less common W522A. You can take the firmware from a similar board, but the radio module will not work there. However, as a spoiler, I’ll say that it never worked for me in Armbian.
In ARM embedded systems, Device Tree structures are used to initialize board devices that cannot be detected automatically. Such devices include processor and memory. In the Device Tree Source (DTS) source files, devices, frequencies, and addresses are described in text. These human-readable files are compiled into DTB (Device Tree Blob) binaries, which the Linux kernel already understands. In order not to drown in the jungle of device trees, we just need to select the files that are suitable for our DTB board. Open the armbi_boot section on the flash drive you received after burning the image. In the directory ./dtb/amlogic there is a collection of files from which we need to select the one suitable for our board. It would seem that we take meson-sm1-h96-max.dtb or meson-g12a-x96-max.dtb and enter it in ./extlinux/extlinux.conf . But it was not there! The network does not work with any of them:
root@aml-s9xx-box:/home/oper# ifconfig eth0 192.168.1.4/24
SIOCSIFFLAGS: Connection timed out
If I’m still ready to put up with without wifi/BT, then without ethernet this microcomputer is not suitable for me at all. A collection of DTB files is located on a flash drive in the armbi_boot section in the ./dtb/amlogic directory.
After reading the Armbian forums, everyone who has a console like mine X96 Max Plus 100W used the file meson-sm1-x96-max-plus-100m.dtb. But my network didn’t work with it either. And the whole secret turned out to be that they had a PHY chip for a gigabit network sealed on the set-top box, a photo of which I showed at the very beginning. I will need a subsystem built into the SOC, which is called RMII and there is a DTB file that supports it: meson-g12a-x96-max-rmii.dtb. This is the DTB file that allowed me to use eth0 in Armbian. It would be impossible to figure out this problem and the problem with the incompatible flash drive without a UART console.
u-boot lessons
It’s time to tell you how I found out that the flash drive is simply incompatible with the bootloader. The solution is simple, but to see it I had to spend a lot of time and deal with the u-boot bootloader, boot scripts and the messages it gave me. It’s just like in the story about a specialist who charged $1 for hitting with a hammer and $999 for knowing where to hit. I’m sharing a recipe for figuring out where to hit.
Press Ctrl+C in the console immediately after turning it on many times and get to the command line of the u-boot boot loader. This is not Linux at all, but you will have to work with peripheral devices in it. And so that you can get to the bottom of it in case of a loading problem, I’ll show you a few tricks for priming.
The help command will write you a list of supported commands. These commands can be used to create scripts that are somewhat reminiscent of bash.
g12a_u212_v1#help
?       - alias for 'help'
aml_sysrecovery- Burning with amlogic format package from partition sysrecovery
amlmmc  - AMLMMC sub system
amlnf   - aml mtd nand sub-system
autoscr - run script from memory
avb     - avb
base    - print or set address offset
bcb     - bcb
bmp     - manipulate BMP image data
boot_cooling- cpu temp-system
booti   - boot arm64 Linux Image image from memory
bootm   - boot application image from memory
bootp   - boot image via network using BOOTP/TFTP protocol
cbusreg - cbus register read/write
chpart  - change active partition
clkmsr  - Amlogic measure clock
cmp     - memory compare
cp      - memory copy
crc32   - checksum calculation
cvbs    - CVBS sub-system
dcache  - enable or disable data cache
defenv_reserv- reserve some specified envs after defaulting env
dhcp    - boot image via network using DHCP/TFTP protocol
dovi    - Dolby_vision sub-system
dtimg   - manipulate dtb/dtbo Android image
echo    - echo args to console
efuse   - efuse commands
efuse_user- efuse user space read write ops
emmc    - EMMC sub system
env     - environment handling commands
ethloop - ethloop       - loopback test using ethernet test package

exit    - exit script
ext4load- load binary file from a Ext4 filesystem
ext4ls  - list files in a directory (default /)
ext4size- determine a file's size
false   - do nothing, unsuccessfully
fastboot- use USB Fastboot protocol
fatinfo - print information about filesystem
fatload - load binary file from a dos filesystem
fatls   - list files in a directory (default /)
fatsize - determine a file's size
fdt     - flattened device tree utility commands
forceupdate- forceupdate
get_avb_mode- get_avb_mode
get_bootloaderversion- print bootloader version
get_rebootmode- get reboot mode
get_system_as_root_mode- get_system_as_root_mode
get_valid_slot- get_valid_slot
go      - start application at address 'addr'
gpio    - query and control gpio pins
gpt     - GUID Partition Table
guid    - GUID - generate Globally Unique Identifier based on random UUID
hdmitx  - HDMITX sub-system 20190123
help    - print command description/usage
i2c     - I2C sub-system
icache  - enable or disable instruction cache
img_osd - image osd sub-system
imgread - Read the image from internal flash with actual size
itest   - return true/false on integer compare
jtagoff - disable jtag
jtagon  - enable jtag
keyman  - Unify key ops interfaces based dts cfg
keyunify- key unify sub-system
ld_bl40 - load bl40 and run bl40.bin from bl33
loadb   - load binary file over serial line (kermit mode)
loadx   - load binary file over serial line (xmodem mode)
loady   - load binary file over serial line (ymodem mode)
loop    - infinite loop on address range
macreg  - ethernet mac register read/write/dump
md      - memory display
mm      - memory modify (auto-incrementing address)
mmc     - MMC sub system
mmcinfo - display MMC info
mtdparts- define flash/nand partitions
mw      - memory write (fill)
mwm     - mw mask function
nand    - NAND sub-system
nboot   - boot from NAND device
nm      - memory modify (constant address)
open_scp_log- print SCP messgage
osd     - osd sub-system
phyreg  - ethernet phy register read/write/dump
ping    - send ICMP ECHO_REQUEST to network host
printenv- print environment variables
query   - SoC query commands
rarpboot- boot image via network using RARP/TFTP protocol
readMetadata- readMetadata
read_temp- cpu temp-system
reboot  - set reboot mode and reboot system
reset   - Perform RESET of the CPU
ringmsr - Amlogic measure ring
rpmb_state- RPMB sub-system
rsvmem  - reserve memory
run     - run commands in an environment variable
saradc  - saradc sub-system
saradc_12bit- saradc sub-system
saveenv - save environment variables to persistent storage
sdc_burn- Burning with amlogic format package in sdmmc
sdc_update- Burning a partition with image file in sdmmc card
set_active_slot- set_active_slot
set_trim_base- cpu temp-system
set_usb_boot- set usb boot mode
setenv  - set environment variables
sf      - SPI flash sub-system
showvar - print local hushshell variables
sleep   - delay execution for some time
sspi    - SPI utility command
store   - STORE sub-system
systemoff- system off
tee_log_level- update tee log level
temp_triming- cpu temp-system
test    - minimal test like /bin/sh
tftpboot- boot image via network using TFTP protocol
true    - do nothing, successfully
ubi     - ubi commands
ubifsload- load file from an UBIFS filesystem
ubifsls - list files in a directory
ubifsmount- mount UBIFS volume
ubifsumount- unmount UBIFS volume
ui      - ui sub-system
unpackimg- un pack logo image into pictures
update  - Enter v2 usbburning mode
usb     - USB sub-system
usb_burn- Burning with amlogic format package in usb
usb_update- Burning a partition with image file in usb host
usbboot - boot from USB device
uuid    - UUID - generate random Universally Unique Identifier
version - print monitor, compiler and linker version
viu_probe- enable viu probe in no secure chip
vout    - VOUT sub-system
vout2   - VOUT2 sub-system
vpp     - vpp sub-system
vpu     - vpu sub-system
write_trim- cpu temp-system
write_version- cpu temp-system
In addition to the commands in u-boot, it is very important to understand the essence of variables.
setenv – creates, overrides or clears a variable if no value is specified.
Examples.
Set ‘a’ to ‘123’:
setenv a 123Erase variable ‘a’
setenv aPrint value ‘a’
printenv aAfter manipulating variables, you can save the values so that after a reboot they are not forgotten with the save or saveenv command.
Booting from external media begins with a script in the root directory of the first partition (armbi_boot) of this media in the file aml_autoscript. This is a binary file that should not be directly edited, although the code can be parsed in text form when opening this file. The code starts like this:
if printenv bootfromsd; then exit; else setenv ab 0; fi;One of the important variables that is used by many scripts is ‘bootfromsd’. Believe it or not, in order to boot from external media, this variable must be erased, as we see from this code. You can take pieces of code from this script and test them on the u-boot command line. But to test these pieces of code, you need to understand a few more things that u-boot can do.
The usb subsystem allows you to work with a USB flash drive:
usb start – initialize the subsystem
Insert the flash drive and enter:
fatls usb 0 – show files on the USB device with index 0.
This command works with both FAT and EXT4 partitions. So you don’t have to worry about the Armbian BOOT partition being stored in ext4. Next we count the file boot.scr to the memory area at address 0x1000000:
g12a_u212_v1# fatload usb 0 0x1000000 boot.scr
reading boot.scr
8147 bytes read in 27 ms (293.9 KiB/s)
Next, run the downloaded script with the command autoscr:
autoscr 0x1000000Similarly, you can work with the mmc subsystem, only to initialize it you need to run the command
mmc rescanIn general, the essence of all u-boot scripts is to try to initialize the next subsystem and load a file, and then act depending on the result of these actions and the set variables.
After digesting the above information, it makes sense to look at the following u-boot environment variable, which contains the boot script from the card:
recovery_from_sdcard=if fatload mmc 0 ${loadaddr} aml_autoscript; then autoscr ${loadaddr}; fi;if fatload mmc 0 ${loadaddr} recovery.img; then if fatload mmc 0 ${dtb_mem_addr} dtb.img; then echo sd dtb.img loaded; fi;wipeisb; setenv bootargs ${bootargs} ${fs_type};bootm ${loadaddr};fi;This script tries to download a file from mmc under index 0 aml_autoscript and run it. If unsuccessful, tries to download recovery.img And dtb.imgand if they are loaded, reports this, modifies the variable bootargs and downloads the application to the download address with the command bootm. This script saved in a variable recovery_from_sdcard can be run with the following command:
run recovery_from_sdcardIt is this script that is used to launch our system from an SD card. If something went wrong during boot, check all the steps from the u-boot command line.
When I messed up the boot, killing the system on EMMC, I stupidly redefined this variable:
setenv recovery_from_sdcard 'usb start;fatload usb 0 0x1000000 u-boot.ext;go 0x1000000'Check that everything is saved:
g12a_u212_v1#printenv recovery_from_sdcard
recovery_from_sdcard=usb start;fatload usb 0 0x1000000 u-boot.ext;go 0x1000000
Then you need to save these settings (you saved the previous value so you can return it to how it was when you get tired of it!?) But here another problem of mine came up:
g12a_u212_v1#saveenv
Saving Environment to aml-storage...
get partition info failed !!
My u-boot does not work with EMMC. At this stage, crutches begin to get boring. I would like to sit down, thoroughly understand this issue and write a normal bootloader for the set-top box. But for now I’m just at the beginning of my journey.
And now the cherry on the cake – from u-boot you can launch another u-boot in three steps by loading it into memory and running the binary code at the address with the command go. This is what launching u-boot from a file looks like u-boot-x96maxplus.bin:
usb start
fatload usb 0 0x1000000 u-boot-x96maxplus.bin
g12a_u212_v1#go 0x1000000
## Starting application at 0x01000000 ...


U-Boot 2021.07-rc3-00183-gd6e1cdad51-dirty (May 31 2021 - 22:33:28 +0800) x96-max-plus

Model: AMedia X96 Max+
SoC:   Amlogic Meson SM1 (Unknown) Revision 2b:b (1:2)
DRAM:  3.8 GiB
MMC:   sd@ffe03000: 0, sd@ffe05000: 1, mmc@ffe07000: 2
Loading Environment from nowhere... OK
In:    serial
Out:   serial
Err:   serial
Net:   eth0: ethernet@ff3f0000
Hit any key to stop autoboot:  0
starting USB...
Bus usb@ff500000: Register 3000140 NbrPorts 3
Starting the controller
USB XHCI 1.10
scanning bus usb@ff500000 for devices... 2 USB Device(s) found
       scanning usb for storage devices... 1 Storage Device(s) found

Device 0: Vendor: JetFlash Rev: 1100 Prod: Transcend 8GB
            Type: Removable Hard Disk
            Capacity: 7722.0 MB = 7.5 GB (15814656 x 512)
... is now current device
Scanning usb 0:1...
Found /extlinux/extlinux.conf
Retrieving file: /extlinux/extlinux.conf
577 bytes read in 12 ms (46.9 KiB/s)
1:      Armbian
Retrieving file: /uInitrd
23401755 bytes read in 966 ms (23.1 MiB/s)
Retrieving file: /Image
27363840 bytes read in 1133 ms (23 MiB/s)
append: root=UUID=1fa9b58c-1f95-468b-868f-6dbc919d31f3 rootflags=data=writeback console=ttyAML0,115200n8 console=tty0 rw no_console_suspend consoleblank=0 fsck.fix=yes fsck.repair=yes net.ifnames=0 splash plymouth.ignore-serial-consoles
Retrieving file: /dtb/amlogic/meson-g12a-x96-max-rmii.dtb
74923 bytes read in 16 ms (4.5 MiB/s)
Moving Image from 0x8080000 to 0x8200000, end=9cb0000
## Loading init Ramdisk from Legacy Image at 13000000 ...
   Image Name:   uInitrd
   Image Type:   AArch64 Linux RAMDisk Image (gzip compressed)
   Data Size:    23401691 Bytes = 22.3 MiB
   Load Address: 00000000
   Entry Point:  00000000
   Verifying Checksum ... OK
## Flattened Device Tree blob at 08008000
   Booting using the fdt blob at 0x8008000
   Loading Ramdisk to 3e9ae000, end 3ffff4db ... OK
   Loading Device Tree to 000000003e998000, end 000000003e9ad4aa ... OK

Starting kernel ...
...
So, if you can’t find a suitable u-boot with EMMC support, then you can solve the problem head-on and work only from a flash drive with the boot that you have. To do this, create a file on your computer aml_autoscript.cmd with content:
usb start
fatload usb 0 0x1000000 u-boot.ext
go 0x1000000
To boot from an MMC card, the code should look like this:
mmc rescan
fatload mmc 0 0x1000000 u-boot.ext
go 0x1000000
Of course, instead of u-boot.ext you need to substitute the name of the bootloader file from your flash drive or rename it u-boot.ext. We compile aml_autoscript.cmd into a binary and put the resulting aml_autoscript on a flash drive in the boot section:
mkimage -C none -A arm -T script -d aml_autoscript.cmd aml_autoscriptmkimage – this is a program from the package u-boot-tools.
At this stage you need to make sure that the file extlinux/extlinux.conf The correct FDT is registered. If extlinux.conf at this address renamed to extlinux.conf.bakthen you need to change the FDT in the file uEnv.txt (for Armbian 6).
Launch
As I said, booting from a flash drive is enabled with a toothpick, but there is another option.
Insert external media with the system, boot into Android and switch to developer mode. To do this, go to settings, select version information and click on it five times. A message should appear indicating that the mode is activated.
Install adb (usually the package android-tools-adb) and running two commands over the network for the IP address of your set-top box over the network:
adb connect x.x.x.x
adb shell reboot update
As a result, the system boots. If the display manager and desktop environment were selected, it will boot and ask for a password. The initial password of the Armbian root system is: 1234, but the system forced me to create all users with passwords at the first boot. Using a TV set-top box as a desktop computer is not the best idea, despite the fact that now even the Panfrost driver, which implements OpenGL for ARM, is already built into the system. At best, like a thin client. Youtube shows videos without any stutters, but the system itself leaves much to be desired in terms of responsiveness. Perhaps using fast media will improve the situation, but I have some trouble and bad luck with this.
Summary
So, to summarize, to install Armbian on a TV-box, we just need to prepare bootable media and force the set-top box to boot from it:
download the Armbian system image;
write the image to a USB flash drive or memory card;
register DTB files in ./extlinux/extlinux.conf or uEnv.txt depending on the version of Armbian
rename the selected u-boot file from this particular bootloader board to u-boot.ext;
register the file with network settings /etc/network/interfaces.d/eth0;
switch to update mode from our media in one of two ways: developer mode or with a toothpick;
boot, make sure that the device appears on the network and start setting up;
Links
Armbian repository:
https://github.com/armbian/build
Proceedings on launching Armbian on TV set-top boxes of various models:
https://github.com/ophub/amlogic-s9xxx-armbian
Some explanations of the situation on github regarding the X96 Max Plus 100W set-top box:
https://github.com/ophub/amlogic-s9xxx-armbian/issues/909
Scraping of the X96 Max Plus console after damage to the EMMC system through the closure of the boot contact on the board:
https://www.youtube.com/watch?v=3do6lDOj2LU


