Getting Started with PyTorch 2.0 and Hugging Face Transformers

In this post, we’ll take a look at working with PyTorch 2.0 and Hugging Face Transformers using the fine-tune BERT model for text classification as an example.
PyTorch 2.0 better in performance, speed, more Python-friendly, but still as dynamic as before.
Let’s go over the following steps:
Setting up the environment and installing PyTorch 2.0.
Loading and preparing the dataset.
Fine-tune and BERT model estimation with the Hugging Face Trainer.
Running inference and testing the model.
Brief Introduction: PyTorch 2.0
PyTorch 2.0, or more specifically 1.14, is fully backward compatible with previous versions. It won’t require any changes to your existing PyTorch code, but it can optimize your code if you add model = torch.compile(model). The PyTorch team explains the emergence of a new version in their FAQ: “We’ve released significant new features that we think change the way you use PyTorch, which is why we’ve named it 2.0 instead of 1.14.”
These new features include full support for TorchDynamo, AOTAutograd, PrimTorch and TorchInductor. This allows PyTorch 2.0 to achieve 1.3x-2x faster training times. on more than 40 model architectures from Hugging Face Transformers. More information about PyTorch 2.0 can be found on the official “GET STARTED”.
Note: This tutorial was created and run on an AWS EC2 g5.xlarge instance including an NVIDIA A10G GPU.
1. Setting up the environment and installing PyTorch 2.0
The first step is to install PyTorch 2.0 and libraries from Hugging Face, transformers And datasets.
# Установка PyTorch 2.0 с cuda 11.7
!pip install "torch>=2.0" --extra-index-url https://download.pytorch.org/whl/cu117 --upgrade --quiet
Also install the latest version transformers which includes native PyTorch 2.0 integration in Trainer.
# Установка transformers и dataset
!pip install "transformers==4.27.1" "datasets==2.9.0" "accelerate==0.17.1" "evaluate==0.4.0" tensorboard scikit-learn
# Установка git-lfs для загрузки модели и логов в hugging face hub
!sudo apt-get install git-lfs --yes
In this example, for model versioning, we will use Hugging face hub. To upload a model to the Hub, you first need to register on Hugging face. To log into your account and save the token (access key) on the disk, use login from the package huggingface_hub.
from huggingface_hub import login

login(
  token="", # ADD YOUR TOKEN HERE
  add_to_git_credential=True
)
2. Loading and preparing the dataset
We will train a text classification model on a dataset BANKING77. The BANKING77 dataset contains text messages from clients in the banking/financial sector. It consists of 13,083 hits, divided into 77 intents (classes).
To download BANKING77 we will use the method load_dataset() from the library 🤗 Datasets.
from datasets import load_dataset

# Dataset id from huggingface.co/dataset
dataset_id = "banking77"

# Load raw dataset
raw_dataset = load_dataset(dataset_id)

print(f"Train dataset size: {len(raw_dataset['train'])}")
print(f"Test dataset size: {len(raw_dataset['test'])}")
Let’s look at an example from a dataset.
from random import randrange

random_id = randrange(len(raw_dataset['train']))
raw_dataset['train'][random_id]
# {'text': "I can't get google pay to work right.", 'label': 2}
To train the model, you must first convert the text into tokens. This is done by the tokenizer. It also converts the tokens to their corresponding identifiers in the pretrained dictionary. For more information on tokenization, see chapter 6 from Hugging Face Course.
from transformers import AutoTokenizer

# Model id to load the tokenizer
model_id = "bert-base-uncased"
# Load Tokenizer
tokenizer = AutoTokenizer.from_pretrained(model_id)

# Tokenize helper function
def tokenize(batch):
    return tokenizer(batch['text'], padding='max_length', truncation=True, return_tensors="pt")

# Tokenize dataset
raw_dataset =  raw_dataset.rename_column("label", "labels") # to match Trainer
tokenized_dataset = raw_dataset.map(tokenize, batched=True,remove_columns=["text"])

print(tokenized_dataset["train"].features.keys())
# dict_keys(['input_ids', 'token_type_ids', 'attention_mask','lable'])
3. Fine-tune and Estimation of the BERT Model with the Hugging Face Trainer
After preparing the data, you can start training the model. We will use the model bert-base-uncased. The first step is to load the model using the class AutoModelForSequenceClassification from Hugging Face Hub. So we create a model with the weights of the pre-trained BERT model, but with a “head” on top specifically for our classification task. Here we are passing in the number of classes (77) from our dataset and label names to make the output more readable.
from transformers import AutoModelForSequenceClassification

# Model id to load the tokenizer
model_id = "bert-base-uncased"

# Prepare model labels - useful for inference
labels = tokenized_dataset["train"].features["labels"].names
num_labels = len(labels)
label2id, id2label = dict(), dict()
for i, label in enumerate(labels):
    label2id[label] = str(i)
    id2label[str(i)] = label

# Download the model from huggingface.co/models
model = AutoModelForSequenceClassification.from_pretrained(
    model_id, num_labels=num_labels, label2id=label2id, id2label=id2label
)
We will monitor the quality of the model during training. Trainer supports evaluation during training, for this we define compute_metrics. Using the library evaluate for calculation metrics f1 on the test dataset.
import evaluate
import numpy as np

# Metric Id
metric = evaluate.load("f1")

# Metric helper method
def compute_metrics(eval_pred):
    predictions, labels = eval_pred
    predictions = np.argmax(predictions, axis=1)
    return metric.compute(predictions=predictions, references=labels, average="weighted")
The last step is to define hyperparameters TrainingArguments for learning. Here we will add parameters from PyTorch 2.0 for fast training time. To use the latest PyTorch 2.0 enhancements, pass the option torch_compile V TrainingArguments.
We also use integration Trainer with Hugging Face Hub to upload model weights, logs and metrics to the repository during training.
from huggingface_hub import HfFolder
from transformers import Trainer, TrainingArguments

# Id for remote repository
repository_id = "bert-base-banking77-pt2"

# Define training args
training_args = TrainingArguments(
    output_dir=repository_id,
    per_device_train_batch_size=16,
    per_device_eval_batch_size=8,
    learning_rate=5e-5,
	num_train_epochs=3,
	# PyTorch 2.0 specifics
    bf16=True, # bfloat16 training
	torch_compile=True, # optimizations
    optim="adamw_torch_fused", # improved optimizer
    # logging & evaluation strategies
    logging_dir=f"{repository_id}/logs",
    logging_strategy="steps",
    logging_steps=200,
    evaluation_strategy="epoch",
    save_strategy="epoch",
    save_total_limit=2,
    load_best_model_at_end=True,
    metric_for_best_model="f1",
    # push to hub parameters
    report_to="tensorboard",
    push_to_hub=True,
    hub_strategy="every_save",
    hub_model_id=repository_id,
    hub_token=HfFolder.get_token(),

)

# Create a Trainer instance
trainer = Trainer(
    model=model,
    args=training_args,
    train_dataset=tokenized_dataset["train"],
    eval_dataset=tokenized_dataset["test"],
    compute_metrics=compute_metrics,
)
To start training, use the method train from Trainer.
# Start training
trainer.train()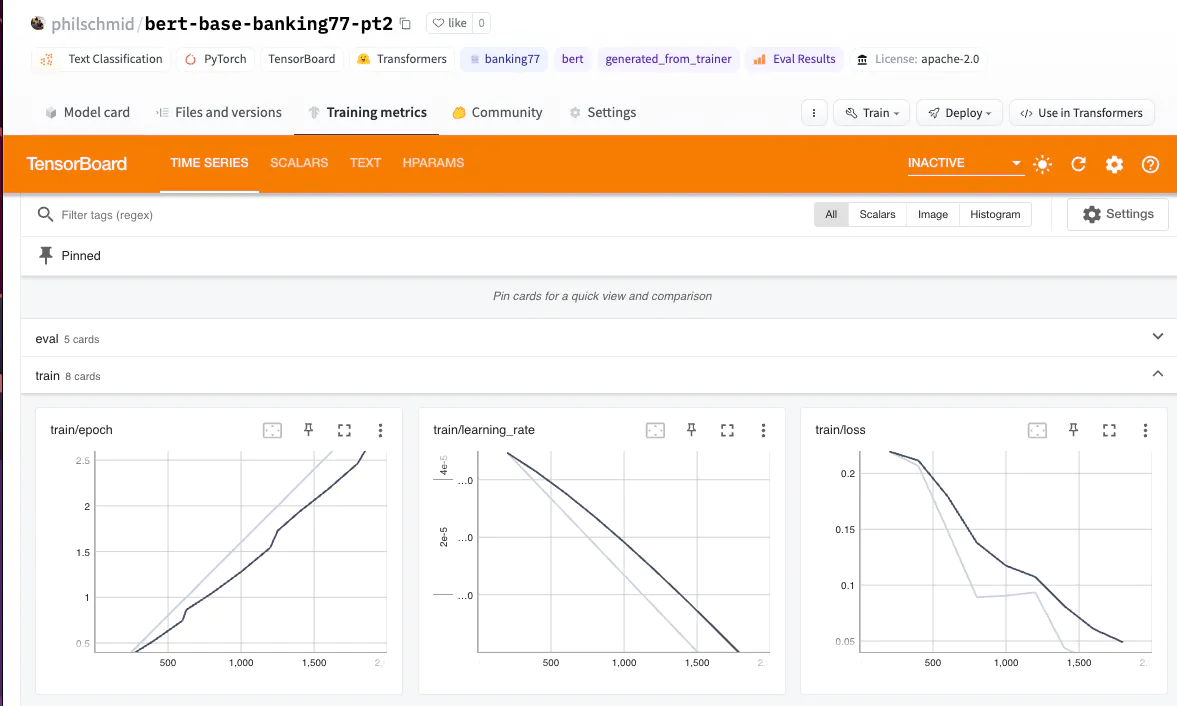
To compare training times, we also ran training without the option torch_compile:
{'train_runtime': 696.2701, 'train_samples_per_second': 43.1, 'eval_f1': 0.928788}Using the option torch_compile and optimization adamw_torch_fused, training time is reduced by 52.5% compared to learning without PyTorch 2.0:
{'train_runtime': 457.7964, 'train_samples_per_second': 65.55, 'eval_f1': 0.931773}Thus, the training time decreased from 696 to 457 seconds. Meaning train_samples_per_second increased from 43 to 65. The value of the f1-metric is the same or slightly better than when learning without using torch_compile.
PyTorch 2.0 is incredibly powerful! 🚀
Let’s store our results and tokenizer in the Hugging Face Hub and create a model card.
# Save processor and create model card
tokenizer.save_pretrained(repository_id)
trainer.create_model_card()
trainer.push_to_hub()
4. Run the inference and test the model
Let’s look at the inference of the model on a text example. The final classifier is obtained using pipeline from the library transformers.
from transformers import pipeline

# load model from huggingface.co/models using our repository id
classifier = pipeline("sentiment-analysis", model=repository_id, tokenizer=repository_id, device=0)

sample = "I have been waiting longer than expected for my bank card, could you provide information on when it will arrive?"


pred = classifier(sample)
print(pred)
# [{'label': 'card_arrival', 'score': 0.9903606176376343}]
Conclusion
In this post, we figured out how to use PyTorch 2.0 to train a text classification model on the BANKING77 dataset. PyTorch 2.0 is a powerful tool to speed up your learning time. In our example, running on NVIDIA A10G, we were able to achieve 52.5% better performance.
Moreover, we have seen how it’s easy to train BERT for your task using Hugging Face and PyTorch.
My telegram channel about DS and more.