Free Oracle Cloud Servers & Mikrotik – Site-to-Site VPN
Providing free servers from an unpopular cloud provider is nothing new. And the news is that now Oracle, in addition to two barely alive free x86_64 servers, opens up access to ARM64 capacities – for everyone, for free, and let no one leave offended!© The ARM offer is much more productive than on traditional processors. Adding to this the crazy free “buns”, I wonder: why do I still pay for VPS and keep my own server in the basement ?! All this can be thrown away if you can reliably and safely connect the data center to your home network.
")
Resource Creation
I will not describe the creation of resources (virtual machines, networks and rules), all this is described in sufficient detail in the article “Getting Free Servers in Oracle Cloud Free Tier”. I will only note that in order to get exactly the ARM64 instance, you need to change the Shape when creating the Compute Instance to Ampere and select the allocated resources (for free use, they promise 1 instance with 4 OCPU and 24 GB RAM or 4 times smaller, i.e. 1 OCPU / 6 GB ).

What’s next?
After creating a cluster of 6 virtual machines, loading them with the most minimal payload, it became clear that I wanted more. I would like to shift all home services to oracle data centers, namely: small databases of all stripes, useful in software development, routine automation server n8n, local gitea for backups of github repositories, Pi-hole and other delights of homebrew hosting. But I really don’t want to put all this on the Internet, even with passwords, even with firewalls, nothing at all.
VPN will help me! Options were considered:
-
VPN server on Mikrotik + VPN client in the cloud. This option requires either setting up a VPN on each instance, or setting up routing within the cloud network through one “master” instance, and VPN already on it. I didn’t like this option because it requires settings every time you recreate an instance, and sometimes you want to recreate them.
-
VPN server on one of the instances + VPN client on Mikrotik. The option is already better, but still, a “sacred cow” appears – an instance with a VPN server that cannot be killed, you need to experiment very carefully with it, and when re-creating, install everything over again.
-
Site to Site VPN. You just need to set up a VPN from the Oracle Cloud side, set up a VPN on Mikrotik, profit! There was only one problem. There are no instructions online on how to do this. Let’s figure it out… (here it is important to note that in order to implement this option, you must have a white IP on your Mikrotik).
So, with little experience setting up a VPN, a university-level understanding of computer networking, and no experience with cloud providers, I set about setting it up.
I want to warn the professional reader that there may and will be mistakes in the text related to understanding the subject area in cryptography and routing, the article does not claim to be encyclopedic accuracy, but is only intended to summarize and preserve the experience that the author has gathered by stepping on a rake and exploring various sources when creating a Site-to-Site VPN on Mikrotik.
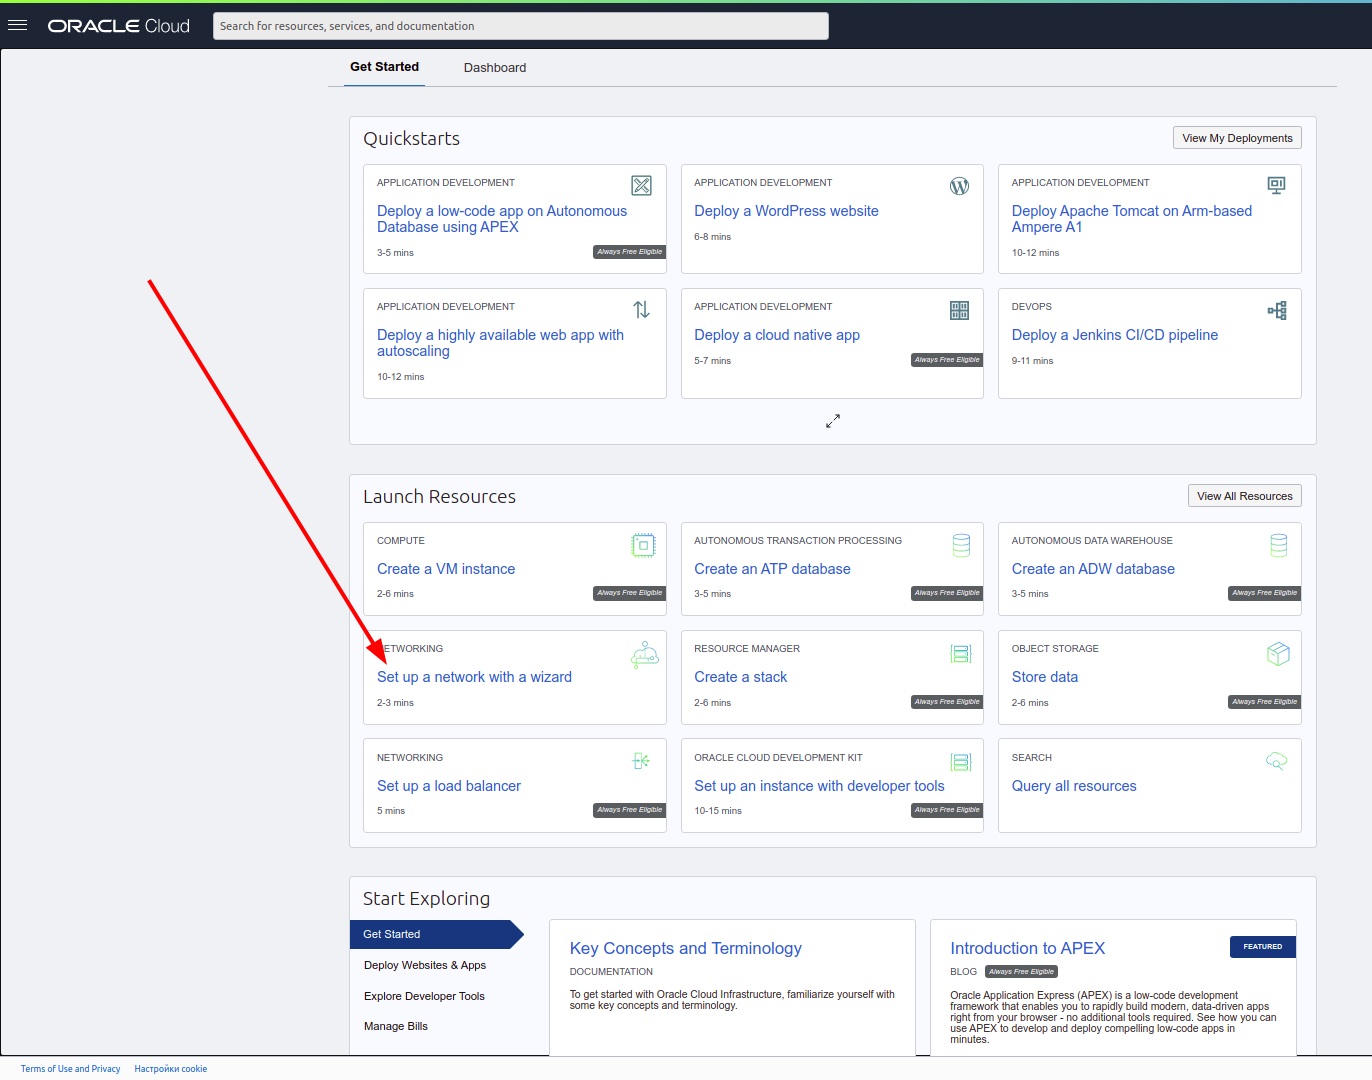
Setting up Oracle
The resource control panel has a network setup wizard that will guide the user through all the necessary steps in one place.
Choosing a VPN:
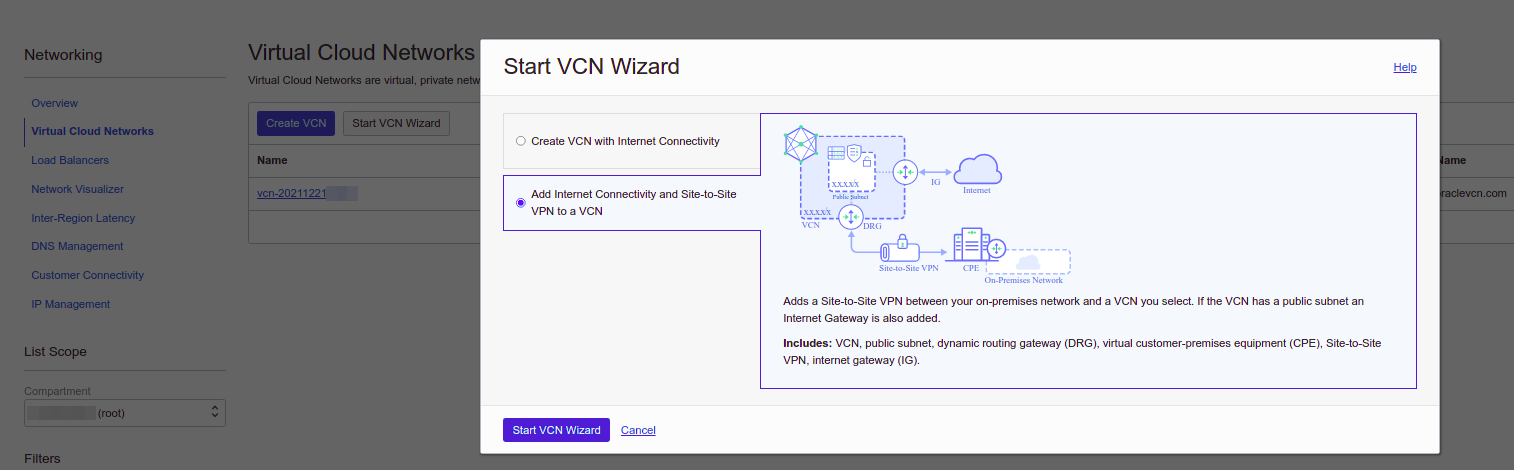
If you have created at least one compute instance in Oracle Infrastructure, you should have automatically created a “Virtual Cloud Network” service item, select it if it is not selected in the wizard. If this is the first attempt to create a VPN, you must choose to create a new “Dynamic Routing Gateway” (DRG) in the wizard, the name will be filled in automatically. When trying to create a VPN again, you can select an existing DRG.

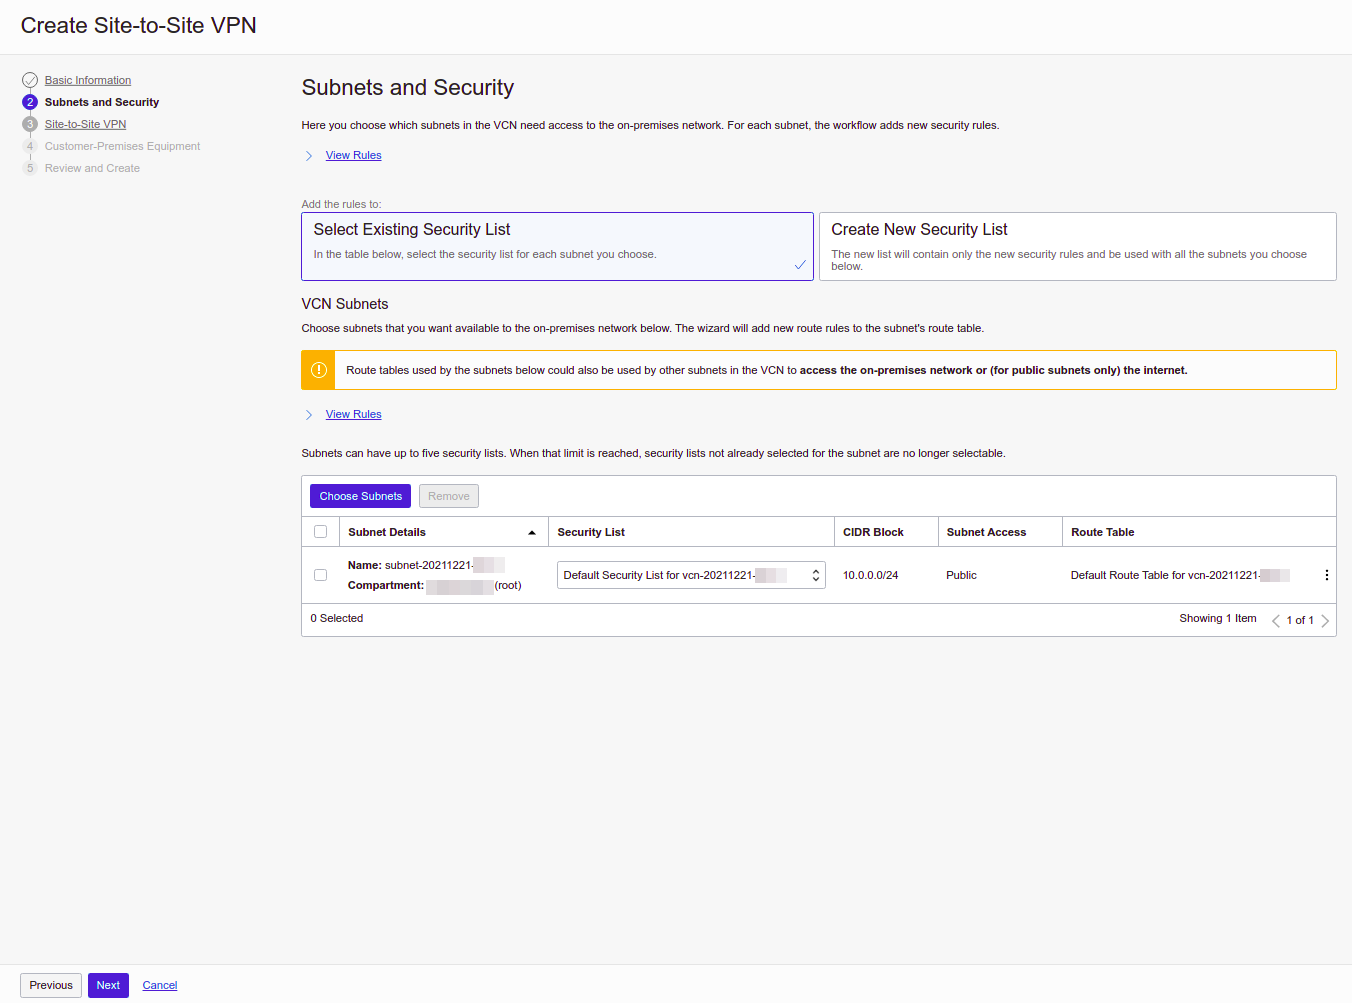
Subnets and security. The Security List allows you to configure firewall rules. You can, of course, choose the Defaul Security List that was automatically created during the creation of the first instance, but I still recommend creating a new one in order to be able to independently configure internal and external security.
The next step allows you to select routing settings. If the reader is familiar with the BGP dynamic routing protocol, it can be configured here. In the article, I will limit myself to a simpler option – this is static routing. If you have Mikrotik installed at home, you probably know which subnets are used in your internal network. In my case it is 192.168.6.0/24, it is for her that Oracle will send traffic via VPN to your Mikrotik.

From the side of Oracle, two tunnels are created – this is just a duplication for reliability.

If you wish, you can configure monitoring of the state of the tunnels, this will allow you to receive notifications when the connection is broken, but I did not do this.
Next, the crucial moment is the indication of the IP address of your router. You can check it on ifconfig.io or any other similar service, the same IP address must be on one of your router’s interfaces.

Check that everything is correct.


Then the cloud magic starts.
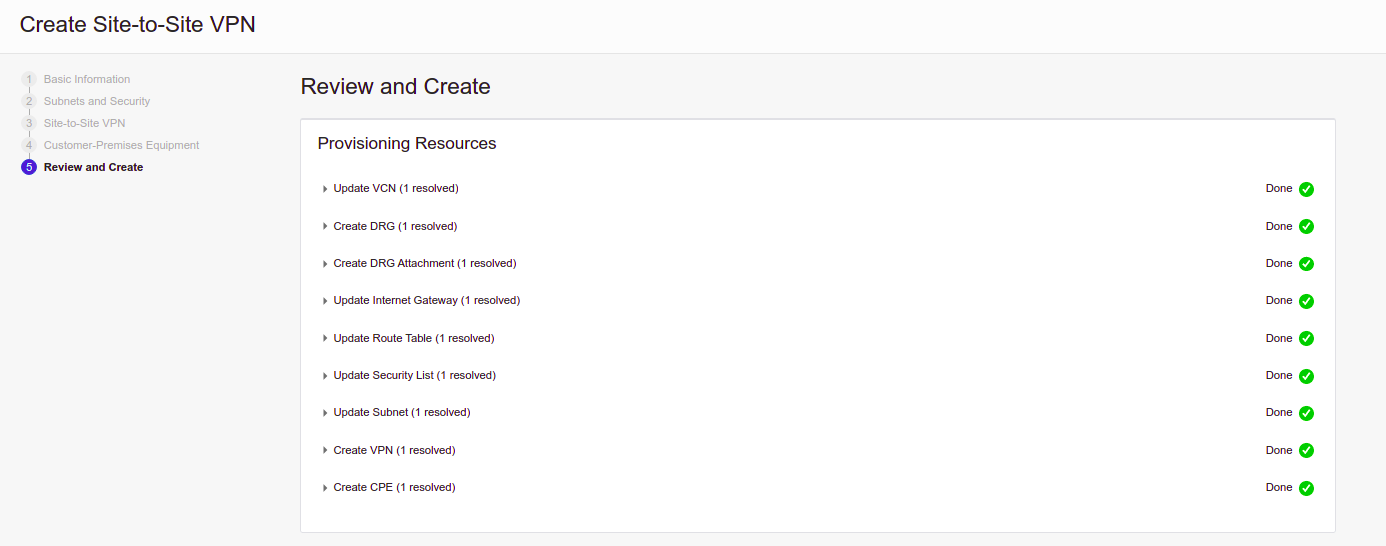
After a few seconds, your tunnel from the Oracle side is ready, you can view its settings.

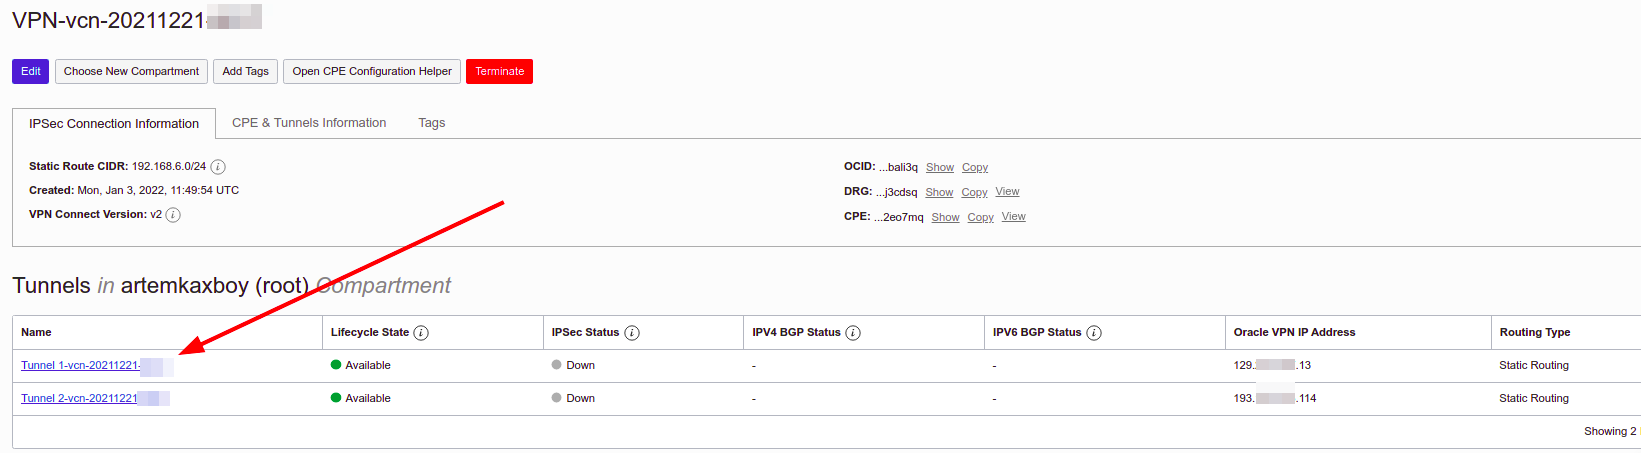
Pressing the View VPN button will show us the status and addresses of the two tunnels from the Oracle side, do not close the page, the addresses will still be useful to us.
We also need a Shared Secret for one (or each) tunnel, you can see it by falling inside the link with the name of the tunnel, there is a button to display the key.

Mikrotik setup
The most time-consuming and inconvenient part is over, it remains to set up a home router. This article helped me a lot here.AWS Site-to-Site VPN with MikroTik (RouterOS)“, thanks to the author. I had to supplement it with parameters from Oracle Documentation and experiments.
Further I will give the necessary parameters and the working order of their configuration, without explaining what it is and why it is needed, the inquisitive reader will be able to find descriptions and explanations in the Oracle or Mikrotik documentation.
# Настройки ipsec proposal должны соответствовать настройкам Phase2
# PFC group 5 = modp1536
/ip ipsec proposal add auth-algorithms=sha256
    enc-algorithms=aes-256-gcm lifetime=1h name=oracle-proposal-phase2
    pfs-group=modp1536

# Настройки ipsec profile должны соответствовать настройкам Phase1
/ip ipsec profile add dh-group=ecp384 enc-algorithm=aes-256
    hash-algorithm=sha384 lifetime=8h name=oracle-profile-phase1

# Здесь нужно вставить IP адрес
/ip ipsec peer add address=<Oracle VPN 1 IP> name=oracle1-peer
    profile=oracle-profile-phase1

# Здесь нужно использовать Shared Secret который мы получили на последнем шаге настройки Oracle
/ip ipsec identity add peer=oracle1-peer
    secret="<Oracle VPN1 Shared Secret>"

# В этот момент должна появиться запись в таблице Active Peers
/ip ipsec active-peers print
# #  STATE        UPTIME  REMOTE-ADDRESS
# 0  established  2m22s   <Oracle VPN 1 IP>

# Здесь нужно указать настройки из шага Subnets and Security
# для Oracle подсети и из шага Site-to-Site VPN - Static Routing
# для внутренней сети Mikrotik
/ip ipsec policy add dst-address=<Oracle VCN подсеть> peer=oracle1-peer
    proposal=oracle-proposal-phase2
    src-address=<Локальная подсеть Mikrotik> tunnel=yes

# В этот момент обновиться состояние policy
/ip ipsec policy print
# Flags: T - TEMPLATE; A - ACTIVE; * - DEFAULT
# Columns: PEER, TUNNEL, SRC-ADDRESS, DST-ADDRESS, PROTOCOL, ACTION, LEVEL, PH2-COUNT
# #     PEER          TUNNEL  SRC-ADDRESS     DST-ADDRESS  PROTOCOL  ACTION   LEVEL    PH2-COUNT
# 0 T *                       ::/0            ::/0         all
# 1  A  oracle1-peer  yes     <Локальная подсеть Mikrotik>  <Oracle VCN подсеть>  all       encrypt  require          2

# Если вы используете NAT на своем Mikrotik (а вы, наверняка, используете)
# нужно добавить правило обхода NAT для IPSec трафика
/ip firewall nat add action=accept chain=srcnat
    src-address=<Локальная подсеть Mikrotik>
    dst-address=<Oracle VCN подсеть> place-before=0
Attention! Important so that the NAT traversal rule is higher in the list than the NAT rule c Action “masquerade”!
/ip firewall nat print
# Flags: X - disabled, I - invalid; D - dynamic
#  0    chain=srcnat action=accept src-address=<Локальная подсеть Mikrotik> dst-address=<Oracle VCN подсеть> log=no log-prefix=""
#  1    chain=srcnat action=masquerade ...
#  2    chain=srcnat action=masquerade ...
#  3 X  chain=srcnat action=masquerade ...
#  4 X  chain=dstnat action=dst-nat ...
#  5    chain=dstnat action=dst-nat ...

# Если это не так используйте команду
/ip firewall nat move numbers=<Номер правила> destination=0
If everything is done correctly, then a connection should appear between the networks, pings and data will begin to flow in accordance with the settings of the selected SecurityList from Oracle Cloud.
If you wish, you can create a second tunnel, but Mikrotik does not allow you to create 2 Policies with the same Source Address and Destination Address. There are several options for using the second tunnel:
-
Set several peers for one policy, in which case the first one will be the main one, if it is not available, the next one is used, and so on.
-
Divide your subnet into segments and use different peers for them. For example, having a subnet 192.168.X.0/24, we will divide it into 192.168.X.0/25 and 192.168.X.128/25, then you can create a separate policy for each of them, then the traffic will be balanced depending on the segment, where the traffic source is located.
-
If your Mikrotik has more than one network, then you can alternate peers for different subnets. This option will also help balance traffic depending on the subnet from / to which the traffic is directed.
-
Register an additional peer to the existing policy, in this case the tunnel will be activated in case of problems with the main peer.
-
Divide the local or remote subnet into 2 parts (for example 192.168.X.0/24, you can divide the smaller segments 192.168.X.0/25 + 192.168.X.128/25) and use different tunnels for different segments.
-
For those who have more than one network configured on Mikrotik, configure different networks through different tunnels.
# Создать Peer используя созданный ранее профиль
/ip ipsec peer add address=<Oracle VPN 2 IP> name=oracle2-peer
    profile=oracle-profile-phase1

# Создать identity указав адрес второго туннеля со стороны Oracle
/ip ipsec identity add peer=oracle2-peer
    secret="<Oracle VPN2 Shared Secret>"

# Вариант 1: добавить peer к существующему policy
# для получения номера правила: /ip ipsec policy print
/ip ipsec policy edit number=<Номер правила> peer
# В редакторе дописываем второго peer, чтобы получилось
# oracle1-peer,oracle2-peer
# Нажимаем Ctrl+O

# Вариант 3: добавить policy для другой подсети
/ip ipsec policy add dst-address=<Oracle VCN подсеть>
    peer=oracle2-peer proposal=oracle-proposal-phase2
    src-address=<Другая локальная подсеть Mikrotik> tunnel=yes
Actually, that’s all. The status of the tunnels can be monitored in the Oracle Cloud Portal.


Very useful, thanks. It was simple to set up with this guide, but I do plan to see if I can use IKEv2 instead at some point.