Asynchronous tasks with FastAPI and Celery
If your application has long running processes, then instead of blocking the main thread, you should process them in the background.
Let’s say a web application requires users to submit a photo (which will likely need to be resized) and verify their email address upon registration. If the application processed the image and sent the confirmation email directly to the request handler, then the end user would have to wait for both of them to complete processing. Instead, you can submit these processes to a task queue and let a separate worker process deal with them. At this time, the user can perform other client-side operations while processing is taking place. The application is also free to respond to requests from other users and customers.
To achieve this, we will walk you through the process of configuring Celery and Redis to handle long running processes in a FastAPI application. We will also be using Docker and Docker Compose to tie everything together. Finally, we’ll look at how to test Celery tasks with unit and integration tests.
Target
By the end of this tutorial, you will be able to:
Integrate Celery into your Fast API application and create tasks.
Containerize FastAPI, Celery and Redis with Docker.
Run processes in the background with a separate worker process.
Save the Celery logs to a file.
Customize Flower to monitor and administer Celery tasks.
Test the Celery task with both unit and integration tests.
Background tasks
To improve user experience, long-running processes should run outside of the normal HTTP request/response flow, i.e. in the background.
Examples:
Running Machine Learning Models
Sending confirmation emails
Web scrapers
Data analysis
Image processing
Reporting
When creating an application, try to distinguish between tasks that should be performed during the request/response life cycle, such as CRUD operations, and those that should be performed in the background.
It’s worth noting that you can use the class BackgroundTasks from FastAPI which comes directly from Starletteto run tasks in the background.
For example:
from fastapi import BackgroundTasks


def send_email(email, message):
    pass


@app.get("/")
async def ping(background_tasks: BackgroundTasks):
    background_tasks.add_task(send_email, "email@address.com", "Hi!")
    return {"message": "pong!"}
So when should you use Celery instead BackgroundTasks?
CPU Intensive Tasks: Celery should be used for tasks that do heavy background calculations. While,
BackgroundTasksruns in the same event loop that handles requests from your application.Task queue: If you need a queue to manage tasks and workers, you should use Celery. Often you will want to get the status of a task and then perform some action based on the status – such as sending an error email, starting another background task, or retrying the task. Celery will handle it all for you.
Principle of operation
Our goal is to develop a fast API application that works in conjunction with Celery to handle long running processes outside of the normal request/response cycle.
The end user starts a new task with a POST request on the server side.
In the POST request handler, the task is added to the queue and the task ID is sent back to the client side.
Using AJAX, the client continues to poll the server to check the status of the task while the task itself runs in the background.

Project setup
Clone the base project from the repository fastapi-celery and then go to the tag v1 V master branch:
git clone https://github.com/testdrivenio/fastapi-celery --branch v1 --single-branch
cd fastapi-celery
git checkout v1 -b master
Since we will need to manage three processes (FastAPI, Redis, Celery worker), we will use Docker to simplify our workflow. Let’s connect them in such a way that they can all be launched from one terminal window using one command.
From the project root directory, create the images and run the Docker containers:
docker-compose up -d --buildOnce the build is complete, go to http://localhost:8004:

Verify that the tests also pass:
$ docker-compose exec web python -m pytest

=============================== test session starts ================================
platform linux -- Python 3.11.2, pytest-7.2.2, pluggy-1.0.0
rootdir: /usr/src/app
plugins: anyio-3.6.2
collected 1 item

tests/test_tasks.py .                                                        [100%]

================================ 1 passed in 0.20s =================================
Before moving on, take a look at the project structure:
├── .gitignore
├── LICENSE
├── README.md
├── docker-compose.yml
└── project
    ├── Dockerfile
    ├── main.py
    ├── requirements.txt
    ├── static
    │   ├── main.css
    │   └── main.js
    ├── templates
    │   ├── _base.html
    │   ├── footer.html
    │   └── home.html
    └── tests
        ├── __init__.py
        ├── conftest.py
        └── test_tasks.py
Starting a task
Event Handler onclick V project/templates/home.html is configured to listen for a button press:
<div class="btn-group" role="group" aria-label="Basic example">
  <button type="button" class="btn btn-primary" onclick="handleClick(1)">Short</a>
  <button type="button" class="btn btn-primary" onclick="handleClick(2)">Medium</a>
  <button type="button" class="btn btn-primary" onclick="handleClick(3)">Long</a>
</div>
onclick causes handleClicklocated in project/static/main.js which sends an AJAX POST request to the server with the appropriate issue type: 1, 2 or 3.
function handleClick(type) {
  fetch('/tasks', {
    method: 'POST',
    headers: {
      'Content-Type': 'application/json'
    },
    body: JSON.stringify({ type: type }),
  })
  .then(response => response.json())
  .then(res => getStatus(res.data.task_id));
}
On the server side, the route is already configured to process the request in project/main.py:
@app.post("/tasks", status_code=201)
def run_task(payload = Body(...)):
    task_type = payload["type"]
    return JSONResponse(task_type)
Now the fun begins – setting up Celery!
Installation Celery
Start by adding Celery and Redis to requirements.txt:
aiofiles==23.1.0
celery==5.2.7
fastapi==0.95.0
Jinja2==3.1.2
pytest==7.2.2
redis==4.5.4
requests==2.28.2
uvicorn==0.21.1
httpx==0.23.3
Celery uses broker messages – RabbitMQ, Redis or AWS Simple Queue Service (SQS) – to facilitate interaction between the Celery worker and the web application. Messages are added to the broker, which are then processed by the workers. After execution, the results are sent to the web application.
Redis will use both the broker and the web application. Add Redis and worker from Celery to file docker-compose.yml in the following way:
version: '3.8'

services:

  web:
    build: ./project
    ports:
      - 8004:8000
    command: uvicorn main:app --host 0.0.0.0 --reload
    volumes:
      - ./project:/usr/src/app
    environment:
      - CELERY_BROKER_URL=redis://redis:6379/0
      - CELERY_RESULT_BACKEND=redis://redis:6379/0
    depends_on:
      - redis

  worker:
    build: ./project
    command: celery -A worker.celery worker --loglevel=info
    volumes:
      - ./project:/usr/src/app
    environment:
      - CELERY_BROKER_URL=redis://redis:6379/0
      - CELERY_RESULT_BACKEND=redis://redis:6379/0
    depends_on:
      - web
      - redis

  redis:
    image: redis:7
Let’s describe the team celery -A worker.celery worker --loglevel=info:
celery workerused to run Celery worker-A worker.celeryLaunches application Celery (which we will define shortly)--loglevel=infoestablishes logging level on info
Then create a new file named worker.py in “project”:
import os
import time

from celery import Celery


celery = Celery(__name__)
celery.conf.broker_url = os.environ.get("CELERY_BROKER_URL", "redis://localhost:6379")
celery.conf.result_backend = os.environ.get("CELERY_RESULT_BACKEND", "redis://localhost:6379")


@celery.task(name="create_task")
def create_task(task_type):
    time.sleep(int(task_type) * 10)
    return True
Here we have created a new instance of Celery and using the decorator tasksdefined a new Celery task function callable create_task.
Keep in mind that the task itself will be executed by the Celery worker.
Starting a task
Update endpoints in main.py to start a task and respond with a task id:
@app.post("/tasks", status_code=201)
def run_task(payload = Body(...)):
    task_type = payload["type"]
    task = create_task.delay(int(task_type))
    return JSONResponse({"task_id": task.id})
Don’t forget to import the task:
from worker import create_taskStart new containers:
docker-compose up -d --buildTo start a new task, run:
$ curl http://localhost:8004/tasks -H "Content-Type: application/json" --data '{"type": 0}'You should see something like:
{
  "task_id": "14049663-6257-4a1f-81e5-563c714e90af"
}
Task status
Back to handleClick client side features:
function handleClick(type) {
  fetch('/tasks', {
    method: 'POST',
    headers: {
      'Content-Type': 'application/json'
    },
    body: JSON.stringify({ type: type }),
  })
  .then(response => response.json())
  .then(res => getStatus(res.data.task_id));
}
When the response from the original AJAX request is returned, we keep calling getStatus() with task id every second:
function getStatus(taskID) {
  fetch(`/tasks/${taskID}`, {
    method: 'GET',
    headers: {
      'Content-Type': 'application/json'
    },
  })
  .then(response => response.json())
  .then(res => {
    const html = `
      <tr>
        <td>${taskID}</td>
        <td>${res.data.task_status}</td>
        <td>${res.data.task_result}</td>
      </tr>`;
    document.getElementById('tasks').prepend(html);
    const newRow = document.getElementById('table').insertRow();
    newRow.innerHTML = html;
    const taskStatus = res.data.task_status;
    if (taskStatus === 'finished' || taskStatus === 'failed') return false;
    setTimeout(function() {
      getStatus(res.data.task_id);
    }, 1000);
  })
  .catch(err => console.log(err));
}
If the response is successful, a new row is added to the DOM table.
Update the endpoint get_statusto return the status:
@app.get("/tasks/{task_id}")
def get_status(task_id):
    task_result = AsyncResult(task_id)
    result = {
        "task_id": task_id,
        "task_status": task_result.status,
        "task_result": task_result.result
    }
    return JSONResponse(result)
Import AsyncResult:
from celery.result import AsyncResultUpdate containers:
docker-compose up -d --buildStart a new task:
curl http://localhost:8004/tasks -H "Content-Type: application/json" --data '{"type": 1}'Then take task_id from the response and call the updated endpoint to view the state:
$ curl http://localhost:8004/tasks/f3ae36f1-58b8-4c2b-bf5b-739c80e9d7ff

{
  "task_id": "455234e0-f0ea-4a39-bbe9-e3947e248503",
  "task_result": true,
  "task_status": "SUCCESS"
}
Also test this in a browser:

Celery logging
Update service worker V docker-compose.ymlto save Celery logs to a file:
worker:
  build: ./project
  command: celery -A worker.celery worker --loglevel=info --logfile=logs/celery.log
  volumes:
    - ./project:/usr/src/app
  environment:
    - CELERY_BROKER_URL=redis://redis:6379/0
    - CELERY_RESULT_BACKEND=redis://redis:6379/0
  depends_on:
    - web
    - redis
Add a new directory to “project” called “logs”. Then add a new file named celery.log to this created directory.
Update containers:
$ docker-compose up -d --buildYou should see the log file being populated locally as we have forwarded the project directory:
[2023-04-05 16:10:33,257: INFO/MainProcess] Connected to redis://redis:6379/0
[2023-04-05 16:10:33,262: INFO/MainProcess] mingle: searching for neighbors
[2023-04-05 16:10:34,271: INFO/MainProcess] mingle: all alone
[2023-04-05 16:10:34,283: INFO/MainProcess] celery@6ea5007507db ready.
[2023-04-05 16:11:49,400: INFO/MainProcess]
  Task create_task[7f0022ec-bcc8-4eff-b825-bde60d15f824] received
[2023-04-05 16:11:59,418: INFO/ForkPoolWorker-7]
  Task create_task[7f0022ec-bcc8-4eff-b825-bde60d15f824]
  succeeded in 10.015363933052868s: True
Flower control panel
Flower is Celery’s lightweight real-time web monitoring tool. You can track current tasks, increase or decrease the pool of workers, view graphs and a number of statistics.
Update the file requirements.txt:
aiofiles==23.1.0
celery==5.2.7
fastapi==0.95.0
flower==1.2.0
Jinja2==3.1.2
pytest==7.2.2
redis==4.5.4
requests==2.28.2
uvicorn==0.21.1
httpx==0.23.3
Then add a new service to docker-compose.yml:
dashboard:
  build: ./project
  command: celery --broker=redis://redis:6379/0 flower --port=5555
  ports:
    - 5556:5555
  environment:
    - CELERY_BROKER_URL=redis://redis:6379/0
    - CELERY_RESULT_BACKEND=redis://redis:6379/0
  depends_on:
    - web
    - redis
    - worker
Restart containers:
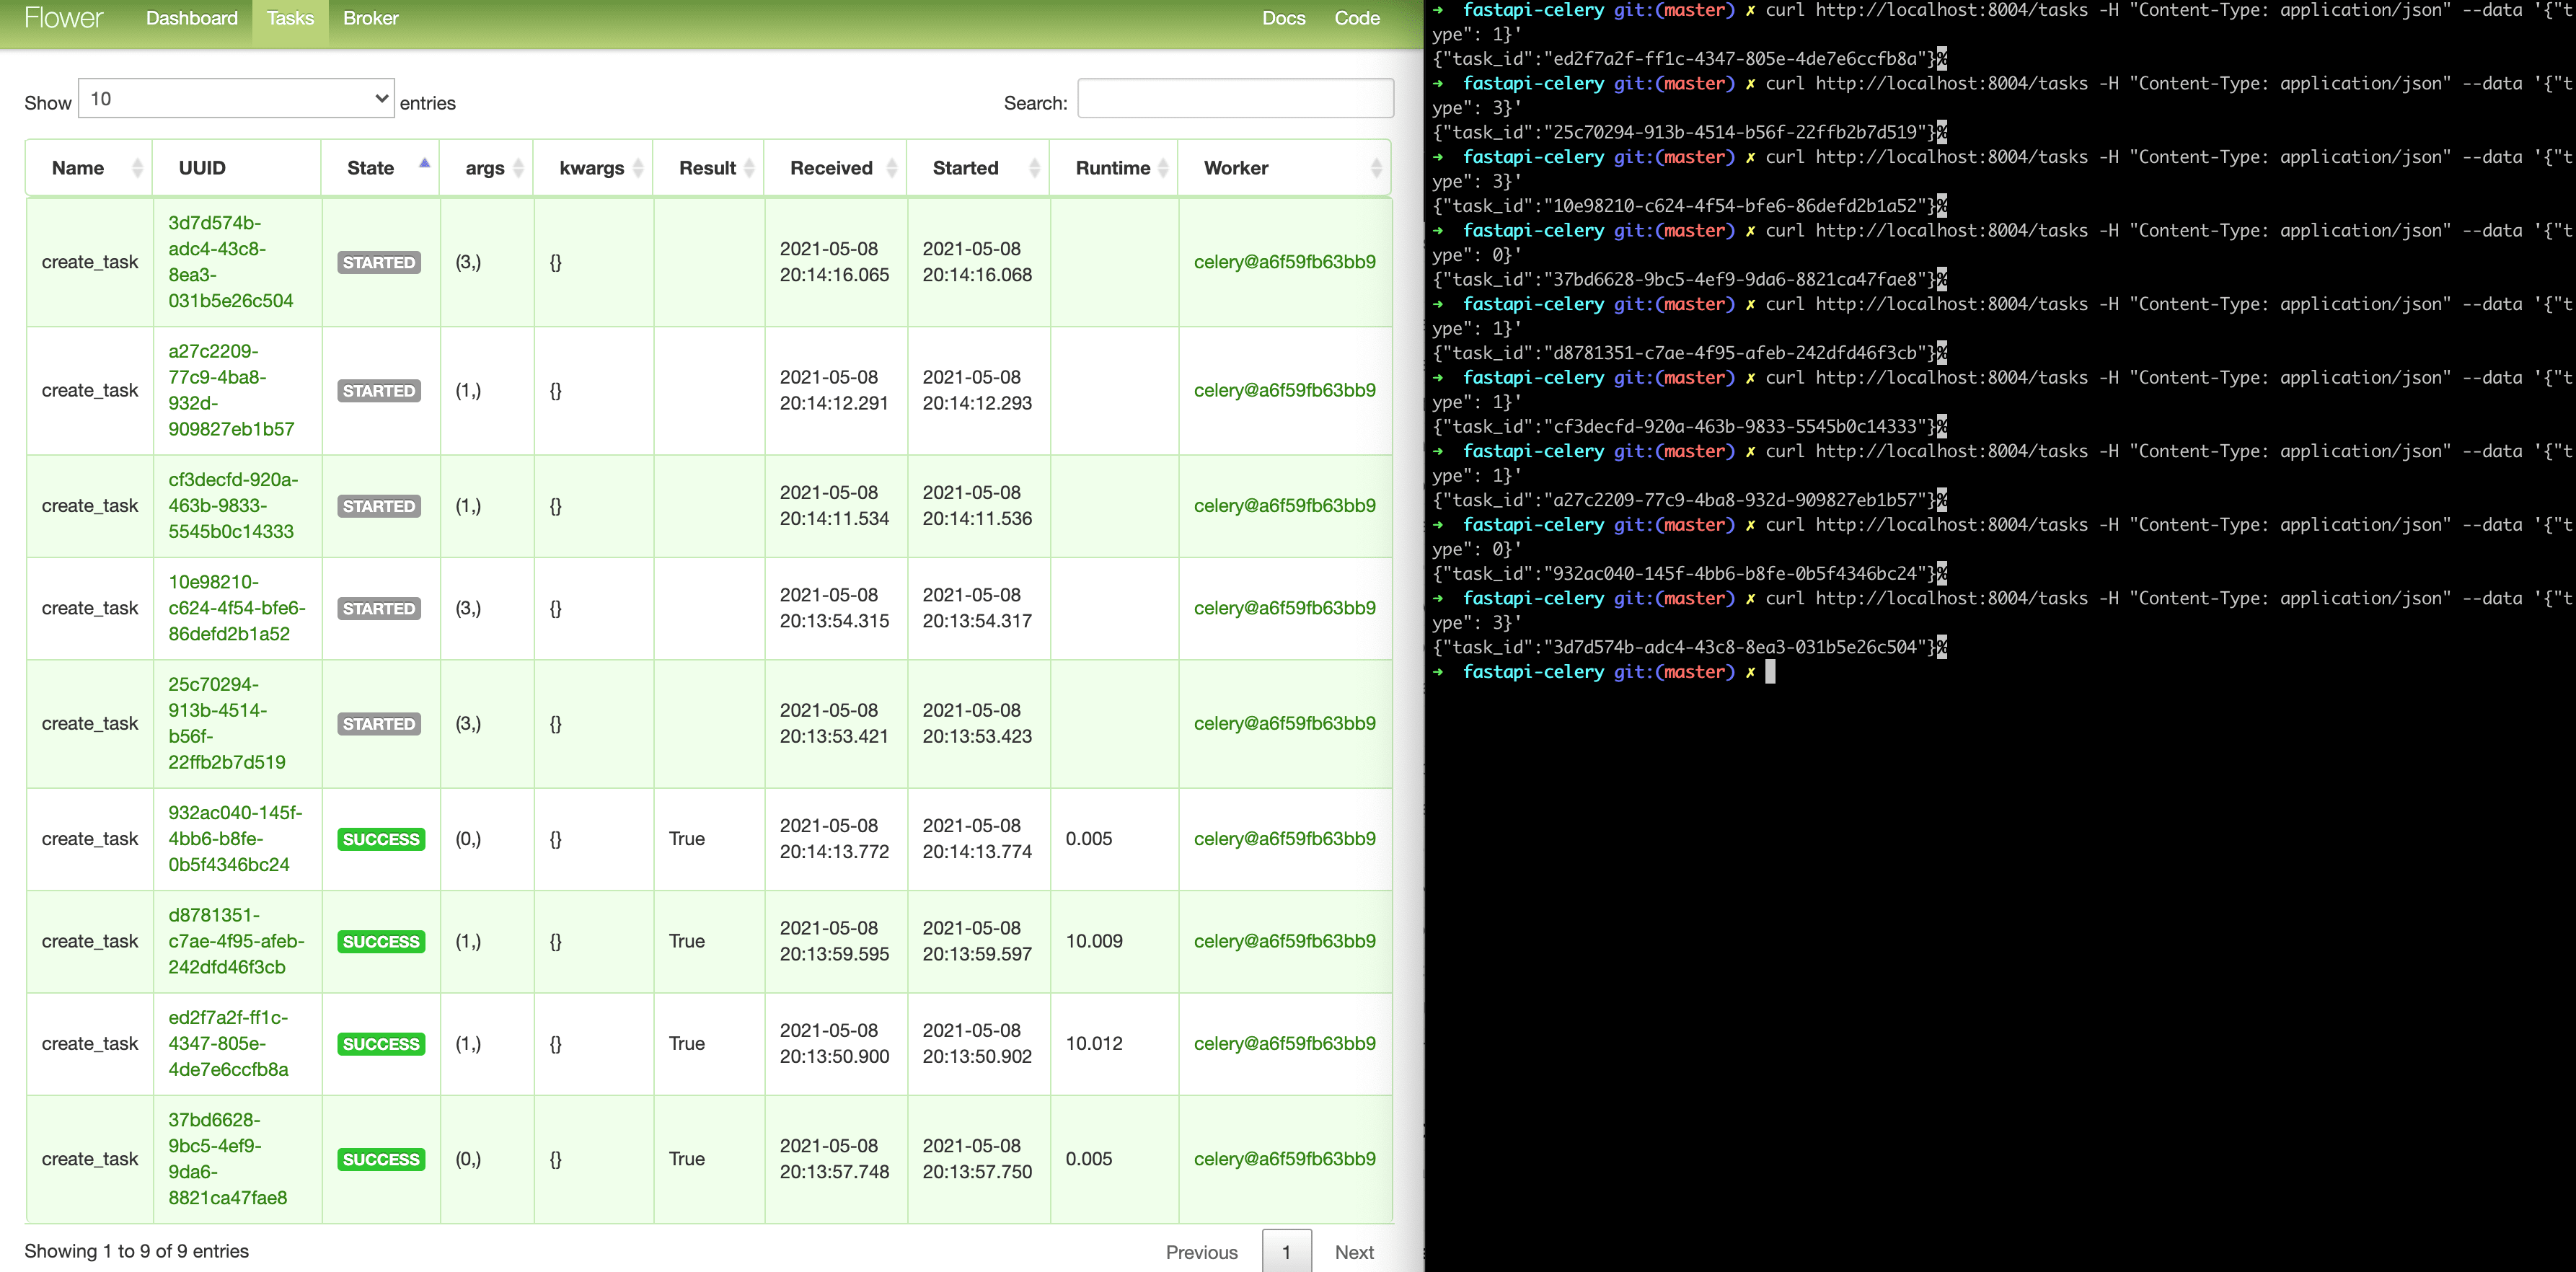
docker-compose up -d --buildGo to http://localhost:5556 to view the dashboard. You should see one worker ready to go:

Run a few more tasks to fully test the dashboard:

Try adding a few more workers to see how it makes a difference:
docker-compose up -d --build --scale worker=3Tests
Let’s start with the simplest test:
def test_task():
    assert create_task.run(1)
    assert create_task.run(2)
    assert create_task.run(3)
Add the above example to project/tests/test_tasks.py and then add the following import:
from worker import create_taskRun this test separately:
docker-compose exec web python -m pytest -k "test_task and not test_home"The execution should take about one minute:
=============================== test session starts ================================
platform linux -- Python 3.11.2, pytest-7.2.2, pluggy-1.0.0
rootdir: /usr/src/app, configfile: pytest.ini
plugins: anyio-3.6.2
collected 2 items / 1 deselected / 1 selected
tests/test_tasks.py .                                                        [100%]
==================== 1 passed, 1 deselected in 60.07s (0:01:00) ====================
It is worth noting that in the above statements we used .run method (not .delay) to run tasks directly, without the involvement of a Celery worker.
Do you want to lock up .run method to speed up the process?
@patch("worker.create_task.run")
def test_mock_task(mock_run):
    assert create_task.run(1)
    create_task.run.assert_called_once_with(1)

    assert create_task.run(2)
    assert create_task.run.call_count == 2

    assert create_task.run(3)
    assert create_task.run.call_count == 3
Let’s import this:
from unittest.mock import patchLet’s test:
$ docker-compose exec web python -m pytest -k "test_mock_task"

=============================== test session starts ================================
platform linux -- Python 3.11.2, pytest-7.2.2, pluggy-1.0.0
rootdir: /usr/src/app, configfile: pytest.ini
plugins: anyio-3.6.2
collected 2 items / 1 deselected / 1 selected
tests/test_tasks.py .                                                        [100%]
========================= 1 passed, 1 deselected in 0.10s ==========================
Much faster!
How about a full integration test?
def test_task_status(test_app):
    response = test_app.post(
        "/tasks",
        data=json.dumps({"type": 1})
    )
    content = response.json()
    task_id = content["task_id"]
    assert task_id

    response = test_app.get(f"tasks/{task_id}")
    content = response.json()
    assert content == {"task_id": task_id, "task_status": "PENDING", "task_result": None}
    assert response.status_code == 200

    while content["task_status"] == "PENDING":
        response = test_app.get(f"tasks/{task_id}")
        content = response.json()
    assert content == {"task_id": task_id, "task_status": "SUCCESS", "task_result": True}
Keep in mind that this test uses the same broker and web application as the development version. You may want to create a new Celery instance for testing purposes.
Add import:
import jsonVerify that the test passed successfully.
Conclusion
This has been a basic guide to setting up Celery for running long running tasks in a FastAPI application. You must allow the queue to handle any processes that might block or slow down user code.
Celery can be used to perform repetitive tasks. You can also split complex, resource-intensive tasks to distribute the computational load across multiple machines to reduce (1) time and (2) the load on the machine processing client requests.
Code from repository.


