An undetectable VPN you’ll love
Classic VPN protocols that are externally indistinguishable from regular HTTP are SoftEther, MS SSTP and AnyConnect/OpenConnect. In my first article, “Internet censorship and bypassing blocking: no time to relax,” I drew attention to the fact that all of them at that time were vulnerable to detection by the active probing method, which made it possible to simply block them. However, recently new versions of the OpenConnect server have included protection against this, and now it is quite possible to use it.
Initially, the protocol appeared under the name AnyConnect, and its creator was the well-known company Cisco. OpenConnect is a completely open-source implementation of client and server for this protocol, fully compatible with it.
What’s so good about OpenConnect compared to alternatives?
Unlike OpenVPN, IPSec And W.G. it looks like a regular HTTPS connection.
Unlike SoftEther VPN, there are clients for it for all popular platforms: Windows, Linux, macOS, Android, iOS, and more than one (we’ll talk about this a little later). Well, there is protection against active probing.
Compared to MS SSTP it has a more productive server part under Linux, and also, when traffic is not blocked, it can, in addition to an HTTPS TLS connection, raise DTLS over UDP for even better performance (Softether also knows how to add UDP, but they have their own “unknown”-looking ” protocol, and here is the popular and well-known DTLS, which, for example, is used in WebRTC). Well, there is protection against active probing.
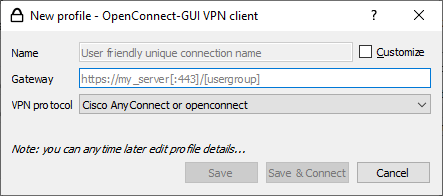
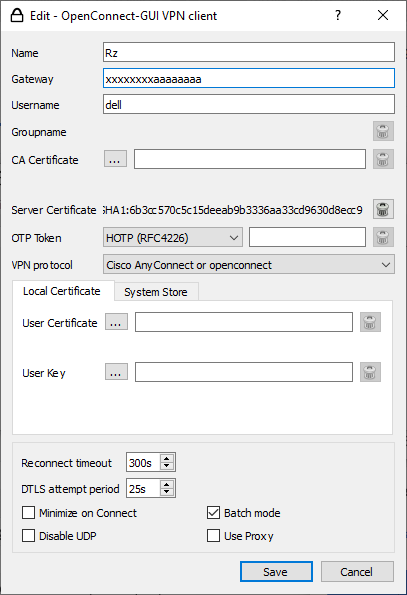
OpenConnect is very easy to configure on clients – you don’t need a bunch of parameters and configs, you only need a URL (server address), username and password.
Plus OpenConnect came from the enterprise world, and it has all sorts of enterprise things, for example, LDAP and Radius user authorization.
Installation and configuration
The OpenConnect open source server is called OCserv and lives at https://gitlab.com/openconnect/ocserv. In addition, it can be found in the repositories of almost all popular Linux distributions. Changes in versions can be viewed in changelogI will note the most important for us:
in version 1.2.0 we added the “camouflage” mode to protect against active probing;
in version 1.2.1 we added support for the OneConnect client (more on this later);
in version 1.2.3 (it has not yet been officially released!) we fixed a bug that prevented the connection of some Cisco clients when masking was enabled (but it seems that you can use other versions of them with which everything should work).
Therefore, look at what you need and check what version is in the turnips of your distribution. If it is very old, then you can always build it manually; the assembly instructions are in the README in the git rep and there is nothing particularly complicated there.
Perhaps there are still some Docker images where everything is already assembled for you – I don’t know, I haven’t checked, if anyone checks and finds a good Docker image, write in the comments, I’ll pin it so that it will also be useful for others.
For those who assemble manually, the systemd file in Debian for OCserv looks like this
[Unit]
Description=OpenConnect SSL VPN server
Documentation=man:ocserv(8)
After=network-online.target

[Service]
PrivateTmp=true
PIDFile=/run/ocserv.pid
Type=simple
ExecStart=/usr/sbin/ocserv --foreground --pid-file /run/ocserv.pid --config /etc/ocserv/ocserv.conf
ExecReload=/bin/kill -HUP $MAINPID

[Install]
WantedBy=multi-user.target
Also keep in mind that OpenConnect, like other similar VPNs, runs on top of HTTPS. That is, yes, you will need a domain and a TLS certificate. The domain can be anything, even DynDNS (see the article about proxies, there are considerations and tips on this matter), and certificates for it can be generated for free with LetsEncrypt and Certbot – there are a lot of instructions about this on the Internet.
By default, server configs are located in /etc/ocserv, namely:
ocserv.conf – main config;
ocpasswd – a file with a list of users to connect to the VPN server;
It is also possible to create a “config-per-user” directory and drop files into it corresponding to the username from ocpasswd in order to override any configuration parameters for a specific user (for example, if you need to constantly assign a specific IP address to some user).
Adding new users to “ocpasswd” is very simple; OCserv comes with a utility with the same name “ocpasswd”, that is, by going to /etc/ocserv and running ocpasswd, passing it as an argument the user name that you want to add to the list , she will ask you for the password for it and add a new account where necessary. Naturally, no one forbids opening this file in a text editor and deleting lines from there that are no longer needed.
Now let’s go through the main configuration parameters with ocserv.conf, see the example with my comments:
# Директива заставляет сервер слушать только на определенном IP-адресе,
# а не на всех интерфейсах сразу
# listen-host = [IP|HOSTNAME]

# То же самое, но для UDP. Если закомментировано,
# то будет использовать значение из предыдущего параметра
udp-listen-host =  localhost

# Номер порта для входящих подключений.
# По умолчанию 443, и должен быть таким, чтобы быть похожим на HTTPS
tcp-port = 443

# То же самое для UDP. Если закомментировано, то UDP использоваться не будет.
# udp-port = 443

# Пользователь и группа под которыми будут работать воркеры (рабочие процессы)
# сервера
run-as-user = ocserv
run-as-group = ocserv

# TLS-сертификат вашего сервера. Нужно подсунуть сюда пути для сертификатов
# для вашего домена - можете сгененировать их с помощью Letsencrypt/Certbot.
server-cert = /etc/letsencrypt/live/yourdomain.com/fullchain.pem
server-key = /etc/letsencrypt/live/yourdomain.com/privkey.pem

# Можно выводить веселоее сообщение для всех подключающихся клиентов.
# Но лучше не надо. Бесит.
# banner = "Hello Habr"

# Если у сервер у вас стоит за чем-то типа HAProxy, то эта опция может пригодится
# listen-proxy-proto = false

# Можно ограничить количество одновременно подключенных клиентов
max-clients = 32

# И одновременно подключенных одинаковых клиентов (с одинаковым логином), 0 - безлимитно
max-same-clients = 0

# ваш домен
default-domain = hellohabr.com

# диапазон IP-адресов, которые вы будете выдавать подключенным клиентам
ipv4-network = 192.168.0.1
ipv4-netmask = 255.255.255.0

# можно также задать в альтернативной форме
#ipv4-network = 192.168.1.0/24

# То же самое для IPv6, если он вам нужен
ipv6-network = fec0::c0ca:c01a:cafe::0/48

# не совсем понял что это, но должно быть true
tunnel-all-dns = true

# DNS-сервер, которые будут использовать ваши клиенты.
# Их можем быть несколько
dns = 1.1.1.1
dns = 8.8.8.8

# маршруты, которые будут переданы клиентам: какие диапазоны IP
# нужно будет отправлять через VPN
# route = 10.10.10.0/255.255.255.0
# route = 192.168.0.0/255.255.0.0
# route = fef4:db8:1000:1001::/64
# default = все
route = default

# либо можно пойти "от противного"
# no-route = 192.168.5.0/255.255.255.0

# про это я уже упоминал чуть выше, можно указать путь к дире
# с файлами для переопределения параметров конфигурации для отдельных юзеров
# config-per-user = /etc/ocserv/config-per-user/

# должно быть true если мы подключаемся клиентами от Cisco
cisco-client-compat = true
And now about the most interesting thing: about camouflage. The essence of masking is that when a client connects to the server, the server expects a special “magic word” from the client in the URL after the question mark, for example, a regular connection URL looks like “https://myserver.com”, and with a secret – “ https://myserver.com/?mysecretword”. If the server sees a secret word in the address, it lets the client into the VPN; if it doesn’t see it, it issues an error message, like a regular web server. The following settings in the config are responsible for this functionality:
# Включаем маскировку
camouflage = true

# Задаем свое секретное слово, которое клиенты должны иметь в URL'е после знака вопроса
camouflage_secret = "mysecretkey"

# А вот тут интересное. Если этот параметр не задан (закомментирован),
# то при отсутствии или несовпадении кодовоего слова сервер вернет
# ошибку HTTP 404, очень похожую на ту, что возвращает веб-сервер Apache.
# А если этот параметр _задан_, то сервер вернет ошибку HTTP 401,
# означающую "необходимо авторизоваться", как это делают многие
# веб-сервисы, админ-панели, морды разных устройств, и т.д.
# - в этом случае браузеры обычно показывают окошко с предложением
# ввести логин и пароль и текстовым сообщением,
# которое можно задать ниже, а OCserv будет "отвергать" все предложенные пароли.
# Если вы решили использовать этот вариант,
то желательно поменять это сообщение с дефолтного на какое-то свое.
camouflage_realm = "My admin panel"
The contents of the HTML pages returned for 404 and 401 errors, unfortunately, are hardcoded in the source code, but if you are going to rebuild the server, you can change it – it is there in the form of string constants, and the code is very simple, you can look into Git: https://gitlab.com/openconnect/ocserv/-/blob/master/src/worker-http-handlers.c?ref_type=heads#L41
Well, the classic point when setting up all kinds of VPNs is to make sure that users can access the Internet through the VPN. Using iptables (you can put these commands in /etc/rc.local) this can be done, for example, like this (check what IP range you set for clients in the config):
iptables -t nat -A POSTROUTING -s 192.168.0.0/24 -o ens3 -j SNAT --to-source <ваш внешний IPv4>Well, or use MASQUERADE (there are also plenty of instructions on the Internet).
If you need IPv6, then everything is a little more complicated – of course, if you immediately have a /64 or even /48 IPv6 subnet, then you want to immediately issue white IPv6 addresses to clients… But here the problem arises that almost all hosters have IPv6 -subnets for VPS are “non-routed” – that is, it will not be that all packets to all addresses of your subnet are sent by the hoster’s equipment to the port of your server. Everything there is much more complicated and is based on complex ICMP logic; for this it is often recommended to use radvd or something similar, but in short, none of the options worked for me. Therefore, for simplicity, you can distribute fake local IPv6 to clients and NAT to one external IPv6 in the same way, may the network gods forgive me for such blasphemy:
ip6tables -t nat -A POSTROUTING -s fec0::c0ca:c01a:cafe::0/127 -o ens3 -j SNAT --to-source 2a05:9403::441All. Basically, the setup is complete and once the server daemon is started it should start accepting connections.
Should I use UDP?
You decide. On the one hand, in theory it should speed up work. On the other hand, UDP running along with a hanging TCP connection to the same server may seem suspicious to censors when the smell of frying begins. I have no UDP (with pure TCP) and
configured in the BBR system
 в/etc/sysctl.conf, не забудьте потом сделать "sysctl -p"

net.core.default_qdisc=fq
net.ipv4.tcp_congestion_control=bbr
between a client in Europe and an OpenConnect server in Russia, 150 megabits/sec ran without problems (it could have been more, it all depends on the home Internet tariff).
If you need to host a website on the same server
Then use an SNI proxy. The site will respond on one domain (subdomain), and the VPN server on another. Nginx with the ssl_preread module (I talked about this in articles about proxying via CDN) or HAProxy can work as an SNI proxy – there are more than enough instructions on the Internet for the “sni proxy” request.
In this case, Nginx or HAProxy will listen on port 443 on the public address, and OCserv will have to listen on localhost on some other port – this is for TCP, and UDP (if you use it) should still be on the public address. And if you use UDP, then it will be very useful to set the “listen-proxy-proto” option to “true” in the OCserv config, and activate the “Proxy Protocol” in Nginx/HAProxy – then they will report real external IP addresses to OCserv connecting clients, and OCserv will be able to match them with the appropriate UDP packets.
Clients and their configuration
OpenConnect and OpenConnect-GUI
Let’s start with the native client. OpenConnect – open source client for OpenConnect/AnyConnect (compatible with both). You can use it directly from the console (read manpages), it is also used, for example, by the OpenConnect plugin for NetworkManager on different Linux distributions.
OpenConnect-GUI – a graphical client based on it. Written in Qt, runs on Windows, Linux and macOS. You can download it from the rap of your distribution, or from the developers’ gitlab: https://gitlab.com/openconnect/openconnect-gui/-/releases, but keep in mind that the last build there was 5 years ago. In principle, it works, but there are some small bugs. More recent versions can be downloaded here: https://drive.google.com/drive/folders/1KdzHlYODE-QSYL-JSQoM5vubEw55hhRiwhere more recent snapshots are posted.
Don’t be alarmed by the unclear link to Google Drive, these are builds made by one of the developers.
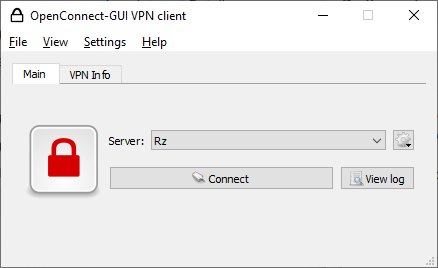
The interface looks like this:


The client is simple, understandable, working, but there is one BUT.
Remember in the article “Internet censorship and bypassing blocking: no time to relax” I talked about detecting clients using TLS fingerprints? So, the openconnect client uses the rather rare GnuTLS library. And this is a very typical sign that in some country censors seemed to simply block all outgoing connections with such fingerprints, precisely in order to block OpenConnect. There can be two solutions – you can persist and rebuild the client with OpenSSL support instead of GnuTLS. According to the documentation, this is possible, but I haven’t tried it. If someone does it, post it publicly, people will thank you. Solution two – use some other client 🙂
Well, yes, OpenConnect is also available under Androidand it lives on Google Play: https://play.google.com/store/apps/details?id=com.github.digitalsoftwaresolutions.openconnect&hl=en_US and in F-Droid: https://f-droid.org/ru/packages/app.openconnect/
The interface is spartan, but it works well. The disadvantage is the same as the desktop version, however, it will be much more difficult to rebuild, although the sources are also available: https://github.com/cernekee/ics-openconnect
Cisco AnyConnect Client
Actually, the original client is from Cisco – it can be used with an open source server.
The desktop version cannot be downloaded from the Cisco website for unregistered customers, but it can be found on the Internet:
It also looks very simple:

An interesting feature is that it is impossible to save the password for connecting to the server in the Cisco client; it will ask for it every time. But if you use camouflage mode with a secret word, then passwords for users can be set very simple so that there are no problems with remembering and entering.
There is also a version for Android called Cisco Secure Client: https://play.google.com/store/apps/details?id=com.cisco.anyconnect.vpn.android.avf&hl=en
and under iOS under the same name:
https://apps.apple.com/us/app/cisco-secure-client/id1135064690
screenshot

Overall it works fine.
One thing – in the bug tracker in the OCserv gitlab, people complained that there were problems connecting to OCserv with camouflage activated using Cisco clients. When I tried and used the clients from the links above, everything worked for me, but maybe something was broken in the new versions, or I’m some kind of magic handyman. If it doesn’t work for you, there is version 1.2.3 with a fix in the GitLab turnip master branch.
OneConnect
The client is from Clavister – they make some of their corporate solutions using a protocol similar to AnyConnect/OpenConnect. Since version 1.2.1 OCServ can accept connections from OneConnect.
Developer’s website: https://www.clavister.com/products/oneconnect/
Download from MS Store: https://apps.microsoft.com/detail/clavister-oneconnect/9P2L1BWS7BB6?hl=en-US&gl=US
Download on Android: https://play.google.com/store/apps/details?id=com.clavister.oneconnect&hl=en_US
Download for masOS and iOS: https://apps.apple.com/us/app/clavister-oneconnect/id1565970099

The interface is beautiful. The implementation of the protocol client, as I understand it, is their own.
Another interesting feature, as with any Chinese proxy, you can add server details to mobile devices using direct links and a QR code.
Direct links are generated like
oneconnect://configuration?desc=Hello%20Habr&server=myserver.com&port=443and apparently, if you translate it into a QR code, it will be scanned (I haven’t checked, it’s just a guess).
I’ll say right away that I haven’t tested this client, and I don’t know how it will work with camouflage enabled. Whoever checks it, write whether it worked or not.
If it doesn’t work, we can try to test it together and send a bug report to the developers.
PS If you want to thank the author for all his work and sleepless nights, then:
BTC bc1ql2yecwzqtpp5xsmk08tzvyx98rqxf4qs848k54
ETH 0x8563494bd4732D7D7BF202521E7103Ea52d51cE5
USDT (TRC20) TRCUfmKJzn4XRBmEbRc5k87j78vLZKWg2U
Important: the author is not present on Telegram or any other messengers or social networks, does not provide no paid consultations and does not perform any work for money, and answers questions only on Habré (when there is time). Beware of scammers.


