We use the neural network model in C ++
Most tutorials on creating and using neural network models are written in Python. However, for some project, sooner or later it may be necessary to use a faster and more reliable language for these tasks, for example, C ++. This article is about how you can use the neural network model in C ++ using the model as an example. YOLOv8 for face detection and libraries PyTorch.
Libraries
PyTorch provides a C++ version of its module, the library LibTorch. It can download (cxx11 ABI) and place next to the future program:
wget https://download.pytorch.org/libtorch/cpu/libtorch-cxx11-abi-shared-with-deps-2.0.0%2Bcpu.zip
unzip libtorch-cxx11-abi-shared-with-deps-2.0.0%2Bcpu.zip
For example, you will also need a library OpenCV. It’s worth it download and install:
wget https://github.com/opencv/opencv/archive/4.7.0.zip
unzip opencv-4.7.0.zip && cd opencv-4.7.0
mkdir build && cd build
cmake ..
cmake --build .
sudo make install
Weights
The usual PyTorch model scale format needs to be exported to the format TorchScript. For most models, it is enough to write the following:
# model_export.py
import torch

MODEL_PATH = 'model.pt'
MODEL_INPUT_SHAPE = (1,3,640,640)

model = torch.load(MODEL_PATH)
example = torch.randn(MODEL_INPUT_SHAPE)
model(example) # model warmup
model_traced = torch.jit.trace(model, example)
model_traced.save('model_traced.torchscript')
However, for example, I use the YOLOv8 model for face detection from Ultralytics, it can be exported using ready-made modules:
pip3 install ultralytics
pip3 install gdown
gdown 1jG8_C_P0SbnzYROZORe7CiJO6oMgp7eZ # yolov8n-face.pt
# model_export_yolov8face.py
import torch
from ultralytics import YOLO
model = YOLO('yolov8n-face.pt')
model.export(format="torchscript")Usage
Includes, libs and linking
For the compiler of the future program, you must specify the path to the icnlude- and lib-files of the LibTorch and OpenCV libraries, as well as link the necessary lib-files (they will be needed during compilation; for automation, you should use an IDE, for example, Visual Studio Code):
# ...
-I/usr/local/include/opencv4
-I/path/to/libtorch/include
-L/path/to/libtorch/lib
# ...
-o main.o
# ...
-lopencv_core
-lopencv_highgui
-lopencv_imgcodecs
-lopencv_imgproc
-lopencv_videoio
-ltorch
-ltorch_cpu
-lc10
Model loading
Loading the model is quite simple:
// main.cpp
#include <torch/script.h>
#include <opencv2/opencv.hpp>

int main() {

  torch::jit::script::Module
    model = torch::jit::load("yolov8n-face.torchscript");

  return 0;
}
Loading data into the input of the model
LibTorch accepts a vector of models as input torch::jit::IValue and returns values torch::jit::IValuewhich then need to be exported to familiar types (tensor .toTensor()tuple .toTuple() or any other available).
The example model takes as input a tensor with the shape (B, 3, 640, 640) normalized image, but returns a tensor with the shape (1, 5, 8400)where 5 tensors contain 8400 integer values cx, cy, w, h and real conf for each detection box, respectively. We implement the loading of data at the input of the model and the receipt of outputs:
// main.cpp
  // ...
  cv::Mat img = cv::imread(source);
  cv::cvtColor(img, img, cv::COLOR_BGR2RGB);
  cv::normalize(img, img, 0.0, 1.0, cv::NORM_MINMAX, CV_32F);
  vector<torch::jit::IValue> inputs = {
    torch::from_blob(
      imgNorm.data,
      {640,640,3},
      torch::kFloat32
    ).permute({2,0,1}).unsqueeze(0)
  };
  at::Tensor outputs = model.forward(inputs).toTensor();
  // ...
Face detection
Next, we implement the use of a specific example model.
Let’s create a class Box for detection boxes:
// detect.h
// ...
class Box {
    public:
        int x1, y1, x2, y2;
        float conf;
        Box(int x1, int y1, int x2,  int y2, float conf) {
            this->x1 = x1;
            this->y1 = y1;
            this->x2 = x2;
            this->y2 = y2;
            this->conf = conf;
        }
};
// ...
Let’s create a function getBoxeswhich will return boxes filtered by certainty conf and with the help of the future Non-Maximum Suppression (NMS):
// detect.h
// ...
vector<Box> getBoxes(
    at::Tensor &outputs,
    float confThres = 0.25,
    float iouThres = 0.15
) {
    vector<Box> candidates;
    for (unsigned short ibatch = 0; ibatch < outputs.sizes()[0]; ibatch++) {
        for (unsigned short ibox = 0; ibox < outputs.sizes()[2]; ibox++) {
            float conf = outputs[ibatch][4][ibox].item<float>();
            if (conf >= confThres) {
                unsigned short
                    cx = outputs[ibatch][0][ibox].item<int>(),
                    cy = outputs[ibatch][1][ibox].item<int>(),
                    w = outputs[ibatch][2][ibox].item<int>(),
                    h = outputs[ibatch][3][ibox].item<int>();
                unsigned short
                    x1 = cx - w / 2,
                    y1 = cy - h / 2,
                    x2 = cx + w / 2,
                    y2 = cy + h / 2;
                candidates.push_back(Box(x1,y1,x2,y2,conf));
            }
        }
    }
    sort(candidates.begin(), candidates.end(), [](Box b1, Box b2){return b1.conf > b2.conf;});
    vector<Box> boxes = nms(candidates, iouThres);
    return boxes;
}
// ...
Let’s create a function nms which will filter candidate boxes and related iouwhich will calculate the IoU metric for them (Intersection Over Union):
// detect.h
// ...
float iou(Box &fb, Box &sb) {
    float inter = max(min(fb.x2, sb.x2) - min(fb.x1, sb.x1), 0) * max(min(fb.y2, sb.y2) - min(fb.y1, sb.y1), 0);
    float union_ = (fb.x2-fb.x1)*(fb.y2-fb.y1) + (sb.x2-sb.x1)*(sb.y2-sb.y1) - inter;
    return inter / union_;
}

vector<Box> nms(vector<Box> &boxes, float iouThres) {
    vector<Box> supBoxes;
    for (Box box: boxes) {
        bool valid = true;
        for (Box supBox: supBoxes) {
            if (iou(box, supBox) > iouThres) {
                valid = false;
                break;
            }
        }
        if (valid == true) {
            supBoxes.push_back(box);
        }
    }
    return supBoxes;
}
// getBoxes
Finally, we get the detection boxes:
// main.cpp
  // ...
  vector<Box> boxes = getBoxes(outputs);
  // ...
And also write a procedure for selecting boxes on the original image:
// detect.h
// ...
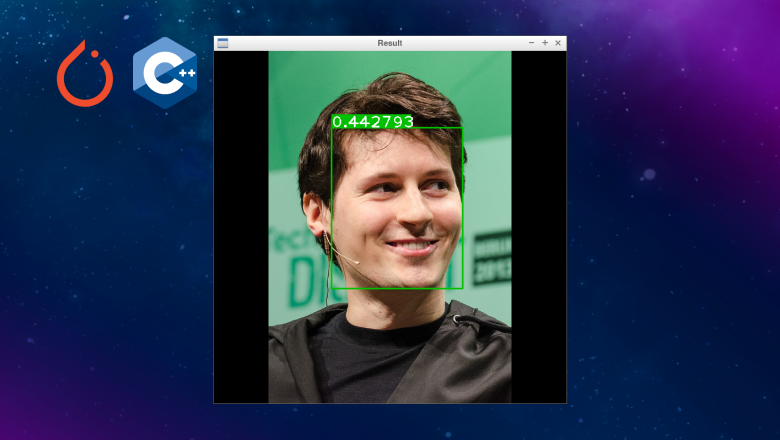
void highlightBoxes(cv::Mat &img, vector<Box> &boxes) {
cv::Scalar rectColor(0,192,0);
unsigned short fontScale = 2, confPrecis = 2;
for (Box box: boxes) {
string text = to_string(box.conf);
cv::rectangle(img, {box.x1,box.y1}, {box.x2,box.y2}, rectColor, 2);
cv::rectangle(
img,
{box.x1, box.y1 - fontScale * 12},
{box.x1 + (unsigned short)text.length() * fontScale * 9, box.y1},
rectColor,
-1
);
cv::putText(img, text, {box.x1,box.y1}, cv::FONT_HERSHEY_PLAIN, fontScale, {255,255,255}, 2);
}
}
// ...And display the result on the screen:
// main.cpp
  // ...
  highlightBoxes(img, boxes);
  cv::imshow("Result", img);
  // return
Conclusion
You can take a look at a more detailed and structured code in one of the branches of the repository of a student project on face recognition raspli. I hope you can get something useful from this tutorial.