Using Clean Architecture in Go

One of the problems that I often encounter in various software projects is the strong coupling of the code, which makes it so difficult to make even simple changes to it without causing unwanted side effects. The fact is that programmers tend to focus on developing specific features without thinking about how the code base will develop in the future. Also, not everyone takes into account that the libraries and frameworks used today may gradually disappear from the scene after a few months or years.
At the start of a project, many decisions have to be made. Most engineers consider the scope of the project and decide which tools will be used to implement it. We are talking, in particular, about programming languages, frameworks, databases, external APIs, and deployment options. By making such decisions at the earliest stages, they become locked into these tools, permeating the entire code base with them, as a result of which it becomes difficult to change and maintain.
Most of these tools are specific, and the choice of most of them (except the programming language) can be postponed for a while until the project is more mature. Therefore, in the early stages of project development, it is worth paying attention not to what tools will be used for implementation. It is better to model the project domain, and approach the above-mentioned tools as they should be – that is, as particulars. Of course, for the project to be implemented, such details also need to be decided, but they can remain in some separate part of the code that is not related to the subject area – where they can be easily changed, deleted or replaced at our discretion.
To solve precisely such problems with strong code coherence, highly experienced engineers have created a number of architectural patterns. These are, in particular, clean architecture Robert Martin (“Uncle Bob”) hexagonal architecture Alistair Cockburn and explicit architecture Herberto Grazi.
This article will show how I was able to build this blog using concepts related to these systems. I mostly stuck to a clean architecture, but also borrowed some concepts and naming principles from other systems. All code is written in Go, but the ideas discussed here apply to any language.
❯ Layers
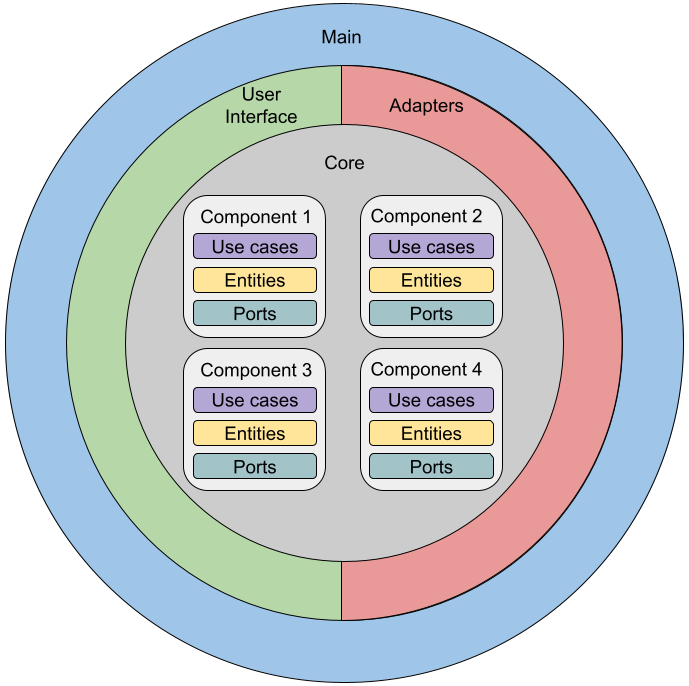
Layers are divided into four main categories: Core, Adapters, User Interface, and Main. Each of them is explained below.
Core
This is the core of the application, and it contains exclusively the business logic rules. All components of this layer do not have any external dependencies. All tests are run without running any web or database server.
The core layer is divided into core components. At the level of these components, it is convenient to divide the application into independent parts, each of which can be developed separately. In my project there is only one nuclear component, it is called blog. Examples of other components also classified as nuclear are: comment, authentication or authorization.
Within each of the nuclear components there are 3 types of elements:
- Use cases – these objects implement each of the actions performed in the system. They can be initiated by the user or run as scheduled jobs, or fire in response to an event. They contain only high-level policy definitions, but are needed to orchestrate other types of elements.
- Entities – these are objects and rules of business logic in their purest form. These can be simple data structures or more complex objects, but they do not contain any information about persistence or delivery mechanisms. These objects can be shared between other application layers.
- Ports – these are simply interfaces used when working with use cases. Any point where code interfaces with a database or with an external library is a port that belongs to the kernel layer.
All kernels exhibit this type of behavior:
use case
called from another layer that receives some data, after which some data is loaded from long-term storage
essence
and this is done using
port
. The code then operates on the entity generating its new state. Other ports and entities may be used in this process. In the end, the entity is again long-term stored in the use case using
port
after which the expected result is returned.
Adapters
Each adapter implements a port interface used by the kernel. Any external dependency, be it a library, framework, external API or database, goes through the adapter. The adapter is a low-level component controlled at the high-level policy level (use case). This structure allows you to provide multiple adapters for the same port. You can also extend the behavior of the adapter using design patterns such as Composite or Decorator.
User interface
It is in the UI layer that the user interacts with the program. This layer can contain many content delivery tools, for example, website (HTML), REST API, GraphQL, gRPC, CLI. Each of them is a separate component in the UI layer.
Main layer (application)
It is in the “main” layer that all connections occur. This layer knows everything about other layers, including how to initialize all components with the correct dependencies. Because the package name
main
reserved in Go, in the blog implementation considered below this layer will be called
app
.
❯ Blog project
The blog project is structured as follows. Posts are written in the form of markup (format
) and are saved as text files in the directory
/posts
. Whenever a specific post is requested from a web server, a file containing that post is downloaded and then parsed. The content of the markup is then converted to HTML and the result of this operation is returned to the user.
The post file format is:
title: Заголовок поста


author: Имя автора


description: описание поста


image_path: /static/image/sample-image.jpg


time: год-месяц-день часов:минут


--


## Содержимое разметки
❯ Implementation
This project was implemented using the Test-Driven Development methodology, but in order to keep this article simple, the tests themselves are omitted, as well as some code fragments. The full source code for the post is posted at
on GitHub.
Later in this post we will look at the implementation of the use case. view post across all layers. Other use cases are structurally similar, and all the code for them is posted in a repository on GitHub.
Directory structure
For this project, I'm following the standard directory structure found in the Go community. This structure is posted in the repository
on GitHub.
Let's look at the directories separately:
- cmd – here is the main file of the content delivery mechanism (web).
- deployment – deployment scripts.
- internal – the most important directory, it contains implementations of all layers and components.
- pkg – packages independent of the project. They are needed to “expand” the language. Each of these packages can be released as a standalone library.
- posts – a directory specific to this project. Written posts are stored here, including markup for them.
- test – contains integration tests and other testing resources.
- web – material for presentation on the Web, in particular templates and static files.
Core
I always start implementing any feature by developing a user case. Use cases are laid at the core level, inside the components to which they belong. Since our application is quite small, there is only one such component –
blog
.
The user case always implements a high-level policy that describes how to work with the feature, and low-level details are left to the adapters connected to the ports. Each use case is presented in the format of a structure (class) with a method Run. The structure contains the dependencies and the request arguments are passed directly to the method Run. Here is the implementation blog.ViewPostUseCase:
// internal/blog/view_post_use_case.go

package blog

type ViewPostUseCase struct {
  postRepo PostRepo
  renderer Renderer
}

func NewViewPostUseCase(postRepo PostRepo, renderer Renderer) *ViewPostUseCase {
  return &ViewPostUseCase{postRepo: postRepo, renderer: renderer}
}

func (u *ViewPostUseCase) Run(path string) (RenderedPost, error) {
  post, err := u.postRepo.GetPostByPath(path)

  if err != nil {
    return RenderedPost{}, err
  }

  return u.renderPost(post)
}

func (u *ViewPostUseCase) renderPost(post Post) (RenderedPost, error) {
  renderedContent, err := u.renderer.Render(post.Markdown)

  if err != nil {
    return RenderedPost{}, err
  }

  return RenderedPost{
    Post: post,
    HTML: renderedContent,
  }, nil
}
Method
Run
receives the path to the post as an argument. Based on this path it downloads
Post
(entity) of
PostRepo
(port). If such a post is found, it displays the markup of that post using
Renderer
(port). Finally, he collects and returns
RenderedPost
(entity).
Post is a simple data structure that contains the post information returned PostRepo. There is another data structure RenderedPost, built inside a use case. It contains the original post and the displayed HTML in the form in which it should be submitted to the UI.
Ports PostRepo And Renderer – these are interfaces to which adapters can be connected. Now you can assemble the entire use case.
Here's how ports and entities are implemented:
// internal/blog/entities.go

package blog

import "time"

type Post struct {
  Title       string
  Author      string
  Time        time.Time
  Path        string
  Description string
  ImagePath   string
  Markdown    string
}

type RenderedPost struct {
  Post Post
  HTML string
}
// internal/blog/ports.go

package blog

import "errors"

type PostRepo interface {
  GetPostByPath(path string) (Post, error)
}

var ErrPostNotFound = errors.New("post not found")

type Renderer interface {
  Render(content string) (string, error)
}
Adapters
Adapters are low-level parts that are controlled from use cases. They are stored in the following directory structure:
internal/adapters/PORT/ADAPTER_TYPE
Where
PORT
is the name of the port implemented by the adapter, and
ADAPTER_TYPE
is the adapter type for this port. In this case we have an adapter
FileSystem
for port
PostRepo
and adapter
Goldmark
for the Renderer port, moreover, the latter is named after the Markdown library that it “adapts”.
Beginning with PostRepothe implementation is:
// internal/adapters/postrepo/filesystem/post_repo.go

package filesystem

import (
  "io/ioutil"
  "path/filepath"

  "github.com/geisonbiazus/blog/internal/core/blog"
)

type PostRepo struct {
  BasePath string
}

func NewPostRepo(basePath string) *PostRepo {
  return &PostRepo{BasePath: basePath}
}

func (r *PostRepo) GetPostByPath(path string) (blog.Post, error) {
  content, err := ioutil.ReadFile(filepath.Join(r.BasePath, path+".md"))

  if err != nil {
    return blog.Post{}, blog.ErrPostNotFound
  }

  post, err := ParseFileContent(string(content))
  post.Path = path

  return post, err
}
IN
filesystem.PostRepo
interface is implemented
blog.PostRepo
.
GetPostByPath
gets the path, in fact, the identifier of the post in the system, then reads the file that it finds in the repository constructor, following this path, and then parses the syntax of this file. This is done using the function
ParseFileContent
generating the entity
blog.Post
.
For simplicity, I do not provide the implementation of the function here ParseFileContent. With her implementationas well as with its corresponding tests you can find it on GitHub.
Second adapter used in ViewPostUseCase – This Renderer (see implementation below):
// internal/adapters/renderer/goldmark/renderer.go

package goldmark

import (
  "bytes"

  "github.com/alecthomas/chroma/formatters/html"
  "github.com/yuin/goldmark"
  highlighting "github.com/yuin/goldmark-highlighting"
)

type Renderer struct{}

func NewRenderer() *Renderer {
  return &Renderer{}
}

func (r *Renderer) Render(content string) (string, error) {
  var buf bytes.Buffer

  markdown := goldmark.New(
    goldmark.WithExtensions(
      highlighting.NewHighlighting(
        highlighting.WithStyle("monokai"),
        highlighting.WithFormatOptions(
          html.TabWidth(2),
        ),
      ),
    ),
  )

  err := markdown.Convert([]byte(content), &buf)

  if err != nil {
    return "", err
  }

  return buf.String(), nil
}
As with the post repository, the structure
goldmark.Renderer
implements the interface
blog.Renderer
. With its help, we abstract from the user case how exactly the markup is converted into HTML. The library is used for this
.
Please note: this and only this file uses and mentions the library at all goldmark. Therefore, it becomes easier to expand the behavior of this library or even replace it as the project develops. This is where adapters are truly useful.
User interface
This blog uses HTTP and HTML technologies to deliver content. Therefore, I will call this component “website”
web
. This package includes everything related to working on the web, in particular, the server, router and handlers (in other languages and frameworks they may be called “controllers”).
Let's start with the handler. Each handler, in order to get the result, first calls the use case from the kernel layer. To simplify testability, each use case is represented as a port in a package web, roughly the way the adapters are presented in the kernel package. Here, the implementation of the use case is the “adapter” of a given port in the UI layer. The use case port is defined as follows:
// internal/ui/web/ports.go

package web

import "github.com/geisonbiazus/blog/internal/core/blog"

type ViewPostUseCase interface {
  Run(path string) (blog.RenderedPost, error)
}
In other languages, such as Java or C#, which require an explicit mention of the interface being implemented, this port would be defined within the kernel layer. This way they become functional without knowing anything about the outer layers. This way we don't create circular dependencies. But because Go implements interfaces implicitly, it is possible to keep an interface close to where it is used without causing too much coupling.
Having arranged the port for the use case, we move on to the implementation of the handler, which is done like this:
// internal/ui/web/view_post_handler.go

package web

import (
  "fmt"
  "html/template"
  "net/http"
  "path"

  "github.com/geisonbiazus/blog/internal/core/blog"
)

type ViewPostHandler struct {
  usecase  ViewPostUseCase
  template *TemplateRenderer
}

func NewViewPostHandler(
  usecase ViewPostUseCase, templateRenderer *TemplateRenderer,
) *ViewPostHandler {
  return &ViewPostHandler{
    usecase:  usecase,
    template: templateRenderer,
  }
}

func (h *ViewPostHandler) ServeHTTP(
  res http.ResponseWriter, req *http.Request,
) {
  path := path.Base(req.URL.Path)
  renderedPost, err := h.usecase.Run(path)

  switch err {
  case nil:
    res.WriteHeader(http.StatusOK)
    h.template.Render(res, "view_post.html", h.toViewModel(renderedPost))
  case blog.ErrPostNotFound:
    res.WriteHeader(http.StatusNotFound)
    h.template.Render(res, "404.html", nil)
  default:
    res.WriteHeader(http.StatusInternalServerError)
    h.template.Render(res, "500.html", nil)
  }
}

func (h *ViewPostHandler) toViewModel(p blog.RenderedPost) postViewModel {
  return postViewModel{
    Title:       p.Post.Title,
    Author:      p.Post.Author,
    Description: p.Post.Description,
    ImagePath:   p.Post.ImagePath,
    Path:        fmt.Sprintf("/posts/%s", p.Post.Path),
    Date:        p.Post.Time.Format(DateFormat),
    Content:     template.HTML(p.HTML),
  }
}

type postViewModel struct {
  Title       string
  Author      string
  Date        string
  Description string
  ImagePath   string
  Path        string
  Content     template.HTML
}
Structure
web.ViewPostHandler
implements the Go internal interface
http.Handler
, which is used by default to handle HTTP requests using the standard library. Method
ServeHTTP
extracts the path to the post from the request, and then executes the use case and at the same time receives
blog.RenderedPost
and the possible result of the error. Depending on the result of the error, the corresponding status code is set, and then using the module
web.TemplateRenderer
the template is displayed.
If successful, it generates postViewModel. This view model contains all the post information in a properly formatted form, ready to be displayed in the user interface. The view model is then passed to the template renderer, which will simply generate the resulting HTML and display it to the user.
Template handler, router And server are also part of the web package, but a story about their implementation is beyond the scope of this post. Their code can be viewed on GitHub.
Application
Once the implementations of all these layers and components are ready, all that remains is to put everything together. These connections are made in the app layer. This component knows about all other components and understands what dependencies are associated with each component. Here's the implementation:
// internal/app/context.go

package app

import (
  "log"
  "net/http"
  "os"
  "path/filepath"

  "github.com/geisonbiazus/blog/internal/adapters/postrepo/filesystem"
  "github.com/geisonbiazus/blog/internal/adapters/renderer/goldmark"
  "github.com/geisonbiazus/blog/internal/core/blog"
  "github.com/geisonbiazus/blog/internal/ui/web"
  "github.com/geisonbiazus/blog/pkg/env"
)

type Context struct {
  Port         int
  TemplatePath string
  StaticPath   string
  PostPath     string
  BaseURL      string
}

func NewContext() *Context {
  return &Context{
    Port:         env.GetInt("PORT", 3000),
    TemplatePath: env.GetString("TEMPLATE_PATH", filepath.Join("web", "template")),
    StaticPath:   env.GetString("STATIC_PATH", filepath.Join("web", "static")),
    PostPath:     env.GetString("POST_PATH", filepath.Join("posts")),
    BaseURL:      env.GetString("BASE_URL", "http://localhost:3000"),
  }
}

func (c *Context) WebServer() *web.Server {
  return web.NewServer(c.Port, c.Router(), c.Logger())
}

func (c *Context) Router() http.Handler {
  return web.NewRouter(c.TemplatePath, c.StaticPath, c.UseCases(), c.BaseURL)
}

func (c *Context) UseCases() *web.UseCases {
  return &web.UseCases{
    ViewPost:  c.ViewPostUseCase(),
  }
}

func (c *Context) ViewPostUseCase() *blog.ViewPostUseCase {
  return blog.NewViewPostUseCase(c.PostRepo(), c.Renderer())
}

func (c *Context) PostRepo() *filesystem.PostRepo {
  return filesystem.NewPostRepo(c.PostPath)
}

func (c *Context) Renderer() *goldmark.Renderer {
  return goldmark.NewRenderer()
}

func (c *Context) Logger() *log.Logger {
  return log.New(os.Stdout, "web: ", log.Ldate|log.Ltime|log.LUTC)
}
Module
app.Context
acts as a container for dependency injection. For example, if it is asked for a web server, it will be able to correctly assemble all the dependencies from all layers to make the web server work. The same goes for any other application component.
Main file
Let's move on, for example, to the main file. The implementation is quite simple, because this is just the entry point for the application:
// cmd/web/main.go

package main

import (
  "log"

  "github.com/geisonbiazus/blog/internal/app"
)

func main() {
  c := app.NewContext()
  log.Fatal(c.WebServer().Start())
}
Function
main
just creates
app.Context
gets the web server and starts it.
❯ Conclusion
According to Robert Martin, good architecture maximizes the number of decisions that
don't have to take it
. That's the point. If every single low-level detail of your application is implemented as an adapter, then you don't feel pressured to make the right decision at the very beginning. Indeed, in reality, the right decision always depends on when exactly the implementation is made.
It's likely that a component that works today will no longer be the best option in a few months or years. Sometimes, in order to meet deadlines, we cut corners and deliberately increase technical debt. This is why it is absolutely necessary to control this aspect in good architecture.
Clean architecture concepts greatly simplify software development and maintainability. You don't have to waste time deciding early on what your infrastructure will be like. If you need to change something, then (provided that the business logic rules do not change), you just need to implement a new adapter. If you need to change a business logic rule, then minimal changes are made to the adapters, sometimes no changes are required at all.
That's why this approach is so good. Everything is easy to change, easy to test, everything is in its place in the code base.
You might also want to read this:
News, product reviews and competitions from the Timeweb.Cloud team – in our Telegram channel ↩