unity. Hot-seat game control
Hello. Recently I set myself the task of making a platformer with Hot-Seat style controls. I specifically considered the model where one player plays on the keyboard, and the second on the gamepad.
However, when I searched the Internet for how to do it correctly, I did not find anything useful, so I had to create the idea myself.
I warn you! I’m just sharing my experience. I’m sure there is a much more practical and convenient solution, this post is more for beginners.
Preparation
Initially, I wanted to use the standard Input Manager, but I ran into problems naming what is responsible for what, so this idea was quickly discarded.
A little later, I found an updated version of it from the Unity developers themselves – Input System. As I understand it, it is pre-installed with Unity itself, but for some reason, the Input Manager still remains the standard method for setting up control. I do not know what it is connected with.
Development, control settings, connection to scripts
So let’s create a project in Unity.
When Unity starts, immediately go to Window -> Package Manager and change Packages to Unity Registry at the top and enter Input System in the search bar on the right. We import into our project.
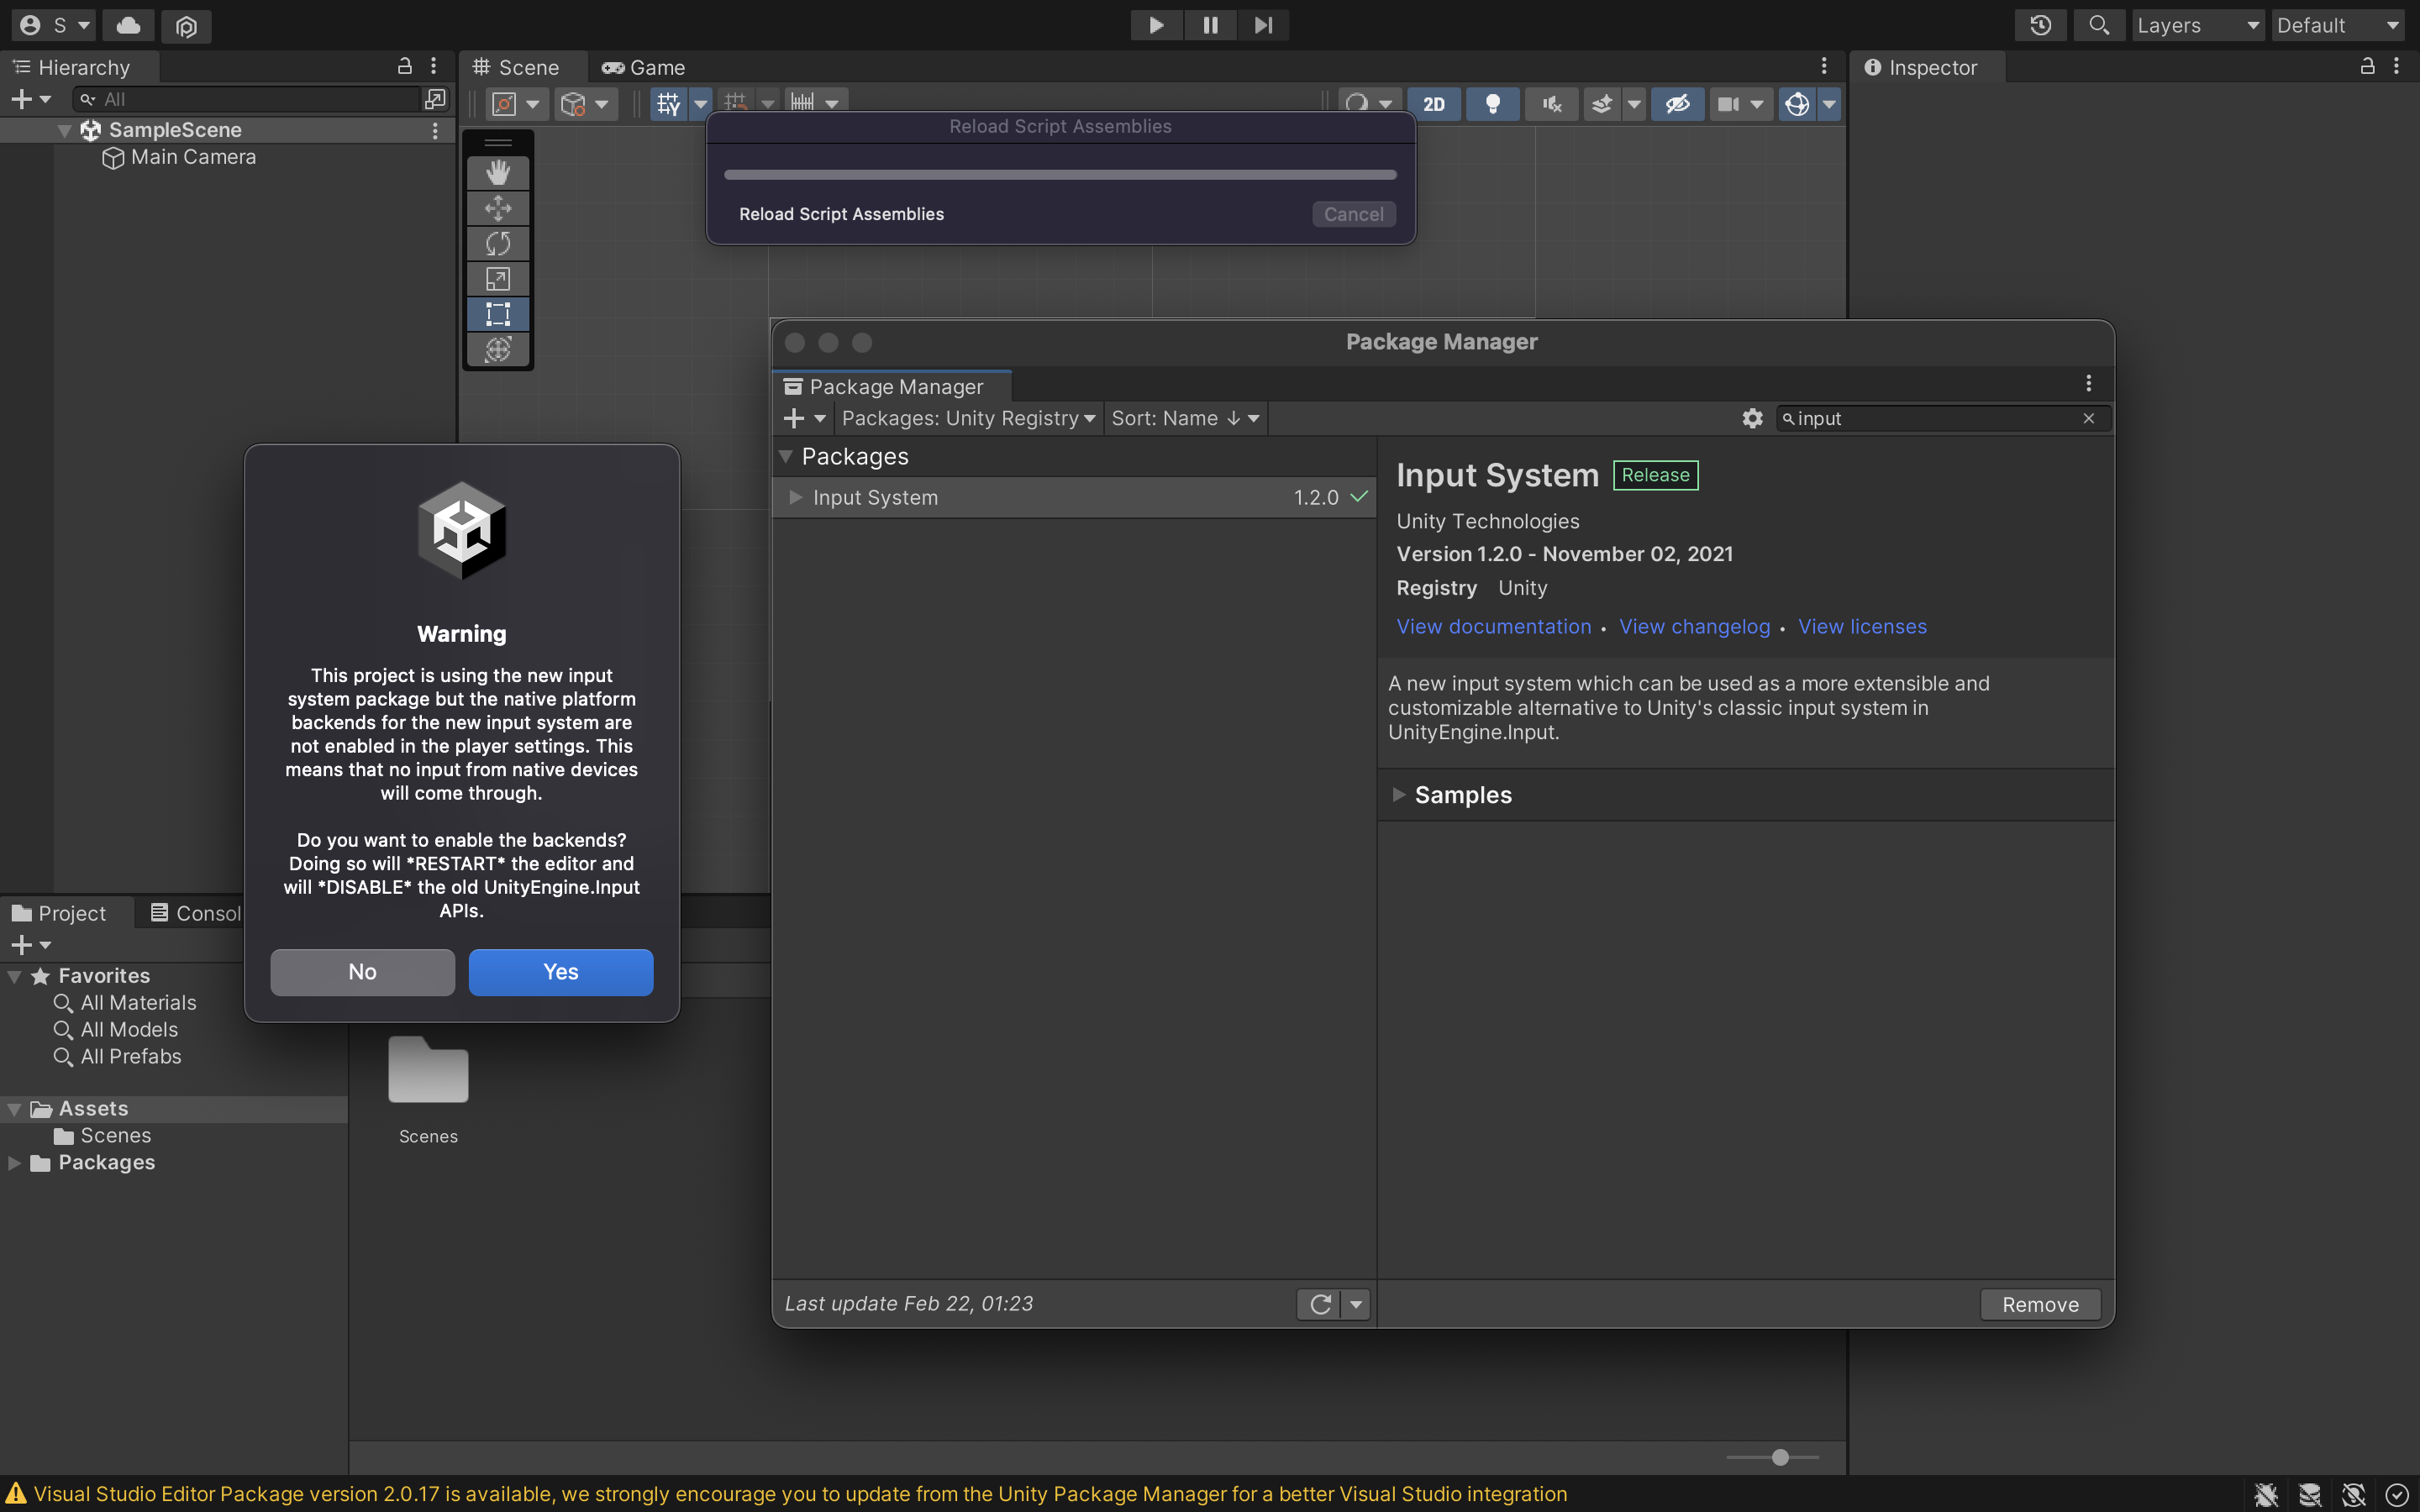
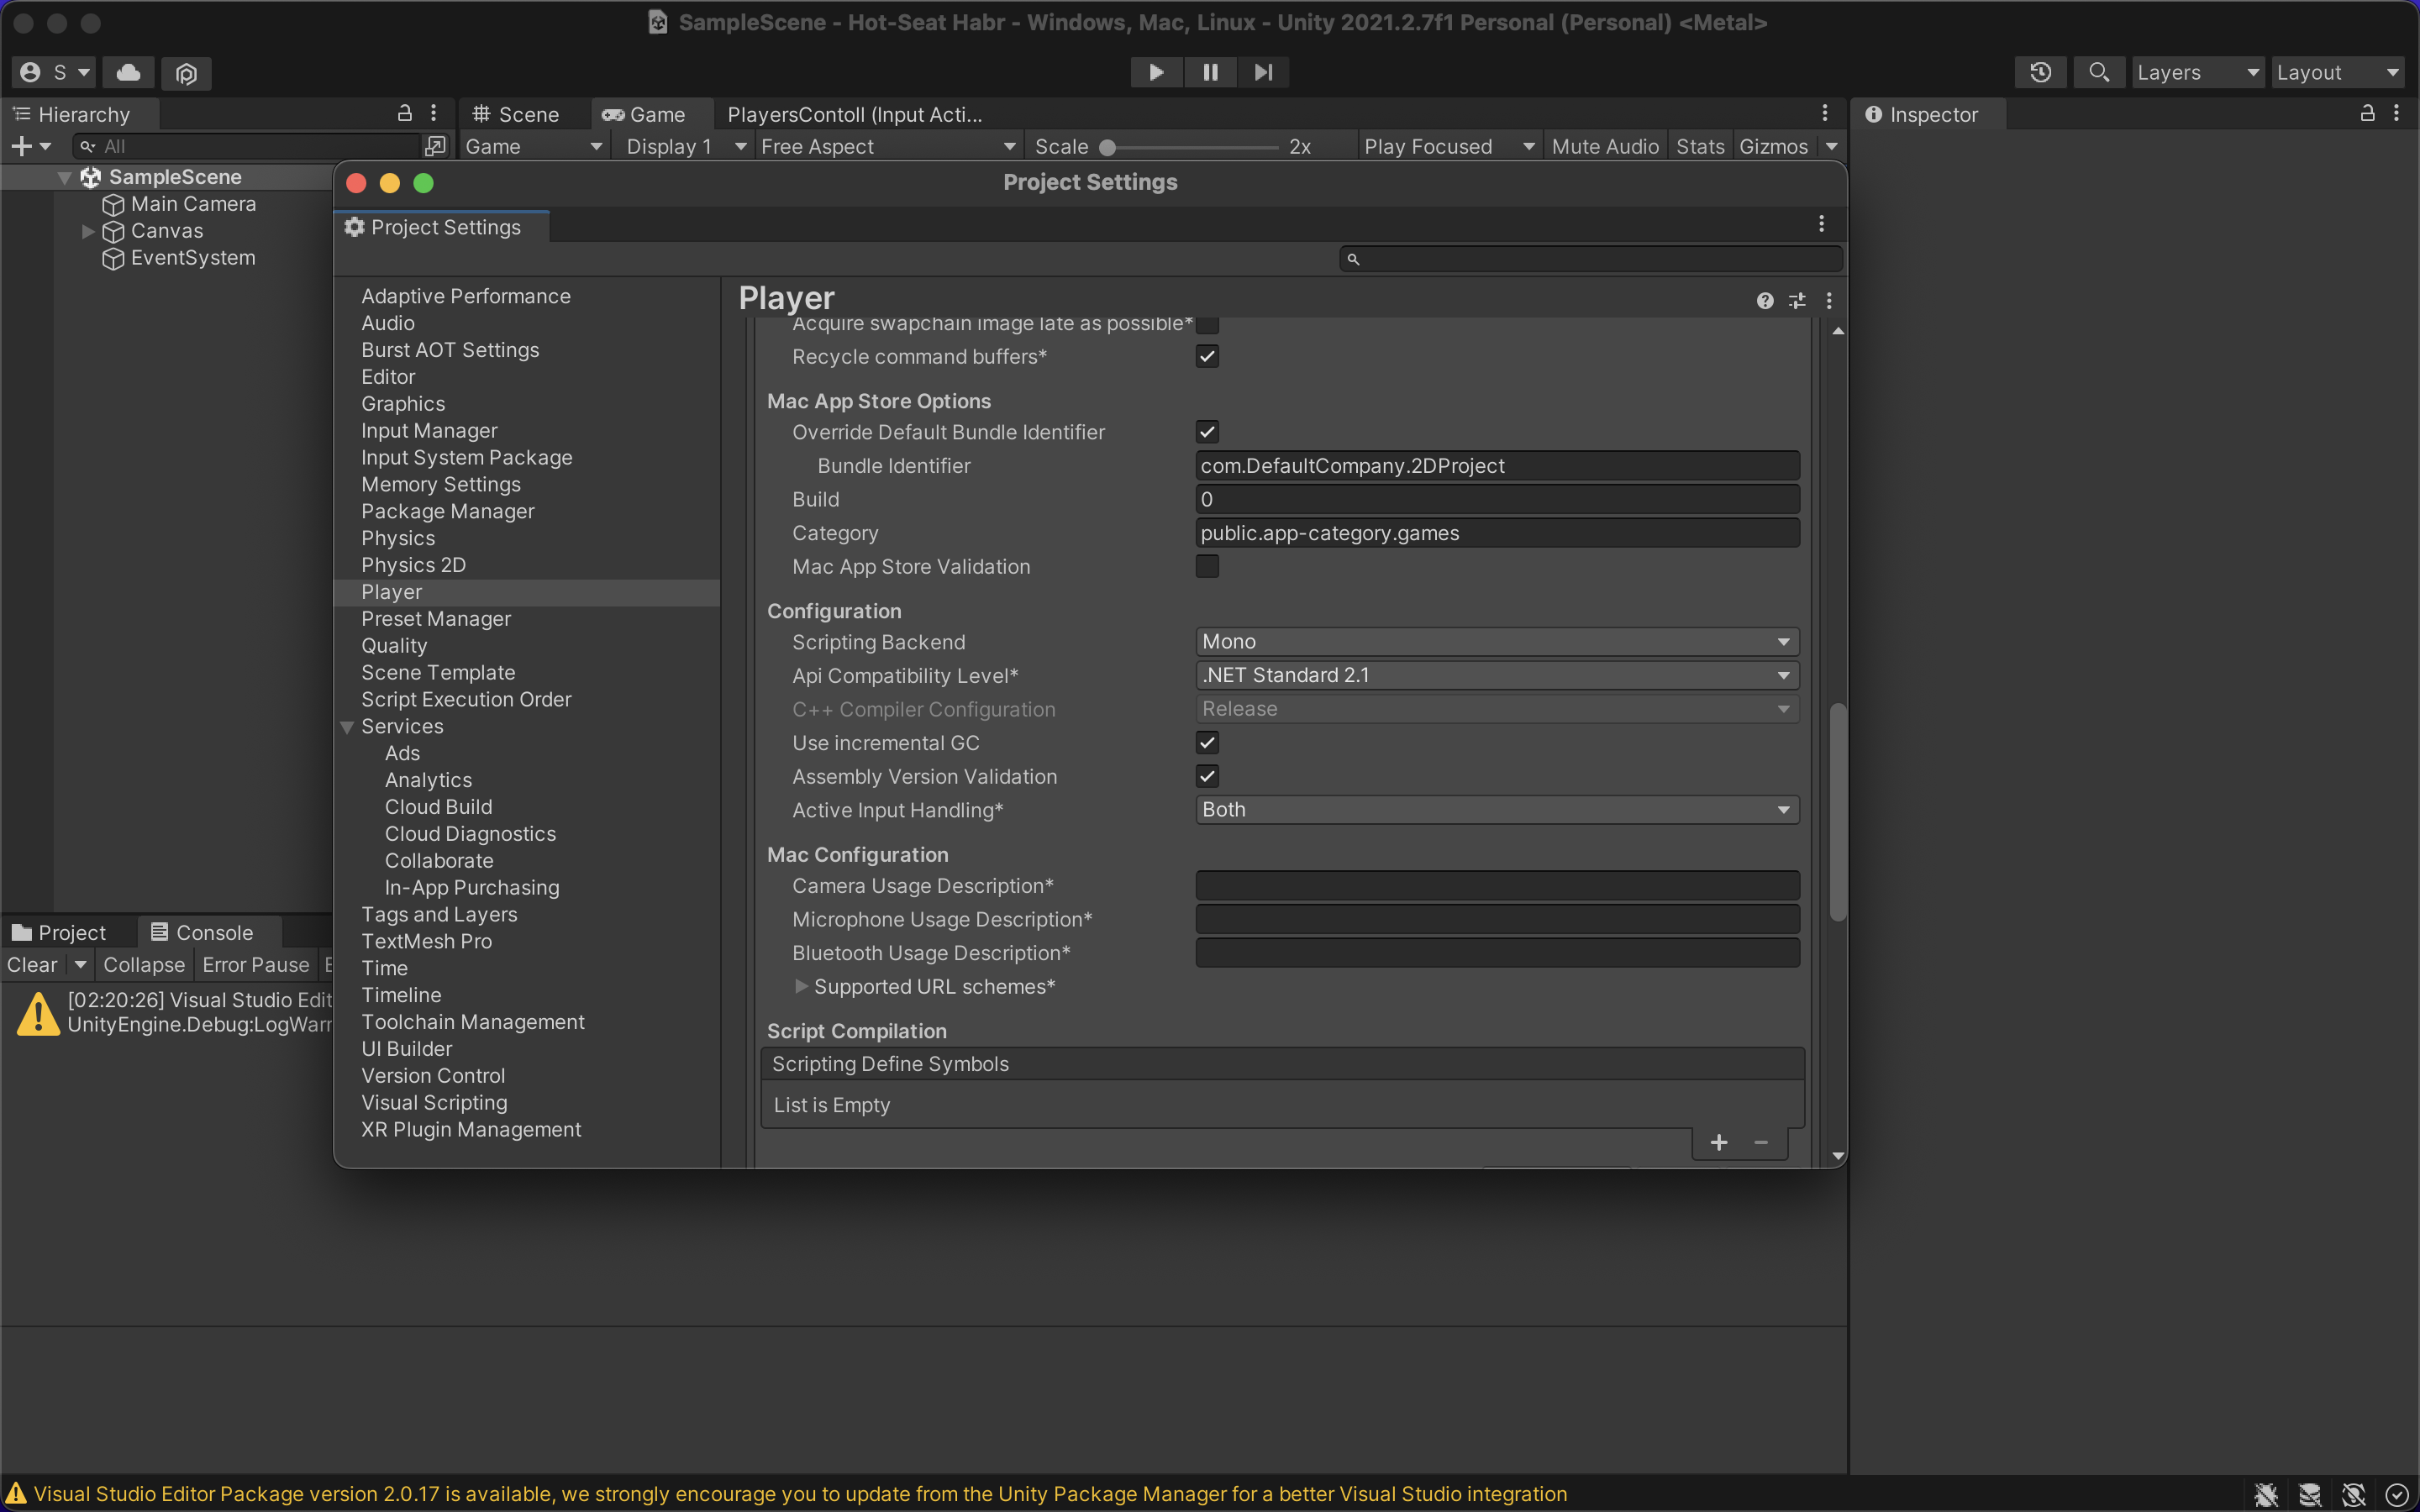
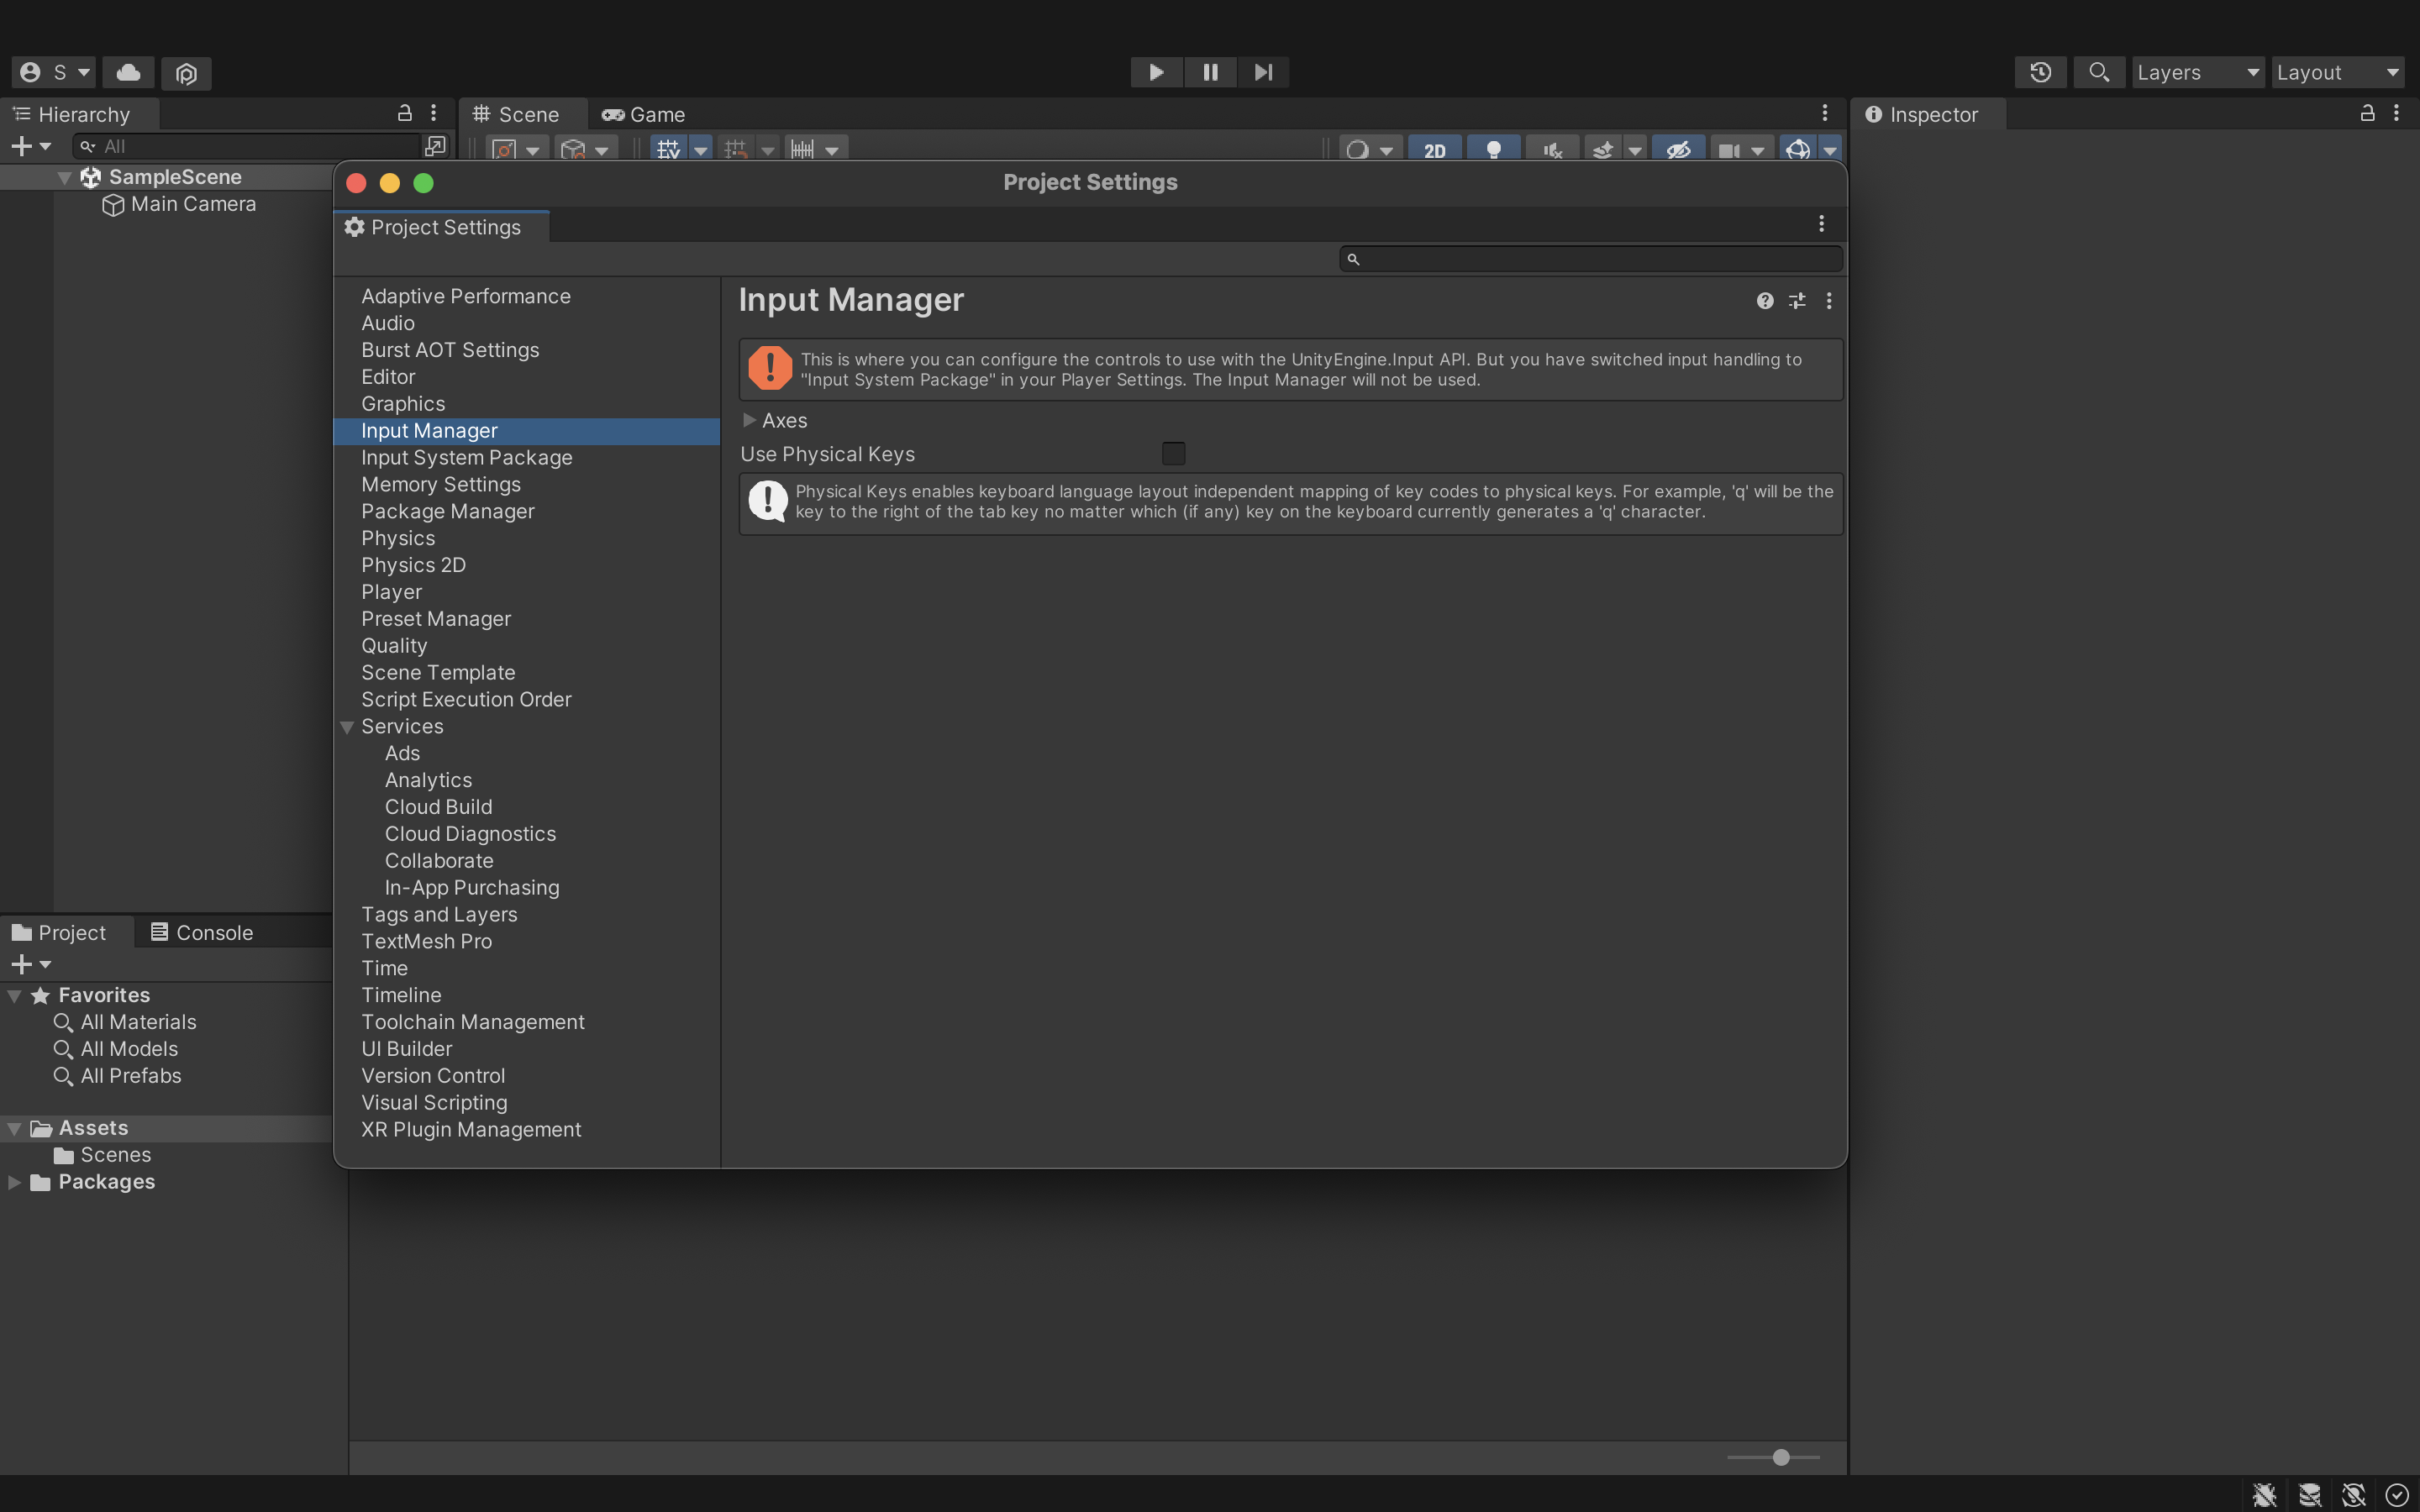
After installation, an error is displayed to us, which says that a new control system has appeared in the project at the moment, but it is not set in the settings and will not work. Press YES. The project will restart and the new control system will be ready to work. To check that everything went right, we can go to Edit -> Project Settings -> Input Manager. There should be a plate in which it says that the new control method is configured, but this one will not work. However, in this case, errors will fly out, so it’s better to go to the Player and scroll to the item “Active Input Handling” and put the value “Both” there.
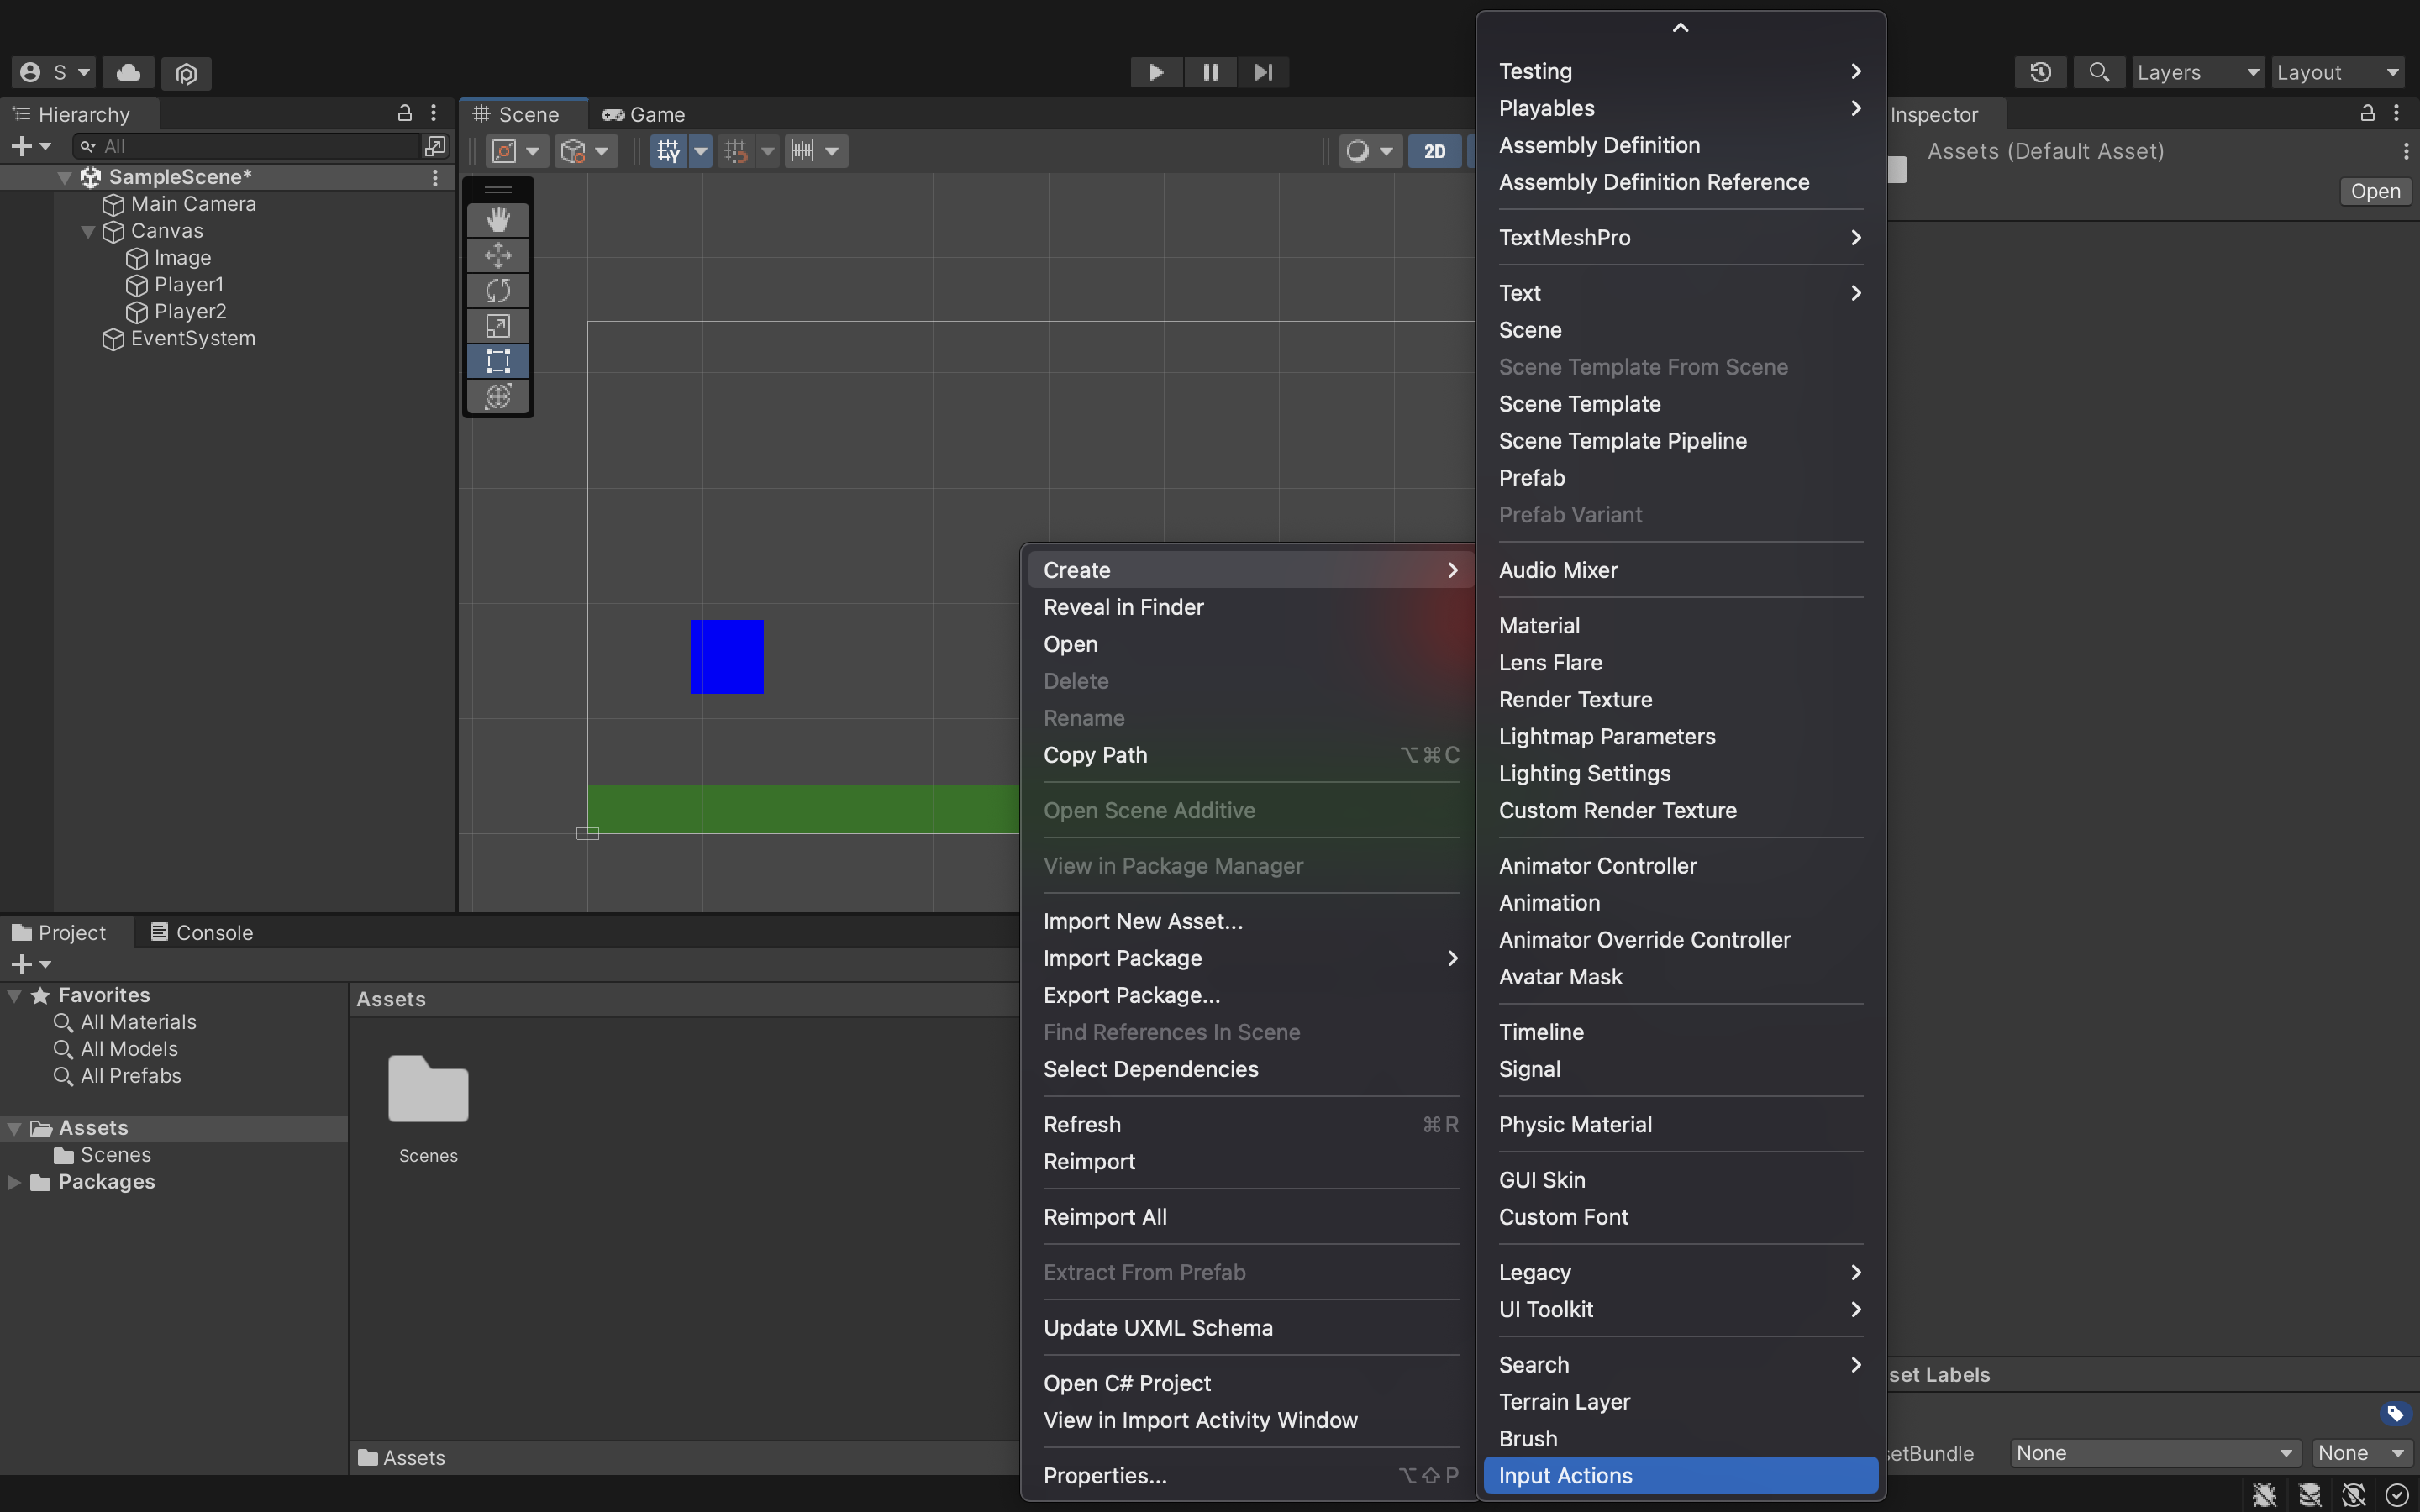
I created a small scene with two squares – these are our players. Now we need to configure their management. Let’s create a control file
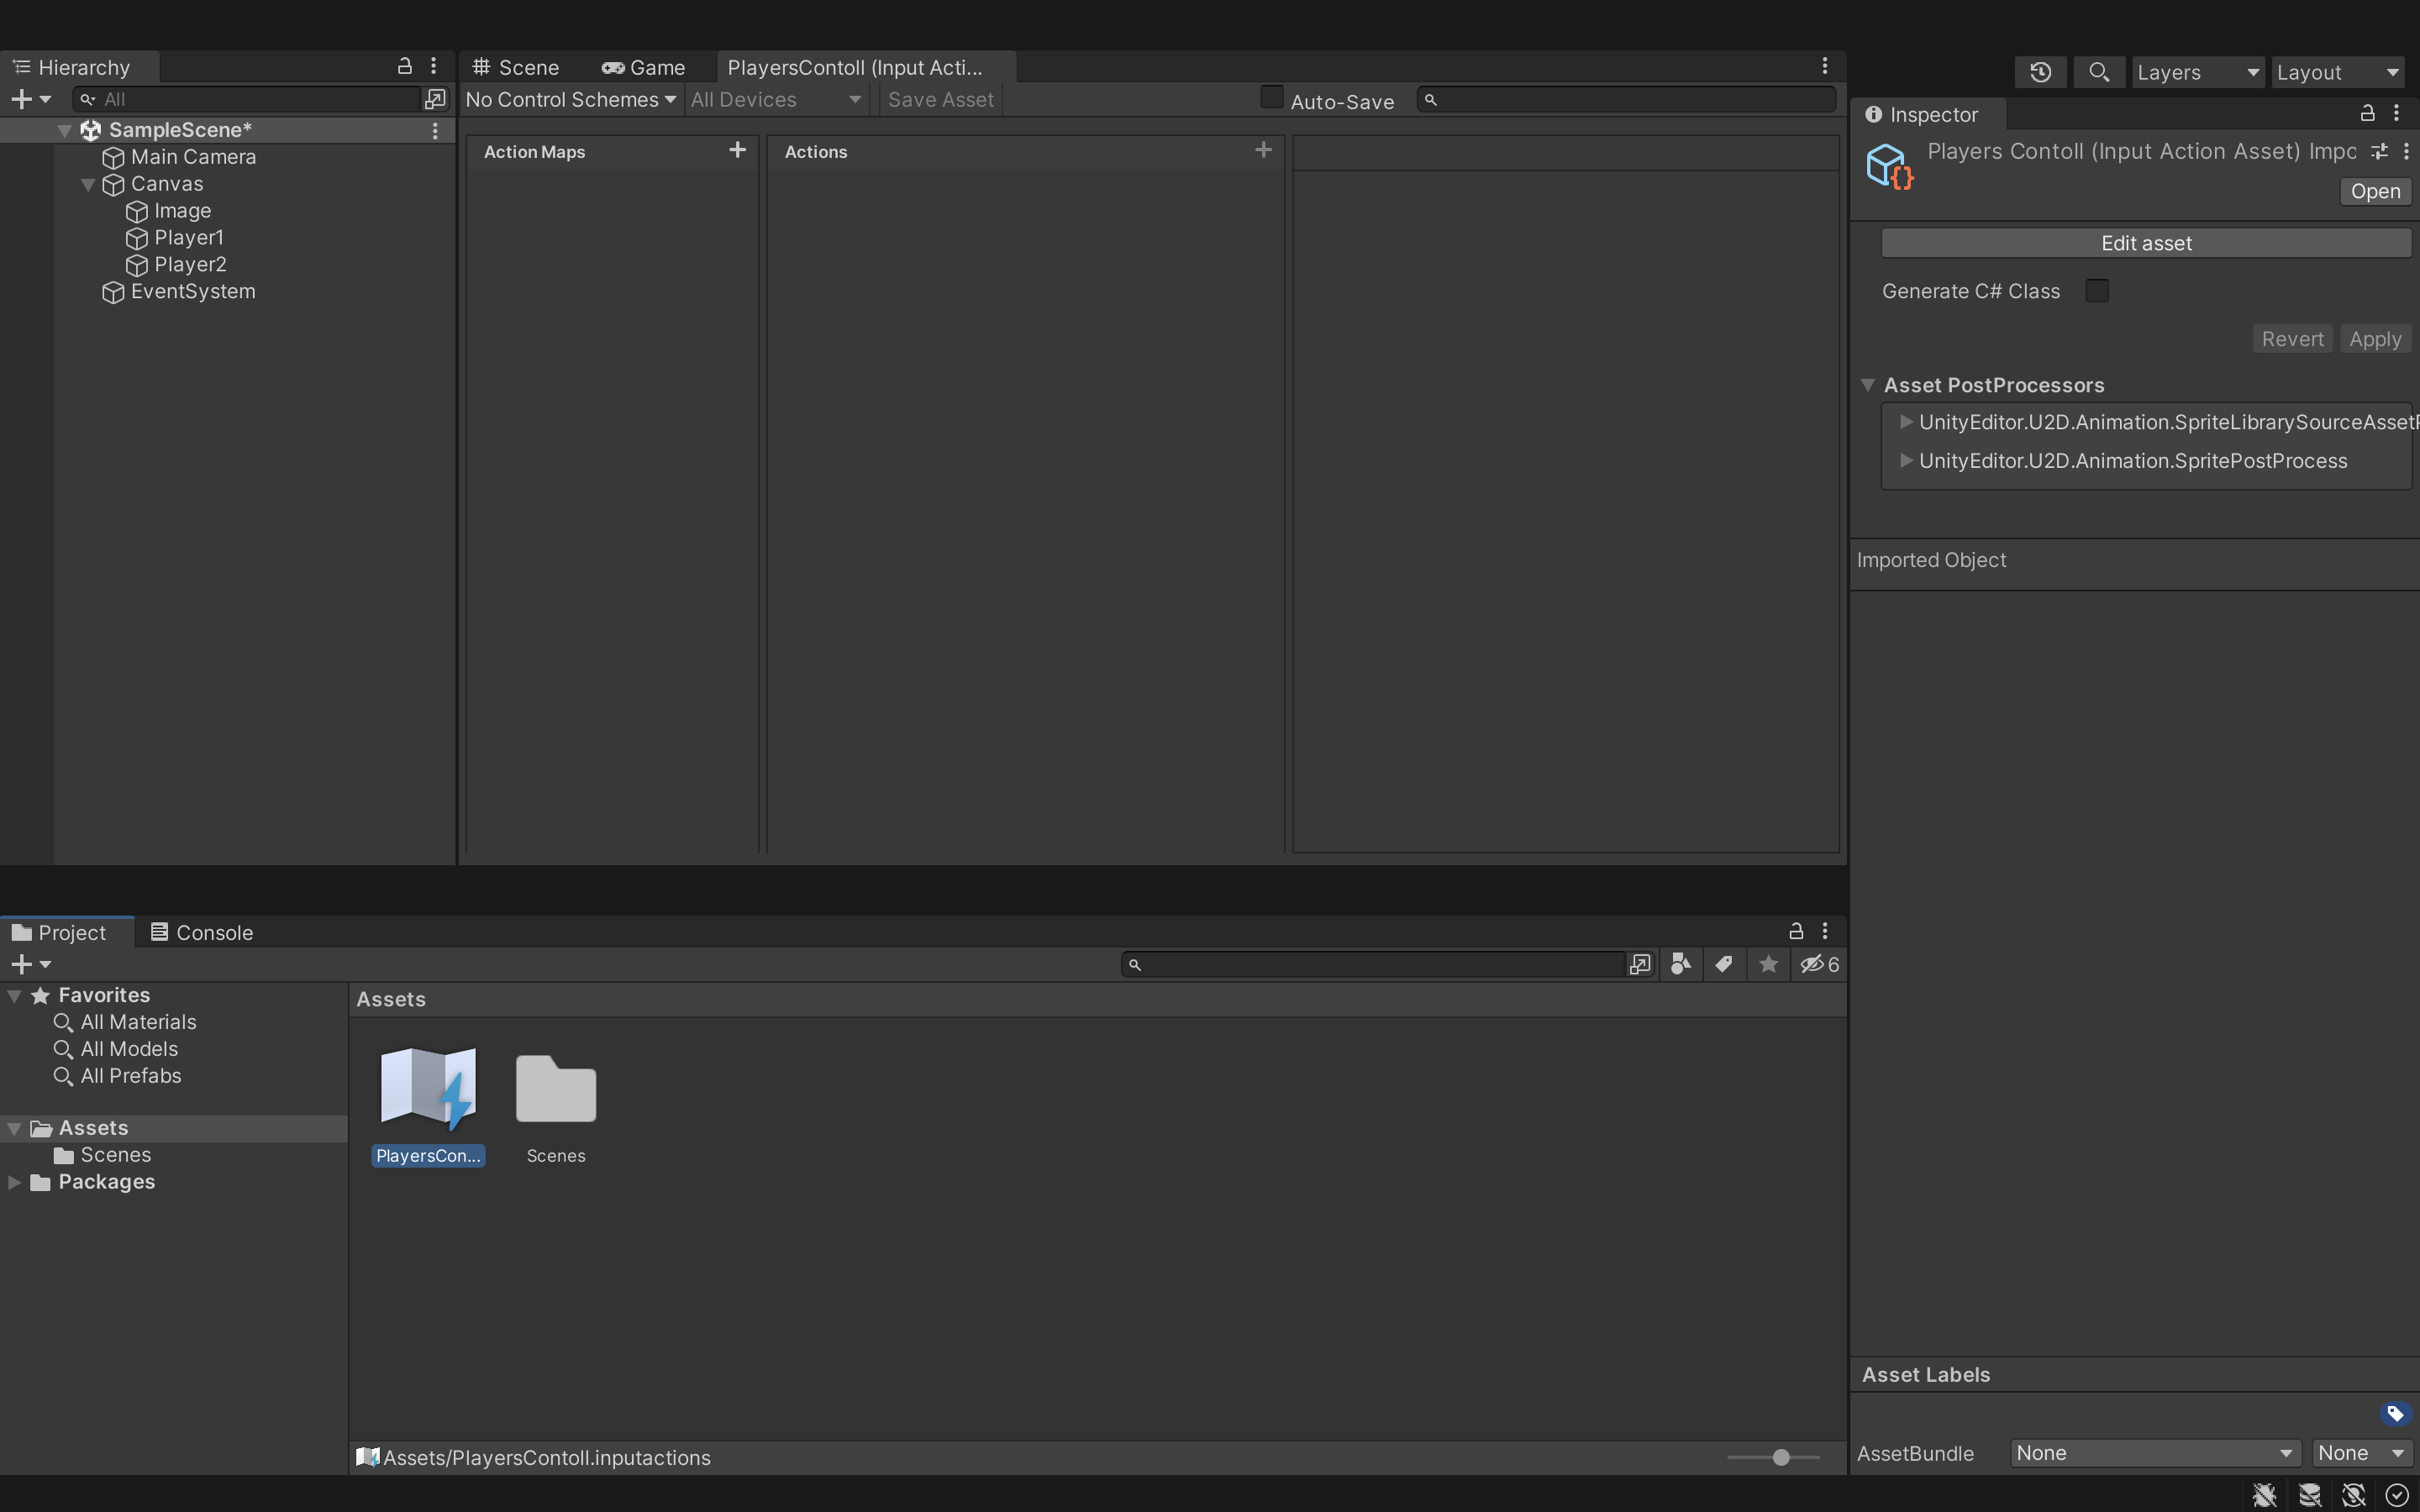
When we double-click on it, we will see the following menu.
Everything that is described below is most likely not the best, but at the same time a working method. Personally, I create two management “maps”. One for the keyboard, the other for the gamepad. It looks like this
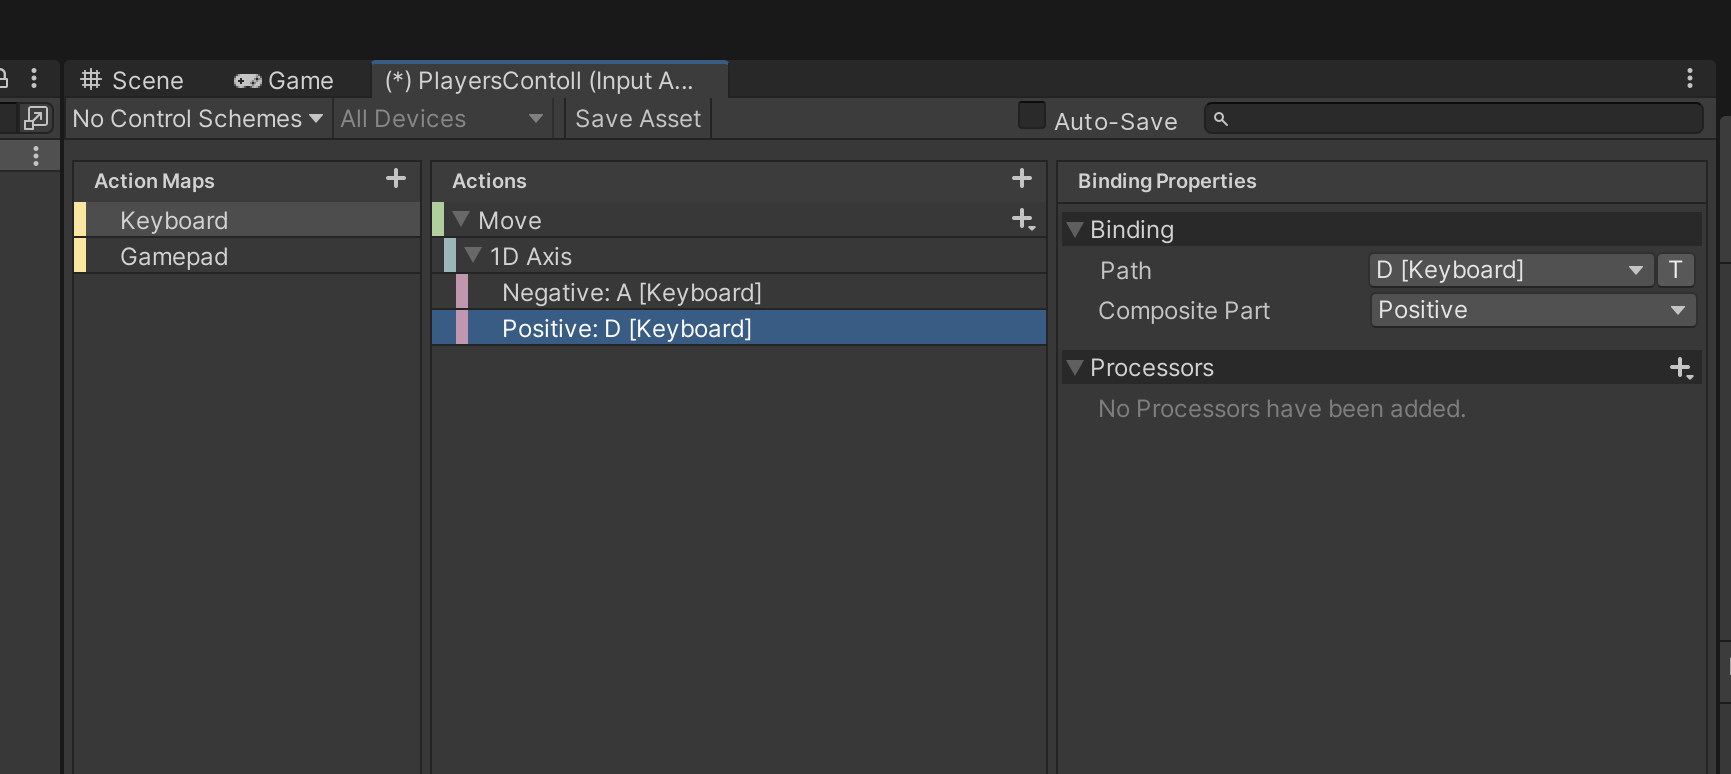
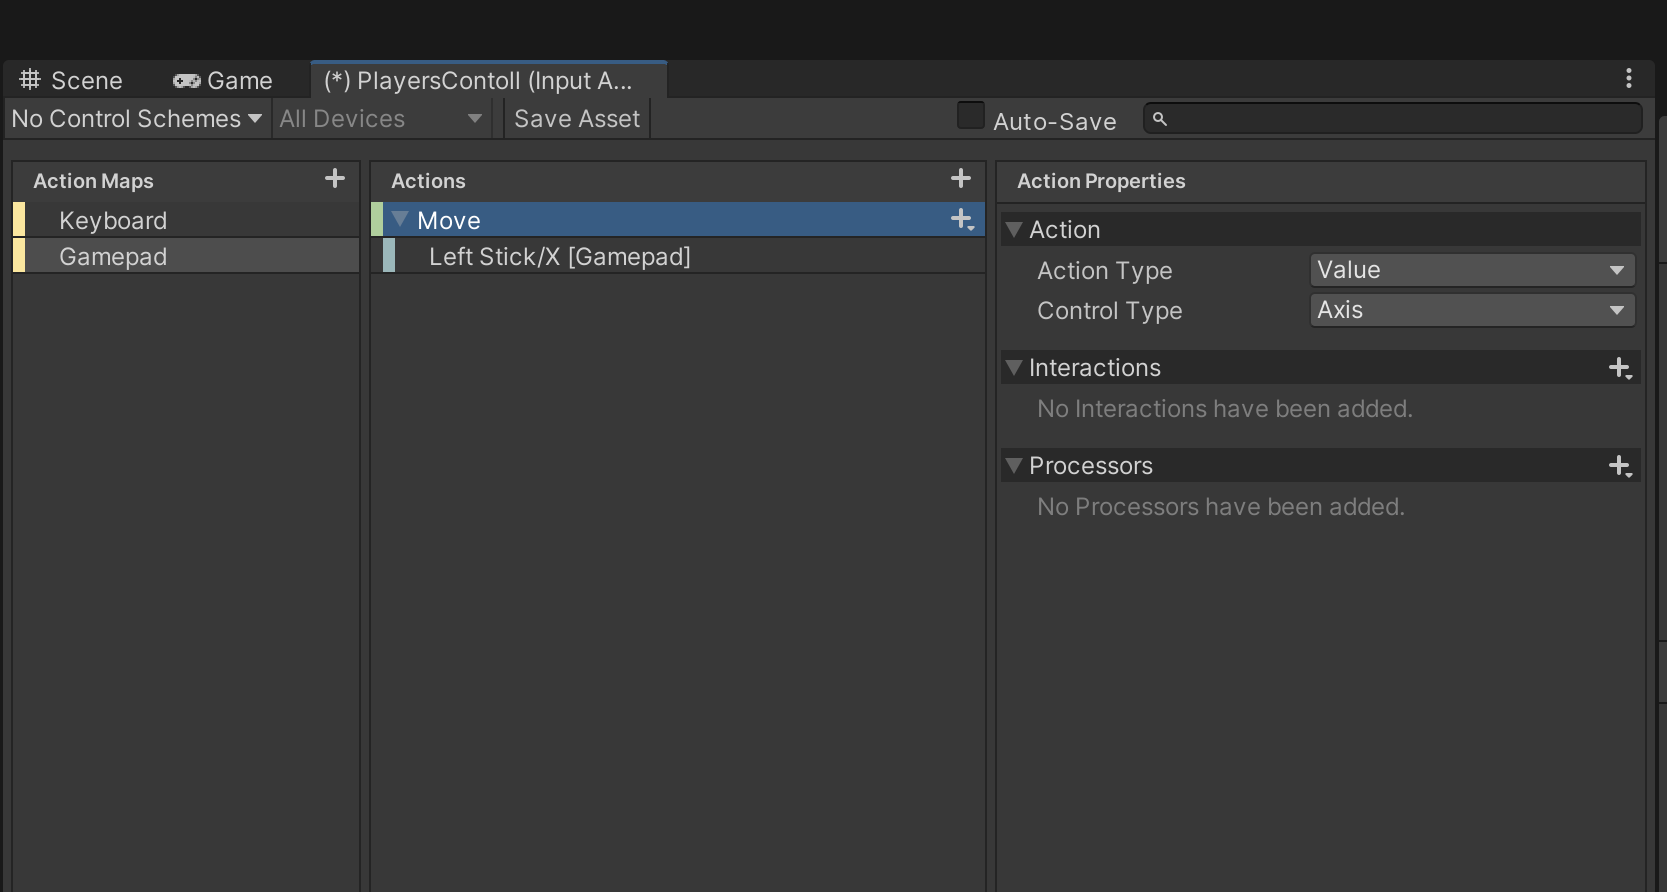
On the screen with controls for the gamepad, you can see the setting of the Move action itself – we should have a value (Value), while the type of this value should be Axis. To make the keyboard control block as in the screenshot, you need to press the “+” next to Move and add a positive / negative binding there.
After we have everything set up, we need to save and create a C # script with this control.
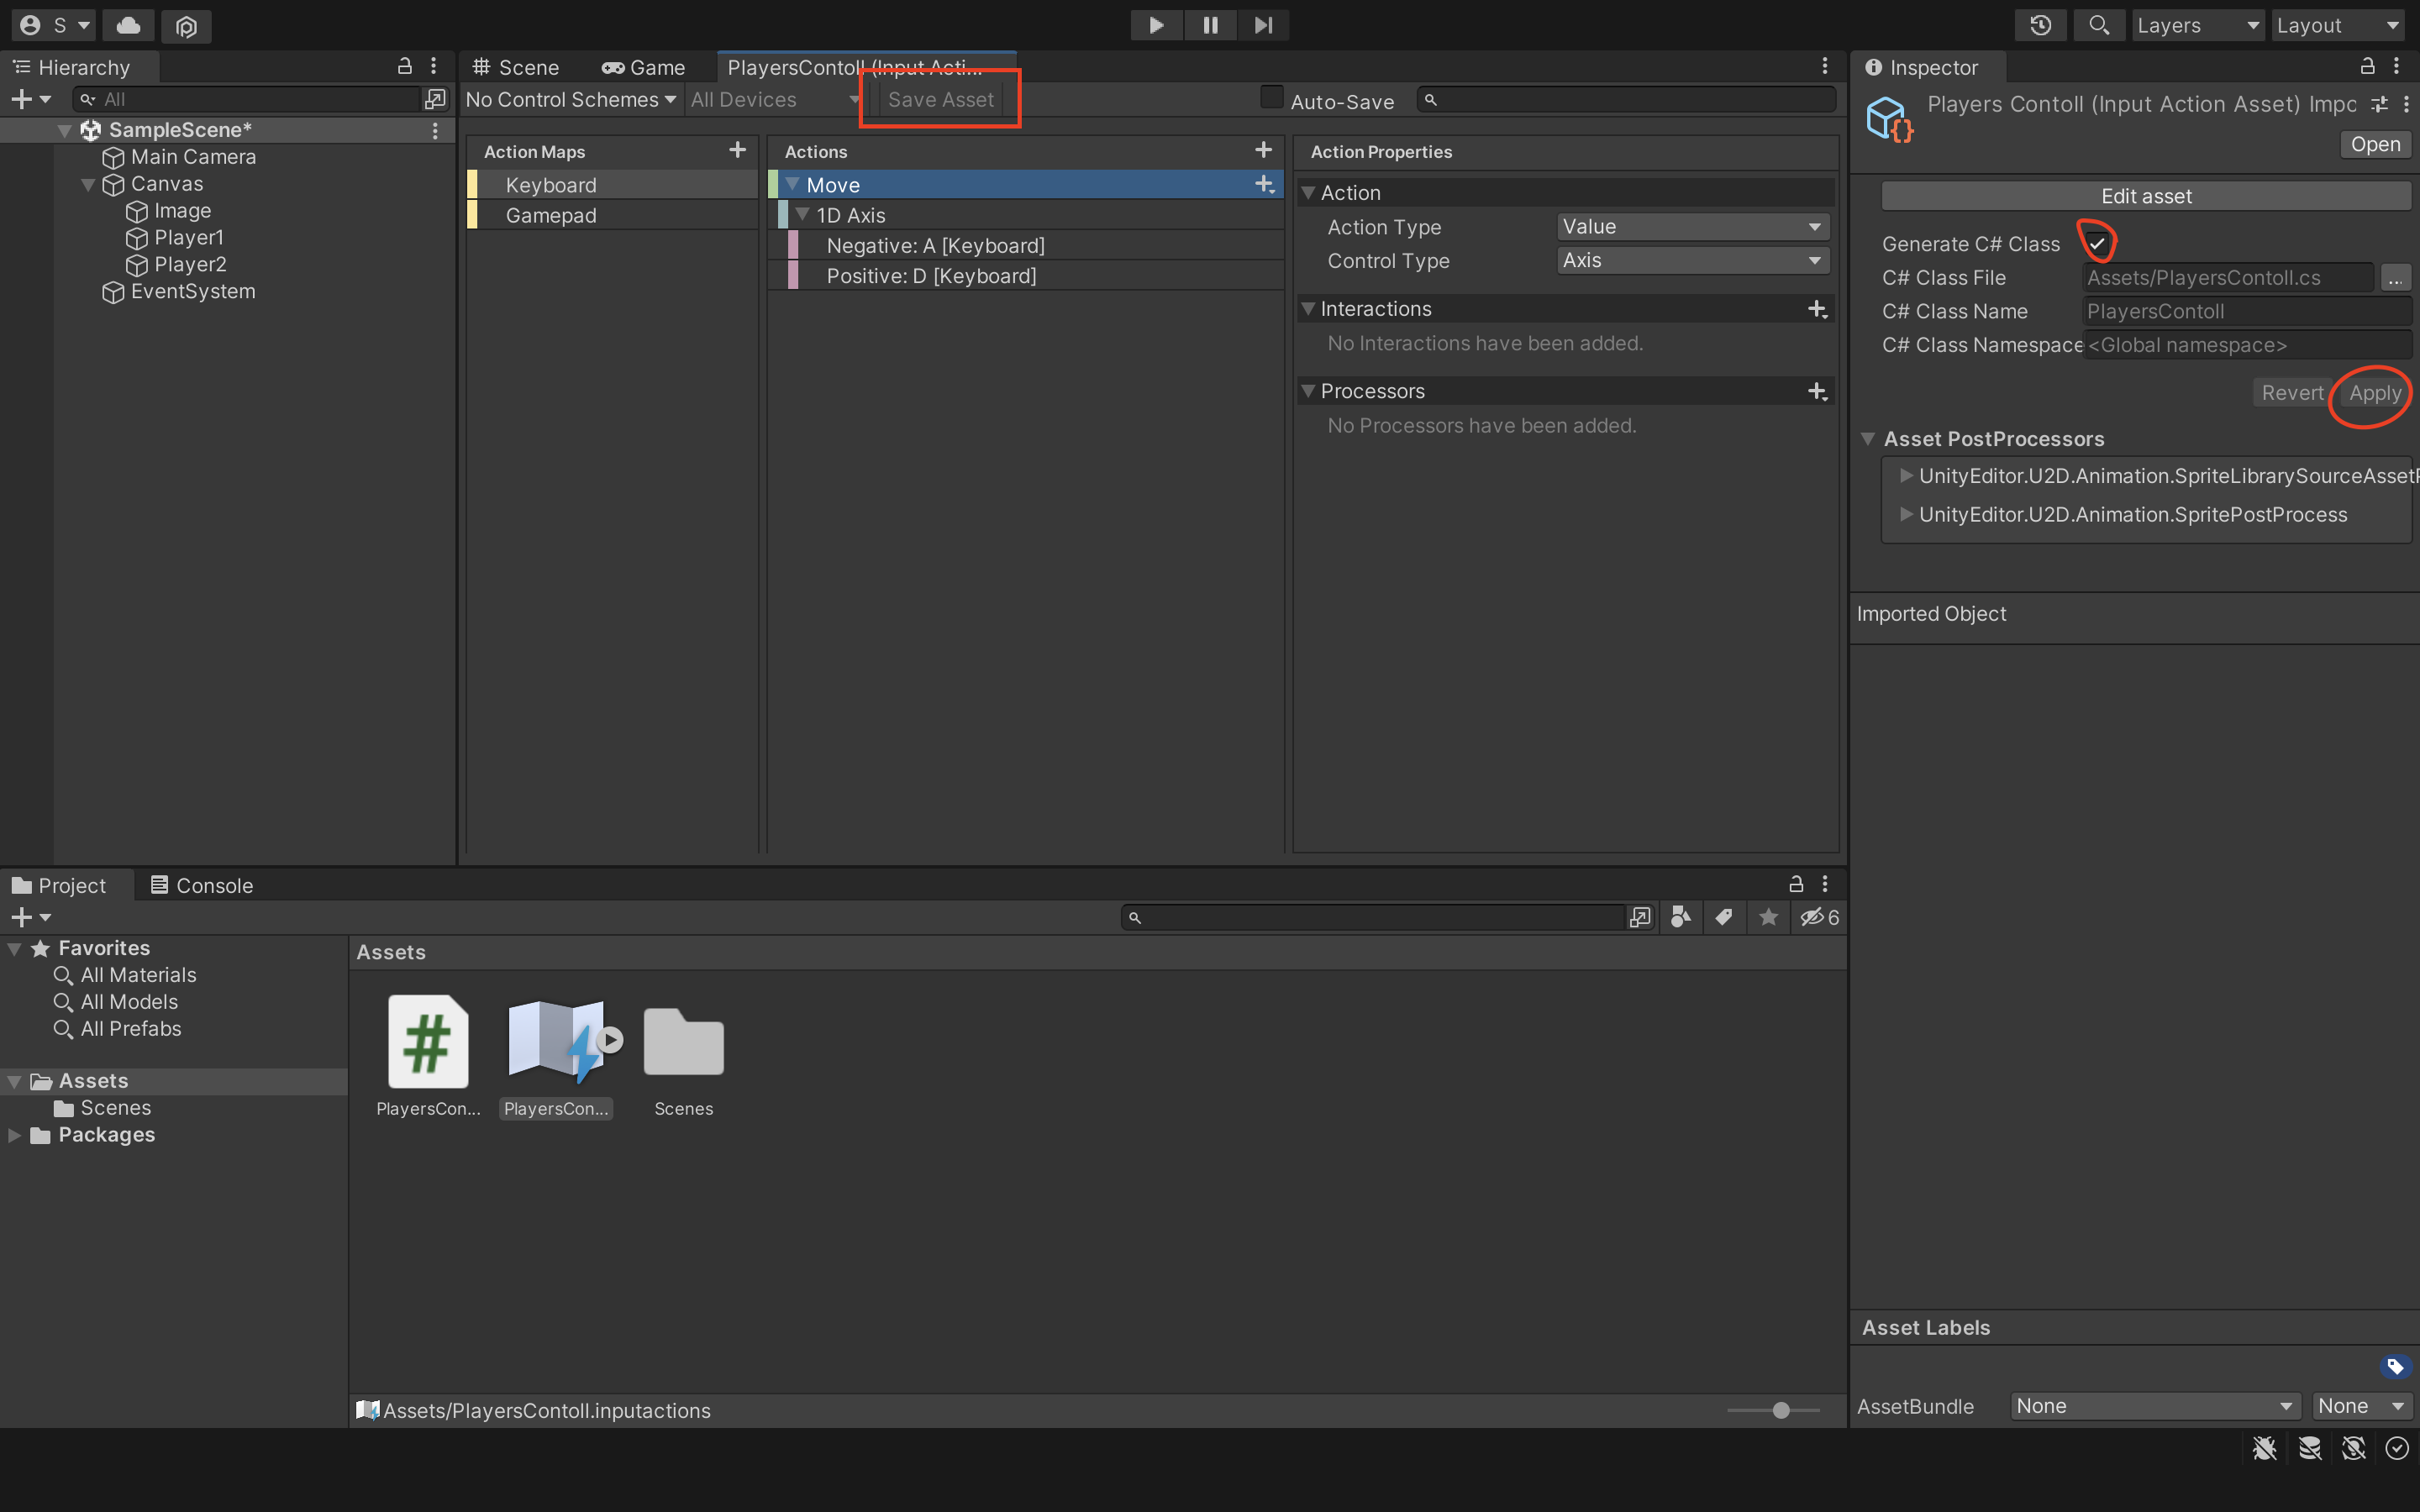
To do this, first click “Save Asset”, then in the inspector click on our Input System file, check the “Generate C # Class” checkbox and confirm. A C# file will appear that will manage it all.
Note. You have the option to click Auto-Save and then this procedure will be done for you. But personally, my macbook hung after every change in the Input System file for a couple of seconds. Not scary, but annoying when you need to add a lot of actions, so I abandoned it.
Finally, it’s time to move it all into our script and enjoy. We create a C# script that will be our control.
Here is the whole code:
using System.Collections;
using System.Collections.Generic;
using UnityEngine;

public class PC : MonoBehaviour
{

    PlayersContoll _PC;  // тут будет храниться наш скрипт управления

    [SerializeField]
    bool isGamepad; // засчёт этой переменной будем контролировать, какой персонаж управляется геймпадом, а какой клавиатурой

    private void Awake()
    {
        _PC = new PlayersContoll();

        /*
         Если вам нужно сделать действия не постоянно выполняемые, а только при нажатии на кнопку (например прыжок), то делаем так:
        if (isGamepad)
        {
            _PC.Gamepad.Jump.performed += context => Jump();
        }
         --//-- для клавиатуры по аналогии с движением
         */
    }

    private void OnDisable()  // Отключаем управление - на случай катсцен, диалогов и прочего
    {
        _PC.Disable();
    }

    private void OnEnable() // Обратно включаем управление
    {
        _PC.Enable();
    }

    private void Update()
    {
        Move();
    }

    void Move()
    {
        float dir;
        if (isGamepad) // Проверяем, геймпадом ли управляется этот объект
        {
            dir =  _PC.Gamepad.Move.ReadValue<float>();
        }
        else
        {
            dir = _PC.Keyboard.Move.ReadValue<float>();
        }
        print(dir);
        gameObject.transform.Translate(new Vector2(dir, 0));
    }
}
In short, first we declare a variable where the control script will be stored (line 8) as well as a bool type variable that will determine the type of control for this character (11). Then, in the Awake block, we assign the script (15) to this variable. If there are any actions that are performed by clicking on the button, we immediately process the subscription to these events here (17-24). After that, we do the processing of the movement, using the same variable that determines the type of control (45-52).
After completing these steps, we throw scripts on objects, put a check in one of them in the “isGamepad” item and rejoice, because now we have one player controlling one object from the keyboard, and the other from the gamepad another object.
Reasoning about the method
This asset has the ability to customize the control scheme. This item is located just above the maps when creating a control. Perhaps you can somehow do through this, but I did not succeed.
Also, another possibility of an asset will probably be more practical. It allows not only to accept movement values in the script (as we have in lines 45-52), but, on the contrary, to transfer values to a specific script from the system itself. Perhaps it can be done this way.
Using the asset, you can track device serials, their names in the interface, and more. Most likely, with the help of this, you can make control using two gamepads, but I didn’t get into it, because there is no second gamepad for tests, and there is no desire to suffer with emulators.
Conclusion
I would be grateful for any feedback in the comments, whether it be criticism of my method or suggestions for improving it. I understand that the method is not ideal, but for the first work with Hot-Seat, the result suited me just fine.

