Unity Framework integration for unit testing in IAR Embedded Workbench
Unfortunately, on developer site for C testing solution – Unity there is no instructions for integrating with IAR Embedded Workbench. Therefore, let’s try to fill this gap and make the article useful for those who are finally ready to start using unit testing in their IAR projects.
You can start with any project convenient for you, for the fee that you have at hand. In my case it is P-NUCLEO-WB55 under which a minimalistic project was assembled for blinking an LED.
The first thing to do for integration is, in fact, to download the files with the Unity source code, add the “Unity” group to the project and add the Unity files to it.

A good solution would be to include unity_fixture*.* files in the project, this will allow you to create tests in a manner similar to CppUTest and in the future their use will make writing tests more convenient and easier. It is worth mentioning that these extensions were originally proposed by the same James Grenning, the author of the above book, and they are widely used in his examples.
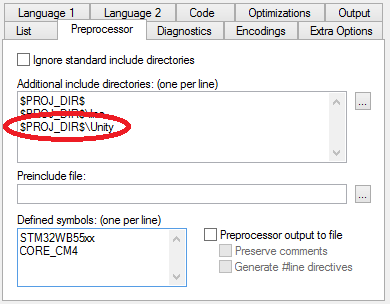
Add to “include directories” the path to the folder with Unity files
Since it will be useful to be able to run tests on both the host system and the target platform, we will make two separate configurations. Just make copies of the main configuration of your project.

Define UNITY_FIXTURE_NO_EXTRAS and UNITY_TEST symbols for Test_Hardware configuration

Let me remind you that you can switch between configurations through the menu in the upper left corner

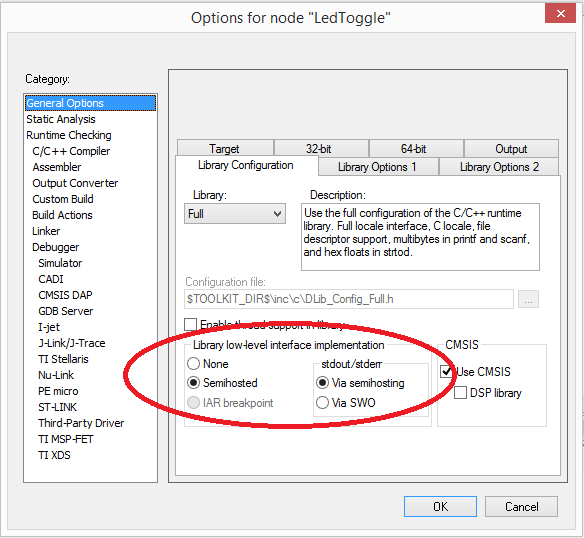
In the Test_Host configuration that will be used to run on the host platform, set stdout via semihosting to be able to see debug output in a terminal window
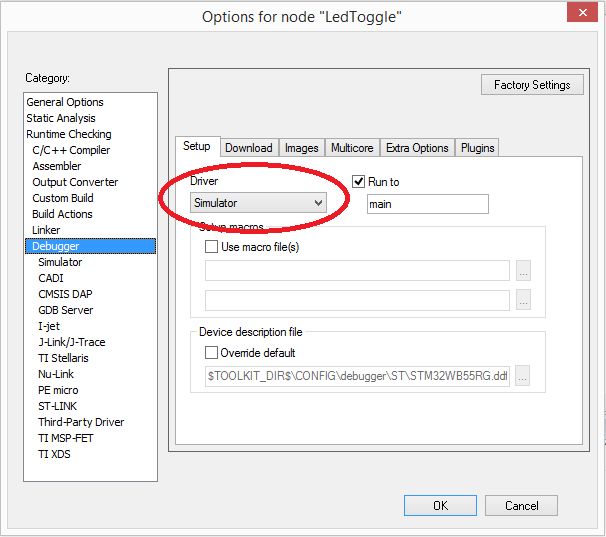
Also in this configuration specify “Simulator” as the debugger
We have defined (or not defined, depending on the configuration) three symbols:
UNITY_FIXTURE_NO_EXTRAS – Tells Unity not to include extensions, primarily “Unity Memory” to keep track of the heap. I, as a MISRA C adherent, try to avoid using the heap as much as possible in my projects, if you have a different point of view, you can leave out this definition and add the necessary files from Unity.
UNITY_TEST – defined in configurations for running tests.
UNITY_TEST_HOST – defined in the configuration to run tests on the host system.
The configurations are ready, you can transgress to Unity integration and test implementation. Open the file with the main function and add a conditional compilation directive to the beginning with the inclusion of the Unity header files for test configurations
#if defined(UNITY_TEST)
  #include "unity.h"
  #include "unity_fixture.h"

  void RunAllTests(void);
#endif
In the main function itself, hide the initialization of the peripherals in conditional compilation for configuring tests on the host system
#if !defined(UNITY_TEST_HOST)
  SystemClock_Config();
  Configure_GPIO();
#endif
And replace the launch of the main loop (or whatever plays its role for you) with the launch of a test for test configurations
#if !defined(UNITY_TEST)
  while (1)
  {
    LL_GPIO_TogglePin(LED2_GPIO_PORT, LED2_GPIO_PIN);
    LL_mDelay(150);
  }
#else
  UnityMain(0, NULL, RunAllTests);
  while(1);
#endif
It remains to add the tests themselves. Description of test development is beyond the scope of this article, there is a lot of good literature on this topic, for example, the book “Test-Driven Development for Embedded C” mentioned above. Unfortunately, its author forbade the use of his examples in third-party articles and tutorials, so let’s write our own simple test for the sqrtf function.
Create a Tests group and add the AllTests.c and Sqrt.c files there

AllTests.c
#include "unity_fixture.h"

//------------------------------------------------------------------------------
void RunAllTests(void)
{
    RUN_TEST_GROUP(sqrt);
}

//------------------------------------------------------------------------------
TEST_GROUP_RUNNER(sqrt)
{
    RUN_TEST_CASE(sqrt, Positive);
    RUN_TEST_CASE(sqrt, Zero);
    RUN_TEST_CASE(sqrt, Negative);
}
Sqrt.c
#include "unity_fixture.h"
#include <stdio.h>
#include <math.h>

//------------------------------------------------------------------------------
TEST_GROUP(sqrt);

//------------------------------------------------------------------------------
TEST_SETUP(sqrt)
{
}

//------------------------------------------------------------------------------
TEST_TEAR_DOWN(sqrt)
{
}

//------------------------------------------------------------------------------
TEST(sqrt, Positive)
{
    TEST_ASSERT_EQUAL_FLOAT(2.0, sqrtf(4.0));
}

//------------------------------------------------------------------------------
TEST(sqrt, Zero)
{
    TEST_ASSERT_EQUAL_FLOAT(0.0, sqrtf(0.0));
}

//------------------------------------------------------------------------------
TEST(sqrt, Negative)
{
    TEST_ASSERT_FLOAT_IS_NAN(sqrtf(-4.0));
}
The project is ready except for one small detail – it will be useful to exclude the Unity and Tests groups from the non-testing configuration. Switch to the main configuration and right-click on the group, then select “Options” from the drop-down menu and check the “Exclude from build” checkbox
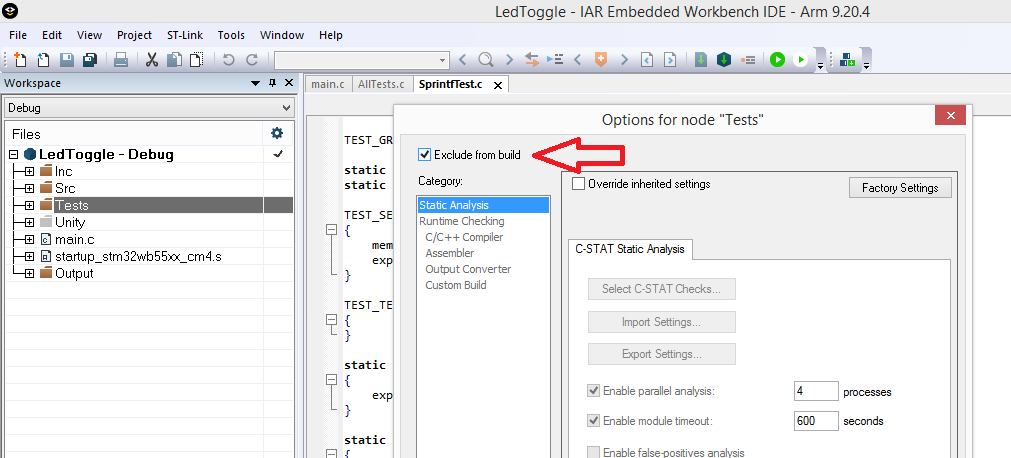
The selected groups will turn gray and will not be used in the configuration.
You can start testing. Go to Test_Host config and start debugging
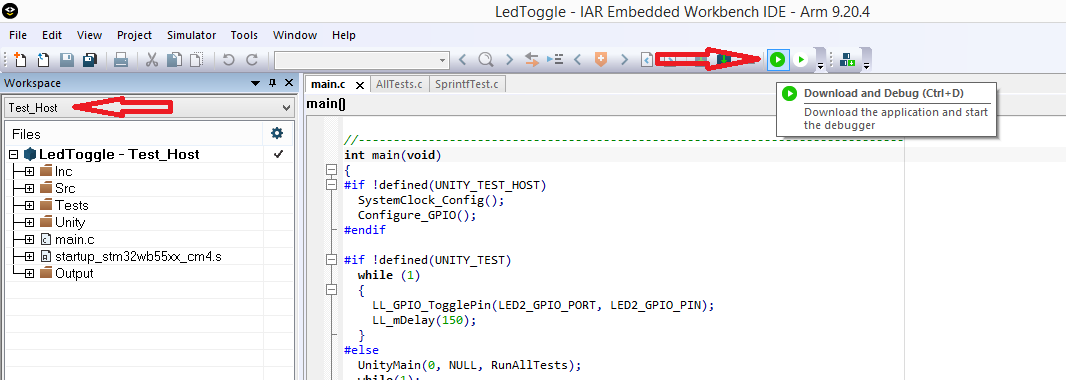
after that go to the “View” menu and make the “Terminal I/O” window visible, now press the “Go” button
If everything is done correctly in the Terminal I / O window, you will see the result of running tests on the host platform

By following the same steps (start debugging) in the Test_Hardware configuration, you will be able to run tests directly on the target platform.
You now have the ability to run unit tests on both the host platform and the target hardware from the same development environment using the same compiler. It’s time to learn how to write tests and cover the modules of your code with them.
But there is one more detail that I would like to dwell on. Running unit tests is extremely helpful when refactoring and optimizing your code to make sure new changes don’t break any functionality and you don’t inadvertently introduce any bug. Also, in the optimization process, it would be very useful to have some kind of metric to estimate the execution time of code sections on the target platform. If you are using a microcontroller with an ARM core that includes Data Watchpoint and Trace (DWT) unitthen you can use the CYCCNT register of the DWT module to count the number of processor cycles spent executing a piece of code.
This can be done in the following way.
Add functions to the file with the main function to initialize the DWT module and get the clock counter
//------------------------------------------------------------------------------
inline void DWT_Init(void)
{
	CoreDebug->DEMCR |= CoreDebug_DEMCR_TRCENA_Msk;
	DWT->CTRL |= DWT_CTRL_CYCCNTENA_Msk;
	DWT->CYCCNT = 0U;
}

//------------------------------------------------------------------------------
inline uint32_t DWT_GetCounter(void)
{
	return DWT->CYCCNT;
}
Modify the test run location as follows
#else
  __disable_interrupt();
  DWT_Init();
  UnityMain(0, NULL, RunAllTests);
  printf ("Execution time %d ticks\n", DWT_GetCounter());
  while(1);
#endif
When run on the target platform, you will get the following output with an estimate of the test execution time in processor cycles

Yes, this estimate includes some unnecessary execution sections, however, the execution time of these sections will be conditionally constant and the proposed metric is quite suitable for evaluating certain optimizations.
The whole project can be taken on github.
Successful testing to all and less errors and problems in your projects.