Setting up WireGuard on Mikrotik
What is WireGuard

If you do not touch the wiki and the official site, and explain as simply as possible, then this is VPN tunneling over UDP.
This is an opportunity to quickly, as simply as possible and reliably, with a good level of security, connect two points to each other.
Peer-to-peer connection, open source, and semi-automated route generation (for some clients) – what more do you need to be happy 😉
The ability to use WireGuard has appeared in mikrotik since the seventh version of RouterOS.
How the connection works (in plain language)
We have two points:
From WireGuard’s point of view, these addresses are called Endpoint.
The points also have internal networks or LANs:
These networks we want to connect with each other. For WireGuard it’s called AllowedAddress, or allowed addresses for the point. For Point A, we will need to specify allowed addresses – 192.168.200.0/24. For Point B, respectively – 192.168.100.0/24
In addition, we must determine for points A and B their addresses. They are used for the interface that WireGuard creates and transfers within the protocol. In the settings of most clients, this will be called Address. In mikrotik we will create a separate address.
Everything! This is enough to create a connection and make it work.
In the end, it will all look like this:

Differences between WireGuard and OpenVPN
I am not an expert in network protocols and cryptographic systems, so I cannot give a detailed comparison of these solutions. But I can highlight a few major differences for me as a user and administrator:
In WireGuard, you do not need to create certificates, unlike OpenVpn, and monitor them. This is both a plus and a minus depending on the purpose of use.
WireGuard creates peer-to-peer connections, where each point can be either a server or a client. This allows you to create, in addition to the classic “stars”, also mesh networks.
OpenVPN allows finer control over clients and their connections. For example, you can individually distribute routes and DNS servers for clients. WireGuard can’t do that.
Separately for mikrotik, there is a drawback that you need to configure routes for each subnet. For win-clients, they are determined and set based on
AllowedAddress.
In general, I concluded for myself that it is more convenient and perhaps safer for external users to use OpenVPN. And for iron (aka hardware) or software routers and their interconnection, WireGuard is more convenient. Basically, set it and forget it.
Preparing for setup
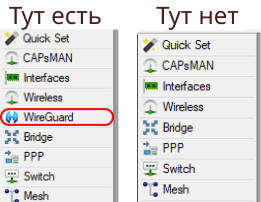
First you need to make sure that our Mikrotik router can work with WireGuard. Next, I will show on the example of the winbox interface. If you are using the command line, then you will most likely be able to determine the presence of WireGuard yourself.
You can check this by simply looking at the menu items (relevant for version 7.5):
You can try to update like this:

If this did not work out, then see your version in the title of the winbox device

and go to mikrotik official website to download the latest OS version.
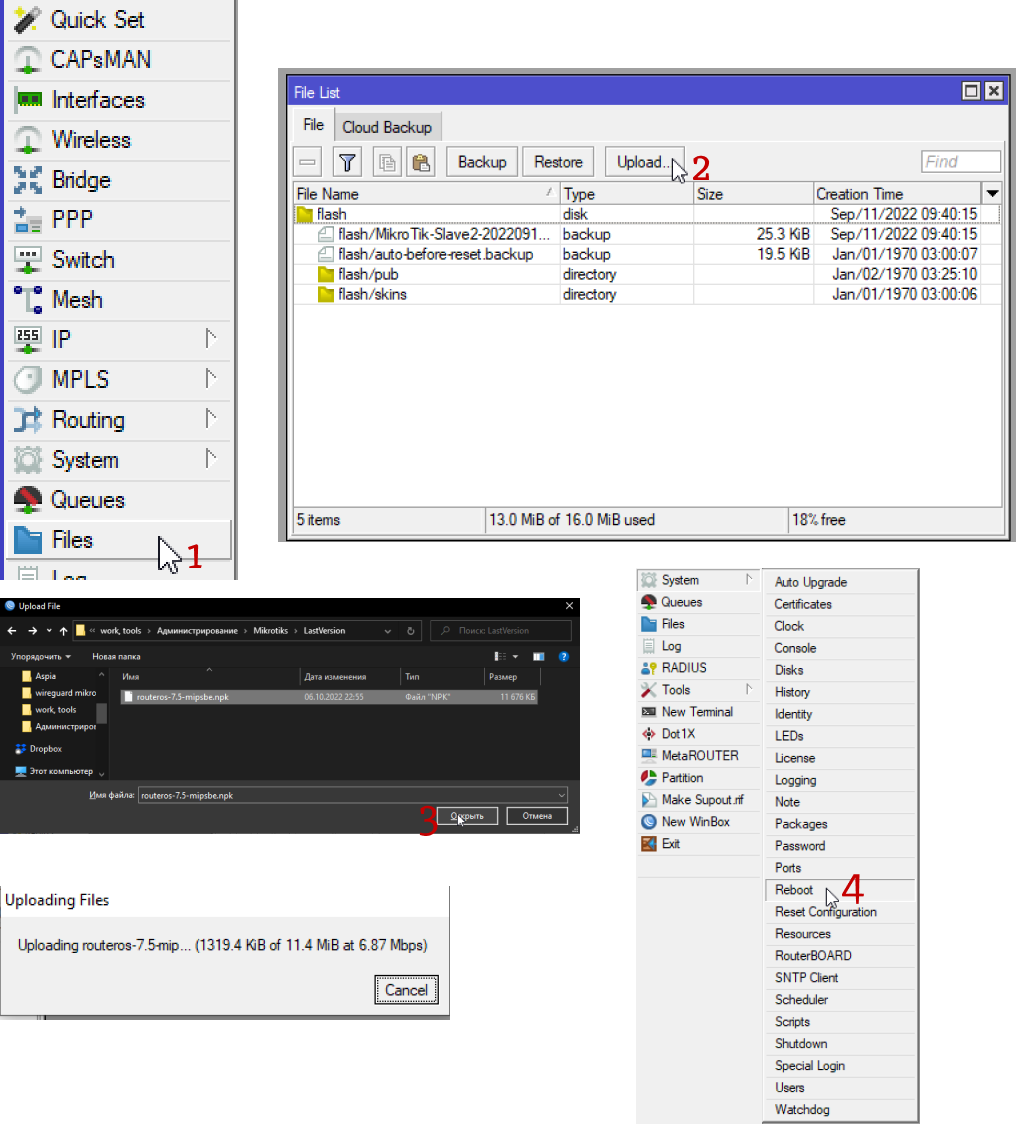
Briefly, how to update by uploading a file to Mikrotik:
If you have a lot of points and also for the convenience of setting up and further maintenance, I recommend that you create a similar table:
Name | Address | end point | EndpointIp | AllowedIPs | Listen Port | private key | public key |
Point A | 10.10.10.1 | 222.222.222.222 | 10.10.11.1/32.192.168.200.0/24 | 13231 | ucwL8IWLNYrPHOu9qk70ZOagPgjJXhzvvkg7ZLooaj4= | ||
PointB | 10.10.11.1 | 111.111.111.111 | 10.10.10.1/32.192.168.100.0/24 | 13231 | FxNwKIFINspWh5pkoFpS5LzNKMDjkqcAV/Ypo2Ed8ys= |
It will make it easier for you to navigate in the future.
Setting up WireGuard on Mikrotik
So, you have WireGuard on Mikrotik, and now we can start the setup.
First of all we need to create an interface to get the public key or Public Key. I didn’t write about it intentionally before, so that it would be easier to understand how WireGuard works.
But without the public key, the connection cannot be established. It serves as an encryption key and, one might say, a password for the point, and for each point it must be unique. When you create an interface, it is generated automatically, so you don’t have to worry about it:

We create interfaces and copy public keys to ourselves.
Script for quick setup
Next, I will give two options for setting up a simple one and a quick one, and a little longer. For starters, a simple one that I use myself. Here is the script that I made for your convenience:
# EXAMPLE start
# Peer A params
# Name peerAname "PointA"
# Interaface Address peerAifAddress "10.10.10.1/24"
# AllowedIPs peerAallowed 10.10.11.1/32,192.168.200.0/24
# EndPoint peerAendAddress "111.111.111.111"
# EndPort peerAendPort 13231
# PublicKey peerAkey "ucwL8IWLNYrPHOu9qk70ZOagPgjJXhzvvkg7ZLooaj4="
# Peer B params
# Name peerBname "PointB"
# Interaface peerBif "PointB"
# AllowedIPs peerBallowed 10.10.10.1/32,192.168.100.0/24
# EndPoint peerBendAddress "222.222.222.222"
# EndPort 13231
# PublicKey "FxNwKIFINspWh5pkoFpS5LzNKMDjkqcAV/Ypo2Ed8ys="
# EXAMPLE end

{
# Peer A params
# SET PARAMS HERE
:local peerAname "PointA"
:local peerAifAddress "10.10.10.1/24"
:local peerAallowed 10.10.11.1/32,192.168.200.0/24
:local peerAendAddress "111.111.111.111"
:local peerAendPort 13231
:local peerAkey "ucwL8IWLNYrPHOu9qk70ZOagPgjJXhzvvkg7ZLooaj4="
# Peer B params
:local peerBname "PointB"
:local peerBifAddress "10.10.11.1/24"
:local peerBallowed 10.10.10.1/32,192.168.100.0/24
:local peerBendAddress "222.222.222.222"
:local peerBendPort 13231
:local peerBkey "FxNwKIFINspWh5pkoFpS5LzNKMDjkqcAV/Ypo2Ed8ys="
# start select
:local input do={:put $input;:return}
:local selectedPeer [$input "Enter current Peer A or B"]
:put "You select is $selectedPeer. Finished!"
# end select
{
# start for A
:if ($selectedPeer = "A") do={
# add address
/ip address
add address=$peerAifAddress interface=$peerAname comment=$peerAname
# add firewall rule
/ip firewall filter
add action=accept chain=input dst-port=$peerAendPort in-interface-list=WAN protocol=udp comment="WireGuard $peerAname"
# add peer
/interface/wireguard/peers
add allowed-address=$peerBallowed endpoint-address=$peerBendAddress endpoint-port=$peerBendPort interface=$peerAname public-key=$peerBkey persistent-keepalive=10 comment=$peerBname
# add route
/ip/route
:foreach peer in=$peerBallowed do={
add dst-address=$peer gateway=$peerAname comment=$peerBname
}
}
# end for A
# start for B
:if ($selectedPeer = "B") do={
# add address
/ip address
add address=$peerBifAddress interface=$peerBname comment=$peerBname
# add firewall rule
/ip firewall filter
add action=accept chain=input dst-port=$peerBendPort in-interface-list=WAN protocol=udp comment="WireGuard $peerBname"
# add peer
/interface/wireguard/peers
add allowed-address=$peerAallowed endpoint-address=$peerAendAddress endpoint-port=$peerAendPort interface=$peerBname public-key=$peerAkey persistent-keepalive=10 comment=$peerAname
# add route
/ip/route
:foreach peer in=$peerAallowed do={
add dst-address=$peer gateway=$peerBname comment=$peerAname
}
}
# end for B
}
}
It can be run directly from the terminal, or from winbox by opening the terminal. You can also add it to System -> Scripts and run from the terminal, but since this is a one-time procedure, I don’t see much point in this.
First, enter all the necessary parameters in the variable lines :local, then copy and paste the script into the terminal. You will only need to choose the point where you are А or B. Enter it and click Enter.
So it will be necessary to repeat at each point!
The script creates addressfirewall rule for access from outside the list interface list WAN. Interface List WAN is created by default. If it doesn’t exist, then add it.
Next, the script creates the point settings Peers to connect and add all necessary routes Routeswhich is taken from Allowed Address
Well, or you can prescribe everything by hand according to the following screenshots:


I hope this article helped someone quickly understand and configure everything. Since I spent at least one day, or even more, on understanding, testing and tuning.
And at the end I will add a general scheme with all the parameters: