Setting up alerts from Opensearch to Telegram
In Magnit, for 1C systems alone, the daily volume of logs exceeds 100 GB. They need to be processed, used, and valuable data extracted. Of course, we use Discover with various dashboards and visualizations. But sometimes efficiency is necessary. This is where an alerting system comes in handy: it allows you to create alerts and notify users about various events or changes in data.
There are not many materials on setting up alerts in RuNet, so we decided to share our manual in the hope that it will help someone save valuable time. In this article we will get acquainted with the basics of working with alerts in OpenSearch and set up one method of delivering alerts – in Telegram.
Alerting system structure
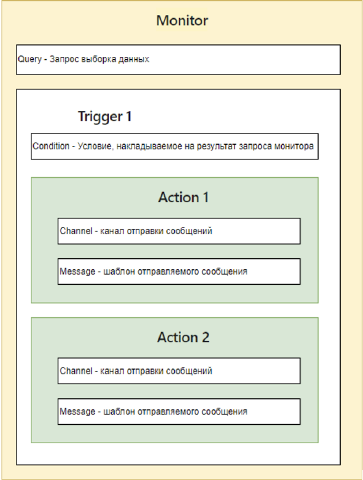
Monitor
The key object of the OpenSearch alerting system is the Monitor.

In a nutshell, in the monitor you need to indicate:
how to get data for verification (Query),
what conditions to check as a result of the query above,
what actions to take when the verification conditions are met. Actions are sending a message according to a configured template to the selected notification channel.
There are several types of monitors:
Per query monitor – on-demand monitor
Per bucket monitor – monitor for a prepared (aggregated) data set
Per cluster metrics monitor – cluster health monitor
Per document monitor – document monitor
Composite monitor – a composite monitor, needed to combine several monitors
In the examples below I will use the simplest Per query monitor.
Channels
Channels – channels for sending messages. They used to be called Destinations, but the Amazon team rebranded (hello, militia-police).
There are 5 types of channels:
Slack is a popular messenger
Chime – Amazon’s solution for online meetings and meetings
Custom webhook – universal sending of HTTP requests to the desired address with the necessary data
Email – send email via SMTP
Amazon SNS – Creator Notification Service
Depending on the channel type, additional settings open. We’ll look at them a little later.
Application monitoring problem
Let’s imagine that not long ago we configured domain authorization in OpenSearch, but have not yet disabled the basic accounts.
Let’s do monitoring that will notify us about the fact of logging in under the admin account.
By default, OpenSearch collects this data into indexes with a name pattern security-auditlog-*
Here is an example of a record for which you would like to receive an alert.
{
  "_index": "security-auditlog-2023.11.22",
  "_id": "qsnk-IsBw5omAc_g2xTR",
  "_version": 1,
  "_score": null,
  "_source": {
    "audit_cluster_name": "docker-cluster",
    "audit_transport_headers": {
      "_opendistro_security_initial_action_class_header": "BulkShardRequest",
      "_opendistro_security_origin_header": "REST",
      "_opendistro_security_remotecn": "docker-cluster"
    },
    "audit_node_name": "4399791e2a7a",
    "audit_trace_task_id": "75Csrxx-Qlm4hI9GTG5EkQ:990161377",
    "audit_transport_request_type": "PutMappingRequest",
    "audit_category": "INDEX_EVENT",
    "audit_request_origin": "REST",
    "audit_request_body": "{\"_doc\":{\"properties\":{\"CompoundContext\":{\"type\":\"keyword\",\"ignore_above\":8191},\"Context\":{\"type\":\"keyword\",\"ignore_above\":8191}}}}",
    "audit_node_id": "75Csrxx-Qlm4hI9GTG5EkQ",
    "audit_request_layer": "TRANSPORT",
    "@timestamp": "2023-11-22T21:17:09.968+00:00",
    "audit_format_version": 4,
    "audit_request_remote_address": "10.0.0.1",
    "audit_request_privilege": "indices:admin/mapping/auto_put",
    "audit_node_host_address": "172.0.0.1",
    "audit_request_effective_user": "admin",
    "audit_trace_resolved_indices": [
      "techlog-all-v001cdevappsrv-2023.11.23"
    ],
    "audit_node_host_name": "172.0.0.1"
  },
  "fields": {
    "@timestamp": [
      "2023-11-22T21:17:09.968Z"
    ]
  },
  "sort": [
    1700687829968
  ]
}
Setting up alerting in Telegram from OpenSearch
Creating a Channel
First you need to create the desired channel.
To do this, open Management -> Notifications

And using the Create channel button, we create a new element in which we fill in the name and description of the channel being created, and as the type (Channel type) specify Custom webhook.
We will send requests through the Telegram API, so we specify the settings according to the rules of the API used.

Setting up a proxy
If calls to the Telegram API need to be made from the OpenSearch server through a proxy, then the following settings must be made:
1. In the JVM settings configuration file, which can be found or created on the server with OpenSearch along the path opensearch/config/jvm.options, you must specify the following parameters:
-Dhttp.proxyHost=some_proxy_host
-Dhttp.proxyPort=3128
-Dhttps.proxyHost=some_proxy_host
-Dhttps.proxyPort=3128
2. If you need to specify a user to work with a proxy, then you need to add the following parameters:
-Dhttp.proxyUser=some_user_name
-Dhttp.proxyPassword=some_user_pass
-Dhttps.proxyUser=some_user_name
-Dhttps.proxyPassword=some_user_pass
Creating a Monitor
After creating a channel for sending messages, you can start creating a monitor. To do this, in the OpenSearch Plugins section, select the Alerting item.
In the window that opens, go to the Monitors tab and create a new monitor using the Create monitor command.
We indicate that this will be a regular monitor: Monitor type — Per query monitor.
Next, I will use a visual editor to configure it. If desired, all settings can be specified using special syntax.

Let’s set up a schedule according to which the monitor will work. I’ll set it to run every 10 minutes.

In the Data source block, you must specify from which indexes the data will be selected and the field that contains the timestamp.
To solve the application problem, I will select data from all OpenSearch security logs.

Next, I’ll set up a query to retrieve data for the last 10 minutes (since the monitor launch interval is every 10 minutes) and set the selection by user name audit_request_effective_user is admin.

By default, the query result does not contain detailed records, and if there is no need to display information for each record in a message, then you can leave the request as is.
Result of the query without detailed records:
{
    "_shards": {
        "total": 30,
        "failed": 0,
        "successful": 30,
        "skipped": 0
    },
    "hits": {
        "hits": [],
        "total": {
            "value": 12,
            "relation": "eq"
        },
        "max_score": null
    },
    "took": 2,
    "timed_out": false
}
I need to display information on the first five records, and I will change the query in a text editor. You can make more entries, but Telegram has a limit on message size.
I’ll switch the editor format to Extraction query editor.

In the query editing side, I will change the sample size
“size”: 5
It is important to remember that switching to the visual editor resets the settings that were made in the text editor, so such fine-tuning should be done at the very end.
Next, we create a trigger and specify the condition for its activation. In my example, I need to perform alerts if there is at least one record.

In a trigger, you need to create an action or actions that must be executed when a condition is met.
For now, I will indicate one event – sending a message to the created channel with a webhook.
And in the Message field you must specify the body template of the POST request to the Telegram API, namely JSON, where the message template will be in the text field. The pattern is specified using the syntax mustache.
For example, we will display all IP addresses from which login occurred under the admin account.
{
    "text":" Обнаружен логин под сервисной учетной записью
Количество событий: {{ctx.results.0.hits.total.value}}
{{#ctx.results.0.hits.hits}}
- Дата: {{_source.@timestamp}}
- IP: {{_source.audit_request_remote_address}}
- Логин: {{_source.audit_request_effective_user}}
{{/ctx.results.0.hits.hits}}"
}
This completes the setup: save the monitor and wait for messages to the Telegram channel.

The described approach is also suitable for solving other notification problems: by combining different types of monitors and channels, you can solve almost any problem. The approach will remain the same: there are data, conditions (triggers) and a message template that is sent to the selected channel.


How to set up Alerting using mTLS when you calling webhook