Selecting your home computer's boot drive from Home Assistant
My main computer is a macbook, which is always with me, and on which I do almost everything I need both at home and outside. But there is also a home computer, which can be optimal for doing resource-intensive tasks. In addition, some things are inconvenient or completely impossible to do on a Mac, so windows, ubuntu and proxmox are installed on different disks at home with a dozen virtual machines for different cases. And I was always very bothered by the inability to remotely turn on the desired operating system at home, so that I could then connect to it remotely and do everything I needed.
And what do you think – I solved this problem. Now, from anywhere, I can launch the operating system I need on my home computer with one click.
Of course, it wouldn't be possible without Home Assistant.
After thinking carefully about the problem, I saw only two reliable feasible options.
The first is to somehow control GRUB from the outside, which is always launched first.
The second is to physically connect the desired drive before turning on the computer.
Since our computer users have the option to download whatever they have to, manually fixing the bootloader and rebooting is not considered.
How, for example, can you implement the first option? Take a small service disk, maybe even a flash drive or DoM. Install some lightweight Linux on it, and write all the other disks on the computer into its grub config. The computer should always load this service axis first, and once it has loaded, it should take a command from somewhere about which target axis to load next, make changes to its config, and reboot the computer. And then from the booted target system, the first thing to do is correct the config of that bootloader back. Overall a working option, but it seems complicated and unreliable to me.
The second option is to manage the physical connection of the disks. In the BIOS, configure each of these disks as bootable, and before turning on the computer, turn off the extra disks. It seems more reliable and interesting, but some kind of physical control interface is needed. I decided to stop at this option.
Part one is iron.
I bought this Tuya four-channel zigbee relay.

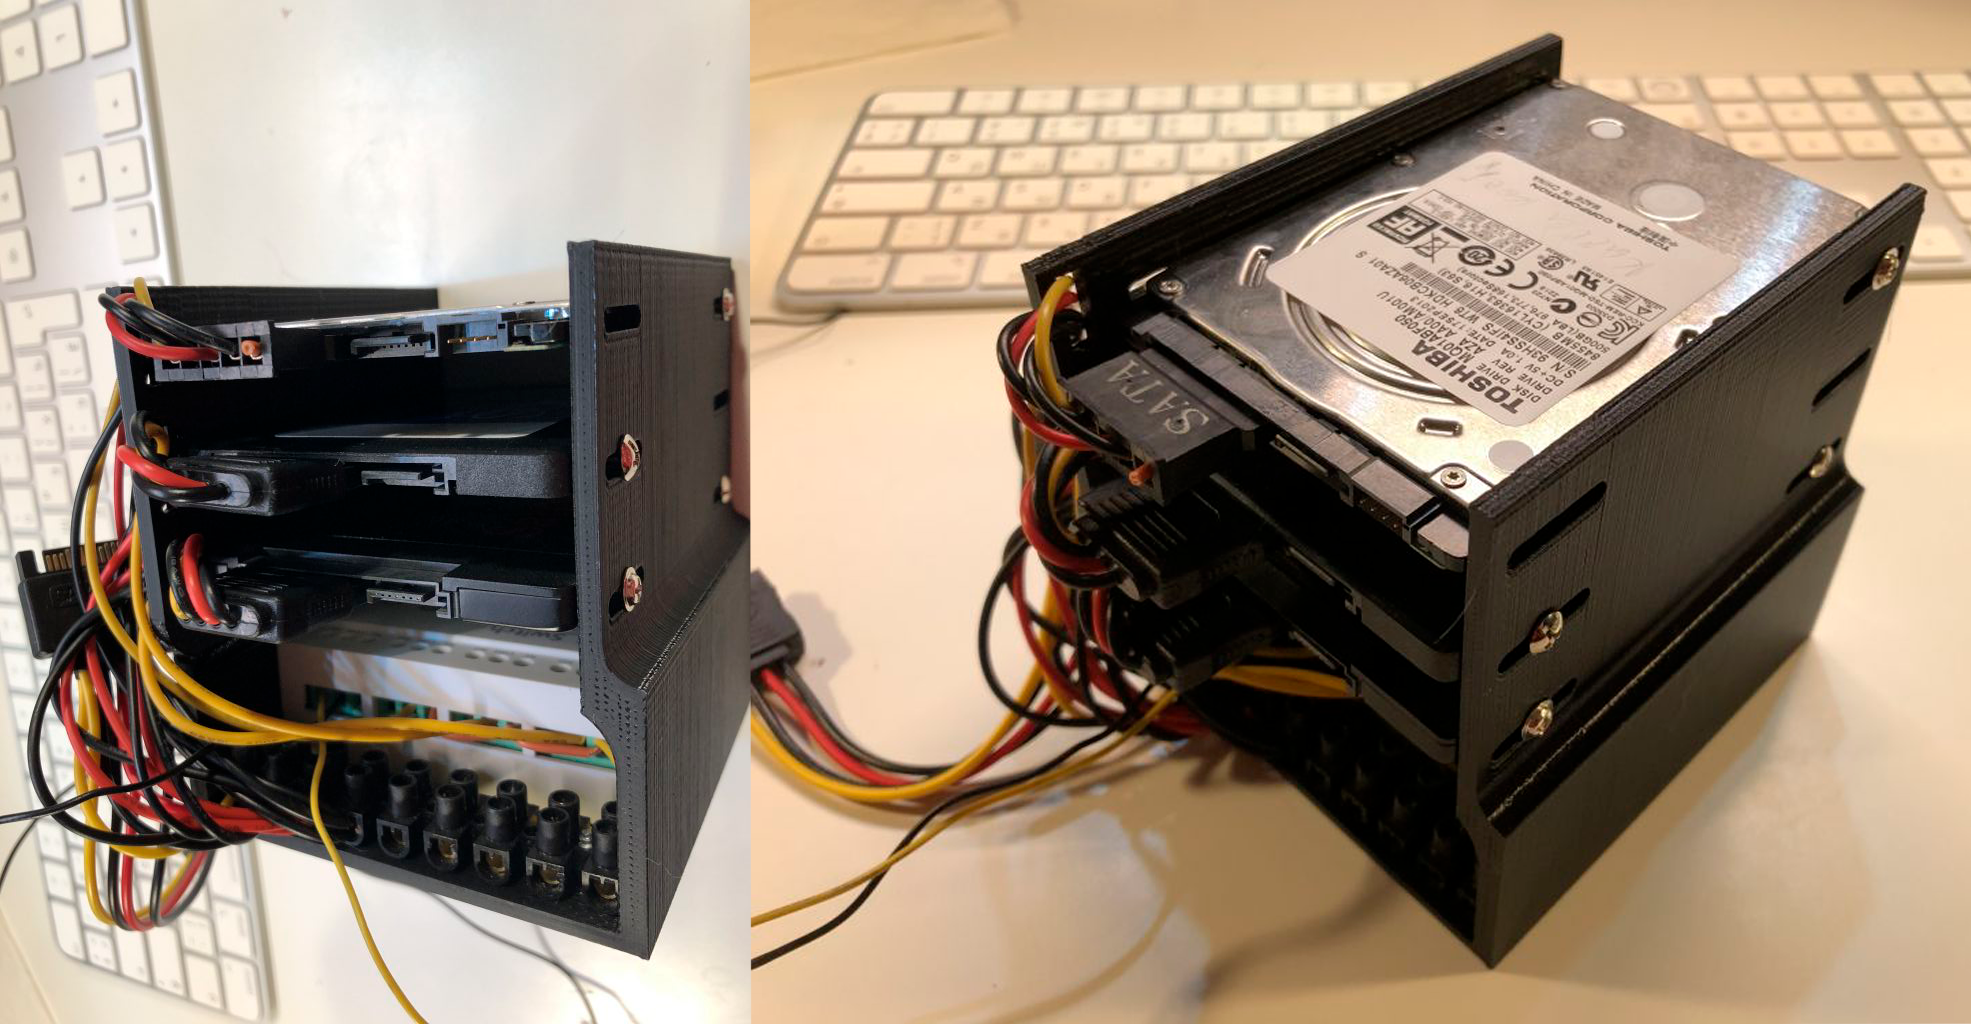
While driving, I drew and printed a design for mounting disks and relays

A little theory:
Modern sata drives receive 5 (red) and 12 (yellow) volts as standard. For compatibility purposes, another 3.3 (orange) volt can sometimes be found, but more often this wire is simply missing.

SSD drives only need 5 volts to operate. 12 in my opinion HDD is needed, and SSDs work fine without it.
Since I have an ssd, we will crash into the red wire.
Disclaimer: I do not claim to be the ultimate truth, and everything I do is done at my own peril and risk. Of course, this is a gross bypass of the standards, and it may come back to haunt me in the future, but it’s unlikely to be serious, there is nothing important or non-redundant on these disks.
After assembly, the following design was obtained:

Unfortunately, the photo is not the final one, the first assembly, and there are inaccuracies. In the photo, the relay controls the yellow wires, but it needs red ones. I forgot to take a photo of the correct version. The top disk is indeed a hdd, the correct disk was busy for now, I will replace it later. And in the final version, I threw out the block and soldered all the wires, there were voltage losses on them and this negatively affected the work.
The wires are connected to normally closed connectors, that is, when the relay is off, all drives are on.
Since there are 3 disks and 4 channels, why have another channel? And I connected it to the computer’s power button, directly to the contacts on the motherboard, in parallel to the physical button.
The next step was to power the relay and connect it to the home assistant. For power supply, a suitable adapter was found in the bins, but there is nothing new in the connection process.
As a result, I now have a device in HA that controls everything I need

Part two – program
We have the device, now we need to make it beautiful.
We make scripts in HA that will press buttons. A script in this context is the same as automation, only for manual launch, without auto-conditions.
Script to launch the desired operating system.
alias: Запустить Windows
sequence:
  - service: switch.turn_off
    data: {}
    target:
      entity_id:
        - switch.rele_diskov_kompiutera_l1
        - switch.rele_diskov_kompiutera_l2
        - switch.rele_diskov_kompiutera_l2
  - service: switch.turn_on
    data: {}
    target:
      entity_id:
        - switch.rele_diskov_kompiutera_l3
        - switch.rele_diskov_kompiutera_l2
  - service: switch.turn_on
    data: {}
    target:
      entity_id:
        - switch.rele_diskov_kompiutera_l4
  - delay:
      hours: 0
      minutes: 0
      seconds: 1
      milliseconds: 0
  - service: switch.turn_off
    data: {}
    target:
      entity_id:
        - switch.rele_diskov_kompiutera_l4
  - service: input_boolean.turn_on
    target:
      entity_id: input_boolean.compon
    data: {}
  - delay:
      hours: 0
      minutes: 0
      seconds: 90
      milliseconds: 0
  - service: switch.turn_off
    data: {}
    target:
      entity_id:
        - switch.rele_diskov_kompiutera_l1
        - switch.rele_diskov_kompiutera_l2
        - switch.rele_diskov_kompiutera_l3
  - service: automation.trigger
    metadata: {}
    data:
      skip_condition: true
    target:
      entity_id: automation.proverka_sostoianiia_kompa
mode: single
Let me explain. First, just in case, we connect all the disks, in case something remains turned off. Then turn off unnecessary disks. Then we press the computer's power button, wait a second, and release it. Then we turn on the auxiliary switch, which stores the state of the computer, more about it below. Then we wait 90 seconds and connect the remaining drives, they will no longer interfere. The last step is to launch automation that checks the state of the computer; more on that later.
We remember that the state of the disks is inverted, that is, by turning on “disconnect disk” I physically disconnect it.
We make the same scripts for other operating systems, the contact numbers will be different.
We add two more scripts that emulate pressing the power button.
alias: Тык питание компа
sequence:
  - service: switch.turn_on
    data: {}
    target:
      entity_id:
        - switch.rele_diskov_kompiutera_l4
  - delay:
      hours: 0
      minutes: 0
      seconds: 1
      milliseconds: 0
  - service: switch.turn_off
    data: {}
    target:
      entity_id:
        - switch.rele_diskov_kompiutera_l4
mode: single
alias: Долгий тык питание компа
sequence:
  - service: switch.turn_on
    data: {}
    target:
      entity_id:
        - switch.rele_diskov_kompiutera_l4
  - delay:
      hours: 0
      minutes: 0
      seconds: 5
      milliseconds: 0
  - service: switch.turn_off
    data: {}
    target:
      entity_id:
        - switch.rele_diskov_kompiutera_l4
mode: single
A long poke is needed to force the computer to shut down if the operating system does not respond to a short one and does not shut down correctly.
Now you can run the scripts and enjoy the relay clicking and the required axes starting. But it's still ugly. Let's add some more whistles. Personally, I don’t have enough visual information about what is currently running.
I’ll do it this way – after starting, each of the operating systems will periodically knock on HA to introduce itself and report that it is running. And he will accordingly check whether there was a state update, and if not, then consider the computer to be turned off. This will result in such primitive active monitoring.
We add an auxiliary element of the List type to HA. Let's call it for example compstate and fill it with a list with the current ones. And one more type Switch – compon.

To make it possible to access via API, we will add a token. This is done in the current user settings

Now all operating systems need to configure API access and state transfer. I will not describe specific methods, they may differ in different systems. The point is simple. You need to send a POST request to http://ip_address_HA_server:8123/api/states/input_select.compstate, authorize with a token, and transfer json with one of the options added earlier to the list. In most cases, curl will do; it is also available for Windows. Well, that is, we add a call to cron or the scheduler, or do it in any other suitable way.
curl \
  -H "Authorization: Bearer тут_вставить_токен" \
  -H "Content-Type: application/json" \
  -d '{"state": "ubuntu"}}' \
  http://ip_адрес_сервера_HA:8123/api/states/input_select.compstate
You can try and make sure that the state of the auxiliary element compstate is changing.
Now we make automation that will check the state of this element. I mentioned it above, make sure that the name in the launch script is correct.
We create a new automation and insert the code.
alias: Проверка состояния компа
description: ""
trigger: []
condition: []
action:
  - repeat:
      sequence:
        - if:
            - condition: or
              conditions:
                - condition: state
                  entity_id: input_select.compstate
                  state: windows
                  for:
                    hours: 0
                    minutes: 3
                    seconds: 0
                - condition: state
                  entity_id: input_select.compstate
                  state: ubuntu
                  for:
                    hours: 0
                    minutes: 3
                    seconds: 0
                - condition: state
                  entity_id: input_select.compstate
                  state: proxmox
                  for:
                    hours: 0
                    minutes: 3
                    seconds: 0
          then:
            - service: input_boolean.turn_off
              target:
                entity_id: input_boolean.compon
              data: {}
            - service: input_select.select_option
              target:
                entity_id: input_select.compstate
              data:
                option: offline
        - delay:
            hours: 0
            minutes: 2
            seconds: 0
            milliseconds: 0
      while:
        - condition: state
          entity_id: input_boolean.compon
          state: "on"
mode: single
Let me explain. Once the automation starts, it repeats the same check every two minutes while the compon helper element is enabled.
We check – if the compstate element is already equal to one of the list values within 3 minutes, then we conclude that the computer is turned off or not responding, change the status to offline and turn off the virtual switch, after which we complete the automation.
Well, the last point is to display everything on the control panel. To do this, add a vertical stack to the lovelace panel with the following code:
type: vertical-stack
cards:
  - type: markdown
    content: >
      {% set p = states('input_boolean.compon') %} Компьютер {{ 'включен' if p
      == "on" else 'выключен' if p == "off" }}.

      {% set s = states('input_select.compstate') %} Состояние - {{ 'Загружен
      windows' if s == "windows" else 'Загружен ubuntu' if s == "ubuntu" else
      'Загружен proxmox' if s == "proxmox" else 'offline' if s == "offline" }}.
  - type: entities
    entities:
      - entity: script.windows
      - entity: script.ubuntu
      - entity: script.proxmox
      - entity: script.unknown
      - entity: script.unknown_2
Let me explain – at the top we show a markdown card in which we perform simple comparisons. If the switch compon is on, then we write Computer is on, otherwise Computer is off.
And in the second line we display the status compstate.
Below we display the commands for launching our scripts.
Here's what happens:

I specifically took a screenshot from my mobile phone to show how free I am now to run the desired system on my home computer 🙂
Something like that. The article turned out to be somewhat chaotic, but I hope interesting. Remember – Home Assistant is not only a valuable tool, but also the ability to control other computers.


![[Инфографика] How artificial intelligence is featured in science fiction](https://prog.world/wp-content/uploads/2019/12/nyutnfydgkbcuwf-g0o-zpn1ms0.jpeg)

