OpenProject in practice

For the impatient: OpenProject took root after a few months, and everyone got used to it. Although, the process was not easy. Anger, bargaining, then acceptance. But, let's take it in order.
Instead of an introduction
So, the initial data. The company is migrating from a product development model to a project model. We are trying to get into long-term resource planning, build a Gantt chart for the entire company for the year, and in general give a little structure to the rather chaotic work of product teams. We need a tool where we will record the work for each project, estimates of labor costs, and deadlines. The output should be a beautiful diagram of the workload of the development and product teams.
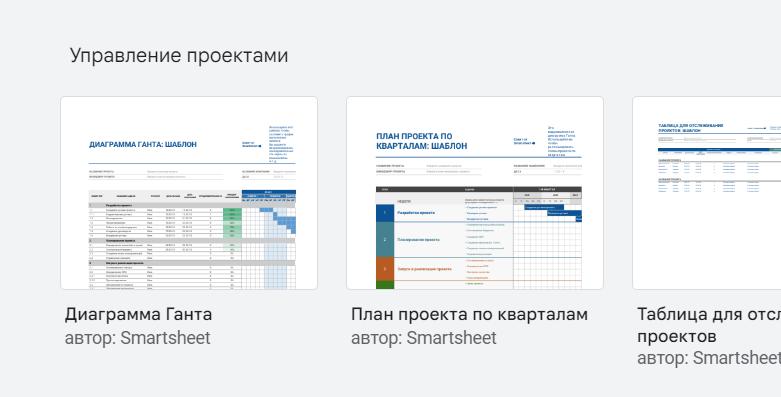
The most obvious quick solution is to put it all in a common Google Docs or Excel Online document. There is a template for a standard project management document in both places. For a small list of roughly five parallel projects and simple detailing of work, this is an ideal tool.
We need a much larger scale, so after playing a little in Excel, we discard this option. The following candidates are MS Project and a plugin for Gira BigPicture. Here we have obvious problems with purchasing licenses, so we continue our search.
Yandex.Tracker – a very good option. In the documentation, I was impressed by the use of understandable corporate terminology. It seems like a small thing to call a list of projects a “portfolio,” but it’s little things like these that create a pleasant impression. If you want a stable ready-made solution, take it without hesitation. But we love adventure and will continue to search for self-hosted options.
We want the following from the application:
It must be open-source. Suddenly you need to finish your microcrutches.
It should not require difficult to pay licenses.
It should integrate seamlessly with Active Directory.
Installation and support should not cause a storm of emotions for the IT department.
OpenProject meets all these requirements. It is open and has the ability to expand functionality with plugins. The free version has LDAP authorization. There are images in docker, i.e. if the company has an infrastructure with containers and a PostgreSQL server, it increases by one, two, three.
Let's dwell on it.
Why OpenProject and not {AppName}?
What about the alternatives? If you google “open-source project management software”, you will see many options. But, “everything is wrong, everything is wrong.” We need a tool for top-level, strategic planning projects to look at what is happening from a bird's eye view. Almost all options from a quick Google search like Plane, Taiga, WeKan – about more low-level tactical planning tasks with Kanban boards, sprints. OpenProject, by the way, also has a board mode with Trello-level cards, but it’s clear that this is more of a nice bonus rather than the main functionality.
So, we raised the OpenProject application and configured authentication. It's time to start our first project. Which is what we'll get started with now.
DISCLAIMER: Everything that will be described below is pure subjectivity. It is quite possible that the same problems can be solved in a much more convenient and understandable way. It is very likely that this simpler solution is described in the extensive English language manual OpenProject. However, I'm too lazy to read it.
Let's start the project
Nested Projects
By default, OpenProject contains two demo projects. We can continue and create our own next to them, but let's not rush. OpenProject has a very convenient system of nested projects. Project X, in which projects A and B are nested, will show within itself all the work from A and B. In practice, it turned out to be very convenient to make one root project with the name of the company, and nest several more virtual projects in it in the following areas, for example, “IT Infrastructure” ”, “External Marketing”, “Internal Products”. So, for example, the “IT Infrastructure” section will include a project for migrating an SQL database to PostgreSQL, and the “External Marketing” section will include a project to prepare for an exhibition. When entering a project with a company name, we see Gantt for everything, when entering virtual subprojects – only for projects from the corresponding category.

Let me note a moment that pretty much blew my mind. It seems that nesting projects at the UI level automatically implies “inheritance” of their data. But no. It doesn't work that way. If we have thirty projects, then in order to globally disable the wiki page, we need to go to the settings of thirty projects, and not to the settings of the root one. If you google for “openproject project inheritance” there will be links to ticket pages where the authors are hinted at the strangeness of this behavior. But the authors stubbornly do not give any hints.
In the administration section there is a page with a project template. In it, you can configure default behavior for new projects. It’s worth taking a look here first before you cheerfully start adding all the dozens of projects into the freshly installed OpenProject.
Custom fields
Initially, the project has the fields Title, Status and Description. Not much. Fantasy suggests that we need more fields. For example:
Affected Company Products
Start and end dates of all work
Teams involved
Project complexity in man-hours or any other units
It would also be useful to have all sorts of metadata like:
Links to standard documents (confluence documentation, presentations)
Link to epic challenges with programming tasks
Thus, the main page of the project will be a portal to all other places where information is stored. In the simplest case, all this is easily recorded in the “Description” field, but there is a more interesting way – custom fields.

In the Administration -> Custom Fields -> Project section, we can configure our additional fields for the “Project” entity. The screenshot shows that the OpenProject authors did not limit themselves to ordinary text fields. There are both typed text fields and drop-down lists with a fixed set of values. Drop-down lists are convenient for entering information about the complexity of the project, the scale of resource expenditures, or the priority of the project at the company level.
Project participants
We need to take care in advance of adding all users who will interact with it to the project. You can assign roles to those “who just want to look” and those who can edit project data. We will not dwell on this in detail; everything here is quite obvious and does not go beyond the bounds of common sense.
From the non-intuitive. If the user is not added to the project, he cannot be selected, for example, as the executor of the task. Let's get used to it, and we haven't seen anything like this. The situation becomes more complicated when there are many projects. We remember that these projects do not have inheritance. Therefore, if a new employee appears in the design department, he must be manually added as a participant in each project where the design department is involved.
User groups help save the situation a little. In the Administration – Users – Groups section, you can create user groups for all necessary cases. For example, “AAA Product Development Team”, “Designers”, “Testers”, “Programmers Team 1”, “Programmers Team 2”. Groups may overlap in terms of participants, so you should not limit yourself to their number. Since groups can only be created by the OpenProject administrator, their structure and participants should be taken care of in advance.
From experience, it is always worth operating with groups of participants, and not directly adding user logins to the project.
Project portfolio
Having filled in the user fields for the project, we will probably want to display a common flat table with data for all active projects (“portfolio”). This function is only available in the paid version of OpenProject. With simple skills of queries to the database or the openproject API, you can independently organize such a table for yourself, for example, by regularly uploading it to Excel.
Complex of works
Having filled out the basis of the project template, go to the “Work package” tab and fill out the table with the planned work for the project.
The minimum unit with which you will have to interact is called a “Work Package”. The word “package” here once again hints that we are interacting not with microtasks at the jira card level, but with groups of tasks.
By analogy with projects, work packages can be nested within each other. For example, a package of work “Front-end development” may have nested packages of work “Preparing a design in Figma” and “MVP programming in React”. The latter, in turn, can compete for more detailed packages of work “Frontend MVP of the Main Site”, “Frontend MVP of the Technical Administrator”. And so on.

You can set the “Type” field for a work package. The default type is “Task”. The “Stage” type is usually used for the root task. Below we will see that on the Gantt chart, stages are visualized with orange bars and tasks with blue bars. There are no other fundamental differences. For a package of work of these types, you can set the start and completion dates, the performer (“the one who will do it with his hands”), and the accountable (“the one who will be kicked if the hands of the performer do not do the work on time”).
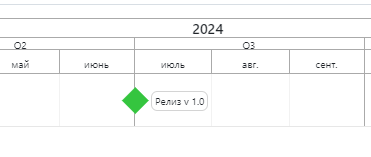
The “Milestone” work type is visualized on the Gantt as green dots. A milestone does not have a duration, but only marks the key points of the project.
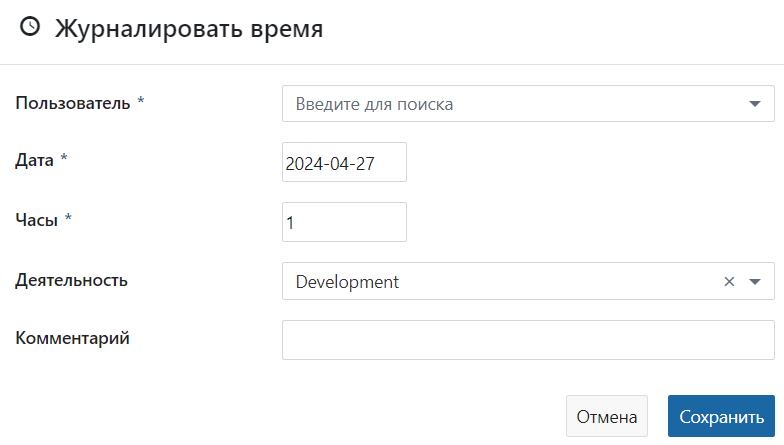
Time logging

When editing a task, next to the Time Spent field there is an inconspicuous clock icon. Clicking on it opens the time logging interface.
If you have used Work Log in Jira, you will immediately notice the ability to select a work type category. Very convenient for analysis. Shame on you, Atlassian developers refusing to add this obvious feature already 21 years old.
Links between work packages
On the work package editing page, you can specify connections between tasks.
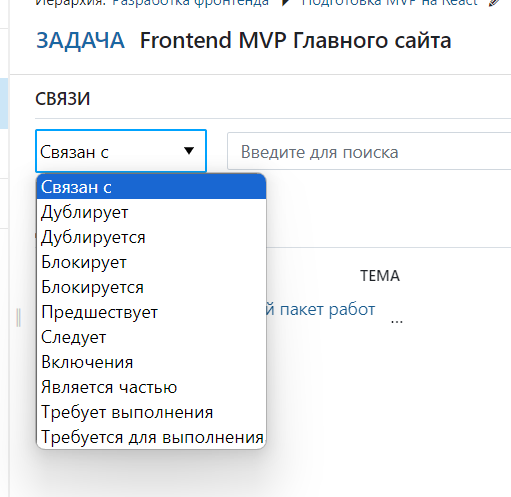
There is an obvious association here – connections between table fields in a SQL database. Cascade delete, foreign keys and all this. The essence here is approximately the same. When one task changes, the data of other related tasks adjusts to that change.
The two most obvious connections are: “Precedes” – the current task must be completed before the bindable task and its antipode “Follows” – the current task must be completed after the bindable task.
If work packages in a project must be done sequentially, they should be linked to each other. In this case, when changing the deadlines of one of the work packages, the deadlines of all related work packages will automatically shift. Comfortable? Yes! User-friendly UI? Not good.
On the “Set of Works” page it is convenient to create a list of works and enter basic information. Next, go to the “Gantt Chart” tab and continue doing more complex operations on it. That's what we will do with you.
Gantt chart
Here we see the same table with work packages, but a Gantt chart is shown on the side. Well, or it’s not showing yet if you haven’t had time to fill out the work deadlines. On the diagram, stripes with work can be drawn with the mouse, which is much more convenient than the “Set of Work” interface. Also, by right-clicking on a work package in the menu there are the items “Add predecessor” and “Add subscriber”. Let's use them to create connections between work packages and the output will be this beauty.

Hooray! This is victory. The result turned out really better than the option with coloring Excel cells. With connections between work packages, it is also easier to support when changes occur. The adventures with the self-hosted application were justified.
Finally, here is another pack of non-obvious oddities and, conversely, pleasant little things related to the Gantt Chart tab.
Full screen mode
There is an inconspicuous button to enable full-screen mode on the toolbar.
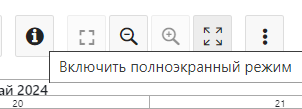
Thank you, developers! This is genius. You need to present the current status of projects to the audience. We share the screen, switch it to full-screen mode and voila, all unnecessary controls are hidden, only the Gantt remains. Megalike for this.
Filters and groupings
You can filter the list of project works by any field and create complex combinations of conditions. In practice, I found a use only for the filter by artist.
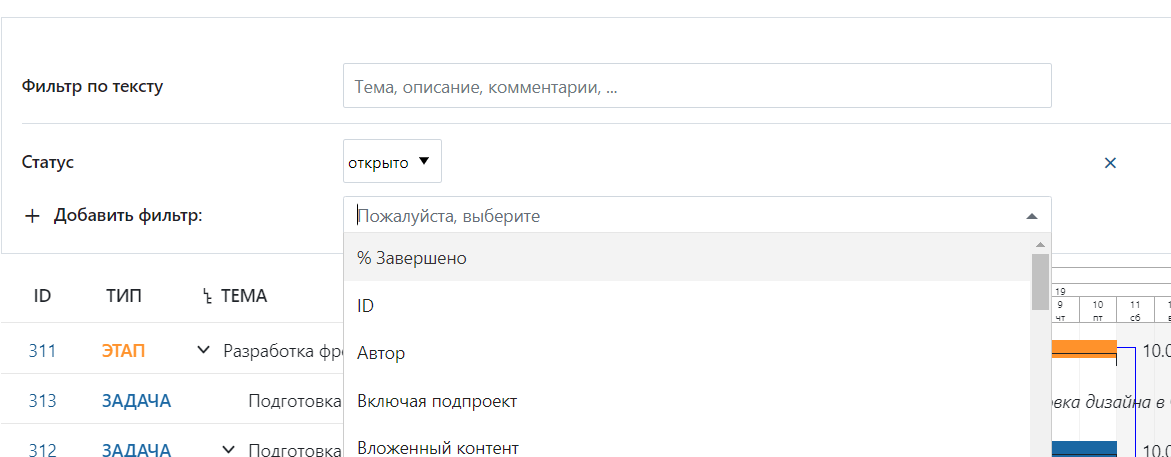
For a Gantt chart in the root project to view all work on all projects of the company, it is very convenient to display it grouped by project.
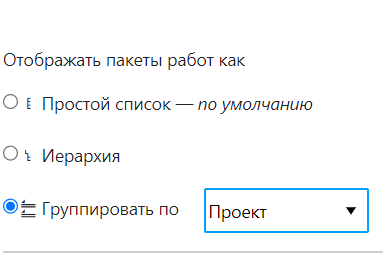
In this case, all works are visually combined into groups. The readability of such a graph increases significantly. An additional bonus of this display is the ability to collapse one or even all projects. In this case, only points with milestones remain on the project graph. It is very convenient to look at project release dates on an annual scale.
From a completely unobvious UX. Changing the filter settings automatically creates a new “View”, i.e. a certain configuration, how the schedule and work table are displayed. In terms of intuitiveness, this is approximately how filtering by a column in Excel would create a new tab with a copy of the table, but filtered by the specified parameters.
Okay, let's try not to suffer. Let's imagine that we are not filtering, but setting the dashboard settings. We configured everything and saved it under a name that everyone could understand. It appears in the list in the sidebar. Another non-obvious thing is that it also needs to be made public. In this interpretation, UX becomes clear. For example, in the root project of the company with a huge Gantt chart for all projects, I generated such dashboards for each development team. Now it’s convenient for everyone to view the workload by team and the task plan for the coming quarters.
The final
As I already said, OpenProject has taken root in our company. The intuitiveness of the interface leaves much to be desired, otherwise this article would never have appeared. Plus, there are convenient SaaS alternatives. But if your goal is to have all the software on your servers, then OpenProject will be among the first candidates for installation. And, I hope, with the tips from this article, its implementation will be easier and more enjoyable.
All the best and success.