Not just DeepL. Neural network translator for your projects in VS Code in a couple of clicks
Large language models (LLMs) and transformer models created on their basis, such as GPT-4, have turned out to be excellent not only for writing texts, but also for translating them into other languages. The same neural network translator DeepL gained its popularity because the texts coming from its “pen” do not cause sharp cognitive dissonance among “native” readers (although it must be admitted that the level of translation is often comparable to technical support from one densely populated country). The authors of DeepL avoid the issue of the underlying model, but judging by the publications, the Transformer architecture is also used there.
In turn, the author of these lines has already used neural networks, namely Stable Diffusion, to work with graphics, and having updated the video card in my computer with an 11th generation Intel i5 processor and 16 GB of RAM to an Nvidia RTX 4060 with 8 gigabytes of memory, I wanted to try it out only on the generation and transfer of styles, but also for other purposes. Yes, I would like a 4090, but for everyday tasks I have more than enough power and only if I try rent it or the same A5000 on VPS hosting.
We are looking for a patient for implantation.
For work-related issues, I use DeepL to translate technical documentation, since it provides the necessary quality of “interlinear translation” and speeds up work on similar texts, which after that all that remains is to proofread and correct obvious mistakes in phrases and terminology. Therefore, I wanted to see what could be used instead, especially considering the hints from the translator’s authors to soon cover up the “freebie” with the free AI Writer.
To begin with, I compared the quality of translation from Russian into English in Copilot (it uses the same model as ChatGPT-4), in the new YandexGPT and in GigaChat from Sber. As a result, I got about the same thing, but not up to DeepL. Still, LLM models are guilty of using “literary-outdated” terms and phrases that are of little use in real life. I also looked at translations from Google, MS and free solutions based on Opus (the same Libretranslate, which works quickly). In my personal opinion, they provide an even worse option for manuals.
All this also needed to be tied into the work environment in which I mock articles and, it would seem, VS Code should have a large library of solutions for this. I won’t bog you down – yes, you can attach well-known translators to it, but for this you need to get API keys (and for DeepL it’s also paid and with a limit on the number of characters), and the translation there is performed in the mode “I’ll do Ctrl+C for you, I’ll paste it into the translation window, then copy the translation back.” This can be done manually and even faster than through the API. I’m already silent about Markdown formatting, which is flying into obscurity.
GPT and LLM models are also screwed into VS Code, but the plugins are mainly designed to create Copilot to make it easier to write code. But I just needed a translation and with the possibility of further expanding it not only into English, but also, for example, for pairs “English-Turkish” or even “English-Chinese”
Another snag for me personally is the corporate VPN through which access to gitlab projects is provided. AnyConnect on Windows does not coexist with Hiddify Next, and to access the API of many commercial GPT models (and web interfaces) you need to replace the IP with a non-Russian one. The ideal solution would be to deploy a local server on which the language model would run and which the plugin would already access in Visual Studio Code. And so that my video card can still pull it out and fit into 16 GB of RAM.
Collecting Frankenstein
Having racked my brain with theory and tried different solutions, I found a fairly working option. It turned out to be a combination of LM Studio and the Continue plugin. So, let’s look at the process of assembling your “machine translation studio” step by step. I will do this under Windows (after all, I have Visual Studio Code), but under Linux it should work close to this manual:
1. Download and install LM Studio on your computer from the official website: https://lmstudio.ai/. The project is under development, closed and most likely will be paid for commercial use, since now under the license it is free only for information and non-commercial use. It doesn’t matter, such model “engines” are also open source and can be attached to the plugin, and LM Studio also does not require you to install Python, PyTorch and CUDA libraries for Python.
2. Launch LM Studio and, typing in the search bar Starling-LM-7B-beta-GGUFdownload the model Starling-LM-7B-beta-Q6_K.gguf. Almost 6 GB model with 6-bit K-quantization. Yes, quantization reduces the accuracy of the model, but it allows you to cram it even into 8 GB of video card memory. Of the previously tested models, I liked this one the most. Although I haven’t tried 7–7.5 GB models yet, which in theory should work.
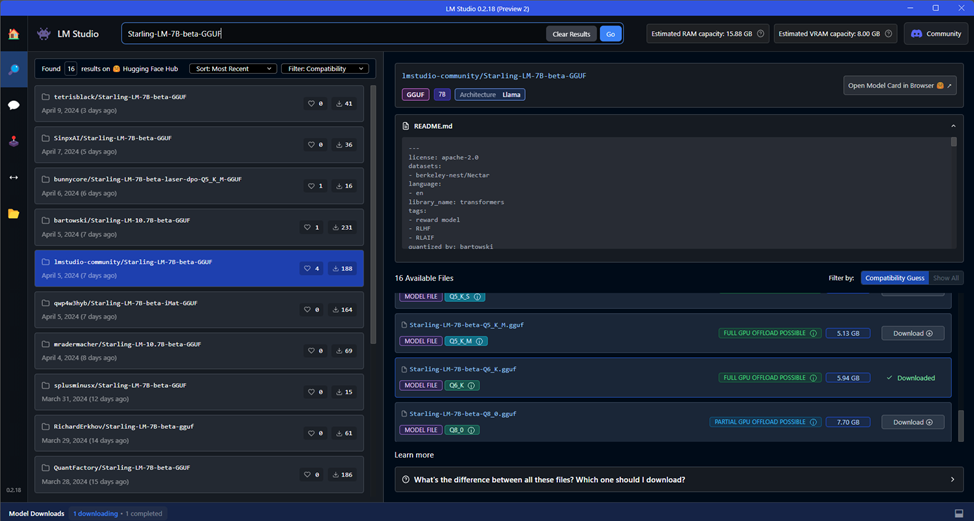
Once you download the model (you can see this by clicking on Model Downloads in the lower left corner), you can immediately see it in action by going to the tab AI Chat and selecting a model from the drop-down list above.
Why this particular model? I tried other available models in the GGUF format, and it was the model based on openchat 3.5 (and it, in turn, on the Mistral model) that showed good results in terms of speed and quality. I also tried the improved model with 10.7 billion parameters (although LM Studio itself says that the model is 34B), but it works much slower and my computer slows down quite a bit when working. Although the translation gives better quality.

3. Launch the server in LM Studio. To do this, go to the tab Local Server (arrow back and forth) and select the model from the top drop-down menu, wait for it to load and click on Start Server. All parameters can be left default.

4. Go to VS Code, find and install the Continue plugin.

5. Go to the tab with the letters C and D, then click on the plus sign next to the drop-down list in the lower left corner and find LM Stuido in the list for connecting.

6. By clicking on this item, select next Autodetect

The configuration file should open config.json, which will indicate the connection to LM Studio. After this, a message will appear that the model is connected, and in the lower left corner the name of this model and a green “light” will appear that everything is loaded.
At this stage, you will already receive an AI assistant for writing programs (it’s better to download a specialized model), but we now need to learn how to translate text and preferably save more formatting.
Learning to translate
Then, if you know JavaScript, you can rewrite the plugin code for yourself, or use the ability to call the prom context through short slash commands. Let's do the second option.
To do this (if you have already closed it), open the configuration file config.json by clicking on the gear in the plugin tab.

In the file that opens, add the following code in the customCommands section after the test section
    {
      "name": "trEN",
      "prompt": "Translate the selected code from Russian to US English. Your reply should contain ONLY the translated text, nothing else. Please use exactly the same formatting as the original text.",
      "description": "Перевод текста US English"
    }
Don't forget to put after the closing curly brace of the section test comma.
What does it mean:
name is a context slash command that can be called in the plugin window by clicking on /.
prompt – a command for the neural network to translate our text from Russian into American English, outputting only the translation text (looking ahead, I will say that the neural network, due to one parameter that, unfortunately, is “hardwired” in LM Studio, does not always listen) and saving the formatting.
description – a description for the slash command, so you don’t forget what it’s about.
We save and check the result. To do this, open the file we need, select a piece of text to translate and click on the right mouse button to call up the menu item Continue – Add Highlighted Code to Context (or press Ctrl + Shift + L).

Selected text should appear in the plugin window and the cursor will blink in the request context area. Here you can either write in words what we want to do (even in Russian) or click on / and choose our team /trEn.

Then press Enter and wait for the translation result. The translation speed can be adjusted in LM Studio by changing the parameter value GPU Offload In chapter Hardware Acceleration, but it is worth remembering that a large value leads to the accumulation and appearance of errors. It is optimal to choose it for yourself, for me it is 15.
The translation sometimes goes right away in Markdown, but sometimes it doesn't, so I added a second command /format V conf.json. Be aware of the commas that separate sections of the file except the last one!
    {
      "name": "format",
      "prompt": "Format code as original markdown",
      "description": "Формат текста"
    }
I call this slash command by adding after /format two-letter code of the target language (for example EN). Formatted text can be pasted into place in the document by clicking on the middle icon Insert of cursor in a window with text.

If the model starts to delirium or something goes wrong, then first restart the session by clicking on the New Session inscription in the lower left corner.

If it doesn’t help, go to LM Studio, stop and start the server again.
In the same way, you can configure translation into other languages. In my case, I checked the translation into three languages: Turkish, Chinese and Dutch. I can’t rate the quality, but it translates. I also added commands for linguistic checking of texts, but universal syntax and spelling checking models are, to put it mildly, strange, and here it is better to use Russian models from Yandex or Sber (I use the neuroeditor from Yandex in Yandex Browser).
LM Studio should work on CPUs with AVX-2 support and on Macs with M1-M3 processors, and for owners of AMD video cards there is a special version with ROCm support.
In principle, I am satisfied with the speed of work and it is enough for translating texts at work, but for mass translation of documentation I will still write a script for translating files and rent a neural network for hosting VPS server with RTX 4090 for speed and quality.
What's next? I want to try the difference in the operation of models with a larger number of parameters and on more powerful hardware (for example, on Nvidia H100 you can run 70B models), other ways to connect them through the same ollama, other models (the same Google released Gemini 1.1) and even try work with embendings based on our ready-made texts and documents. If you are interested in this topic, share your successes, comments and additions in the comments.
AI FREE – this text was written by a person without the use of neural networks.