Need for Speed. Comparing Hashcat performance on VMs, PCs and laptops with different CPUs and GPUs
Why Hashcat
Hashcat is perhaps the most famous program for such tasks. It can calculate hashes of various types, supports many hashing algorithms, and uses several methods at once when working with dictionaries.
The program works with various operating systems and supports password brute force techniques on resources with CPU and GPU, as well as in a hybrid format.
Database of downloaded users
My test base consisted of 221 accounts. All this is access to corporate mail. It was them that I checked with dictionaries.
Dictionaries and where to find them
All popular dictionaries are available for download free and without SMS:
Top29Million-probable-v2 – 29 million passwords per 300 Mb (link);
CrackStation – 1.5 billion passwords on 15 Gb (link);
All-in-One – 28.3 billion passwords on 329 Gb (link).
For checks, I used the first dictionary, since it contains less data. It would take too long to carry out reconciliations across huge databases.
Test benches and drivers
I immediately decided to use four stands: a virtual machine, a desktop PC, laptops with built-in and discrete video cards. In general, I tested the work of Hashcat on what was at hand.
Stand No. 1. Virtual machine
Located in cloud NGcloud. VMware ESXi hypervisor:
CPU – Intel Xeon Gold 6226R 2.9GHz 12 cores,
RAM – 24 Gb,
GPU – NVIDIA TESLA A16,
OS – Windows Server 2019/Ubuntu Server 22.04.
I tested different policies on a video card: 2, 4, 8 and 16 Gb.
Stand No. 2. Desktop PC
System unit:
Stand No. 3. Laptop with Iris Xe
Lenovo ThinkPad T14 Gen3 with integrated graphics card:
CPU – i5-1235U,
GPU – Iris Xe,
RAM – 16 Gb,
OS – Windows 10 Pro.
Stand No. 4. Laptop with GTX
Lenovo IdeaPad l340 with discrete graphics card:
CPU – i5-9300H,
GPU – GTX 1650 8 Gb,
RAM – 16 Gb,
OS – Windows 10 Pro.
By drivers for Windows Server 2019 the selection is as follows:
1. On GPU:
NVDIA Graphics Driver 528.24,
NVIDIA RTX Desktop Manager 203.87 (link),
NVDIA CUDA SDK Toolkit 12.0 (link).
2. On CPU:
For Ubuntu Server 22.04 installed:
1. On GPU:
Opencl-headers distribution.
Driver nvidia-linux-grid-525_525.85.05, which is more convenient to download via the NVIDIA-Linux run file (link).
CUDA SDK Toolkit 12 (link).
2. On CPU:
Distribution pocl-opencl-icd.
If it is not determined, then download OpenCL™ Runtime 16.1 for Intel® Core™ and Intel® Xeon® Processors (link).
Now to the point
If you suddenly want to conduct testing yourself, the procedure will be something like this.
1. Create an account with Domain Admins rights, if you don’t already have one. It is needed in order to obtain password hashes directly from AD.
There are many ways how and with what you can dump data. I prefer to use secretsdump (link to exe), just don't forget to disable your antivirus before downloading. This is the simplest option, and it is recommended by experienced colleagues.
Here are other ways that I know of that can also retrieve hashes from AD:
ntdsutil and NtdsAudit (link),
If you don’t trust the software, you can load the PS module (link),
You can also make shadow copies of ntds.dit and SYSTEM.
2. After removing the hashes, download Hashcat, prepare the system and the program itself.
Then we check that the program has identified the necessary device:
./hashcat.bin -I
The -I flag shows installed devices on which password brute force can be started.

Next, we go into the directory with hashcat and register the launch with the necessary flags. In our case it turns out like this:
./hashcat.bin -D 1 -m 1000 –hwmon-disable -a 0 -O -w 4 /home/user/hashcat626/hash/AD1903.txt /home/user/hashcat626/database/Top29Million-probable-v2 . txt -r rules/OneRuleToRuleThemAll.rule
Now let's look at the request in detail:
./hashcat.bin – access to the program. On Windows in PS it will look like .\hashcat.
-D 1 — select the device on which to run the search (1=CPU, 2=GPU). By default, Hashcat uses the GPU.
-m 1000 — hashing type.
–hwmon-disable – disables temperature and fan indicators.
-a 0 — dictionary attack mode (there are also brute force, mask attack, hybrid, etc. modes).
-O – Enables optimized kernels, which affects the maximum password length.
-w 4 – workload modes (1 is the lowest, 4 is the highest).
/home/user/hashcat626/hash/AD1903.txt – path to hashes. On Windows it will be like this: “C:\hashcat626\hash\AD1903.txt”.
/home/user/hashcat626/database/Top29Million-probable-v2.txt – path to the password database. On Windows – C:\hashcat626\database\Top29Millionprobable-v2.txt.
-r rules/OneRuleToRuleThemAll.rule – path to the mutation rule (it is responsible for converting words from the dictionary according to predefined conditions). On Windows you need to replace / with \ .
Important nuances
During the process I encountered unexpected errors. It turned out that they were all solvable. But if I had known about them in advance, I would have saved a lot of hours and nerves.
1. When running the test on Toolkit 12.4 (the current version at the test stage), an error occurred: OpenCL 8.4 is not supported. Only 8.0 can be used. The documentation did not specify which version to take. Therefore, I looked at the release year of Hashcat and checked it with the OpenCL release dates. The release dates for version 12 coincided. It worked 😉
2. If you install the program on a virtual machine in the ESXi hypervisor, then you first need to install vmware tools, and only then upload the drivers to the video card. Otherwise, you will get a black screen like I did and will have to roll back the system.
3. When working with a virtual machine, it is better to specify the –hwmon-disable flag. This way you can avoid spam errors about unavailable temperature and fan speed sensors.

4. When installing drivers on Ubuntu, it is better to initially install opencl-headers. Only after this can you upload drivers to the video card. The program was always installed successfully in this sequence. If I did everything in the reverse order, I had to re-run the run file.
5. It is better to use the deb (local) installation of CUDA SDK Toolkit, as errors occurred online at some stands. There were no such problems when installing locally.
results
Let me remind you that the main goal was to test the speed of checks on different devices with different GPUs and CPUs. So what happened.
1. Dictionary test Top29Million-probable-v2. Here I collected all the stands, since I initially planned to test the speed only on this base.
Virtual machine (Stand No. 1) | PC (Stand No. 2) | Lenovo ITL 14 Gen 3 laptop (Stand No. 3) | Lenovo IdeaPad l340 laptop (Stand No. 4) | ||||||||||
Ubuntu Server | Windows | ||||||||||||
CPU | GPU 16 Gb | CPU | GPU 2Gb | GPU 4Gb | GPU 8Gb | GPU 16Gb | CPU | GPU RTX 3060 | GPU GTX 1660 super | CPU | GPU Iris Xe | CPU | GPU GTX 1650 |
174 min. | 9 min. 33 sec. | 148 min. | 9 min. 33 sec. | 9 min. 35 sec. | 9 min. 36 sec. | 9 min. 41 sec. | 282 min. | 3 min. 31 sec. | 6 min. | 216 min. | 93 min. | 384 min. | 6 min. 41 sec. |
2. The CrackStation dictionary test is optional, so I limited myself to only one laptop and did not run it on Ubuntu.
Virtual machine (Stand No. 1) | PC (Stand No. 2) | Lenovo IdeaPad l340 laptop (Stand No. 4) | |||
Windows | |||||
CPU | GPU 4Gb | GPU 16Gb | RTX 3060 | 1660 super | GPU 1650 |
5737 min. | 379 min. | 382 min. | 136 min. | 186 min. | 252 min. |
3. The All-in-One vocabulary test is also optional, so the sample is the same as above.
Virtual machine (Stand No. 1) | PC (Stand No. 2) | Lenovo IdeaPad l340 laptop (Stand No. 4) |
Windows | ||
GPU 16Gb | RTX 3060 | GPU |
9420 min. | 3118 min. | 6385 min. |
You've probably already noticed: the difference in CPU and GPU speeds is impressive.
1. On a virtual machine The scanning speed on the GPU is 15-18 times higher than on the CPU. Although I think that such a huge difference could have happened due to the fact that the VM lacked some drivers. Maybe that's why I got poor performance. Still, on the GPU the indicators all turned out to be the same, plus or minus.
Another conclusion: Hashcat really does not use the video card capacity, but only the CUDA core. It turns out that you can use a GPU with any number of gigabytes to audit password hashes.
The main thing is to take into account the allocated volume of cores. The more there are, the faster the verification will take place.
2. On PC with the RTX 3060 video card (3584 cores), the difference in speed with the CPU was as much as 86 times, and with the GTX 1660 (1408 cores) – 47 times.
3. On a laptop with a built-in video card Ires Xe (96 cores) did not achieve the same cosmic performance as at previous stands. In general, the GPU turned out to be only 2-3 times faster than the CPU. And this is logical: the video card here is not a separate device, but just a controller of the processor or chipset itself, which uses part of the RAM.
4. On a laptop with a discrete card GTX 1650 (1024 cores) is 60 times faster than the CPU.
In hybrid mode, I didn’t see any significant changes at all. There will probably still be a difference with more powerful processors. But I didn't have a chance to check this.
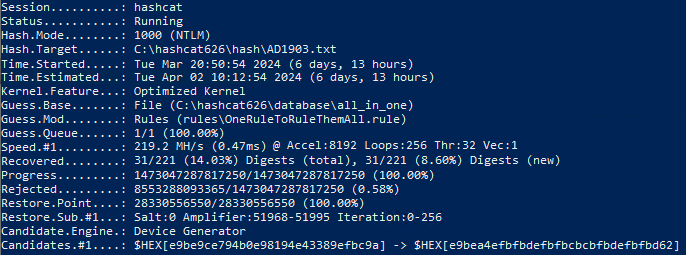
If interested, here are screenshots of all checks >>
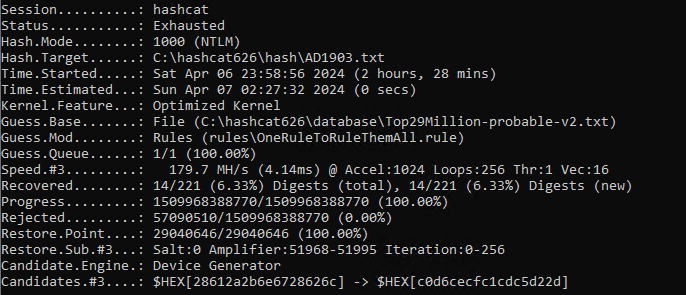
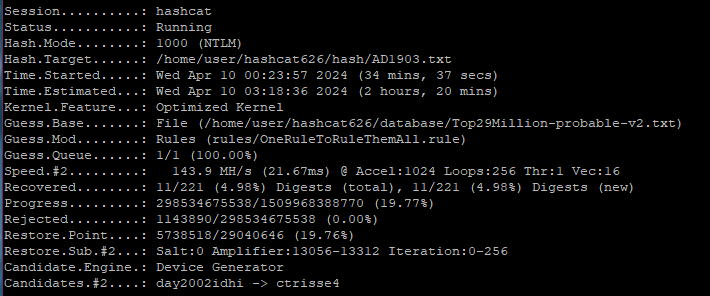
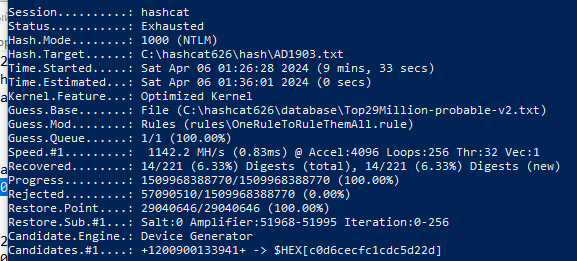
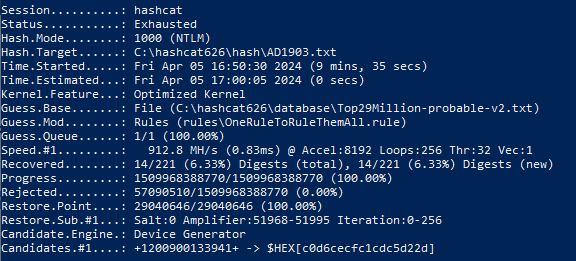
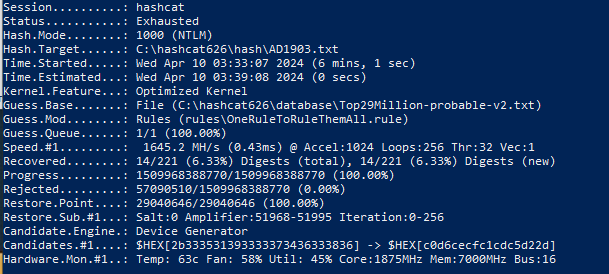
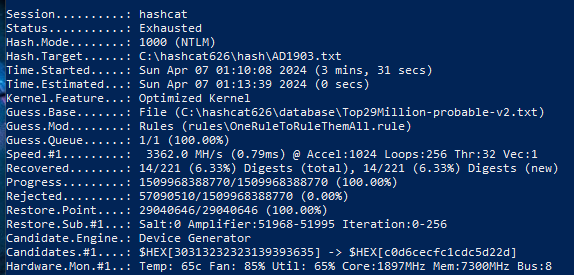
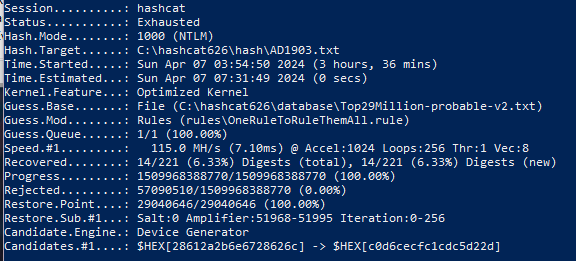
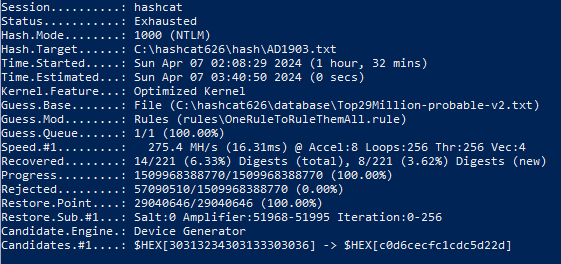
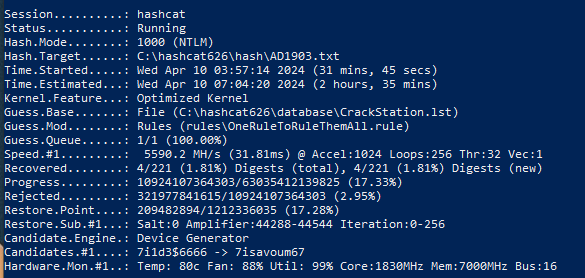
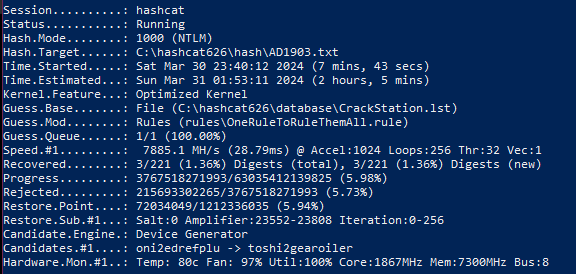
1. Base Top29Million-probable-v2.
Test of virtual VM OS Windows Server on CPU:
Test of virtual VM OC Ubuntu on CPU:
PC test on CPU:

Test of virtual VM on GPU 2 Gb:
Test of virtual VM on GPU 4 Gb:
Test of virtual VM on GPU 8 Gb:
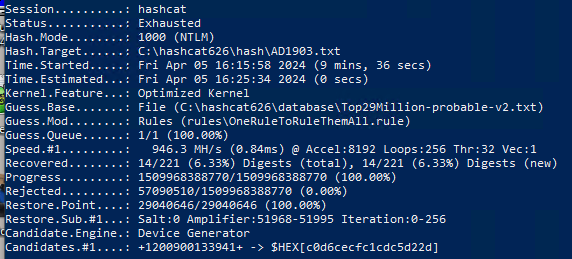
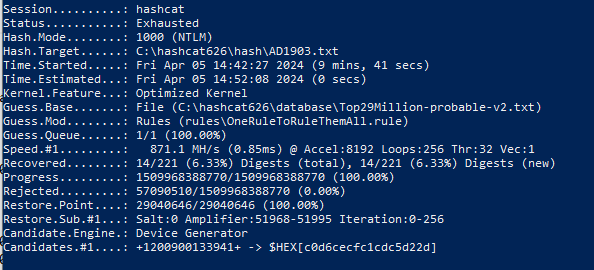
Test of virtual VM on GPU 16 Gb:
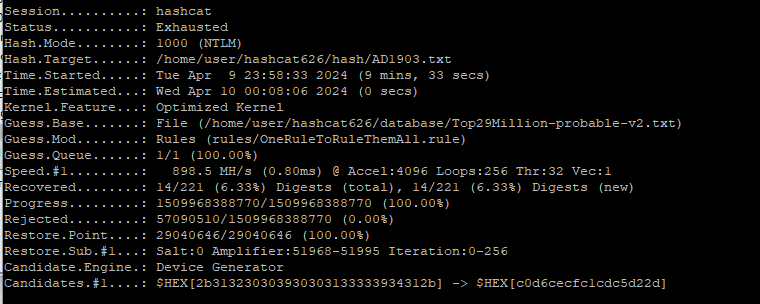
Test of a virtual VM with Ubuntu Server on a 16 Gb GPU:
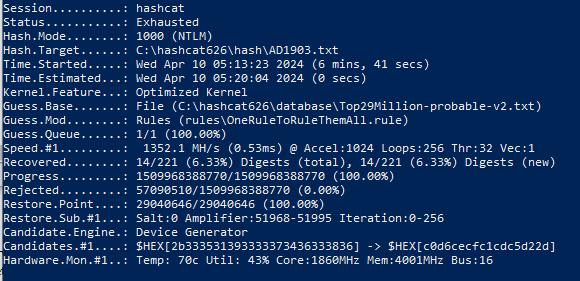
Test on a laptop with GTX 1650 8 Gb:
Test on a PC with GPU 1660 SUPER 8 Gb:
Test on PC with GPU RTX 3060 12 Gb:
Test on a Lenovo ITL 14 Gen 3 CPU laptop:
Test on a Lenovo ITL 14 Gen 3 GPU Iris Xe laptop:
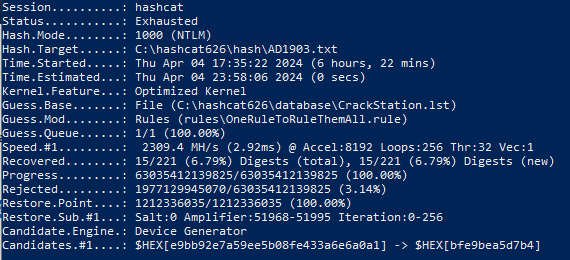
2. CrackStation base.
Test on a virtual machine on the CPU:

Test on a virtual machine on a 4 Gb GPU:
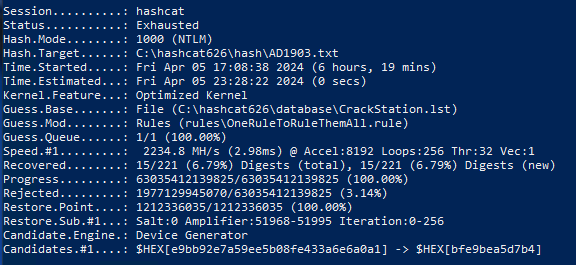
Test on a virtual machine on a 16 Gb GPU:
Test on a PC with 1660 SUPER 8 Gb:
Test on PC with RTX 3060 12 Gb:
3. All-in-One base.
Test on a virtual machine on a 16 Gb GPU:
Test on a laptop with GTX 1650 8 Gb:

Test on PC with GPU RTX 3060 12 Gb:

Bonus: mutation rules and speed
During the testing process, I also measured the time it takes to check according to the basic rules of mutation. Based on the Top-29 database, it turned out something like this:
Rule | OneRuleToRuleThemAll.rule | dive.rule | generated2.rule | rockyou-30000.rule | d3ad0ne.rule |
Time spent | 9 min. 41 sec. | 16 min. 44 sec. | 9 min. 18 sec. | 5 minutes. 21 sec. | 5 minutes. 47 sec. |
Number of weak passwords | 14 | 14 | 9 | eleven | eleven |
The conclusion is this: OneRuleToRuleThemAll.rule processes almost twice as fast and with the same result as other rules. It is possible that on large dictionaries the difference in speed will be more than 7 minutes.
What happens to passwords in the end?
Checks against different dictionaries yielded (as expected) different results. Out of 221 credentials, the following number of weak passwords were found:
Top29Million-probable-v2 | CrackStation | All-in-One |
14 | 15 | 31 |
Let's convert the numbers into percentages: the share of bad combinations in the Top-29 database was 6.33%, in CrackStation – 6.79%. But the most matches were found in the All-in-One dictionary – 14.03%.
It turns out that for a more serious audit it is better to use a third base. Let this test take a very long time. Thanks Cap, yes.
Although there is an interesting nuance: I also checked 61 accounts, but the All-in-One time did not change at all. That is, the process lasted the same amount as for 221 accounts. I didn’t understand what it was. What are your guesses?