Implementation of a neural network for the Digit Recognizer competition on Kaggle and its applied use. Part No. 2
The article is a continuation of the first part, in which a neural network was trained to solve the problem of the Digit Recognizer competition on Kaggle. The previous article used a trick that increased the accuracy of the neural network in the context of the competition results (up to 0.99896), as a result of which the author’s position in the leaderboard increased significantly. In this article we will look at how you can integrate and use a trained neural network model into a system for recognizing handwritten numbers.

Introduction
After training a neural network that solves a problem from a certain subject area, after a while the question arises of how to use it in your application? After all, the learning results sooner or later must go beyond Google Colab or Jupyter Notebookto bring any benefit.
The task of integrating trained models into your system is solved quite simply using TensorFlow. It is known that when training a neural network, its weighting coefficients are adjusted, which are optimized for performing a specific task. TensorFlow allows you to save weighting coefficients and transfer them to other applications, which based on them will restore the behavior of the neural network (the result of its training). Thus, training and deploying a neural network model can be done using one tool, which makes our life much easier.
You can create a sequence of actions for the deployment model:
Training a neural network model (achieving a certain result)
Saving weights
Transferring weight coefficients (closer to the application into which the neural network will be integrated)
Loading weight coefficients and using the model to solve problems (writing business logic)
Let’s start developing a server application using the Flask web framework, which will solve the problem of recognizing handwritten numbers using the weights of the trained model.
Server application development
Saving weights
First you need to save the weights of the model, but how to do this? Quite simple. In the first article, when training a neural network, the ModelCheckpoint callback was used, which saves the best results of the model to a separate folder mnist-cnn.hd5 and there is no need for manual saving. The callback code looks like this:
# Колбэк для сохранения лучшего варианта работы нейронной сети
checkpoint = ModelCheckpoint('mnist-cnn.hd5',
                             monitor="val_accuracy",     # Доля правильных ответов на проверочном множестве
                             save_best_only=True,        # Сохраняем только лучший результат
                               verbose=1)                  # Вывод логовй
In the absence of this callback, the weights of the trained model can also be saved; for this task, you can use the following code (taken from official documentation):
model.save_weights('./checkpoints/my_checkpoint')Figure 1 shows the file structure of the model-cnn.hd5 folder after saving the weight coefficients to it.

Functional requirements
First, let’s create functional requirements for the server application.
What is required from the server? First of all, processing one single request to download an image and its subsequent processing using a neural network. In general, that’s all. The server will have only one function.
In a single function on the server, an image should be loaded, processed (reducing its size with minimal loss of quality), loading weight coefficients into the model (creating it based on saved data), transferring the trained image model and returning the result of the neural network (response).
File structure
Figure 2 shows the file structure of the server application project.
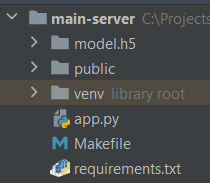
You can immediately notice that the saved weight coefficients of the model (model.h5) have been transferred to the project structure, there is a folder for distributing statics (public, but it was more likely needed for testing and debugging image loading), as well as the entry point to the server application (app. py) and other files.
Particular attention should be paid to dependencies in requirements.txt, as older versions of TensorFlow or newer ones may not work with existing code.
A little about working with dependencies in Python
In order to capture all existing application dependencies in a specific list, which can then be used to install them, you can use the following command:
pip freeze > requirements.txtTo install all dependencies from requirements.txt you can use the following command:
python -m pip install -r requirements.txt

# Альтернатива
pip install -r requirements.txt
If you need to remove all dependencies that are located in the requirements.txt folder (this may also be necessary), you can use the following command:
pip uninstall -y -r requirements.txtEntry point to the server application
To begin with, I will present the entire source code of the entry point to the application:
import os
import uuid
import numpy as np
from flask import Flask, request, jsonify
import tensorflow as tf
from PIL import Image
from flask_cors import CORS

# Путь к папке public
base_path="./public/"

# Экземпляр flask-приложения
app = Flask(__name__, static_folder="public")

# Настройка CORS-политики
cors = CORS(app, origins=["http://localhost:3000"])

# Эндпоинт для распознавания цифр на изображении
@app.route('/digit-recognize', methods=['POST'])
def upload_file():
    # Получение данных о файле
    file = request.files['file']

    # Получение расширения файла
    file_ext = file.filename.rsplit('.', 1)[1].lower()

    # Генерация UUID идентификатора
    c_uuid = str(uuid.uuid4())

    # Формирование полного пути к файлу
    filename = base_path + c_uuid + '.' + file_ext

    # Сохранение файла на сервер
    file.save(filename)

    # Загрузка весов модели
    model = tf.keras.models.load_model("model.h5")

    # Загрузка изображения с конвертацией в grayscale
    img = Image.open(filename).convert("L")

    # Изменение размера изображения
    new_image = img.resize((28, 28))

    # Конвертация изображения в массив и изменение размера
    x = np.array(new_image).reshape((28, 28, 1))
    x = np.expand_dims(x, axis=0)
    images = np.vstack([x])

    # Предсказание цифры на изображении
    classes = model.predict(images, batch_size=1)

    # Выбор из результата наибольшего (выбор класса цифры)
    result = int(np.argmax(classes))

    img.close()

    # Удаление изображения
    os.remove(filename)

    # Возврат ответа
    return jsonify({'value': result})

# Запуск приложения по 5000 порту
app.run(host="0.0.0.0", port=5000)
Now let’s look at it in order.
First we create a Flask application, define the path to the static folder and configure the CORS policy:
# Путь к папке public
base_path="./public/"

# Экземпляр flask-приложения
app = Flask(__name__, static_folder="public")

# Настройка CORS-политики
cors = CORS(app, origins=["http://localhost:3000"])
The application will run on port 3000, so when setting up the CORS policy, add the address http://localhost:3000 to origins.
Next, we define the endpoint for executing the server’s business logic:
# Эндпоинт для распознавания цифр на изображении
@app.route('/digit-recognize', methods=['POST'])
def upload_file():
  ...
POST requests for handwritten digit recognition will be processed at /digit-recognize. When defining a handler, the app.route (application route) decorator is used.
Let’s move on, but according to the internal business logic of the POST request handler:
# Получение данных о файле
file = request.files['file']

# Получение расширения файла
file_ext = file.filename.rsplit('.', 1)[1].lower()

# Генерация UUID идентификатора
c_uuid = str(uuid.uuid4())

# Формирование полного пути к файлу
filename = base_path + c_uuid + '.' + file_ext

# Сохранение файла на сервер
file.save(filename)
In the handler, we first read data about the file using request.files (an array of files received with the request), get the file extension, generate a temporary UUID for the file name and form the full path to the file, after which we save it (in the public folder).
Let’s move on:
# Загрузка весов модели
model = tf.keras.models.load_model("model.h5")

# Загрузка изображения с конвертацией в grayscale
img = Image.open(filename).convert("L")

# Изменение размера изображения
new_image = img.resize((28, 28))

# Конвертация изображения в массив и изменение размера
x = np.array(new_image).reshape((28, 28, 1))
x = np.expand_dims(x, axis=0)
images = np.vstack([x])

# Предсказание цифры на изображении
classes = model.predict(images, batch_size=1)

# Выбор из результата наибольшего (выбор класса цифры)
result = int(np.argmax(classes))

img.close()

# Удаление изображения
os.remove(filename)

# Возврат ответа
return jsonify({'value': result})
After the image is saved in the public folder, we load this image and convert it to black and white in grayscale (convert(“L”)).
Then we change the image size to 28×28 (the quality deteriorates, but neural, as I will show later, does an excellent job of recognizing such images).
The next step is to convert the image into an array and then change its size (so that the data in the array matches the size of the input layer of the model).
After converting the image into an array, we pass it to the model for prediction and identify the highest probability of belonging to a particular class of digits in the current image.
After all operations, we delete the loaded image and return the recognition result.
The server application is launched using the following code:
# Запуск приложения по 5000 порту
app.run(host="0.0.0.0", port=5000)
Testing
Let’s test the capabilities of the trained model using an example of 10 digits (from 0 to 9).
Postman is used as the main testing tool.
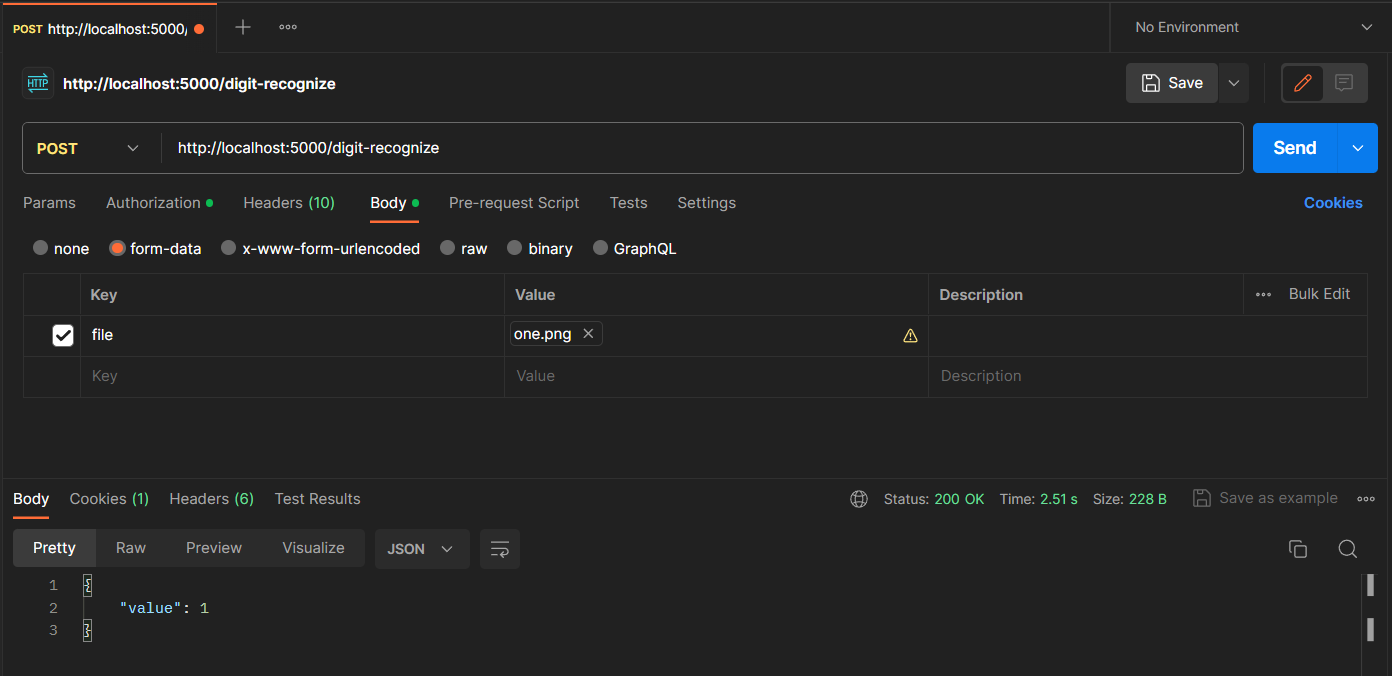
In Figure 3 you can see that in Postman the form-data request is used and the file key has added the value one.png, on which a unit is drawn (see Figure 4).
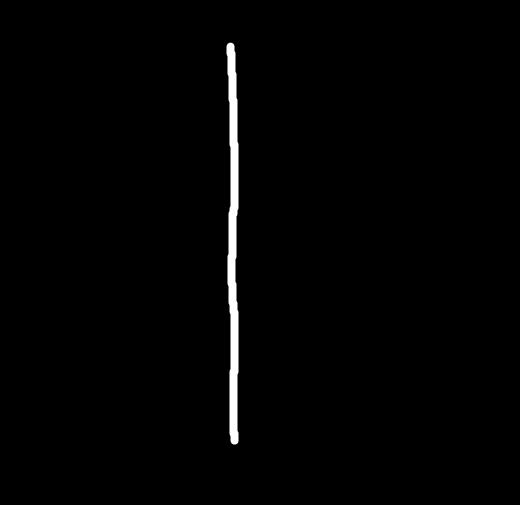
You can see that the neural network recognized the unit correctly (since the returned value is 1). Figure 5 shows the results for recognizing all other digits.
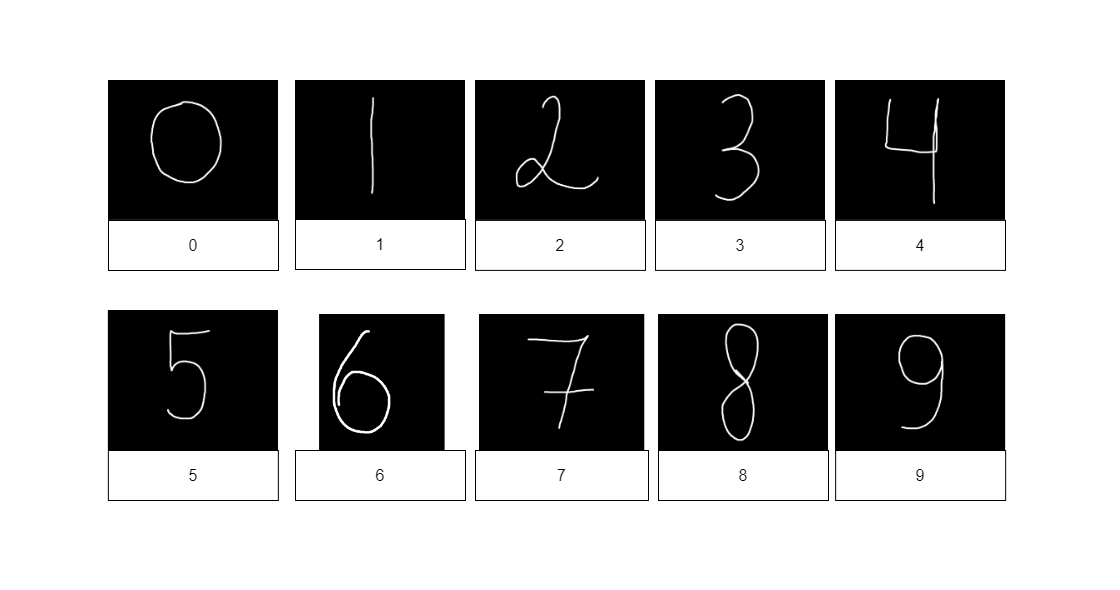
It seems that all the numbers were recognized, not a bad result. However, there are very noticeable problems with recognizing the number 6. Of course, I selected the number 6 so that it would be recognized well (this can be seen from the changed size of the test image), but this is still an error in the neural network. I think that the problems are in the training sample (it is really small) and, perhaps, in the trick that was used during training (but the main goal was to achieve the highest possible score). In most cases, when testing the number 6, the neural network sees the number 5, and in order to get more than one case of correct recognition of this number, it is necessary to reduce the image size (so that when resizing to 28×28, the image quality does not deteriorate).
Images and source code for testing the model will be available via a link in the sources used, so the reader will be able to independently test the operation of the server application and model. Let’s move on to the web application.
Web application development
Functional requirements
The main task of the web application is to provide the user with the functionality to draw numbers and then send them to the server for recognition.
That is, the user must go to the site, draw a number, and then click on one of the controls to send the image to the server. Once the server receives the image, it recognizes it and returns the result back to the client, which displays it.
File structure
The file structure of the web application is shown in Figure 6.
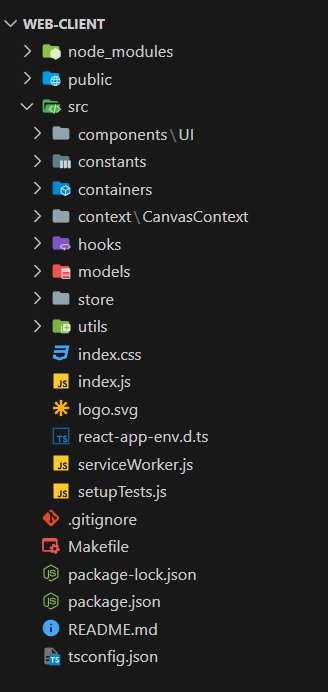
The project structure is quite large, so I will describe only a small part of the files and directories that are of greatest interest:
components/UI – this directory stores all UI components of the web application
containers – directory for storing containers (large components that include other components)
context/CanvasContext – this directory contains a context for working with canvas and obtaining certain data about it from anywhere in the application (the context is connected at the entry point level)
store – this directory contains the logic for working with Redux
utils – this directory contains useful utilities (for working with images, for example)
index.js – entry point to the web application
Let’s begin a gradual dive into the software implementation of the web application.
Point of entry
The entry point looks like this:
import React from "react";
import ReactDOM from "react-dom";
import "./index.css";
import App from "./containers/App/App";
import * as serviceWorker from "./serviceWorker";
import { CanvasProvider } from "./context/CanvasContext/CanvasContext";
import { Provider } from "react-redux";
import store from "./store/store";

ReactDOM.render(
  <React.StrictMode>
    <Provider store={store}>
      <CanvasProvider>
        <App />
      </CanvasProvider>
    </Provider>
  </React.StrictMode>,
  document.getElementById("root")
);

serviceWorker.unregister();
In general, everything is standard here. The Redux storage is connected through the Prodiver wrapper, which in turn wraps the CanvasProvider context, which in turn (finally) wraps the App – the main component of the web application.
CanvasProvider
The CanvasProvider wrapper is essentially a context within which it will be possible to interact with a specific canvas entity (canvas) on which the user will be able to draw handwritten numbers.
Since the CanvasProvider source code is quite large, I will post it a little lower in the “spoiler”, and I, in turn, will continue to describe the most important sections of this component, assuming that the reader has previously familiarized himself with the code located in the “spoiler”.
CanvasProdiver source code
import React, { useContext, useRef, useState } from "react";

// Создание элемента React-контекста
const CanvasContext = React.createContext();

// Ширина / высота холста
const width = 512;
const height = 512;

/**
 * Провайдер холста
 * @param {*} param0 Параметры провайдера
 * @returns
 */
export const CanvasProvider = ({ children }) => {
  // Состояние рисования
  const [isDrawing, setIsDrawing] = useState(false);

  // Ссылка на холст
  const canvasRef = useRef(null);

  // Ссылка на контекст
  const contextRef = useRef(null);

  /**
   * Подготовка холста (первоначальная стилизация)
   */
  const prepareCanvas = () => {
    const canvas = canvasRef.current;
    canvas.width = width * 2;
    canvas.height = height * 2;
    canvas.style.width = `${width}px`;
    canvas.style.height = `${height}px`;
    canvas.style.border = "1px solid black";
    canvas.style.background = "black";

    const context = canvas.getContext("2d");
    context.scale(2, 2);
    context.lineCap = "round";
    context.strokeStyle = "white";
    context.lineWidth = 8;
    context.fillStyle = "black";
    contextRef.current = context;
  };

  /**
   * Начало рисования
   * @param {*} param0 Параметры
   */
  const startDrawing = ({ nativeEvent }) => {
    const { offsetX, offsetY } = nativeEvent;
    contextRef.current.beginPath();
    contextRef.current.moveTo(offsetX, offsetY);
    setIsDrawing(true);
  };

  /**
   * Завершение рисования
   */
  const finishDrawing = () => {
    contextRef.current.closePath();
    setIsDrawing(false);
  };

  /**
   * Рисование
   * @param {*} param0 Параметры
   * @returns
   */
  const draw = ({ nativeEvent }) => {
    if (!isDrawing) {
      return;
    }
    const { offsetX, offsetY } = nativeEvent;
    contextRef.current.lineTo(offsetX, offsetY);
    contextRef.current.stroke();
  };

  /**
   * Очистка холста
   */
  const clearCanvas = () => {
    const canvas = canvasRef.current;
    const context = canvas.getContext("2d")
    context.fillStyle = "black"
    context.fillRect(0, 0, canvas.width, canvas.height)
  };

  /**
   * Конвертация снимка холста в изображение
   */
  const getImage = () => {
    return canvasRef.current.toDataURL("image/jpeg");
  };

  return (
    <CanvasContext.Provider
      value={{
        canvasRef,
        contextRef,
        prepareCanvas,
        startDrawing,
        finishDrawing,
        clearCanvas,
        draw,
        getImage
      }}
    >
      {children}
    </CanvasContext.Provider>
  );
};

export const useCanvas = () => useContext(CanvasContext);
The CanvasProvider component defines the drawing state (whether something is currently being drawn or not), as well as links to components (which can change):
 // Состояние рисования
  const [isDrawing, setIsDrawing] = useState(false);

  // Ссылка на холст
  const canvasRef = useRef(null);

  // Ссылка на контекст
  const contextRef = useRef(null);
Before drawing anything, you need to prepare a canvas. The prepareCanvas function is responsible for preparing the canvas:
  /**
   * Подготовка холста (первоначальная стилизация)
   */
  const prepareCanvas = () => {
    // Обращение к текущему элементу холстка
    const canvas = canvasRef.current;
    // Внесение изменений в визуал (стили HTML элемента)
    canvas.width = width * 2;
    canvas.height = height * 2;
    canvas.style.width = `${width}px`;
    canvas.style.height = `${height}px`;
    canvas.style.border = "1px solid black";
    canvas.style.background = "black";

    // Получение контекста холста
    const context = canvas.getContext("2d");
    // Внесение изменений в визуал (стили самого холста)
    context.scale(2, 2);
    context.lineCap = "round";
    context.strokeStyle = "white";
    context.lineWidth = 8;
    context.fillStyle = "black";
    contextRef.current = context;
  };
This function simply carries out the initial initialization of the canvas styles and the canvas html element.
In general, canvas looks like this:
Yes, that’s right – it’s just a canvas filled with black. In this case, the brush will paint in white, similar to the drawings on which the neural network was tested.
Next we have functions for processing the drawing start event (mouse holding), then the drawing itself (mouse movement), and finally the completion of drawing (mouse release).
  /**
   * Начало рисования
   * @param {*} param0 Параметры
   */
  const startDrawing = ({ nativeEvent }) => {
    const { offsetX, offsetY } = nativeEvent;
    contextRef.current.beginPath();
    contextRef.current.moveTo(offsetX, offsetY);
    setIsDrawing(true);
  };

  /**
   * Завершение рисования
   */
  const finishDrawing = () => {
    contextRef.current.closePath();
    setIsDrawing(false);
  };

  /**
   * Рисование
   * @param {*} param0 Параметры
   * @returns
   */
  const draw = ({ nativeEvent }) => {
    if (!isDrawing) {
      return;
    }
    const { offsetX, offsetY } = nativeEvent;
    contextRef.current.lineTo(offsetX, offsetY);
    contextRef.current.stroke();
  };
All these functions are used in the Canvas functional component from the containers folder as follows:
/**
 * Функциональный компонент холста
 * @returns
 */
const Canvas = () => {
  const {
    canvasRef,
    prepareCanvas,
    startDrawing,
    finishDrawing,
    draw,
  } = useCanvas();

  useEffect(() => {
    prepareCanvas();
  }, []);

  return (
    <canvas
      onMouseDown={startDrawing}
      onMouseUp={finishDrawing}
      onMouseMove={draw}
      ref={canvasRef}
    />
  );
}
That is, we connect to the CanvasContext context via the useCanvas hook and attach handlers to the canvas HTML element itself. For holding the mouse – startDrawing, for releasing – finishDrawing, and for drawing – draw.
CanvasProvider also has a getImage function that converts the current drawing on the canvas into an image/png image that can be sent to the server for recognition:
  /**
   * Конвертация снимка холста в изображение
   */
  const getImage = () => {
    return canvasRef.current.toDataURL("image/jpeg");
  };
Well, CanvasProvider simply returns a context with states and functions attached to it:
return (
    <CanvasContext.Provider
      value={{
        canvasRef,      // Ссылка на HTML-элемент холста
        contextRef,     // Ссылка на контекст холста
        prepareCanvas,  // Предварительная подготовка холства
        startDrawing,   // Начало рисования
        finishDrawing,  // Завершение рисования
        clearCanvas,    // Очистка холста
        draw,           // Рисование
        getImage        // Получение изображения
      }}
    >
      {children}
    </CanvasContext.Provider>
  );
Main web application container
Let’s move on to the App component.
Its code looks like this:
function App() {
  // Подключение селектора
  const recognizeSelector = useAppSelector((s) => s.recognizeReducer);

  return (
    <>
      <div className={styles.container}>
        <div className={styles.paint}>
          <Canvas />
          <div className={styles.buttons}>
            <ClearCanvasButton />
            <RecognizeButton />
          </div>
          <input className={styles.input} value={recognizeSelector.value} readOnly />
        </div>
      </div>
    </>
  );
}

export default App;
This component simply assembles all the elements (canvas, buttons and one input for displaying the recognition result).
The component also interacts with the Redux store through a selector, the code of which is presented below.
Slice code recognizeSlize
/* Библиотеки */
import { createSlice, PayloadAction } from "@reduxjs/toolkit";
import { IValueModel } from "src/models/IValueModel";

/* Локальные интерфейсы */
interface IRecognizeSlice {
  value: string;
  isLoading: boolean;
}

/* Базовое состояние текущего слайса */
const initialState: IRecognizeSlice = {
  value: "",
  isLoading: false,
};

export const recognizeSlice = createSlice({
  name: "recognize_slice",
  initialState,
  reducers: {
    loadingStart(state: IRecognizeSlice) {
      state.value = "";
      state.isLoading = true;
    },

    loadingEnd(state: IRecognizeSlice) {
      state.isLoading = false;
    },

    clear(state: IRecognizeSlice) {
      state.value = "";
      state.isLoading = false;
    },

    setValue(state: IRecognizeSlice, action: PayloadAction<IValueModel>) {
      if (action.payload) {
        state.value = action.payload.value.toString();
      }
    },
  },
});

export default recognizeSlice.reducer;
The main logic for sending an image for recognition is presented in the RecognizeButton component.
RecognizeButton
This component defines buttons that, when clicked, simply create a copy of the canvas at the current moment in time and convert this copy (a picture in image/png format) into a file:
const RecognizeButton = () => {
    // Подключаем диспетчер
    const dispatch = useAppDispatch();

    // Берём из контекста только функцию для получения текущего изображения холста
    const { getImage } = useCanvas();

    const clickHandler = () => {
        // Конвертация данных из image/png в File
        const file = dataURLToFile(getImage(), "file.png");

        // При успешной конвертации вызываем action recognizeImage
        file && dispatch(RecognizeAction.recognizeImage(file));
    }

    return (
        <>
            <button className={styles.button} onClick={clickHandler}>Распознать</button>
        </>
    );
}
Converting image/png data to File
/**
 * Преобразование DataURL в файл
 * @param dataURL DataURL файла
 * @param filename Название файла
 * @returns {File} Файл
 */
export const dataURLToFile = (dataURL: string, filename: string) => {
  if (dataURL.length === 0) {
    return null;
  }

  let arr = dataURL.split(","),
    // @ts-ignore
    mime = arr[0].match(/:(.*?);/)[1],
    bstr = atob(arr[1]),
    n = bstr.length,
    u8arr = new Uint8Array(n);
  while (n--) {
    u8arr[n] = bstr.charCodeAt(n);
  }

  return new File([u8arr], filename, { type: mime });
};
When you click on the “Recognize” button, the handler function simply delegates execution to the recognizeImage function from actions:
/**
 * Отправка изображения для распознавания
 * @param image Изображение
 * @returns
 */
const recognizeImage = (image: File) => async (dispatch: any) => {
  // Начинается загрузка
  dispatch(recognizeSlice.actions.loadingStart());

  try {
    // Определение данных для загрузки изображения
    const formData = new FormData();
    // Добавление файла в FormData
    formData.append("file", image);

    // Отправка запроса на распознавание
    const response = await axios.post(
      `${Api.server}${Api.digit_recognize}`,
      formData
    );

    // Обработка ошибок
    if (response.status != 200 && response.status != 201) {
      console.log(response.data.message);
      return;
    }

    // Установка ответа слайсу
    dispatch(recognizeSlice.actions.setValue(response.data));
  } catch (e: any) {
    console.log(e);
  }

  // Окончание загрузки
  dispatch(recognizeSlice.actions.loadingEnd());
};
The function works with the state to register the download (whether there is a download or not), and generates data in the FormData format and then sends it to the server.
In general, all the main functions of the web application have been described.
Testing
Let’s draw some numbers to make sure that the whole system works.
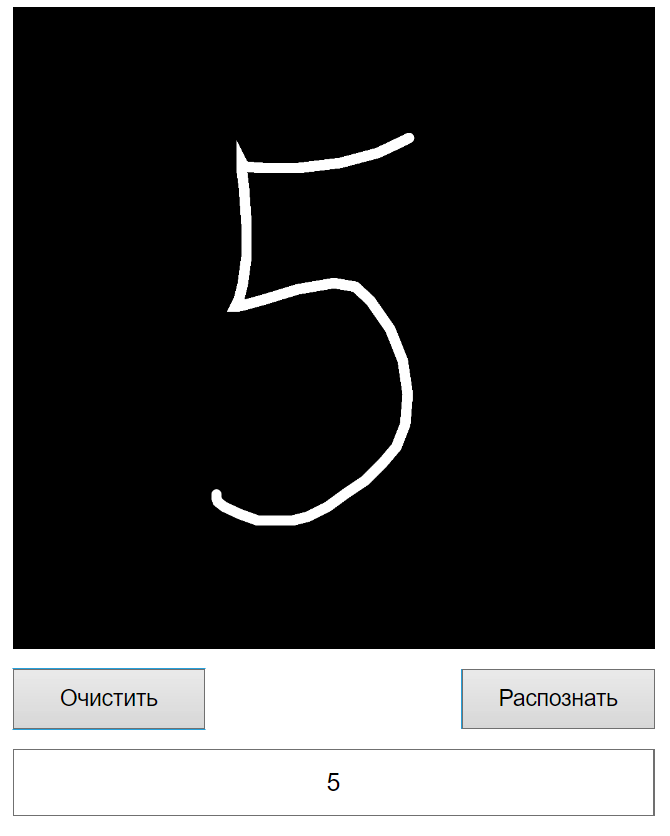
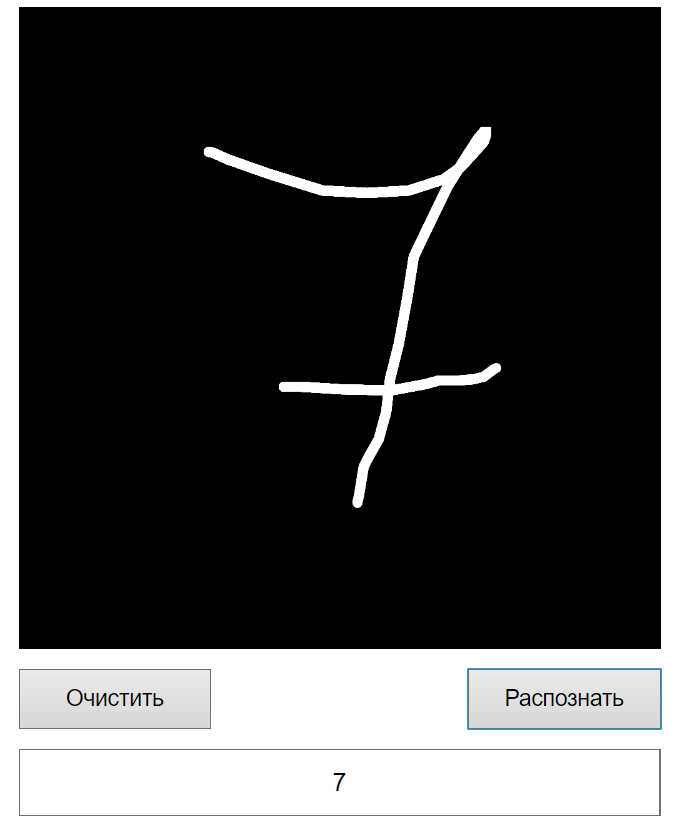
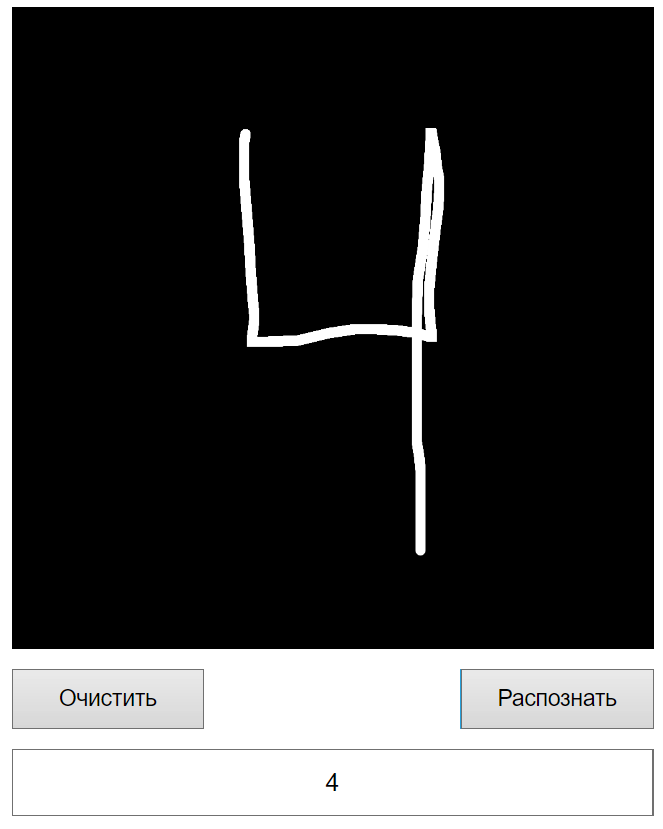
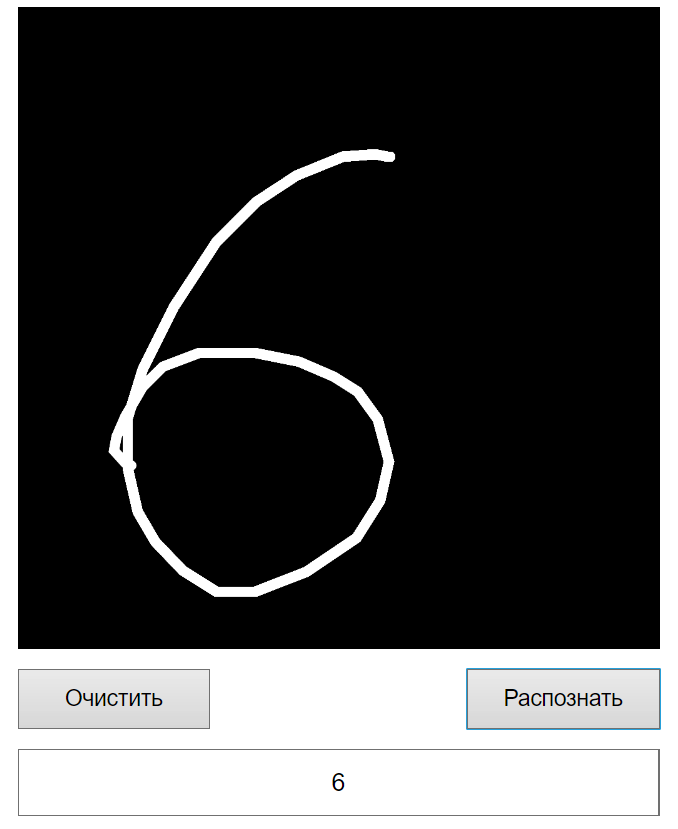
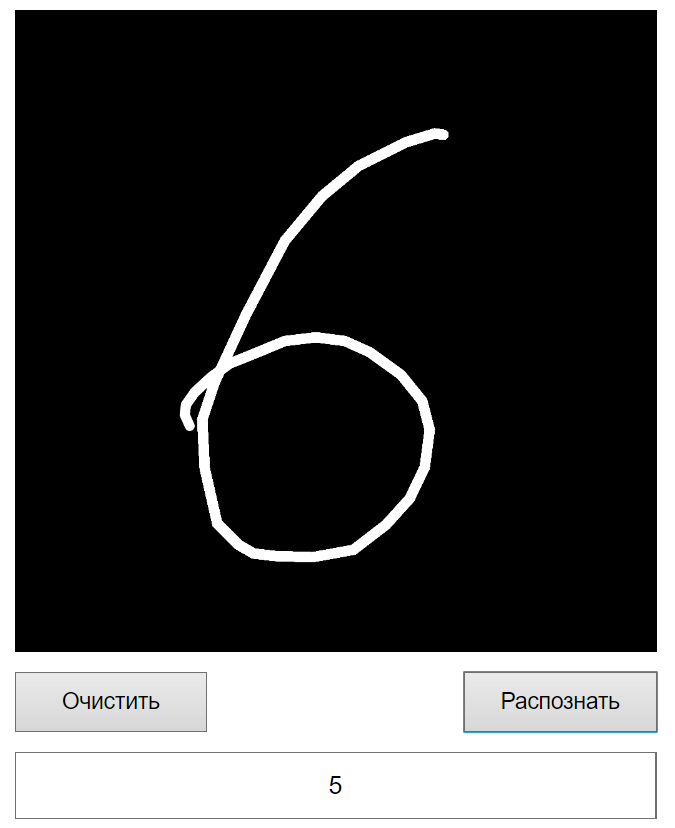
As you can see, in Figure 11 the number 6 was recognized well, but in Figure 12 not so much.
The rule of thumb for this figure (within the current learning level model) is to draw it on the left, preferably well. Apparently the neural network identified signs for this number that it is on the left (“thanks” ImageDataGenerator).
conclusions
In this article, we looked at how you can save the weights of a trained model and load them into a server application for useful use. A server application was developed that accepts one POST request with an image for recognition after processing it. A web application was also implemented with the ability to draw on a canvas and send an image from the canvas to a server that successfully recognizes handwritten numbers.
List of sources used
Project source code: link to code
Drawing on Canvas in React.js: link to video
