How to relocate from the office while maintaining the local network
When moving to another country, it became necessary to keep the work network as if I were in the office, so that both I had access to the office network and my colleagues could access my network, for example, they could print to my printer. Moreover, the main task was to make the network deployment as fast and simple as possible. Ideally, it should be enough to plug the router into a power outlet.
This is not a step-by-step instruction for setting up, for understanding it is desirable to have experience in setting up Mikrotik routers.
Equipment and network diagram
Since it is initially unknown what kind of Internet will be at the deployment point, it was important to consider all possible options. In the best case, it will be a router with the ability to directly connect to RJ45, then there is a WIFI network and, in extreme cases, a network of a mobile operator.
For these purposes, I decided to use the following equipment:
Router Mikrotik hap ac2 (you can use another model with USB to taste);
Mikrotik map lite access point (as a WIFI connection client);
Huawei E3372 modem from one of the operators, unlocked and stitched for any SIM cards.
The principle of operation is as follows: if RJ45 is available, just plug our router into it; if WIFI – connect the router to the map lite, and on this access point, where the WIFI client is already configured in advance (in the wlan1 interface, select Mode = station and dhcp client hang on this interface), enter the SSID and password from the local network, power can be taken from USB router; if there is nothing at all, we buy a local SIM card, and we stick a modem into the router. Also, later I realized that it is always better to have a ready-made modem, since not everywhere there is a stable Internet, and it can be used for a backup channel. I thought I foresaw everything, but I was wrong, more on that below.
About the setup, I also have Mikrotik in the office, I set up an sstp server on it, I won’t describe it here, since there are a lot of manuals on the Internet and it’s not very difficult. Accordingly, on my “camping” router, I set up an sstp client that raises the VPN tunnel. Don’t forget to add the masquarade rule to the firewall on both routers.

Also, in order to avoid problems with routing, on the SSTP server, specify Only One = yes in the profile.

The general network diagram is as follows:
Office network 192.168.2.0/24;
My network is 192.168.5.0/24;
Access point map lite 192.168.6.1;
Modem 192.168.8.1 (default);
VPN 10.1.2.1 – 10.1.2.5.

Routing
The most important thing here is to set up routing.

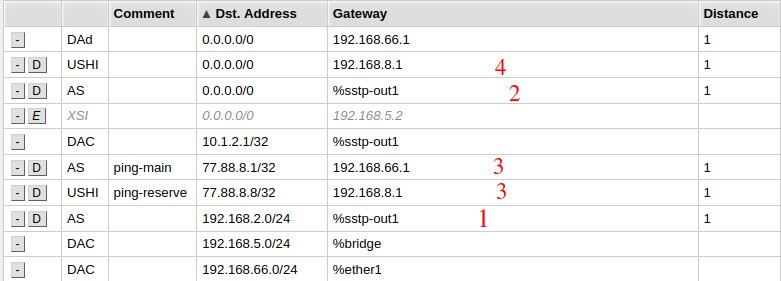
1. Everything that goes to the local office network is sent through the tunnel, a similar route in the opposite direction must be created on the office router.
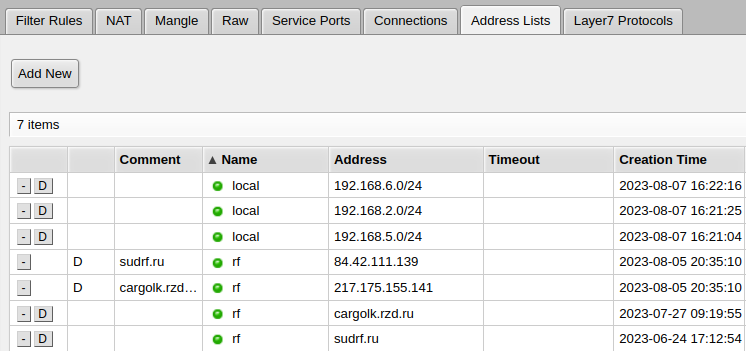
2. Here is the route for Russian sites that are inaccessible from outside. To do this, in the firewall, create a list of sites marked rf
Screen

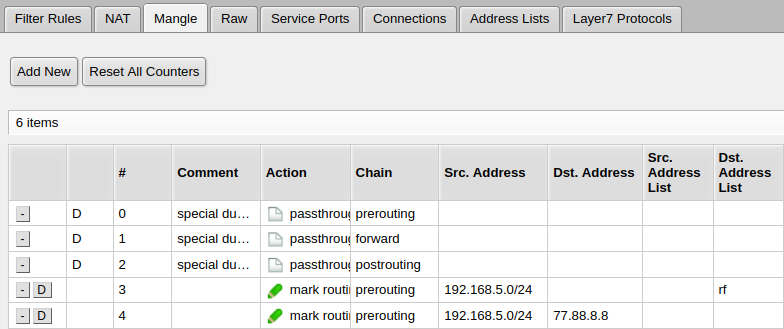
and mark packages to these sites in the Mangle tab.
Screen

In this route, you need to specify Routing Table = rf, having previously created it.
Screen

.
3. These are two routes for pinging the primary and backup links, and for automatically switching between them (more on that below). The backup ping gateway is the modem address, you won’t need to change it, but the main channel’s gateway will need to be changed here when you change this channel. This is the only thing that will need to be edited in the config when changing the location and the Internet provider, respectively, but before editing the Internet will still work through the modem, so the plug & play rule is fulfilled.
4. This route is for a backup channel through a modem, in it Routing Table = reserve.
Backup channel via modem
At this stage, everything should already work for us, and we have the ability to forward individual sites through the office Internet. But practice has shown that even a stationary Internet can be unstable, and, moreover, since we already have a modem, it’s a sin not to take the opportunity to make a backup channel through it.
To do this, I modified the script found on the Internet and added it to the schedule with a launch every minute. This script pings two addresses, each through its own channel, and depending on the availability of the channel, turns on or off the Mangle rule, which marks all packets, except for local ones, to go through the backup channel. Before that, we create a list of local addresses in Address Lists, in my case these are 192.168.2.0/24 and 192.168.5.0/24.

Script
:local PingCount 5;
:local CheckIp1 77.88.8.1;
:local CheckIp8 77.88.8.8;
:local isp1 [/ping $CheckIp1 count=$PingCount interface="ether1"];
:local isp2 [/ping $CheckIp8 count=$PingCount interface="lte1"];
:local BackGw [/ip firewall mangle get [find comment="reserve"] disable];
:if (($isp1=0) && ($isp2=$PingCount) && ($BackGw=true)) do={
  /ip firewall mangle enable [find comment="reserve"];
  :delay 2
  :log warning "Set routes to lte1";
  /ip firewall connection remove [ find protocol~"tcp" ];
  /ip firewall connection remove [ find protocol~"udp" ];
  :delay 2
  :log warning "Set routes to lte1";
}
:local MainGw [/ip firewall mangle get [find comment="reserve"] disable];
:if (($isp1=$PingCount) && ($MainGw=false)) do={
  /ip firewall mangle disable [find comment="reserve"];
  :delay 2
  :log warning "Set routes to ether1";
  /ip firewall connection remove [ find protocol~"tcp" ];
  /ip firewall connection remove [ find protocol~"udp" ];
  :delay 2
  :log warning "Set routes to ether1";
}
The previous screenshots show that you also need to create a Routing Table = reserve, a Mangle rule, to mark packets to the address 77.88.8.8, so that the ping to this address always goes through the backup route, and 2 routes for pinging the main and backup channel.
Conclusion
I mentioned earlier that I didn’t foresee everything, and I had another unforeseen problem that prompted me to write this article. Upon arrival in another country, it turned out that the modem does not support the frequencies of the local operator, and it was not possible to launch the Internet through it. And I came up with the idea to use the phone as an access point with a local SIM card (it worked in the phone), and connect the WIFI client to it on the map lite and further down the list. Seeing this design, I involuntarily smiled, but it all works quite stably, so the option is quite viable, and you can safely add a smartphone with the ability to distribute the Internet to the initial list of equipment.
The article turned out to be chaotic, because I wrote it suddenly and this is my first experience, I hope it will be useful to someone.


