GitLab + K8s + Werf
I think most of those who came across this article know what Gitlab and Kubernetes are. If you don’t know, google to the rescue. In this article, it is out of scope.
What is Werf? Werf is a utility that combines CI / CD systems (like Gitlab, Github Actions), docker and helm in one bottle and allows you to build a container image, push it to a container repository and deploy using helm with one command.
So let’s go.
The post will be short and as dry as possible. Let’s divide it into two parts:
Environment setup
Application Deployment Example
Let’s get to the first part.
Environment setup
Hopefully you already have Gitlab. If not, then expand. I have gitlab deployed with docker-compose.
About connecting Kubernetes to Gitlab
💡 Starting from version 15, Gitlab declared the K8S connection method via certificates as deprecated and now offers the only way to connect clusters via gitlab-agent and kubernetes agent server (aka kas). Read more here.
If you still have a kubernetes agent server connected, connect like this
environment:
        GITLAB_OMNIBUS_CONFIG: |
            ...
            gitlab_kas['enable'] = true
That is, in gitlab.rb it will be simple gitlab_kas['enable'] = true. Don’t forget to do gitlab-ctl reconfigure.
We also need a Kubernetes cluster. Hope you have it too. If not, I advise you to try Managed Service For Kubernetes from Yandex.Cloud. You can choose compact, inexpensive, and also evicted (the most budgetary) instances.
Now you need to run gitlab-agent for kubernetes. To do this, create the infra repository and now add the file along the path:
# .gitlab/agents/mks-agent
ci_access:
  groups:
  - id: <group_id>
  projects:
  - id: <project_id>
Instead of group_id or project_id, we put down the paths to projects or groups where this kubernetes cluster will be available. For example for a group infra and project my-group/my-app it will look like this:
# .gitlab/agents/mks-agent
ci_access:
  groups:
  - id: infra
  projects:
  - id: my-group/my-app
After that, go to Infrastructure > Kubernetes Clusters > Connect a cluster, select the desired agent from the drop-down list. Gitlab will show you to install gitlab-agent via helm. It will look like this:
helm repo add gitlab <https://charts.gitlab.io>
helm repo update
helm upgrade --install mks-agent gitlab/gitlab-agent \\
    --namespace gitlab-agent \\
    --create-namespace \\
    --set image.tag=v15.2.0 \\
    --set config.token=<your_token> \\
    --set config.kasAddress=wss://<gitlab_domain>/-/kubernetes-agent/
Ready. You can check gitlab-agent in the Infrastructure > Kubernetes Clusters list. Must be able connected .
Now let’s install the necessary components for Werf to work in the kubernetes cluster. AT repositories on Github I posted the manifests for deploying these components (plus everything for rolling out the environment). I took these manifestos from the official site from this section.
If you have downloaded the repository, then just run
cd werf
kubectl -n kube-system apply -f werf-fuse-device-plugin-ds.yaml
kubectl create namespace gitlab-ci
kubectl apply -f enable-fuse-pod-limit-range.yaml
kubectl apply -f sa-runner.yaml
cd ..
The point is small, it remains to install gitlab-runner.
In the same repository values.yaml file for official gitlab-runner. To add a shared runner go to Gitlab > Admin > Shared Runners > Register an instance runner. Copy the registration token. Now in the copied repository we do
cd gitlab-runner
helm repo add gitlab <https://charts.gitlab.io>
vim values.yaml # set your domain and registry token
helm install --namespace gitlab-ci gitlab-runner -f values.yaml gitlab/gitlab-runner
We check that the runner has appeared. I specifically put the werf tag so that you don’t get lost later.
The environment is ready. At this stage, we get the following scheme:

Application deployment
Install werf locally on your computer. This will help in the future to develop applications faster, see the render of manifests and work with helm secrets.
We use this link to the official site.
Check the version
werf version
v1.2.122+fix2
Create a project in Gitlab, name my-app-werf (for example). Adding a file to the project werf.yaml
# werf.yaml
configVersion: 1
project: my-app-werf
deploy:
  namespace: my-app-werf
---
image: my_app_werf
dockerfile: Dockerfile
If you have a monorepo for microservices, then werf can handle it without any problems. werf.yaml will then look something like this:
configVersion: 1
project: my-microservice-app-werf
deploy:
  namespace: my-microservice-app-werf
---
image: my_app_werf_backend
dockerfile: Dockerfile
context: backend # папка сервиса
---
image: my_app_werf_frontend
dockerfile: Dockerfile
context: frontend # папка сервиса
For clarity, let’s make a simple web server in Go:
// main.go
package main
import (
"fmt"
"html"
"log"
"net/http"
"os"
)
func main() {
	http.HandleFunc("/", MainHandler)
	log.Print("Starting server...")
	log.Fatal(http.ListenAndServe(":"+os.Getenv("PORT"), nil))
}
func MainHandler(w http.ResponseWriter, r *http.Request) {
	fmt.Fprintf(w, "Hello, %q", html.EscapeString(r.URL.Path))
}
Let’s write Dockerfile
# Dockerfile
FROM golang:alpine as builder
WORKDIR /app
COPY . .
RUN go build -o app
FROM alpine as prod
WORKDIR /app
COPY --from=builder /app/app /app/app
ENV PORT=8080
ENTRYPOINT [ "/app/app" ]
Create helm templates for deployment along the way .helm/templates :
# .helm/templates/regcred.yaml
{{- if .Values.dockerconfigjson -}}
apiVersion: v1
kind: Secret
metadata:
  name: regcred
type: kubernetes.io/dockerconfigjson
data:
  .dockerconfigjson: {{ .Values.dockerconfigjson }}
{{- end -}}
# .helm/templates/app.yaml
apiVersion: apps/v1
kind: Deployment
metadata:
  labels:
    app: my-app-werf
  name: my-app-werf
spec:
  selector:
    matchLabels:
      app: my-app-werf
  replicas: 1
  template:
    metadata:
      labels:
        app: my-app-werf
    spec:
      imagePullSecrets:
        - name: regcred
      containers:
        - name: my-app-werf
          image: "{{.Values.werf.image.my_app_werf}}"
          imagePullPolicy: IfNotPresent
          ports:
            - name: http
              containerPort: 8080
              protocol: TCP
---
apiVersion: v1
kind: Service
metadata:
  name: my-app-werf
  labels:
    app: my-app-werf
spec:
  ports:
  - port: 8080
    name: my-app-werf-service
  selector:
    app: my-app-werf
# .helm/templates/ingress.yaml
apiVersion: networking.k8s.io/v1
kind: Ingress
metadata:
  name: my-app-werf
  annotations:
    cert-manager.io/cluster-issuer: letsencrypt-cluster
spec:
  ingressClassName: nginx
  tls:
    - hosts:
        - "app-werf.apps.<your_domain>"
      secretName: app-werf-mks-tls
  rules:
    - host: "app-werf.apps.<your_domain>"
      http:
        paths:
          - path: /
            pathType: ImplementationSpecific
            backend:
              service:
                name: my-app-werf
                port:
                  number: 8080
Personally, I use nginx ingress with cert-manager, so cluster issuer is specified in the annotations.
Add .dockerignore so as not to copy the excess and cache only the necessary.
.helm
.gitlab-ci.yml
werf.yaml
The icing on the cake remains: gitlab CI/CD. Werf collects all Gitlab environment variables and uses them when building and rendering manifests. Plus, a special type of assembly is used, more here. This is again out of scope.
We write .gitlab-ci.yml and wonder how compact it looks
# .gitlab-ci.yml
stages:
  - build-and-deploy
build_and_deploy:
	stage: build-and-deploy
	image: registry.werf.io/werf/werf
	variables:
		WERF_SYNCHRONIZATION: kubernetes://gitlab-ci
	script:
		- source $(werf ci-env gitlab --as-file)
		- werf converge
	tags: ["werf"]
One team werf converge does everything at once: builds a docker image, pushes it to the registry, and deploys the application from the built image.
I suggest checking the structure of the project
.
├── .dockerignore
├── .gitlab-ci.yml
├── .helm
│   └── templates
│       ├── app.yaml
│       ├── ingress.yaml
│       └── regcred.yaml
├── Dockerfile
├── go.mod
├── main.go
└── werf.yaml
Before pushing, you can check how the manifests will look locally with the following command.
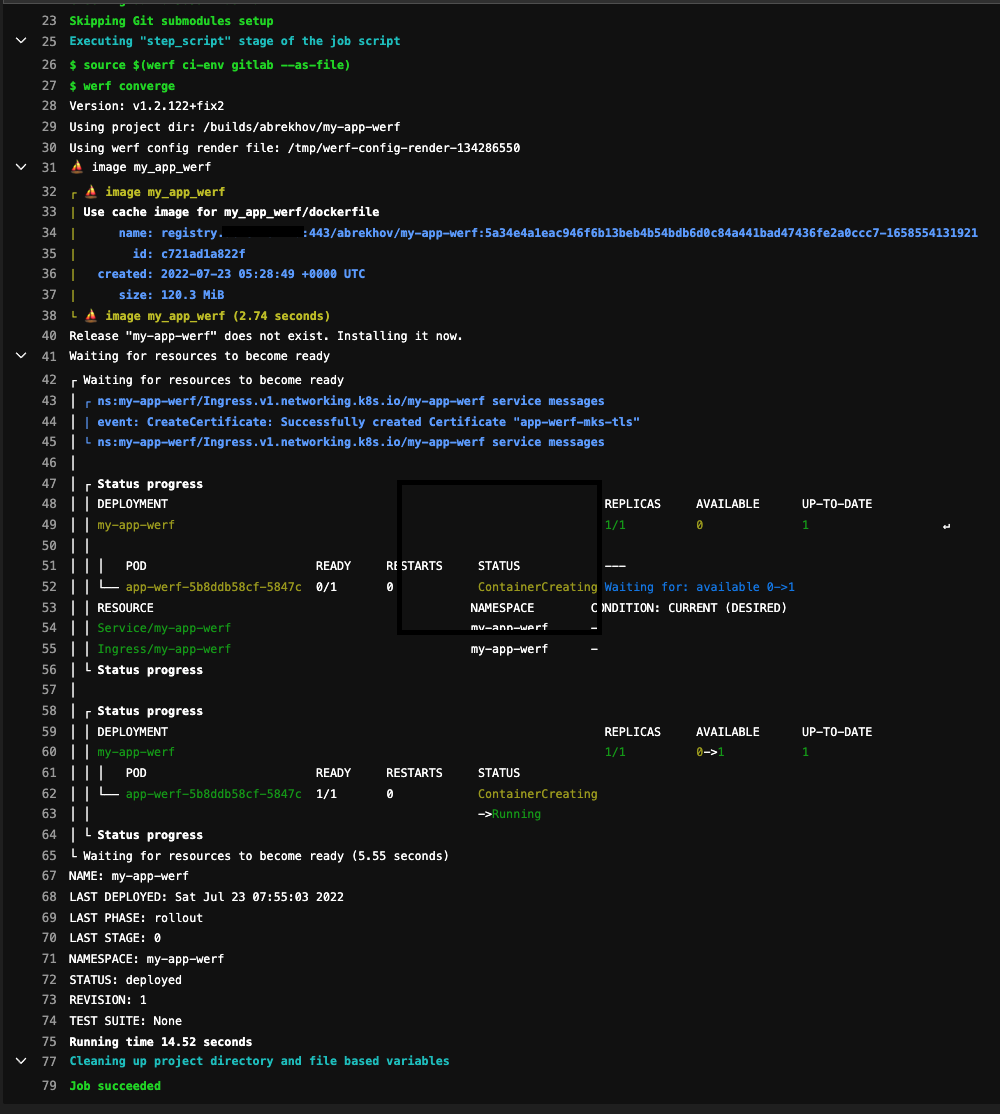
werf render --devCommit changes, push. Voila! This is how the pipeline in Gilab CI / CD looks like:

We have such a scheme:

Pros and cons
pros
Minuses
Frankly speaking, ArgoCD and Werf can complement each other. Details here.


