Create your own clone with Fine-tuned LLM
Get a digital twin

Translation of the article by Sergey Savvov.
Purpose of this article – show how to effectively and cost-effectively set up LLM on a custom dataset. We will look at using the Falcon-7B model with LoRa adapters using the library Lit-GPT.
Have you ever wondered what it’s like to have a digital twin? A virtual copy of yourself that can have conversations, learn, and even express thoughts? Recent advances in artificial intelligence (AI) have made this once fantastic idea achievable.
The efforts of the AI community have resulted in the development of many high-quality open-source LLMs, including LLaMA, Falcon, StableLM, and Pythia. You can customize these models to tailor them to your specific task, such as training a chatbot to answer financial questions. In addition, it can also guarantee the privacy of data when it cannot be transferred or processed using the Cloud APIs.
In this study, I wanted the model to learn to speak in my style, imitating using jokes, phrases and words.
Data collection and preparation
Before going into details, I want to note that retraining GPT-like models can be quite a challenge. However, I decided to take it one step further and train the model in Russian.
This presents an additional problem since the models are mostly trained on English texts.
Considering that Russian is my native language, I have a good base, including personal correspondence.
Data collection
I chose Telegram because it provides a convenient API for collecting data. In addition, it serves as the main platform for my communication with friends. This choice allows the model to gain a deeper understanding of the unique communication style and better imitate me.
Following documentationI wrote a small script that downloads all correspondence from private chats and saves them to a file.
First, create a Telegram client:
from telethon.sync import TelegramClient

client = TelegramClient(PHONE_NUMBER, TELEGRAM_APP_ID, TELEGRAM_APP_HASH)
client.start()
Then we get a list of dialogs:
def get_dialogs(limit: int | None = 100) -> list[Dialog]:
    """Get all dialogs from the Telegram."""
    dialogs: list[Dialog] = client.get_dialogs(limit=limit)
    dialogs = [dialog for dialog in dialogs if dialog.is_user]  # remove groups or channels
    logger.info(f"Found {len(dialogs)} dialogs")
    return dialogs
And finally, we load the history of correspondence:
def parse_messages(dialog: Dialog, limit: int = 1000) -> list[dict]:
    """Get all messages from the dialog."""
    all_messages_list = []
    offset_id = 0

    while True:
        messages: list[Message] = client(
            GetHistoryRequest(
                peer=dialog,
                offset_id=offset_id,
                offset_date=None,
                add_offset=0,
                limit=limit,
                max_id=0,
                min_id=0,
                hash=0,
            )
        ).messages
        if not messages:
            break

        all_messages_list.extend(
            {
                "date": message.date.isoformat(),
                "message": message.message,
                "out": message.out,
            }
            for message in messages
            # Filter audio or video content
            if message.message and not message.is_bot
        )
        offset_id = offset_id = messages[-1].id
    return all_messages_list
You can find the complete script Here.

It’s worth mentioning that I deliberately excluded audio and video messages from the dataset and focused exclusively on text content. As a result, some information in the dialogue could be lost. Extracting text from such data is a large topic that would be better suited for a separate article. Data preparation
Data preparation
At this stage, you must transform the data into instructions for retraining the model.
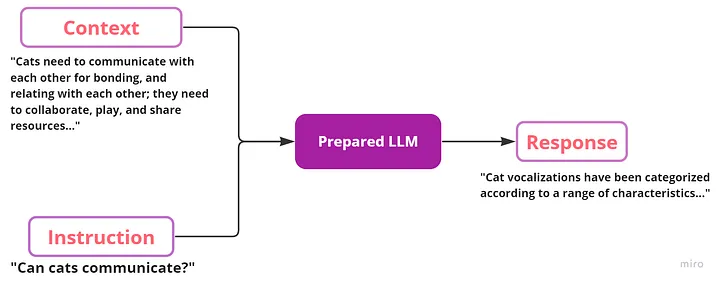
fine tune usually includes retraining the model to follow instructions or perform another target task (for example, text sentiment analysis). ChatGPT (which started out as a fine-tuned version of the base GPT-3 model) is a typical example of a model that was created to follow instructions. Instruction sets usually contain three keys: instruction, input (optional context for this instruction) and response from LLM. The following is an example of these instructions:
[
    {
        "instruction": "Can cats communicate?",
        "context": "Cats need to communicate with each other for bonding, and relating with each other; they need to collaborate, play, and share resources...",
        "response": "Cat vocalizations have been categorized according to a range of characteristics...",
    }
]
Schematically, the fine tuning process can be represented as follows:
It is important to remember that you can change the data format to suit your needs. For example, you can enter a function and ask the model to generate documentation as a response. However, in my experience, smaller models (such as the 7B) may struggle with complex queries.
To avoid this, try simplifying queries or breaking them down into a series of sequential instructions. This way you can achieve better results and improve model performance.
To create instructions based on my chat, I used several approaches:
Splitting a conversation into batches when the interval between two messages exceeds one day. Then we consider this as the beginning of a new dialogue, therefore, there will be no context from the previous conversation.
Combining several messages in a row from one user into one.
Setting the maximum context length to speed up the learning process.
Adding tags to your and the other person’s responses to help the model better understand the context.
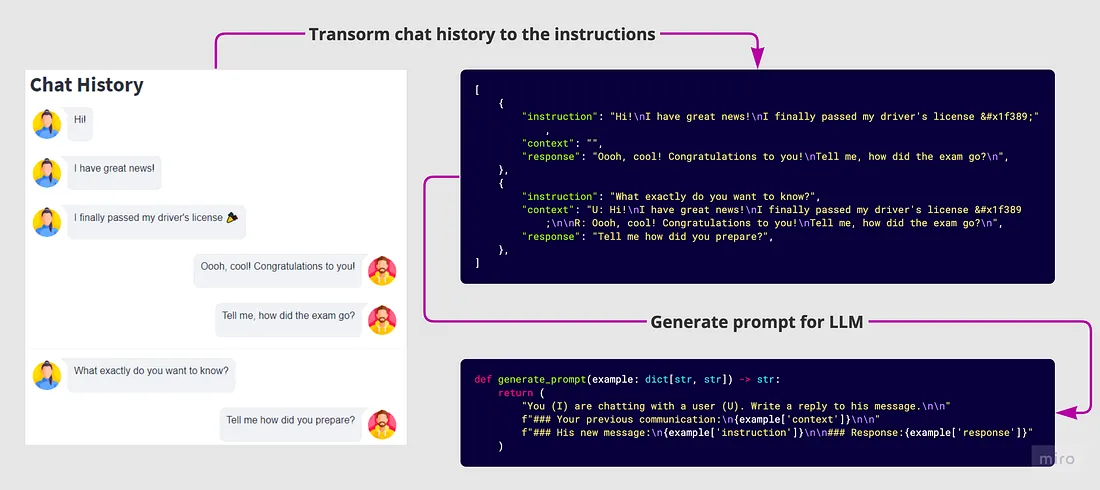
I also cleared my chat history of sensitive information such as personal passwords or emails.
As a result, I got 51k instructions, which is quite comparable with Dolly 2.0 instruction dataset from Databricks (~15k instructions) and Alpaca dataset (~52K instructions).
Model
I decided to choose an open-source large LLM Falcon from Technology Innovation Institute. This is an autoregressive decoder model with two options: a model with 7 billion parameters and a model with 40 billion parameters. Model 40B variant was trained on 384 AWS GPUs for 2 months.

Based what is known about this model, the Falcon architecture is very similar to GPT-3 and LLaMA, except for the use of multi-query attention (Shazeer 2019) And RefinedWeb corpus as a training dataset (what could be the key to success).
Parameter-efficient LLM fine-tuning with LoRA
If we are looking at LLM (Large Language Model) retraining methods, one of the valuable resources is the OpenAI article PALMS: Pre-training an Autoencoder Latent Model for Sequence Generation. The article discusses the use of fine-tuning, which involves training the model using the same methods as the original training, but at a lower learning rate~ 0.1. This process allows the model to be trained on specific data, thereby improving the quality of its responses in the desired area.
There are other approaches besides fine-tune, such as using adapters. They involve adding additional smaller layers to the existing layers of the original model, training only the added layers. This approach allows for faster training because the weights involved are relatively small.
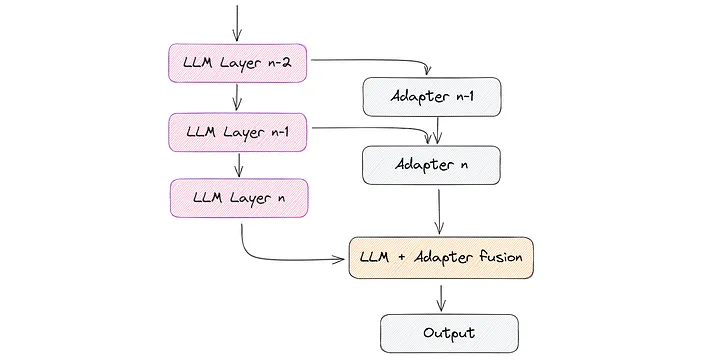
The LoRa concept draws inspiration from observing how matrix weights change during training, as in work. Aghajanyan et al. (2020). These observations show that matrices can be approximated using a lower dimensional space while retaining much of their essential information and structure.
Each matrix W represented as the sum of W + A * B during training. Source Matrix W frozen, and only matrices are trained A And B. Therefore, the updated weights are obtained as ΔW = W + A * B. Due to the fact that the matrices A And B remain small, the learning process becomes faster and requires fewer resources. In a nutshell, this is the LoRa method, which is illustrated in the figure below.
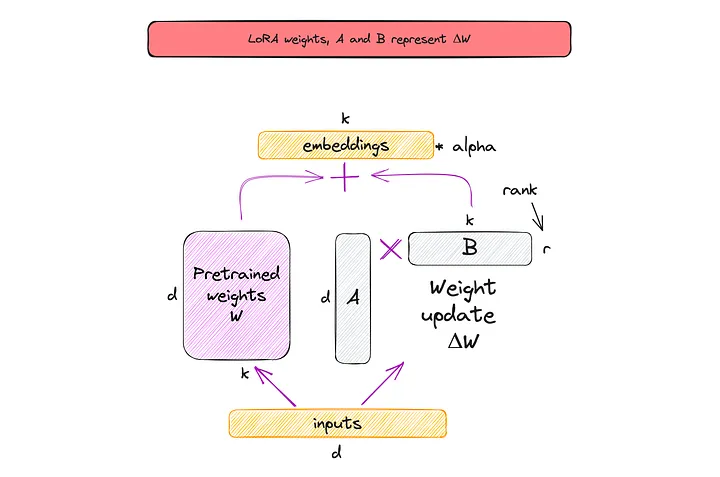
note that r in the figure above is hyperparameter , which we can use to specify the low rank matrices used for adaptation. Smaller r results in a simpler low-rank matrix, resulting in fewer parameters to learn during adaptation. Choosing a smaller r in LoRa involves a trade-off between model complexity, adaptability, and the risk of underfitting or overfitting.
For more information, I recommend the following resources:
Experiment
For my experiments, I used Lit-GPT librarywhich includes an open-source LLM implementation and runs on Lightning Fabric. For the training hardware, I used one A100 GPU with 40 GB of memory.
Loading model weights
To start experimenting, the first step is to load the weights of the model and convert them to lit-gpt format. This is pretty easy to do:
# download the model weights:
python scripts/download.py --repo_id tiiuae/falcon-7b

# convert the weights into a standardized form:
python scripts/convert_hf_checkpoint.py --checkpoint_dir checkpoints/tiiuae/falcon-7b
Instructions for loading other supported weights such as RedPajama can be found in the “howto section“.
Prepare the dataset
Fine-tuning includes two main steps – first we process the dataset in Lit-Parrot, and then we run the fine-tuning script on the processed dataset.
I have modified an existing Alpaca script that provides the functionality to create prompts for model training. In my case, I needed to change the function to generate prompts:
def generate_prompt(example: dict[str, str]) -> str:
    """Generates a standardized message to prompt the model"""
    return (
        "You (I) are chatting with a user R. Write a reply to his message.\n\n"
        f"### Your previous communication:\n{example['context']}\n\n"
        f"### His new message:\n{example['instruction']}\n\n"
        f"### Your response:{example['response']}"
    )
After making changes, you can start the data preparation process:
python scripts/prepare_dataset_my.py \
  --checkpoint_dir checkpoints/tiiuae/falcon-7b/
Preparing prompts will not take much time. In my case, it took only 2 minutes for 51 thousand instructions:

Fine tuning the Falcon model
Once you’ve prepared your dataset, it’s fairly easy to set up the model.
I changed some settings in the fine-tuning script to improve the results, here is an overview of the hyperparameter settings I used:
bfloat16 precision (more about bfloat16 I wrote in the article 7 ways to speed up inference of your hosted LLMs) In addition, the scripts were configured to train models on 51k iterations using efficient batch size of 128 with gradient accumulation (more on gradient accumulation in Finetuning LLMs on a Single GPU Using Gradient Accumulation).
For LoRa I used rank of 16to get a better trained adapter. And set alpha to 32 (alpha is a scaling factor that adjusts the magnitude of the cumulative result, this balances knowledge of the prior model and adaptation to the new task).
Then you need to run the finetune/lora.py script with your data path.
python finetune/lora_my.py \
  --checkpoint_dir checkpoints/tiiuae/falcon-7b/ \
  --data_dir data/falcon/ \
  --out_dir out/falcon \
  --precision bf16-true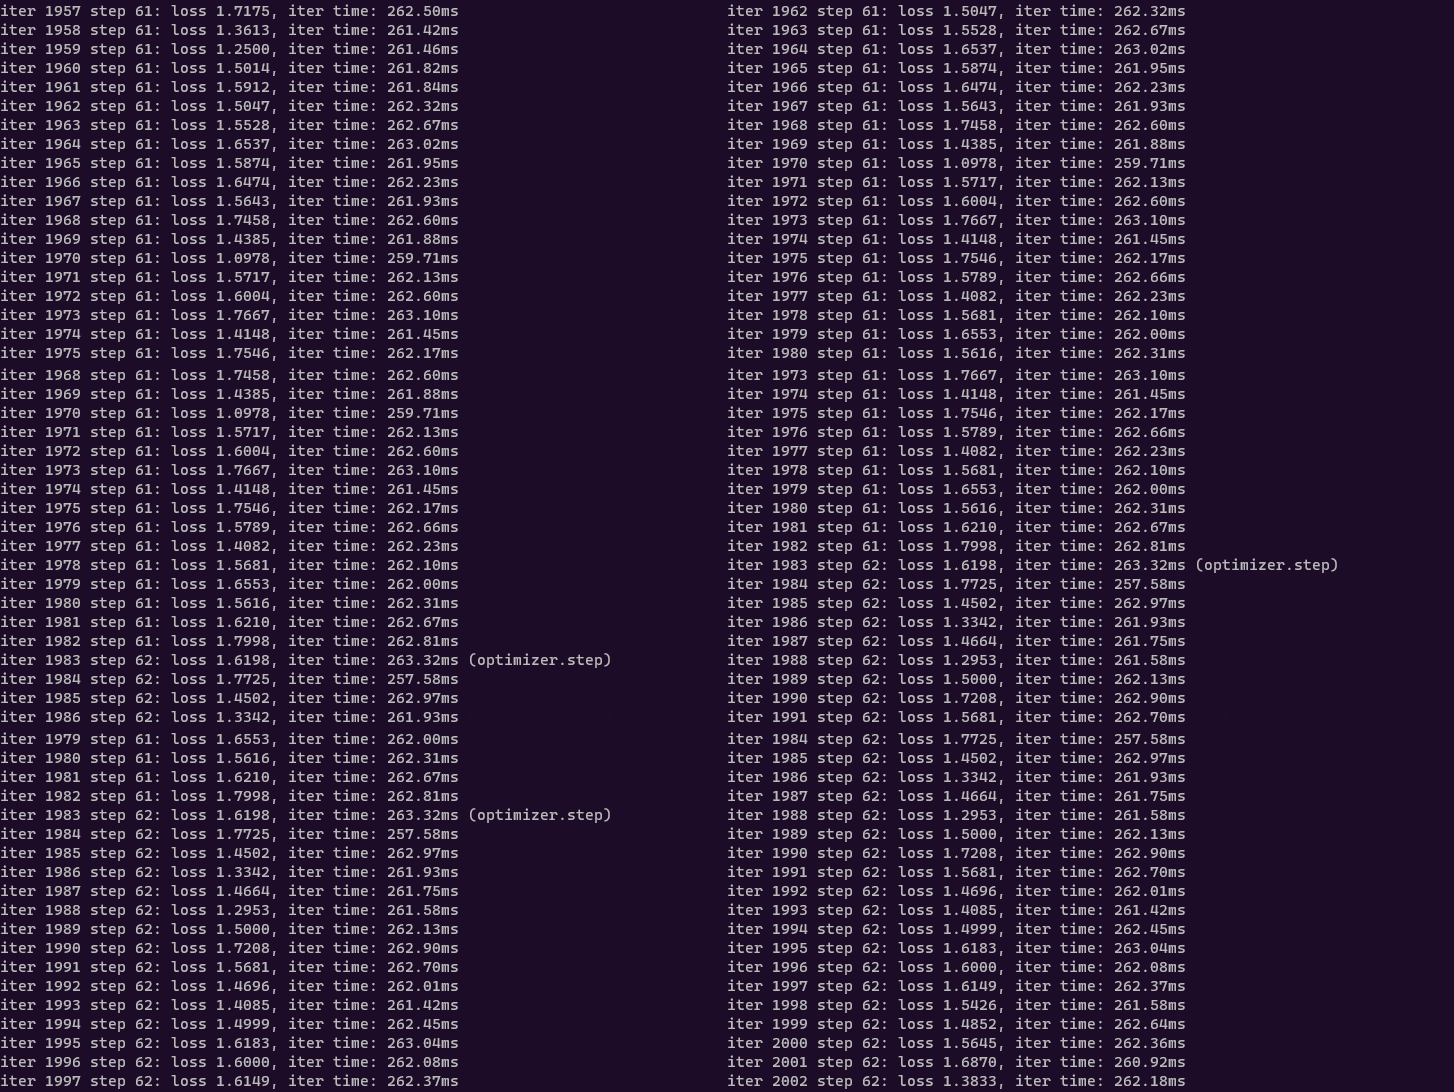
Monitoring the learning process
You can use the nvidia-smi Linux command to monitor GPU usage every half second:
watch -n 0.5 nvidia-smi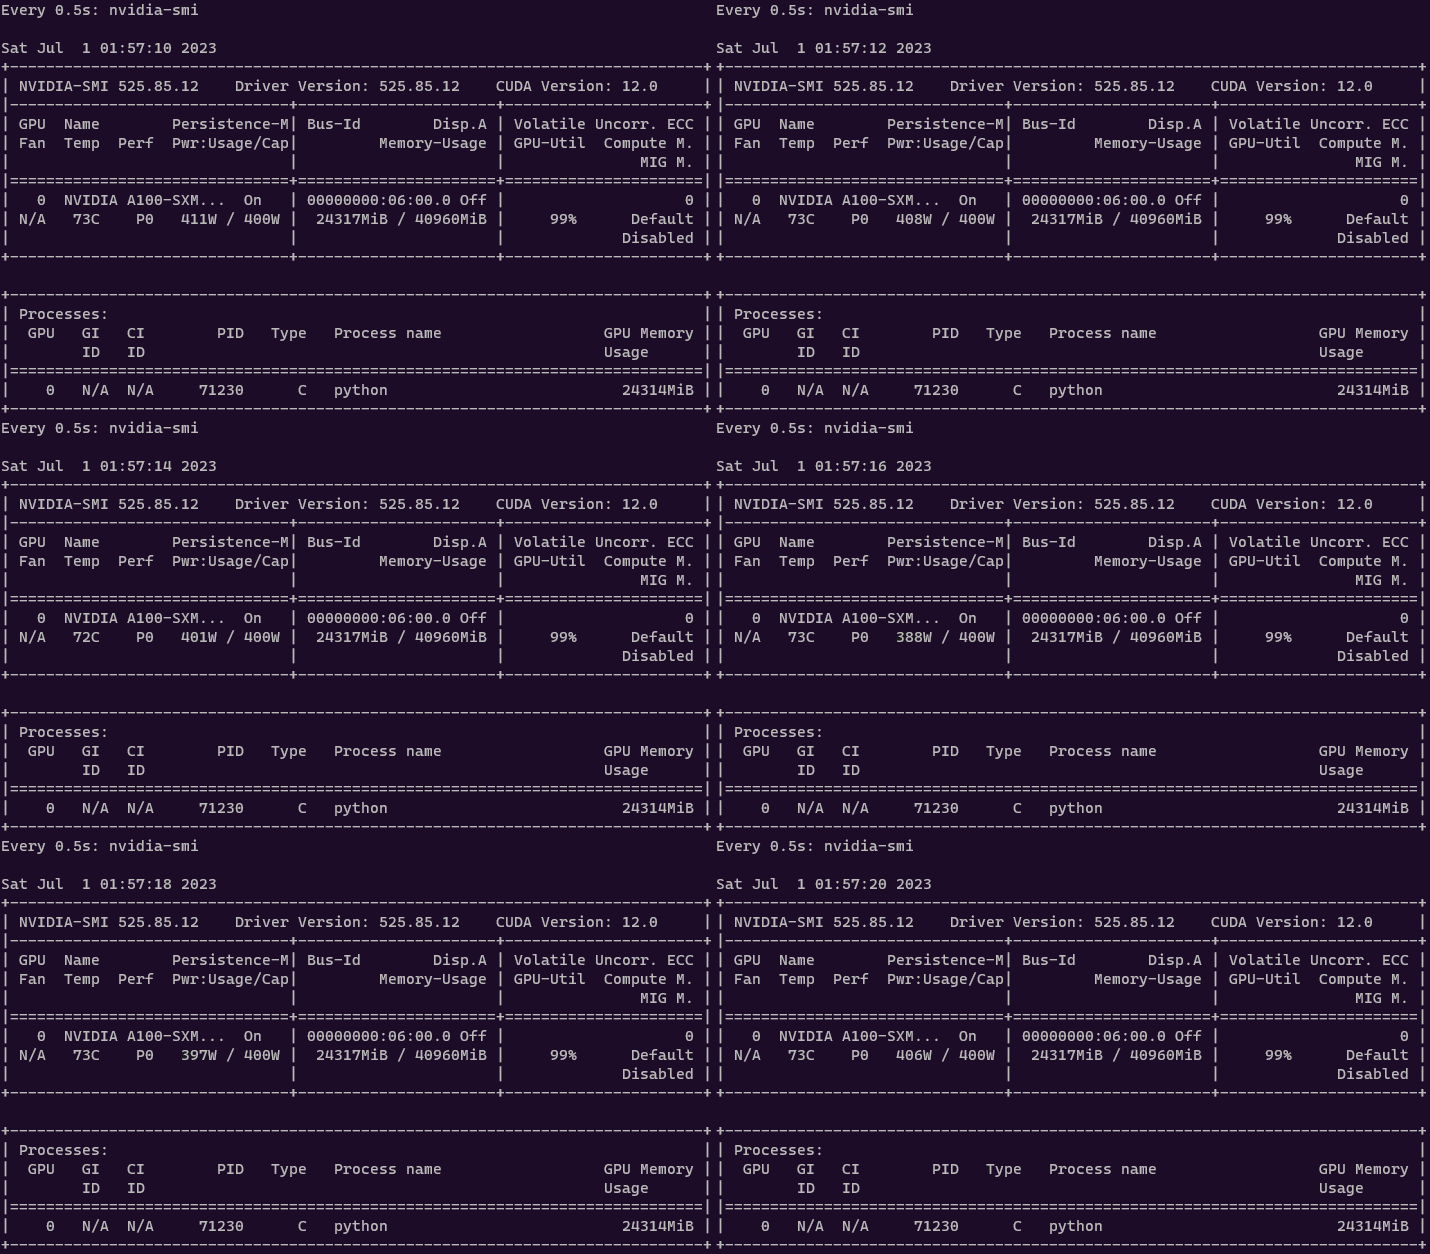
After finishing the tutorial, you can find the model’s checkpoints in the out/falcon folder and use the generation script to play around with the model.
It took me approximately 10 hours And 30 GB memory. It should be noted that the adapter itself is light, weighs only 40 MB. This is significantly less than the 16 GB Falcon model.
Trained Model Inference
To use the trained model, Lit-GPT provides ready-made scripts. You can quantize the original model (int8, int4), as well as change the precision and use multiple GPUs at the same time:
python generate/lora.py \
  --checkpoint_dir checkpoints/tiiuae/falcon-7b \
  --lora_path out/falcon/lit_model_lora_finetuned.pth \
  --prompt "What happened to you? Tell me" \
  --max_new_tokens 300
  --precision bf16-true
I ran the model on 1 GPU without quantization and with bfloat16 precision. And also changed the original lora script and divided it into two parts:
Web interface using streamlitAnd streamlit-chat for faster model testing. My version Here.
RestAPI using web framework FastAPI to output the model. This allowed the model to be loaded into memory once and then used again.
Demo:

It is important to note that this is one of the best examples I have received. The rest were noticeably worse.
The response time of the model, even without quantization, was surprisingly fast at 45.51 tokens per second. If you want to speed up text generation or minimize memory usage, I recommend checking out my previous article “7 Ways To Speed Up Inference of Your Hosted LLMs“.
Quality Comparison
Although a detailed performance test for real-world problems is beyond the scope of this article, I can share my personal observations regarding the use of fine-tuned models.
During testing, I ran into strange behavior such as unrelated text generation, random ignorance of context, and difficulty in maintaining coherent dialogue.
It seems to me that this can be fixed in several ways:
Improve your data cleansing processes to ensure higher data quality.
Include additional datasets with annotated dialogs.
Increase LoRA rank from 16 to 32.
Use a larger model such as the Falcon-40B.
Shorten or simplify the context length.
Simplify queries to provide clearer instructions.
Restrictions
Although Lit-GPT offers a lot of functionality, I recommend using it primarily for hypothesis testing. In my opinion, it is not yet fully prepared for production use. For example, at the time of this writing, Lit-GPT there was no built-in implementation to convert the model back to the HuggingFace format. However, it is still possible and the authors of the library suggest a couple of solutions:
Doing the reverse transformationi for each of the HuggingFace classes.
Creation of HF Transformer model version of
lit_gpt.model.
Note that the first method do not support modifications of LoRa and adapter.
Keep these limitations in mind when designing your solution. If you’re fine-tuning LLM for production, I recommend doing it with pure PyTorch. IN this Amazon article there is additional information.
Conclusion
The ability to fine-tune LLM with just one GPU and a few hours is really impressive. It is possible to create many small LoRa modules for different tasks. And then connect the adapters to one large deployed LLM. Considering the small size of the adapters and the speed of their learning, this advantage cannot be ignored.
However, it is important to approach the process with realistic expectations. It is likely that you will need to experiment with different hyperparameters to achieve optimal results. In addition, annotating and cleaning the dataset are important steps to ensure the best results. Also note what data LLM was trained on, and check benchmarks for tasks similar to yours.
I am sure that by following these steps you can achieve great results!
If you have any questions or suggestions feel free to contact me:


