Continent 4 Getting Started 2.0. Working with users
Welcome to the fourth article in the “Continent 4 NGFW Getting Started 2.0” series!
In the previous material, we looked at the functions and settings of the firewall, and also created basic firewall policies.
You can see all the virtual machines used in this article in the block diagram below:

AUTHENTICATION PORTAL
Setting up an authentication portal consists of 5 steps:
1 Create an authentication portal certificate
2 Create a DNS record with an authentication portal on the DNS server
3 Create an intermediate CA certificate
4 Attach the created certificates to UB
5 Activate and configure the user authentication component
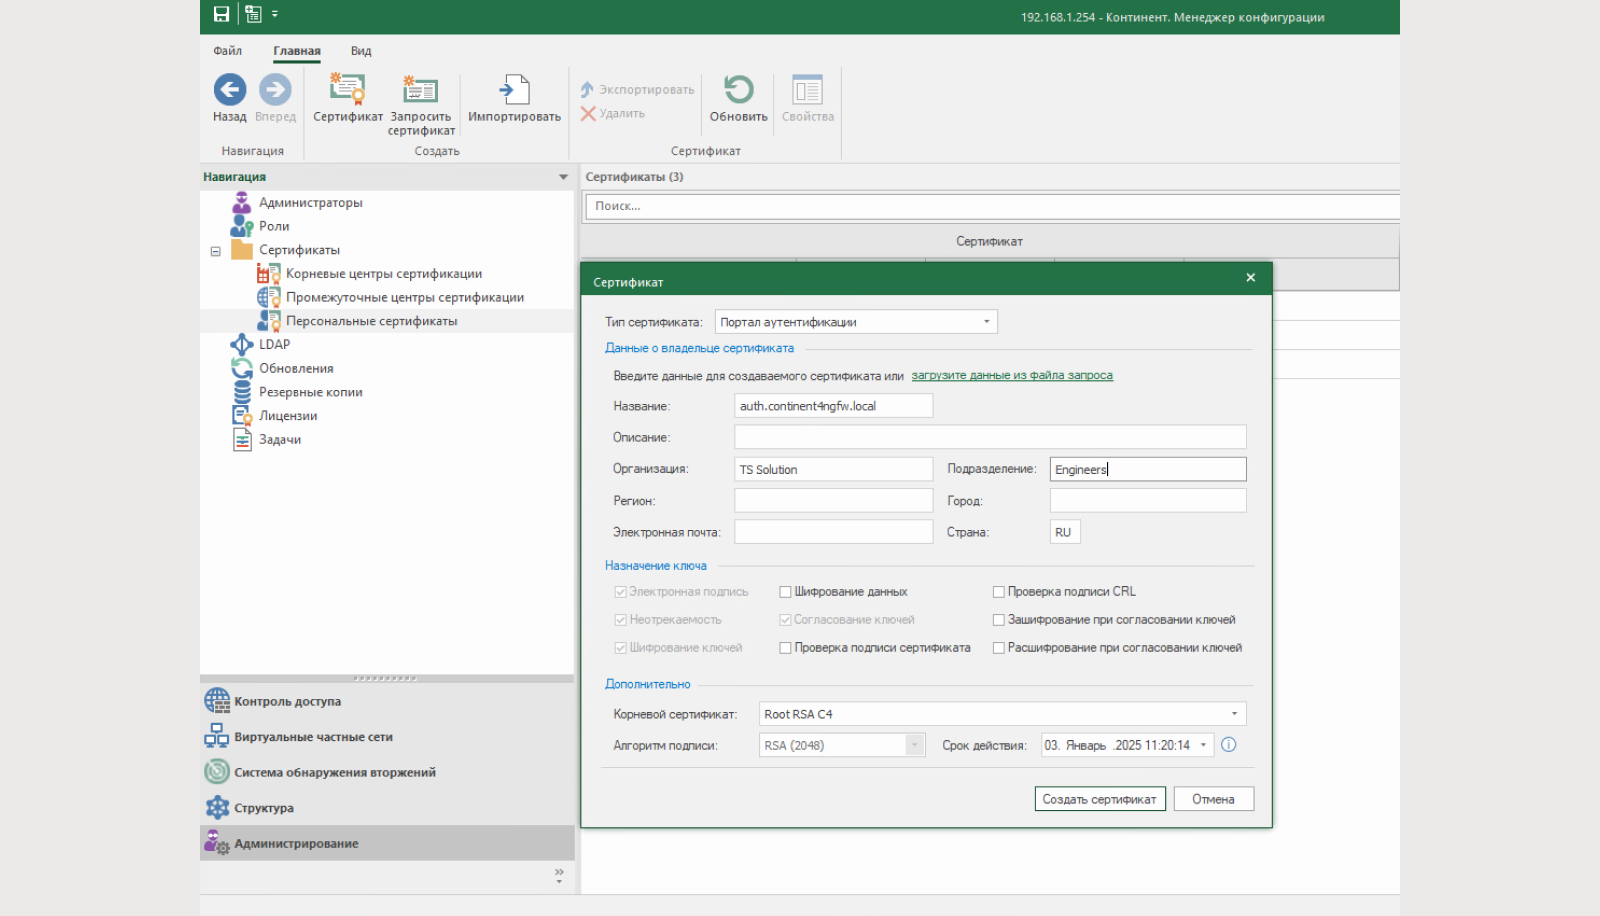
1. In the Configuration Manager, create an authentication portal certificate.
Go to the section “Administration – Personal certificates – Certificate”.
Certificate parameters:
Certificate type: authentication portal;
Name: FQDN record that will redirect to the internal interface Continent 4 NGFW;
Other fields: arbitrary;
Root certificate: Previously created RSA root certificate (2048)

2. Create a DNS record on the DNS server with an FQDN similar to the name of the certificate.

3. In the Configuration Manager, create a certificate for redirecting to the authentication portal.
Go to the section “Administration – Intermediate Certification Authorities – Intermediate Certificate”.
The certificate parameters are arbitrary; the root certificate is similar to a personal certificate.
4. We attach the created certificates to the UB.
Go to the properties of the MB (in our case, this is a MB with a central control system), the “Certificates” tab. Attach the “Authentication Portal” certificate and the “Redirect to Authentication Portal” certificate.

5. Go to the UX properties and enable the “User Identification” component.

In the “User Identification” section, enable the authentication portal. Select the node interfaces available to the identity portal (internal).
Range of forwarded addresses: LAN1 (192.168.1.0/24).

We save and set the policy.
Now, when we try to open any website from the 192.168.1.0/24 subnet, we will be automatically redirected to the authentication portal.
This means that the redirect certificate to the authentication portal is working. If the authentication portal opens: the authentication portal certificate is working.

LOCAL USERS
The authentication portal is configured and running successfully. Now we need to create users that we can authenticate on it. To do this, we will create a local user.
Let's go to the section “Access Control – List of NCC objects – Users” RMB on the free area “Create”. The menu for creating a local user will open.
Three parameters are required:
Account: user login;
Username: the first (and last) name of the created user;
Password and/or certificate as authentication method. A password is required to authenticate on the portal.


After creating the user, we will add a new rule, higher than the previously created rules for accessing the Internet from the local network of the Central Office.
Let's allow our user to open and use Telegram.

We save and set the policy.
Now you can try to log in to the authentication portal.
If successful, a notification will be displayed with the time until the end of the session and the “Exit” button.


Please note that Telegram is available to us, but access to other resources is still available. Rules are triggered not only by user matches, but also by IP addresses.

If we go to the Monitoring System and find a trigger according to the sixth rule, we will see that the user’s login is in the “Sender’s name” field.

DOMAIN USERS
Working with local users is convenient in special cases (for example, for VPN, which we will talk about later), or for VPNs with certificates (more details in the article about VPN). With a large number of users, it is much more convenient to work with domain groups. Adding groups from the AD directory is possible using the LDAP connector. Let's do it.
In the “Administration” tab, go to the “LDAP” section and then “Create an LDAP profile”:
Name: arbitrary;
Name: domain name;
Search base: search area in the domain;
User: user login with rights to read the domain;
Password and confirmation: user password;
Checkbox to enable SSL security: when you click on the checkbox, LDAPS mode (tcp/636) will be enabled. Without the checkbox enabled, LDAP mode (tcp/389) will be used;
Primary and backup LDAP servers: NetBIOS servers, address and port

Let’s add the created profile to the UX in the “Structure” tab: RMB for UB – “User Identification” – “LDAP Profile”.

We save and set the policy.
Return to the LDAP profile and click “Import LDAP groups”. If the connection to AD is successful, the LDAP group import window will appear on the screen. The imported groups will appear in the NCC Objects “Users” tab.

We import the previously created “Internet Users” group into AD and add it to the previously created rule for the local user.
Let's save and set the policy.

Go to the authorization page.
Log in using a domain account.


Let's also try to open Telegram and other resources. The rules must work successfully.

Let's turn to the monitoring system. Events associated with the telegram signature must be with the sender's name. In our case, the sender is a domain user

CONCLUSION
This concludes the fourth article. We have done a lot of work and set up an authentication portal, created a local user, looked at working with users, and added a domain group. We also looked at how the rules work with users.
Let's remember the most important points:
The authentication portal can work both for all users and for specific hosts/subnets;
We recommend that local users use certificates for VPN connections. If there are many users, we recommend using domain groups with Active Directory;
With Active Directory, you cannot “pull up” a specific user. Continent 4 NGFW operates only with domain groups.
In the next article we will look at web filtering settings in detail.
Stay with us!
All the significant news from the world of cybersecurity, practical cases of implementing and configuring solutions, as well as invitations to useful training are already waiting for you on our channels: