Continent 4 Getting Started 2.0. Intrusion detection system
We are glad to welcome all readers to the penultimate article of the series “Continent 4 NGFW Getting Started 2.0”!
In the previous article, we examined in detail the organization of a VPN network (Site-to-Site, Remote Access). And in these materials we will get acquainted with intrusion detection and prevention system.
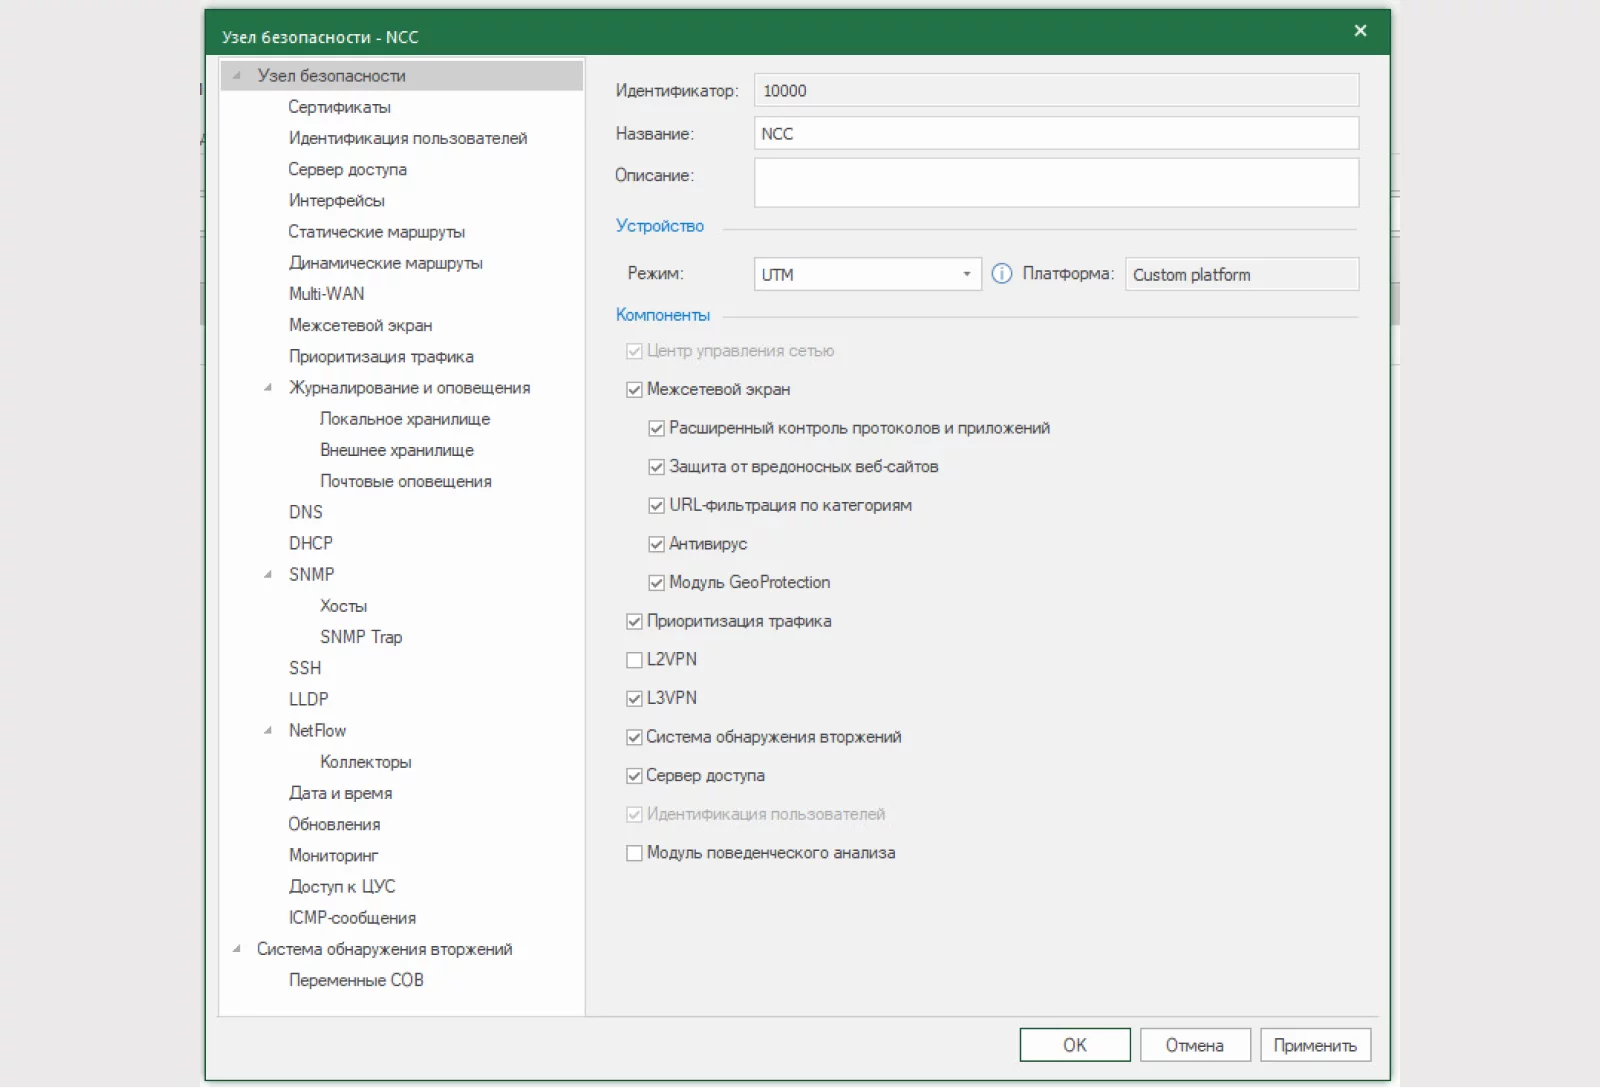
Continent 4 NGFW has the ability to inspect traffic passing through the security node for intrusions and network security breaches. To do this, the “Attack Detector” component is enabled on the UX.
The attack detector is available in two application options:
Monitor: in this mode, traffic is mirrored to the IDS component from the SPAN port of the router/UB. When an attack is detected, the attack detector will record it and send information to the central control center. In this mode it only uses detection invasions.
Inline: in this mode, the IDS component is installed “in the gap” of the network connection between the external router and the protected network. If an attack is detected, IDS records the attack and, if specified in the IDS policy, blocks malicious traffic. In this mode it can be used prevention or detection invasions.
In Continent 4 NGFW “Attack Detector” is used in two operating modes:
Attack detector as part of UTM. Traffic is first checked by the firewall and if allowed. transmitted to the OWL. Traffic analysis is carried out using the signature method.
Security node in Attack Detector mode. All traffic is immediately transferred to the IDS. Traffic analysis is carried out using the signature method + a heuristic analyzer is supported for monitoring application traffic.
Signature analysis looks for specific patterns in traffic. To do this, it is necessary to keep signatures up to date, updating the database at least once a week.
All virtual machines used in this article can be viewed in the presented block diagram:

ATTACK DETECTOR
First you need to download the decision rule bases (DRBs).
This can be done in two ways: locally and remotely from the update server. The typical file name with the BRP is “ids_update.json.gz”.
In the article on installation and configuration, we have already done this operation.
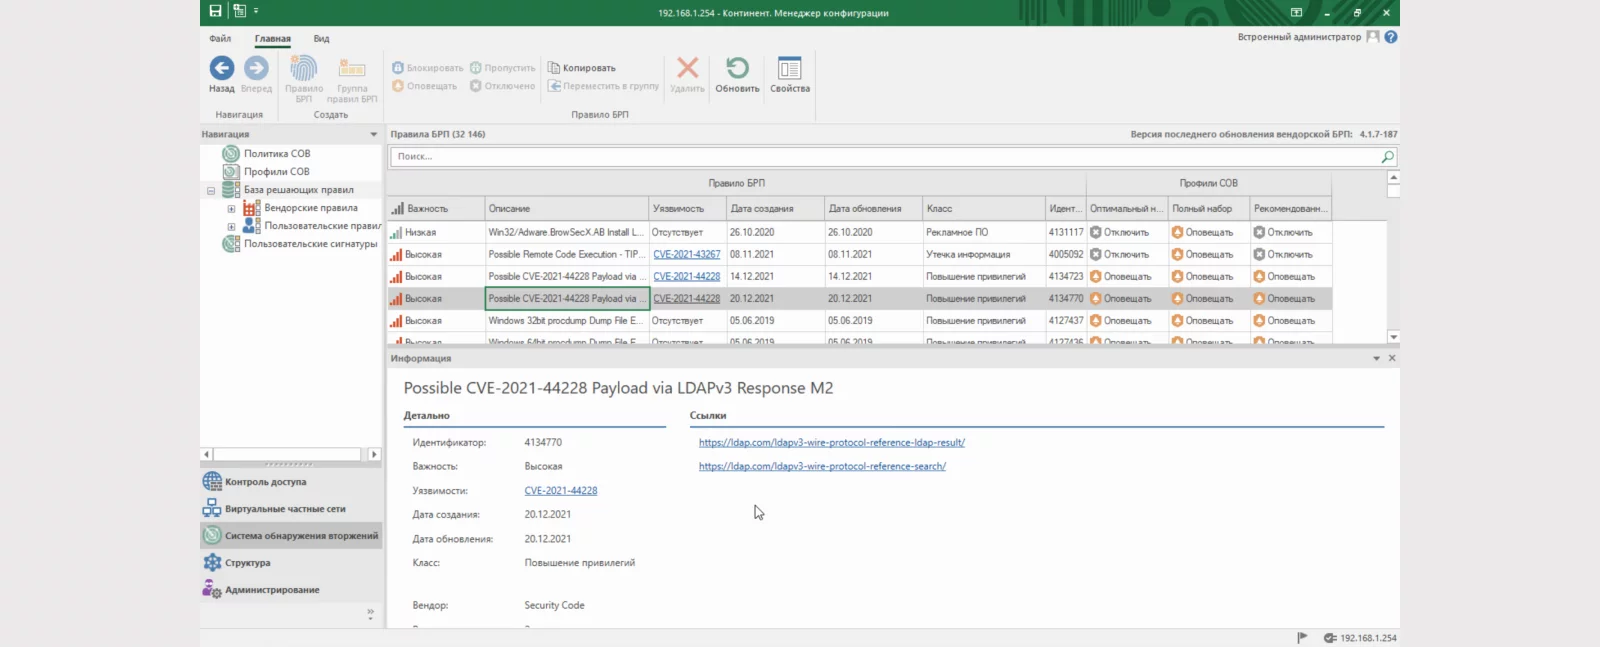
Vendor signatures are divided into the following classes:
Adware. Advertising software (banners, redirecting users to advertising sites, downloading/installing advertising content).
Elevation of privileges. An attempt was made to gain user/administrator privileges.
Backdoors. Malicious software that allows you to gain hidden unauthorized access to the system.
Vulnerable applications. Various software with vulnerabilities.
Potentially dangerous SSL certificates. Blacklist of SSL certificates used by botnet control servers.
Malicious command centers. Activity of known botnet control servers.
Cryptolockers. Malicious software designed for extortion.
Cryptominers. Malicious software for hidden generation of cryptocurrency.
DoS attacks. Attacks on a system by overloading it with a large number of requests with the goal of its failure/inaccessibility/slow operation.
Exploits. Malicious software that uses data or executable code to exploit a vulnerability on a remote system.
False antiviruses. Malicious software that masquerades as legitimate antivirus software.
Information leak. Possible data leak.
Malicious file downloaders. Malicious software that secretly downloads additional malicious components onto the system.
Malware for mobile applications. Various malicious software for mobile platforms running Android/IOS.
Network scanners. Activity of various network scanning software.
Network worms. Malicious software that has the ability to self-replicate on the network.
Phishing. Various phishing network activities.
Violation of security policy. Violation of security policy.
Shell codes. Executable code that allows you to access the command interpreter.
Spyware. Malicious software that secretly collects system/user data.
Web attacks. Network activity of various web attacks (SQL injections, XSS, etc.)
Potentially dangerous traffic. Potentially dangerous traffic.
It is also possible to create and edit custom decision rules and their groups. Any vendor rule can serve as the basis for a custom rule.
To upload your own signatures, you need to import signatures in txt format in the “Custom Signatures” tab. A maximum of 50,000 signatures can be downloaded at one time. The imported signatures will appear in the list.
If the signature passes the test, it is assigned the status “True”. Otherwise, the signature is assigned the status “Error”.

Let's activate the “Attack Detector” component and configure its parameters:
EXTERNAL_NET – $HOME_NET,
HOME_NET – remove the subnet 10.0.0.0/8;


Let's save the settings and install the policy.
Go to “Intrusion Detection System” – “IDS Profiles”. The IDS profile determines the operation of the attack detector.
By default, there are already three profiles:
We will create our new profile called “Ultimate”. We will include all available signatures in it. We will use this profile to protect the DMZ.

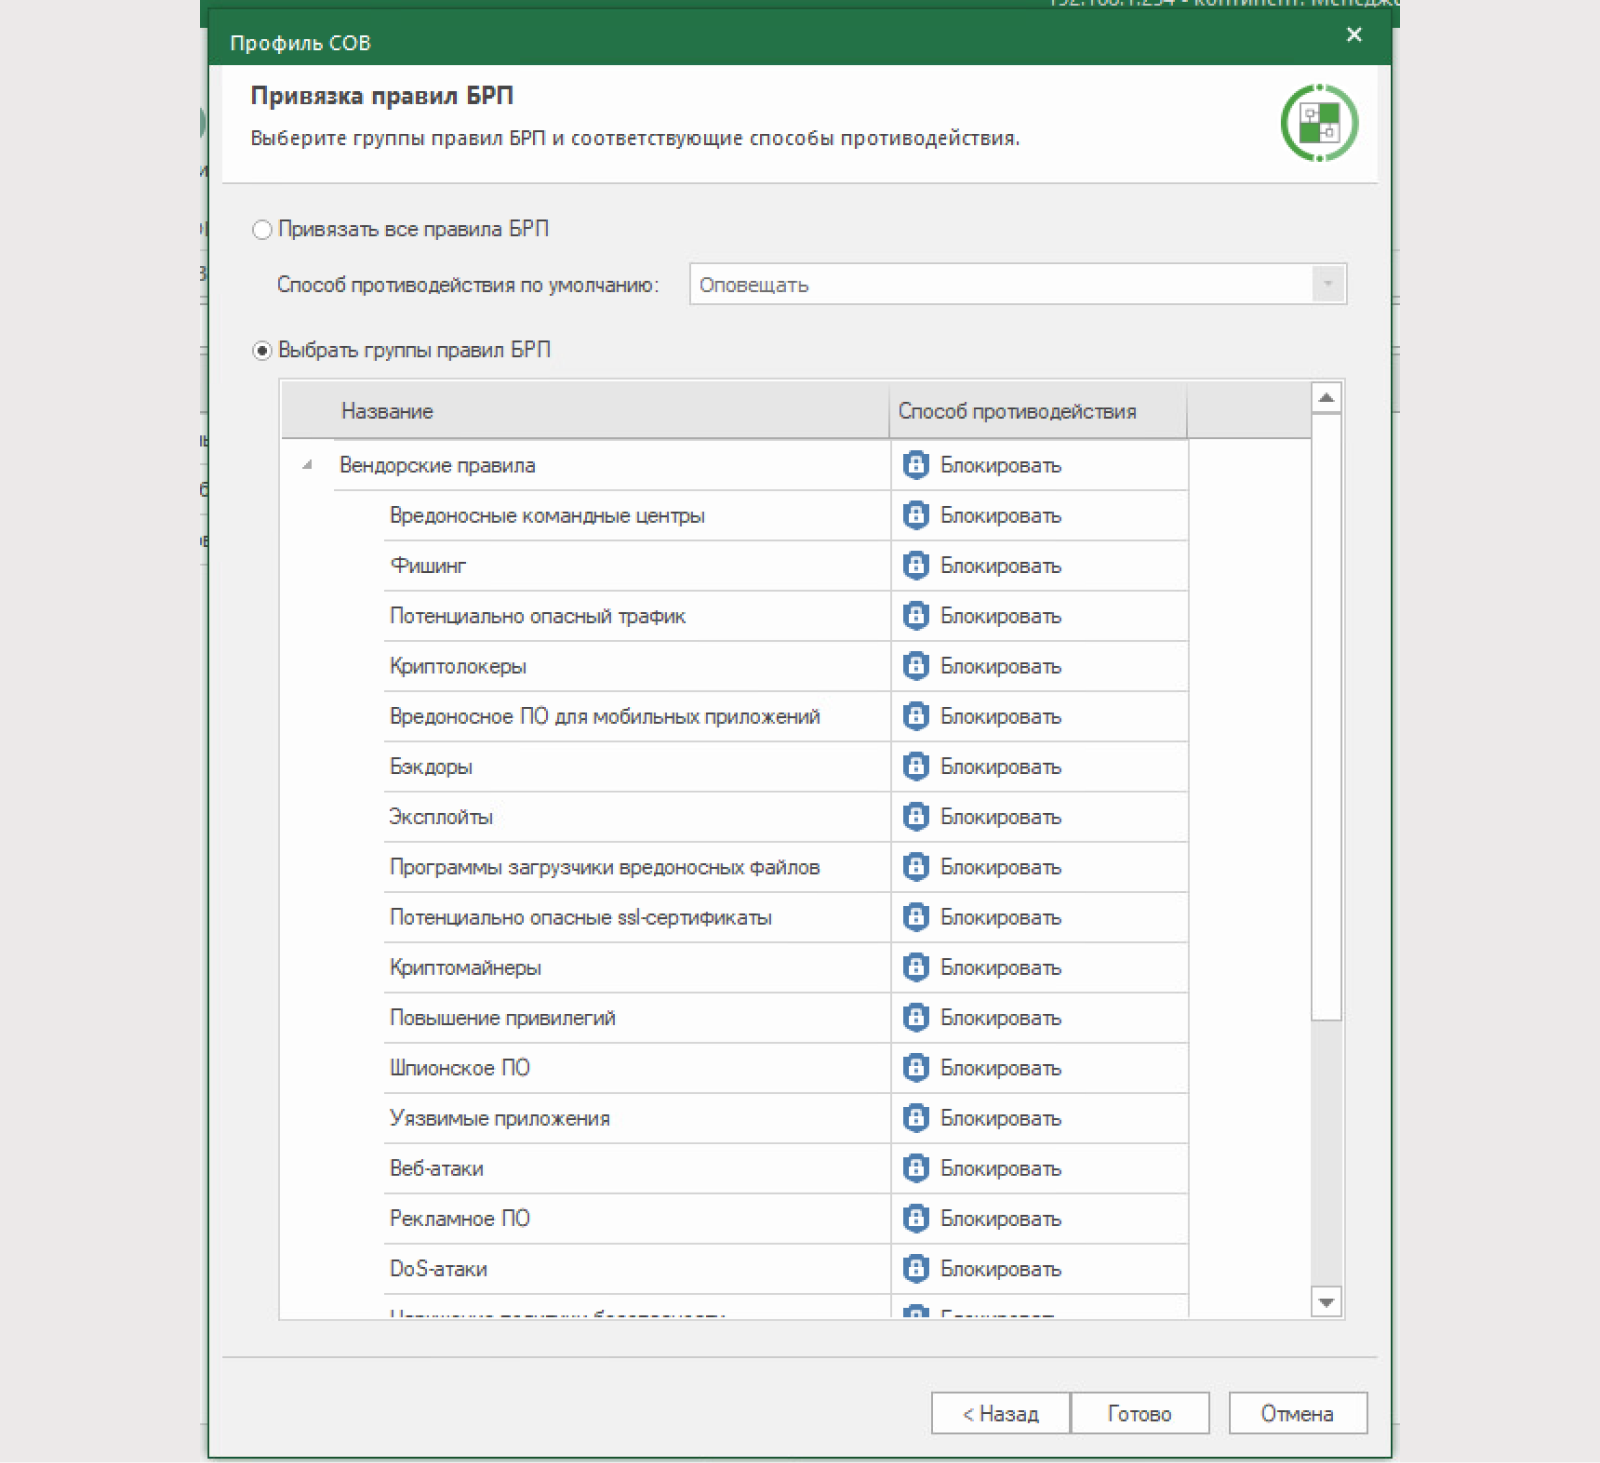
Using all signatures will increase the load on the device. You need to limit yourself to only the necessary signatures in the “block” state. Signature classes that are unlikely to be present in the infrastructure can be disabled.
If you want your profile to block signatures associated with a specific service, you must use the search bar and block signature data.

After creating profiles, you need to create a policy, i.e. a rule that determines which profile will be assigned to which attack detector. Only one IDS policy can be applied per UX.
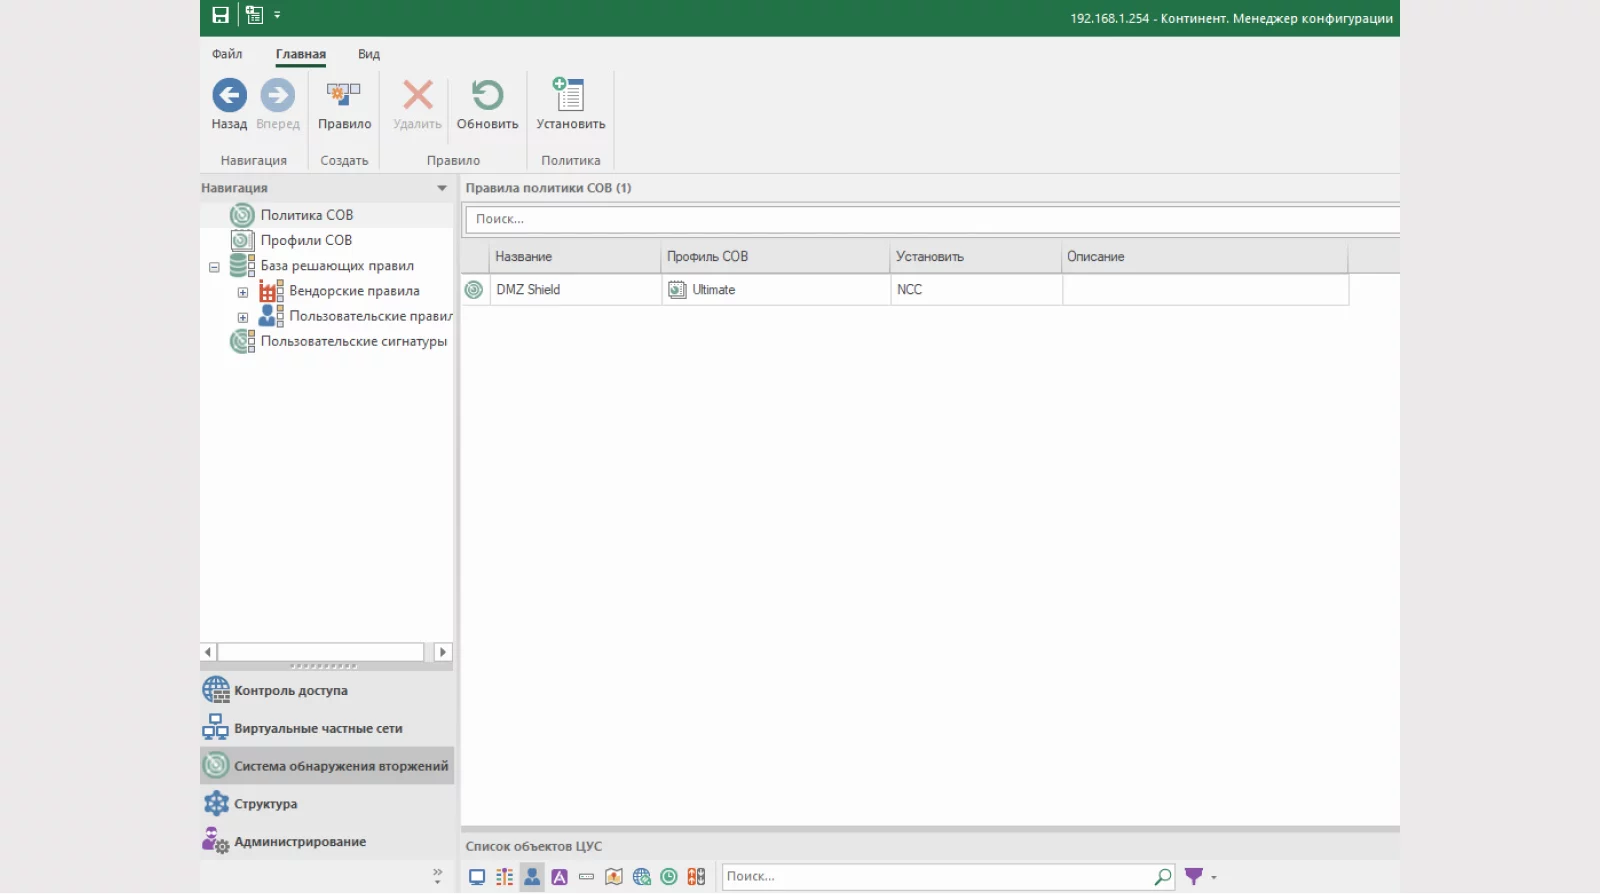
An IDS policy can be applied to specific rules on the firewall. The IDS will be applied after the traffic has been processed by the firewall. If traffic is dropped on the ME, then it no longer goes to the IDS.
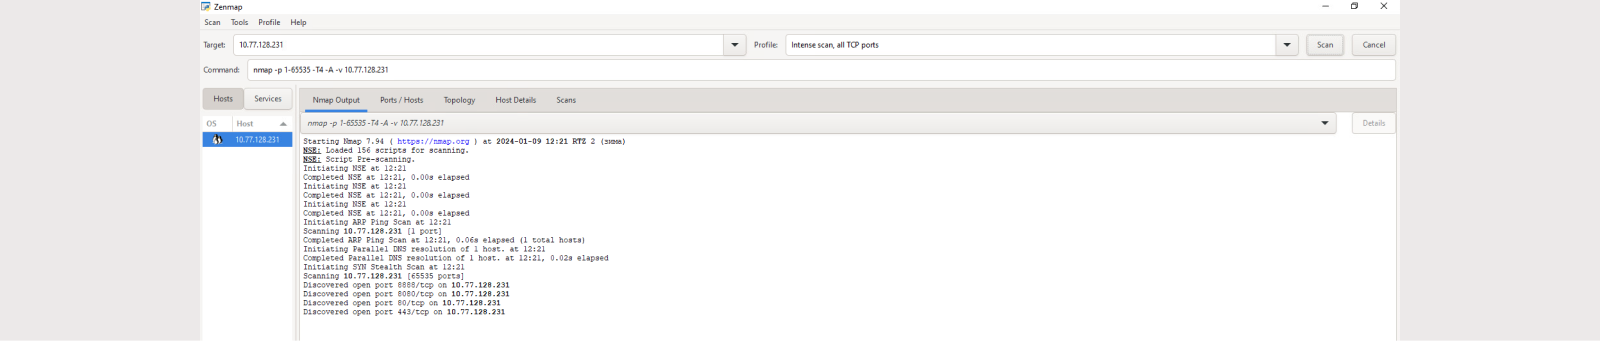
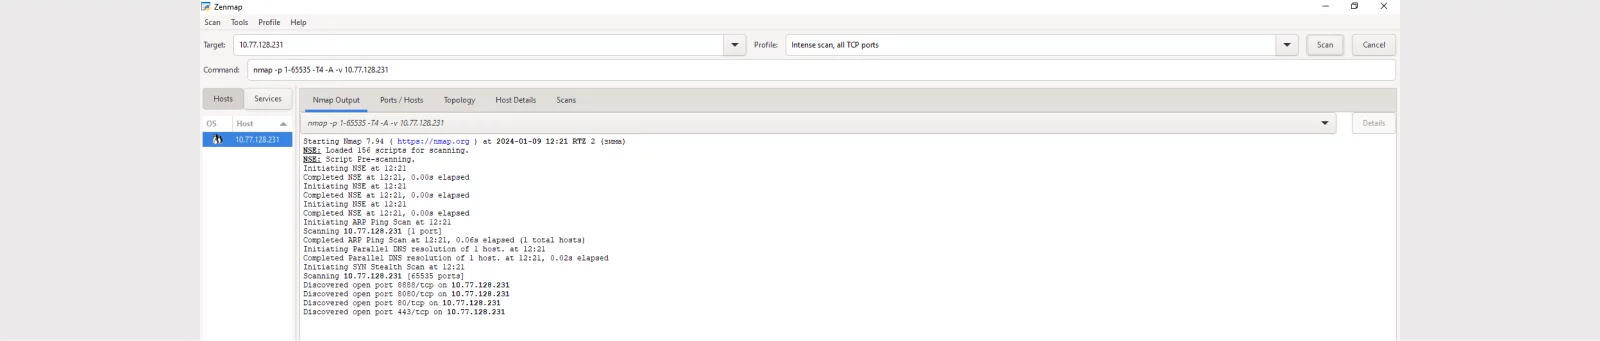
Let's start NMAP scanning in aggressive mode on the Remote user side.
Let's check the events in the Monitoring System:
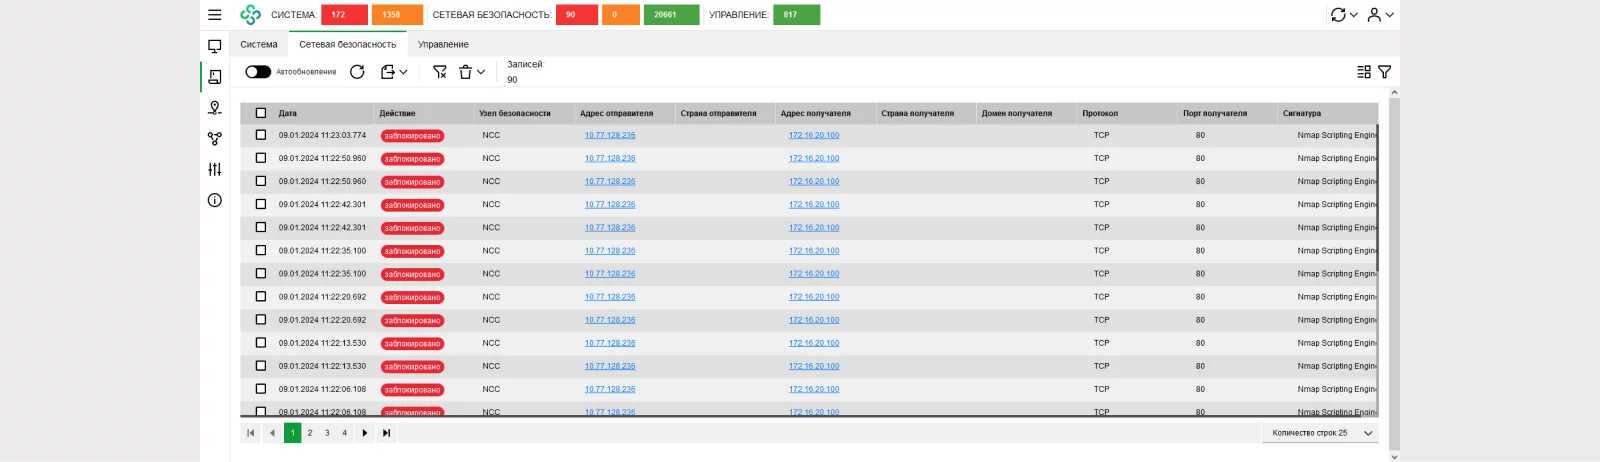
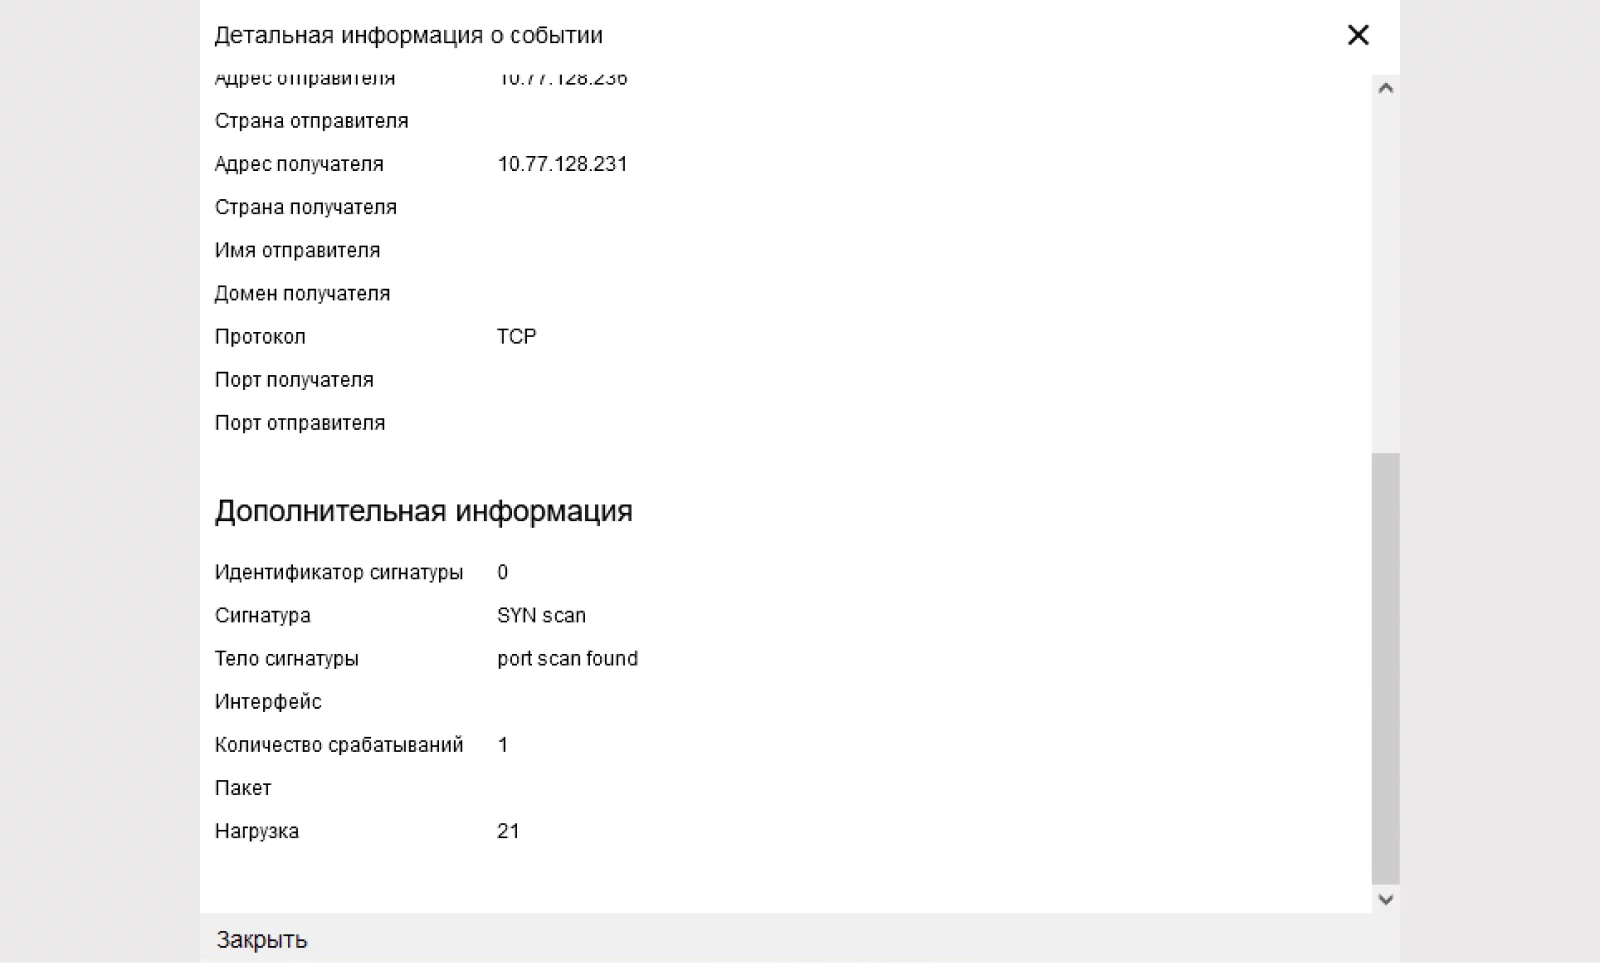
Using detailed information, you can determine the signature class and its identifier. This identifier will help you find the signature in the PDU.


BEHAVIORAL ANALYSIS MODULE
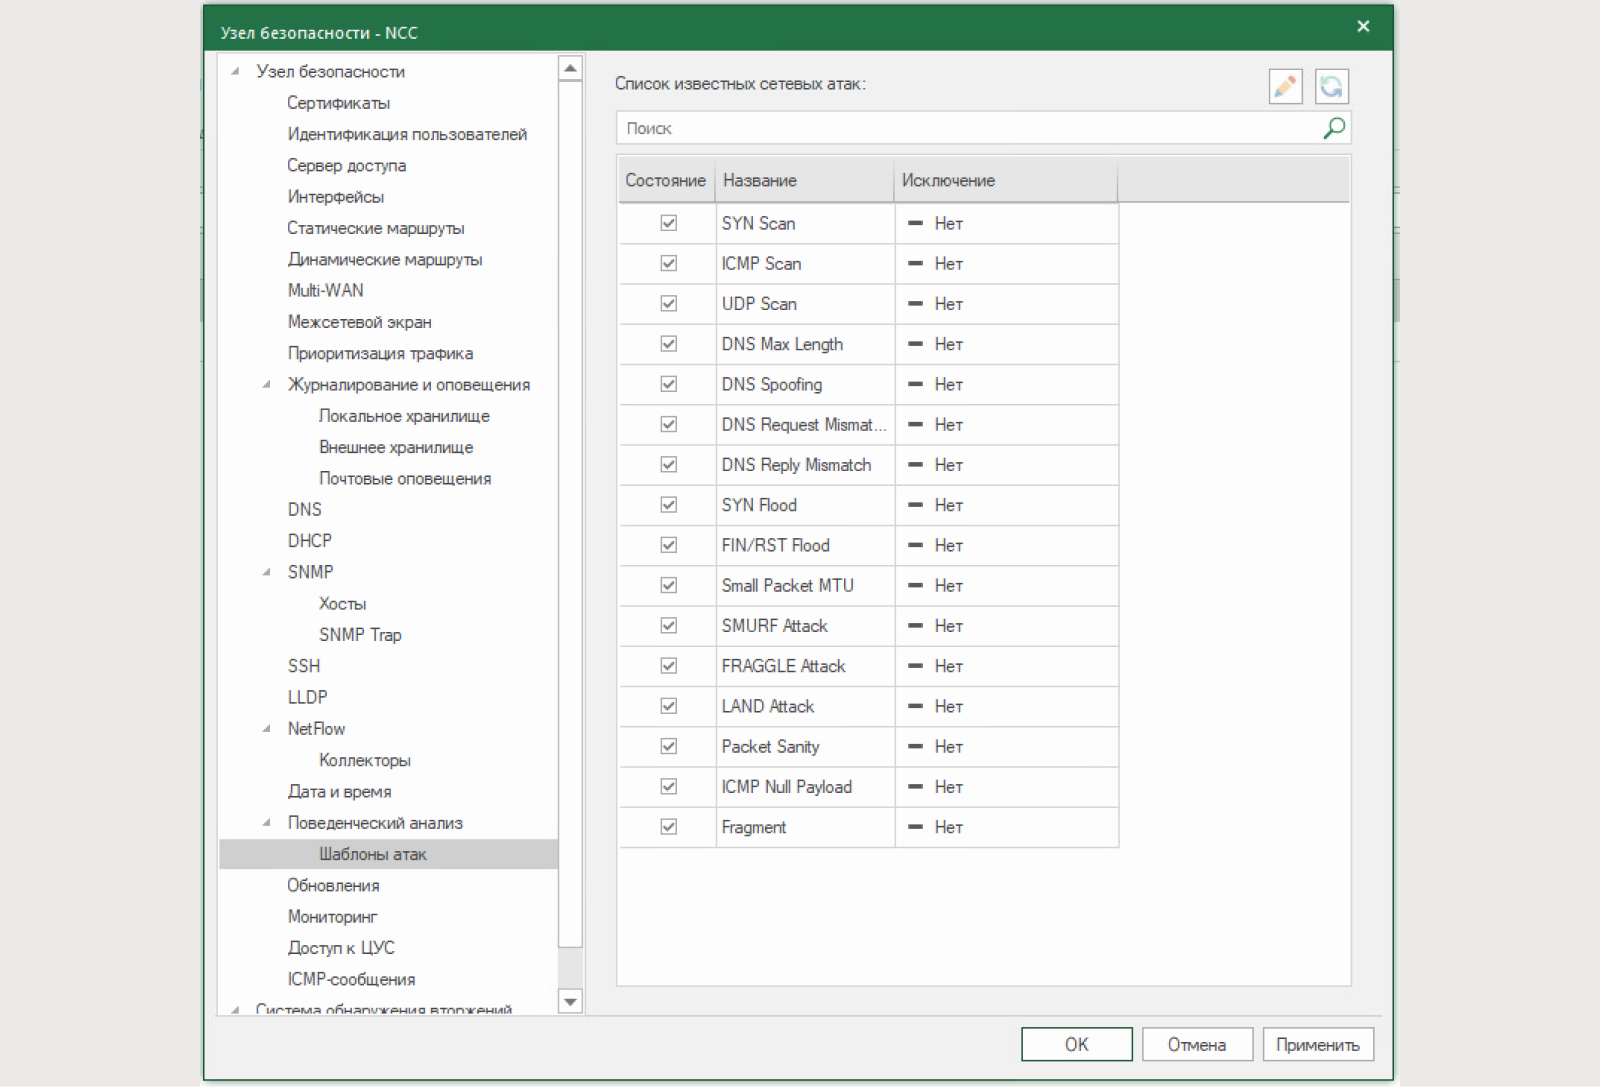
In addition to the attack detector, which detects/prevents threats, Continent 4 NGFW has a Behavioral Analysis Module component. Self-learning module for detecting network scanning attacks and denial of service (DoS) threats.
The Behavioral Analysis Module (BAM) supports the following types of attacks:
Type of attack | Description |
|---|---|
S-scan | Pattern for detecting port scanning by sending SYN packets from one IP address |
FIN/RST scanning | Port scanning detection pattern by sending FIN or RST packets from a single IP address |
ISMR scanning | Detection pattern for IPMR scanning by setting a threshold value for the number of IPMR ECHO REQUEST packets from one IP address |
UDP scanning | Pattern for detecting ICMP PORT UNREACHABLE packets sent to an IP address, setting a threshold for the number of UDP connections from that IP address |
ICMP packets consisting of only a header (Null Payload ICMP packet) | Pattern for detecting header-only ICMP packets |
DNS request/response size exceeded (DNS max length) | DNS Request/DNS Response Exceeded Maximum Size Detection Pattern |
Packet Sanity | Template for checking the correctness of packet parameters (TCP flags, non-zero ports) |
Reducing packet size (Small Packet MTU) | A pattern for detecting a DoS attack in which the attacker sends large amounts of data using small packets. Packets have a high overhead, consuming server resources |
DNS spoofing | Detection pattern for an MITm (man in the middle) attack in which domain name cache data is modified by an attacker to return a false IP address |
DNS responses that do not match (DNS mismatch) | Pattern for detecting different DNS responses to a single DNS request within a given time interval |
Incorrect DNS replies (DNS-reply mismatch) | Pattern for detecting DNS responses with a mismatched request ID or port within a specified time interval |
SYN-flood | A pattern for detecting a DoS attack in which more than a specified number of SYN packets are sent to one IP address within a specified time interval. |
SMURF attack | Pattern for detecting a fake broadcast ping request using the victim's IP address as the source IP address. All hosts on the network respond to such a request |
FIN/RST-flood | Pattern for detecting a DoS attack in which more than a specified number of FIN or RST packets are sent to a single IP address within a specified time interval |
FRAGGLE attack | Attack detection pattern similar to SMURF using spoofed UDP broadcast packets |
LAND attack | Pattern for detecting an attack in which SYN packets are sent with matching addresses of the ruler and recipient |
The module processes traffic, creates filtering rules and remembers the average load of network nodes. And if an attack is detected, it sends a command to the firewall to block traffic.
Let's activate and configure this module:


Let's run NMAP again in aggressive mode.
This mode includes a SYN-flood attack.
Let's turn to the Monitoring System. It will show that the Behavioral Analysis Module is working
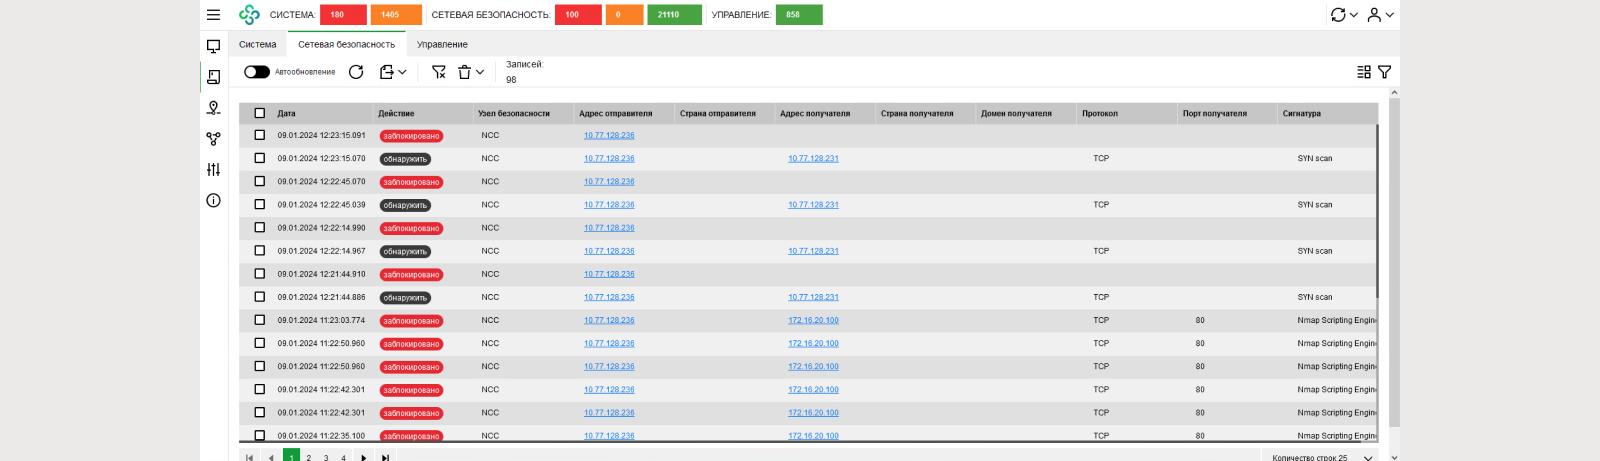
Let's open each event in more detail.
First event^ detection.
MPA saw an anomaly in traffic:

After the MPA saw an anomaly in the traffic, a decision was made to block traffic from the source of the malware.


CONCLUSION
Let's summarize the seventh article in our series: we looked at the principle of operation of the intrusion detection and prevention system, and also interacted with the behavioral analysis module.
We provide additional useful information and remind you of important points:
Using the IDPS mechanism significantly increases the load on the Security Node. It is recommended to enable only those signatures that are truly needed. Installing policies on the UX when YES is enabled can take 2-5 times longer than usual.
If large volumes of traffic need to be filtered, it is strongly recommended to use a separate device.
For MPA and DA it is necessary to check and adjust the mechanism. If it is not possible to carry out this procedure, we do not recommend deviating from the standard presets.
In the next, last article of the series, we will take a detailed look at working with the Monitoring System.
All the significant news from the world of cybersecurity, practical cases of implementing and configuring solutions, as well as invitations to useful training are already waiting for you on our channels: