also iron, but half the price
We continue our reviews of the new “hardware” series of Kincony controllers and this time we will look at its next representative – KC868-A16S. In the last review, commentators rightly noted that no matter how good the controller is, the price of 50 thousand rubles is not very humane – in this sense, the KC868-A16S looks much more attractive: outwardly it is almost indistinguishable from the AIO, has the same metal body, advanced functionality, and at the same time costs two (and in some configurations three) times cheaper.
How it turns out that the price for “almost the same thing” differs significantly and what the developers had to sacrifice we will learn from this article.
❯ KC868-A16S
First, to get an idea of what we are talking about, let’s take a look at the list of components and subsystems of the KC868-A16S:
- Microcontroller ESP-WROOM-32UE
- SMA connector and Wi-Fi antenna
- 16 digital inputs “dry contact”
- 2 analog inputs 0-5 V
- 2 analog inputs 4-20 mA
- 16 relays 250V/10A
- 16 relay status LEDs
- Built-in board with relay control buttons (16 pcs.)
- 1-Wire GPIO (for sensors)
- 3.3V power output to sensor
- RS485 interface
- 433 MHz receiver connector
- Connector for 2G/4G GSM module
- Connector for RTC module on DS3231
- Ethernet LAN8270A
- I2C interface connector
- USB Type-C connector
- Reset and Boot buttons
- Power supply from 12/24 V
- Power indicator
At first glance, there is a more than decent list of components and capabilities – many advanced automation projects can be completed on the basis of such a controller. But how does it compare to the flagship KC868-AIO? To visualize this, let’s look at the comparison table.

After analyzing this table, we can draw the following conclusions: this is really almost the same thing, the (significant) difference lies only in the number of digital and analog inputs, the lack of analog outputs in the A16S and the different organization of mosfets/relay control outputs for these controllers. The remaining differences can be considered insignificant in most cases.
Moreover, the difference in the organization of mosfets/relay outputs cannot be considered either a disadvantage or an advantage – it all depends on the requirements of a specific project.
But there are restrictions on entrances 16/2/2 for KC868-A16S and 56/11/8 for the KC868-AIO are important: if you need to service 50 digital inputs, then you won’t be able to get by with 16.
Hence the conclusion: lucky people whose requirements fit into the performance characteristics of the “younger brother” can buy the KC868-A16S at half the price of the KC868-AIO (smile).
Now let’s see what the KC868-A16S is and how it works.
❯ Package
As you remember from the previous article, one of the “tricks” of the new Kincony controllers is that the company has finally begun to properly (high-quality) package its products. In addition to aesthetic satisfaction, such packaging contributes to the safety of the electronic content of the controller during its transportation across the planet and the final three-point shots of professional players of the domestic post office.

View of the KC868-A16S right out of the box. The case has a connector for connecting a Wi-Fi antenna, and the case cover itself is attached to the base with just two screws, which subtly emphasize the brutality of this IoT solution.

Weighing the fighter before sparring gives a record result of 763 grams, and the fighter falls into the heavy category of “about a kilogram of iron.”

❯ Disassembly
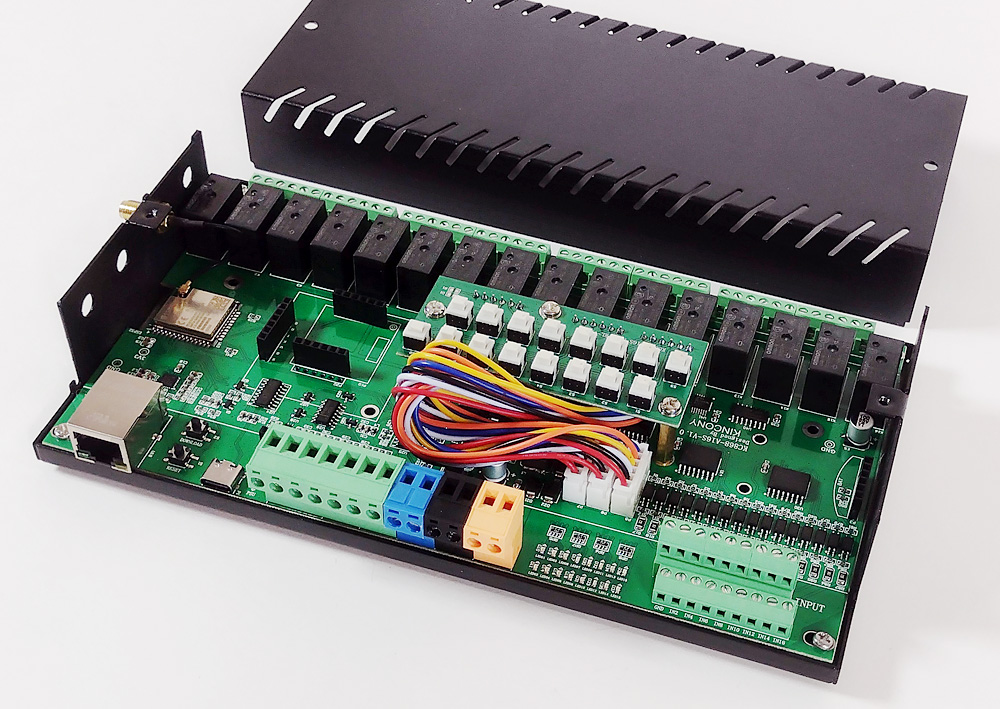
We remove the top cover and the controller remains in the metal tray. The board with 16 mysterious buttons immediately attracts attention. Which is located… yes, yes – inside the controller case! (Kinkony’s creativity is off the charts again.)

We completely get rid of the hardware of the case and free the controller board. From this angle, a bundle of multi-colored wires of noticeable thickness already attracts attention (both the bundle itself and the wires that make it up).

Button board separately. We will find out why the button board is connected to the motherboard with three connectors a little later, but for now we can admire the design sophistication in the form of two rows of buttons offset by one position (I love Kincony).

❯ Circuit design
Now let’s move on to analyzing the circuitry of the KC868-A16S and examining what and how it works. First, a top view of the main board, without the button board.

Appearance of the back side of the controller board. Everything is expected and in the usual Kincony style.

Power subsystem
The power subsystem is designed in a standard manner for Kincony. Among the unusual elements, one can note the double contacts for connecting the supply voltage 12/24 V.

ESP32
Connection diagram for ESP32 microcontroller pins from the manufacturer. As always, there are small inaccuracies that are corrected in the pinout, which I will present at the end of the article.

USB-UART
USB-UART adapter to CH340C and with USB Type-C connector for independent programming of the controller.

Digital inputs (DI)
16 digital opto-isolated “dry contact” inputs on EL357 optocouplers, distributed over two blocks. To ensure their operation in conjunction with the ESP32, digital input/output expanders with an I2C interface are used on 2 PCF8574P microcircuits.

Addresses on the I2C bus: 0x22 (DI1-8), 0x23 (DI9-16).
Analog Inputs (AI)
Everything here is very modest: two analog inputs 0-5 V and two analog inputs 0-20 mA. But you need to remember that this is modest for Kincony, and for manufacturers of other controllers such a number of analog inputs is the norm (and often there are none at all).

Relay and button board
16 relays are controlled using two digital input/output expanders with an I2C interface PCF8574P. The 74HCT14 microcircuits with inverting Schmitt triggers and ULN2003A with Darlington transistor matrices are directly servicing the relay operation.
Addresses on the I2C bus: 0x24 (relay 1-8) and 0x25 (relay 9-16).

And a few words about the additional board with 16 buttons. The manufacturer positions these buttons as a means of emergency, direct control of the relay state, bypassing software (firmware). Therefore, the board with the buttons is located inside the controller body and is not accessible from the outside during normal use.
The button board is connected to the controller using three connectors P7, P8 and P9. Why was such a strange solution used? It’s hard to say, but it would be more logical to use one connector with a large number of contacts, and, by the way, not so thick wires – there is no need to switch high-amp current there.
Sensors (1-Wire)
One pin pulled to 3.3 V for connecting sensors or a 1-Wire bus. Or any other devices connected to one GPIO. Yes, only one contact, which is very sad.

Receiver 433 MHz
The KC868-A16S circuit provides for connecting a standard module for receiving 433 MHz radio signals. Rudimentary, but maybe it will be useful to someone.

View of the receiver itself. You can buy it on Aliexpress or order it when purchasing a KC868-A16S controller.

RS485
Standard Kincony RS485 subsystem circuit.

Ethernet
Also, the Ethernet subsystem circuit on the LAN8720A is standard for Kincony.

RTC (DS3231)
The KC868-A16S controller has the ability to connect a standard real-time clock (RTC) module on the DS3231 chip.

Which is certainly a very useful feature for such a controller.

GSM 4G
The KC868-A16S provides for the connection of a GSM 2G module SIM800L or a 4G module SIM7600 (at least the KC868-AIO was able to accommodate something – it only supports a 4G module).

At one time, you can use only one of the 2G/4G module options, but not both modules at the same time.

I2C connector
A very useful connector for expanding the functionality of the KC868-A16S. For example, you can connect an I2C display module to it.

❯ Pinout
Correct ESP32 pinout with bugs and inaccuracies corrected.

❯ Connection diagram
Corrected and updated KC868-A16S wiring diagram from the manufacturer (it’s wonderful).

❯ Total
A very worthy alternative to the KC868-AIO for less money and a very worthy DIY controller in its own right. 16 digital inputs, 16 relays, Wi-Fi, Ethernet, GSM, RS485, RTC and other capabilities, plus all this in a metal case, with sane documentation and the ability to install ready-made firmware or create your own – what else does a DIY automator need to be happy?
You might also want to read this: