Add modbus to Embox RTOS and use it on STM32 and not only

We are often asked what Embox different from other microcontroller operating systems like FreeRTOS? It is, of course, correct to compare projects with each other. But the parameters by which the comparison is sometimes offered, personally plunge me into slight bewilderment. For example, how much memory does Embox need to run? What is the time to switch between tasks? Does Embox support modbus? In this article, using the example of a question about modbus, we want to show that the Embox difference is a different approach to the development process.
Let’s develop a device that will include a modbus server. Our device will be simple. After all, it is intended only for demonstration of modbus. This device will allow controlling LEDs using the Modbus protocol. To communicate with the device, we will use an ethernet connection.
Modbus open communication protocol. It is widely used in industry to organize communication between electronic devices. It can be used to transfer data via serial communication lines RS-485, RS-422, RS-232 and TCP / IP networks (Modbus TCP).
The modbus protocol is simple enough to implement on your own. But since any new implementation of the functionality may contain bugs, let’s use something ready-made.
One of the most popular implementations of the modbus protocol is an open source project libmodbus… We will use it. This will reduce development time and reduce errors. At the same time, we will be able to focus on the implementation of business logic, and not on studying the protocol.
Our project will be conducted in a separate repositories… If you wish, you can download and play everything yourself.
Linux prototype development
Let’s start by developing a prototype on the host. In order to be able to use libmodbus as a library, you need to download, configure and build it.
For this purpose, I sketched a Makefile
libmodbus-$(LIBMODBUS_VER).tar.gz:
    wget http://libmodbus.org/releases/libmodbus-$(LIBMODBUS_VER).tar.gz

$(BUILD_BASE)/libmodbus/lib/pkgconfig/libmodbus.pc : libmodbus-$(LIBMODBUS_VER).tar.gz
    tar -xf libmodbus-$(LIBMODBUS_VER).tar.gz
    cd libmodbus-$(LIBMODBUS_VER);
    ./configure --prefix=$(BUILD_BASE)/libmodbus --enable-static --disable-shared;
    make install; cd ..;
Actually, from the configuration parameters, we only use prefix to build the library locally. And since we want to use the library not only on the host, we will build a static version of it.
Now we need a modbus server. There are examples in the libmodbus project, let’s make our implementation based on some simple server.
    ctx = modbus_new_tcp(ip, port);
    header_len = modbus_get_header_length(ctx);
    query = malloc(MODBUS_TCP_MAX_ADU_LENGTH);

    modbus_set_debug(ctx, TRUE);

    mb_mapping = mb_mapping_wrapper_new();
    if (mb_mapping == NULL) {
        fprintf(stderr, "Failed to allocate the mapping: %sn",
                modbus_strerror(errno));
        modbus_free(ctx);
        return -1;
    }

    listen_socket = modbus_tcp_listen(ctx, 1);
    for (;;) {
        client_socket = modbus_tcp_accept(ctx, &listen_socket);
        if (-1 == client_socket) {
            break;
        }

        for (;;) {
            int query_len;

            query_len = modbus_receive(ctx, query);
            if (-1 == query_len) {
                /* Connection closed by the client or error */
                break;
            }

            if (query[header_len - 1] != MODBUS_TCP_SLAVE) {
                continue;
            }

            mb_mapping_getstates(mb_mapping);

            if (-1 == modbus_reply(ctx, query, query_len, mb_mapping)) {
                break;
            }

            leddrv_updatestates(mb_mapping->tab_bits);
        }

        close(client_socket);
    }
    printf("exiting: %sn", modbus_strerror(errno));

    close(listen_socket);
    mb_mapping_wrapper_free(mb_mapping);
    free(query);
    modbus_free(ctx);
Everything is standard here. A couple of places of interest are the mb_mapping_getstates and leddrv_updatestates functions. This is exactly the functionality that our device implements.
static modbus_mapping_t *mb_mapping_wrapper_new(void) {
    modbus_mapping_t *mb_mapping;
    mb_mapping = modbus_mapping_new(LEDDRV_LED_N, 0, 0, 0);

    return mb_mapping;
}

static void mb_mapping_wrapper_free(modbus_mapping_t *mb_mapping) {

    modbus_mapping_free(mb_mapping);
}

static void mb_mapping_getstates(modbus_mapping_t *mb_mapping) {
    int i;

    leddrv_getstates(mb_mapping->tab_bits);

    for (i = 0; i < mb_mapping->nb_bits; i++) {
        mb_mapping->tab_bits[i] = mb_mapping->tab_bits[i] ? ON : OFF;
    }
}
Thus, we need leddrv_updatestates, which sets the state of the LEDs, and leddrv_getstates, which gets the state of the LEDs.
static unsigned char leddrv_leds_state[LEDDRV_LED_N];

int leddrv_init(void) {
    static int inited = 0;
    if (inited) {
        return 0;
    }
    inited = 1;
    leddrv_ll_init();

    leddrv_load_state(leddrv_leds_state);
    leddrv_ll_update(leddrv_leds_state);

    return 0;
}

...
int leddrv_getstates(unsigned char leds_state[LEDDRV_LED_N]) {
    memcpy(leds_state, leddrv_leds_state, sizeof(leddrv_leds_state));
    return 0;
}

int leddrv_updatestates(unsigned char new_leds_state[LEDDRV_LED_N]) {
    memcpy(leddrv_leds_state, new_leds_state, sizeof(leddrv_leds_state));
    leddrv_ll_update(leddrv_leds_state);
    return 0;
}
Since we want our software to work both on the board and on the host, we need different implementations of the functions for setting and getting the state of the LEDs. Let’s store the state for the host in a regular file. This will allow the status of the LEDs to be obtained in other processes.
For example, if we want to check states via a website, we will launch the website and specify this file as the data source.
void leddrv_ll_update(unsigned char leds_state[LEDDRV_LED_N]) {
    int i;
    int idx;
    char buff[LEDDRV_LED_N * 2];

    for (i = 0; i < LEDDRV_LED_N; i++) {
        char state = !!leds_state[i];
        fprintf(stderr, "led(%03d)=%dn", i, state);
        buff[i * 2] = state + '0';
        buff[i * 2 + 1] = ',';
    }
    idx = open(LED_FILE_NAME, O_RDWR);
    if (idx < 0) {
        return;
    }

    write(idx, buff, (LEDDRV_LED_N * 2) - 1);

    close(idx);
}

...

void leddrv_load_state(unsigned char leds_state[LEDDRV_LED_N]) {
    int i;
    int idx;
    char buff[LEDDRV_LED_N * 2];

    idx = open(LED_FILE_NAME, O_RDWR);
    if (idx < 0) {
        return;
    }
    read(idx, buff, (LEDDRV_LED_N * 2));
    close(idx);

    for (i = 0; i < LEDDRV_LED_N; i++) {
        leds_state[i] = buff[i * 2] - '0';
    }
}
We need to specify the file where the initial state of the LEDs will be saved. The file format is simple. The states of the LEDs are listed separated by commas, 1 – LED is on, and 0 – off. Our device has 80 LEDs, more precisely 40 pairs of LEDs. Let’s assume that by default the even LEDs will be off and the odd ones on. File contents
0,1,0,1,0,1,0,1,0,1,0,1,0,1,0,1,0,1,0,1,0,1,0,1,0,1,0,1,0,1,0,1,0,1,0,1,0,1,0,1,0,1,0,1,0,1,0,1,0,1,0,1,0,1,0,1,0,1,0,1,0,1,0,1,0,1,0,1,0,1,0,1,0,1,0,1,0,1,0,1We start the server
./led-server
led(000)=0
led(001)=1
...
led(078)=0
led(079)=1
Now we need a client to manage our device. It is also very easy to develop it based on an example from libmodbus
ctx = modbus_new_tcp(ip, port);
    if (ctx == NULL) {
        fprintf(stderr, "Unable to allocate libmodbus contextn");
        return -1;
    }

    modbus_set_debug(ctx, TRUE);
    modbus_set_error_recovery(ctx,
            MODBUS_ERROR_RECOVERY_LINK |
            MODBUS_ERROR_RECOVERY_PROTOCOL);

    if (modbus_connect(ctx) == -1) {
        fprintf(stderr, "Connection failed: %sn",
                modbus_strerror(errno));
        modbus_free(ctx);
        return -1;
    }


    if (1 == modbus_write_bit(ctx, bit_n, bit_value)) {
        printf("OKn");
    } else {
        printf("FAILEDn");
    }

    /* Close the connection */
    modbus_close(ctx);
    modbus_free(ctx);
We launch the client. Install 78 LED, which is off by default
./led-client set 78
Connecting to 127.0.0.1:1502
[00][01][00][00][00][06][FF][05][00][4E][FF][00]
Waiting for a confirmation...
<00><01><00><00><00><06><FF><05><00><4E><FF><00>
OK
On the server we will see:
...
led(076)=0
led(077)=1
led(078)=1
led(079)=1
Waiting for an indication...
ERROR Connection reset by peer: read
That is, the LED is installed. Let’s turn it off.
./led-client clr 78
Connecting to 127.0.0.1:1502
[00][01][00][00][00][06][FF][05][00][4E][00][00]
Waiting for a confirmation...
<00><01><00><00><00><06><FF><05><00><4E><00><00>
OK
On the server we will see a message about the change:
...
led(076)=0
led(077)=1
led(078)=0
led(079)=1
Waiting for an indication...
ERROR Connection reset by peer: read
Let’s start the http server. We talked about website development in the article. In addition, we only need the website for a more convenient demonstration of how modbus works. Therefore, I will not go into much detail. I will immediately give a cgi script:
#!/bin/bash

echo -ne "HTTP/1.1 200 OKrn"
echo -ne "Content-Type: application/jsonrn"
echo -ne "Connection: closern"
echo -ne "rn"

if [ $REQUEST_METHOD = "GET" ]; then
    echo "Query: $QUERY_STRING" >&2
    case "$QUERY_STRING" in
        "c=led_driver&a1=serialize_states")
            echo [ $(cat ../emulate/conf/leds.txt) ]
            ;;
        "c=led_driver&a1=serialize_errors")
            echo [ $(printf "0, %.0s" {1..79}) 1 ]
            ;;
        "c=led_names&a1=serialize")
            echo '[ "one", "two", "WWWWWWWWWWWWWWWW", "W W W W W W W W " ]'
            ;;
    esac
elif [ $REQUEST_METHOD = "POST" ]; then
    read -n $CONTENT_LENGTH POST_DATA
    echo "Posted: $POST_DATA" >&2
fi
And let me remind you that you can start using any http server with CGI support. We are using python’s built-in server. Run with the following command:
python3 -m http.server --cgi -d .Let’s open our website in a browser:
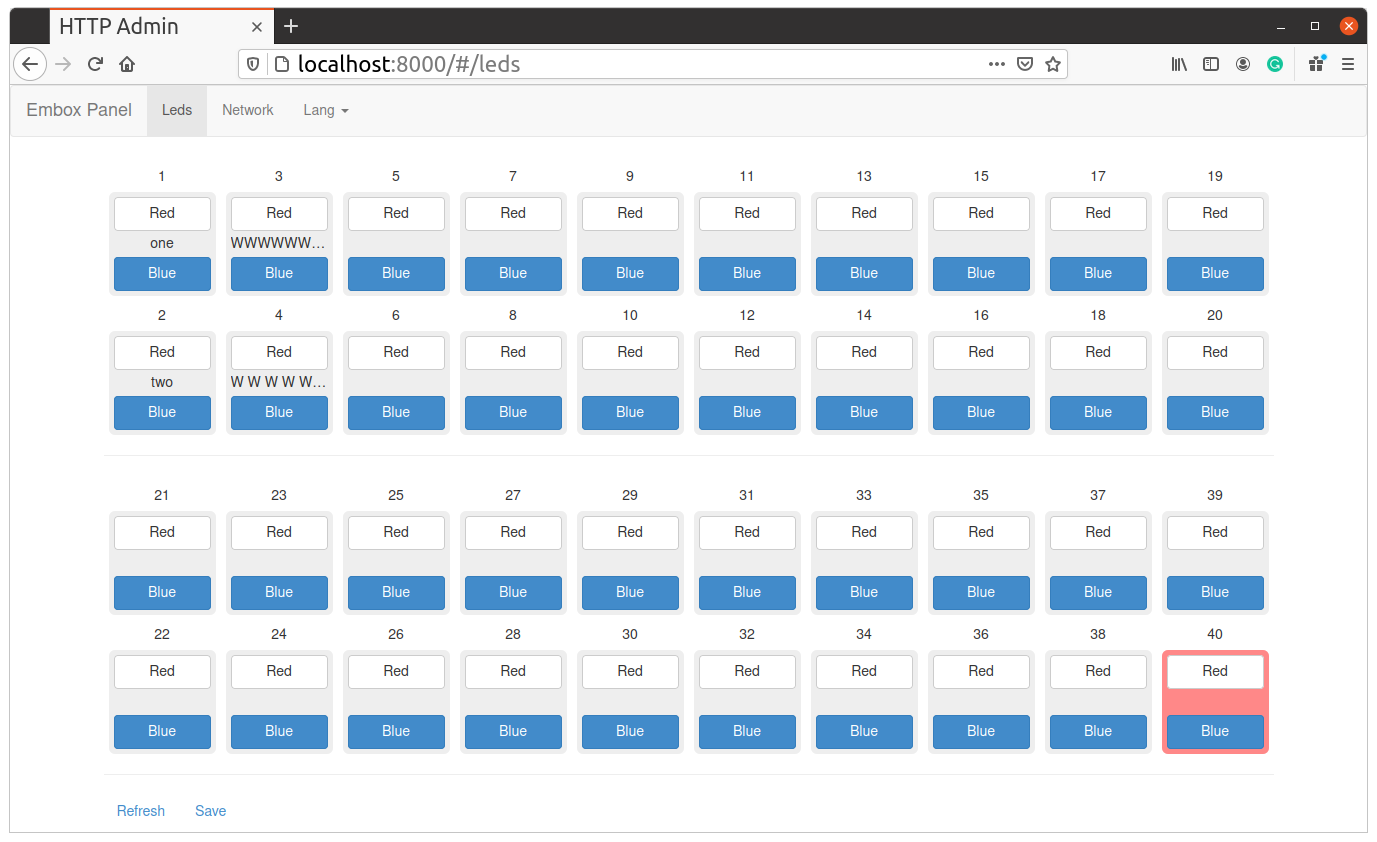
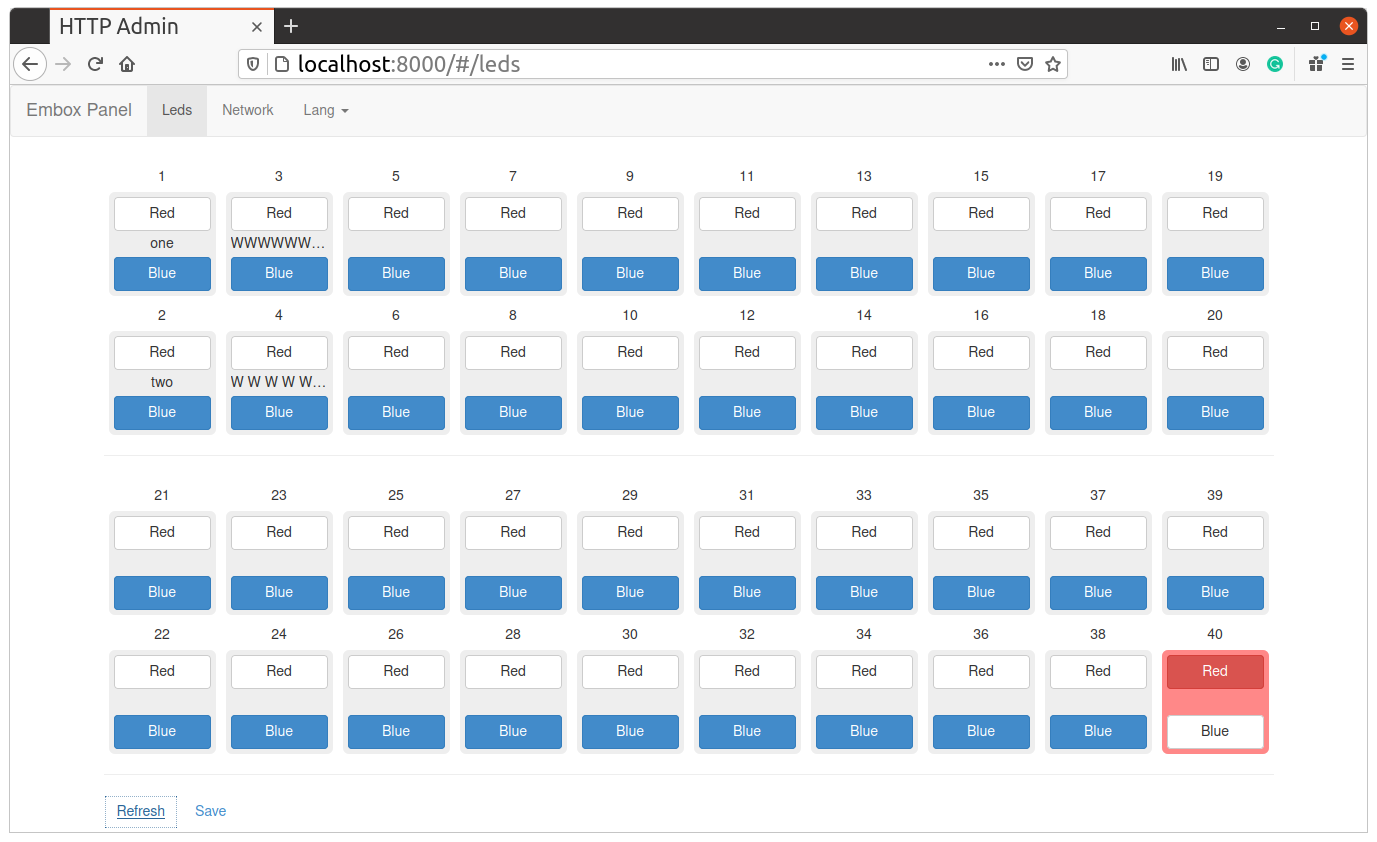
Install 78 LEDs using the client:
./led-client -a 127.0.0.1 set 78
Connecting to 127.0.0.1:1502
[00][01][00][00][00][06][FF][05][00][4E][FF][00]
Waiting for a confirmation...
<00><01><00><00><00><06><FF><05><00><4E><FF><00>
OK
reset the 79 LED:
./led-client -a 127.0.0.1 clr 79
Connecting to 127.0.0.1:1502
[00][01][00][00][00][06][FF][05][00][4F][00][00]
Waiting for a confirmation...
<00><01><00><00><00><06><FF><05><00><4F><00><00>
OK
Let’s see the difference on the website:
Actually, our library works great on Linux.
Adaptation to Embox and run on the emulator
Libmodbus library
Now we need to move the code to Embox. let’s start with the libmodbus project itself.
It’s simple. We need a description of the module (Mybuild):
package third_party.lib

@Build(script="$(EXTERNAL_MAKE)")
@BuildArtifactPath(cppflags="-I$(ROOT_DIR)/build/extbld/third_party/lib/libmodbus/install/include/modbus")
module libmodbus {
    @AddPrefix("^BUILD/extbld/^MOD_PATH/install/lib")
    source "libmodbus.a"

    @NoRuntime depends embox.compat.posix.util.nanosleep
}
We are using annotation Build (script = “$ (EXTERNAL_MAKE)”) we indicate that we use the Makefile to work with external projects.
Using annotation BuildArtifactPath add paths for searching for header files to those modules that will depend on this library.
And we say that we need a library source “libmodbus.a”
PKG_NAME := libmodbus
PKG_VER  := 3.1.6

PKG_SOURCES := http://libmodbus.org/releases/$(PKG_NAME)-$(PKG_VER).tar.gz
PKG_MD5     := 15c84c1f7fb49502b3efaaa668cfd25e

PKG_PATCHES := accept4_disable.patch

include $(EXTBLD_LIB)

libmodbus_cflags = -UHAVE_ACCEPT4

$(CONFIGURE) :
    export EMBOX_GCC_LINK=full;
    cd $(PKG_SOURCE_DIR) && (
        CC=$(EMBOX_GCC) ./configure --host=$(AUTOCONF_TARGET_TRIPLET)
        prefix=$(PKG_INSTALL_DIR)
        CFLAGS=$(libmodbus_cflags)
    )
    touch $@

$(BUILD) :
    cd $(PKG_SOURCE_DIR) && (
        $(MAKE) install MAKEFLAGS='$(EMBOX_IMPORTED_MAKEFLAGS)';
    )
    touch $@
The build makefile is also simple and straightforward. The only thing I note is that we use the internal compiler ($ (EMBOX_GCC) ) Embox and as a platform (–host) we pass the one that is set in Embox ($ (AUTOCONF_TARGET_TRIPLET)).
We connect the project to Embox
Let me remind you that for the convenience of development, we have created a separate repository. In order to connect it to Embox, it is enough to tell Embox where the external project is located.
This is done using the command
make ext_conf EXT_PROJECT_PATH=<path to project> at the root of Embox. For instance,
make ext_conf EXT_PROJECT_PATH=~/git/embox_project_modbus_iocontrolmodbus-server
The modbus server source code does not require any changes. That is, we are using the same code that we developed on the host. We need to add Mybuild:
package iocontrol.modbus.cmd

@AutoCmd
@Build(script="true")
@BuildDepends(third_party.lib.libmodbus)
@Cmd(name="modbus_server")
module modbus_server {
    source "modbus_server.c"

    @NoRuntime depends third_party.lib.libmodbus
}
In which, with the help of annotations, we indicate that this is our command, and also that it depends on the libmodbus library.
We will also need emulation libraries. I will not give Mybuild for them, they are trivial, just note that the sources are also used without changes.
We also need to build our system together with a modbus server.
Add our modules to mods.conf:
    include iocontrol.modbus.http_admin
    include iocontrol.modbus.cmd.flash_settings
    include iocontrol.modbus.cmd.led_names
    include third_party.lib.libmodbus
    include iocontrol.modbus.cmd.modbus_server
    include iocontrol.modbus.cmd.led_driver

    include embox.service.cgi_cmd_wrapper(cmds_check=true, allowed_cmds="led_driver led_names flash_settings")

    include iocontrol.modbus.lib.libleddrv_ll_stub
And we put our leds.txt file with LED statuses into the root file system. But since we need a mutable file, let’s add a RAM disk and copy our file to that disk. System_start.inc content:
"export PWD=/",
"export HOME=/",
"netmanager",
"service telnetd",
"service httpd http_admin",
"ntpdate 0.europe.pool.ntp.org",
"mkdir -v /conf",
"mount -t ramfs /dev/static_ramdisk /conf",
"cp leds.txt /conf/leds.txt",
"led_driver init",
"service modbus_server",
"tish",
This is enough to run Embox on qemu:
./scripts/qemu/auto_qemumodbus and httpd servers start automatically at startup. Let’s set the same values using the modbus client, only by specifying the address of our QEMU (10.0.2.16):
./led-client -a 10.0.2.16 set 78
Connecting to 10.0.2.16:1502
[00][01][00][00][00][06][FF][05][00][4E][FF][00]
Waiting for a confirmation...
<00><01><00><00><00><06><FF><05><00><4E><FF><00>
OK
and correspondingly
./led-client -a 10.0.2.16 clr 79
Connecting to 10.0.2.16:1502
[00][01][00][00][00][06][FF][05][00][4F][00][00]
Waiting for a confirmation...
<00><01><00><00><00><06><FF><05><00><4F><00><00>
Let’s open a browser:

As expected, everything is the same. We can control the device via modbus protocol already on Embox.
Running on a microcontroller
To run on a microcontroller, we will use STM32F4-discovery. In the above screenshots of the browser pages, you can see that 80 legs of output are used, combined in pairs, and you can also notice that these pairs have other properties, for example, you can set a name, or the pair can be highlighted. In fact, the code was taken from a real project and unnecessary parts were removed from it for simplicity. 80 output pins were obtained using additional shift register ICs.
But there are only 4 LEDs on the STM32F4-discovery board. It would be convenient to set the number of LEDs in order not to modify the source code. Embox has a mechanism that allows you to parameterize modules. You need to add the option in the module description (Mybuild)
package iocontrol.modbus.lib

static module libleddrv {
    option number leds_quantity = 80
...
}
And it will be possible to use in the code
#ifdef __EMBOX__
#include <framework/mod/options.h>
#include <module/iocontrol/modbus/lib/libleddrv.h>
#define LEDDRV_LED_N OPTION_MODULE_GET(iocontrol__modbus__lib__libleddrv,NUMBER,leds_quantity)
#else
#define LEDDRV_LED_N 80
#endif
In this case, you can change this parameter by specifying it in the mods.conf file
include iocontrol.modbus.lib.libleddrv(leds_quantity=4)if the parameter is not specified, then the one specified in the module by default is used, that is, 80.
We still need to manage the real output lines. The code is as follows:
struct leddrv_pin_desc {
    int gpio; /**< port */
    int pin; /**< pin mask */
};

static const struct leddrv_pin_desc leds[] = {
    #include <leds_config.inc>
};


void leddrv_ll_init(void) {
    int i;
    for (i = 0; i < LEDDRV_LED_N; i++) {
        gpio_setup_mode(leds[i].gpio, leds[i].pin, GPIO_MODE_OUTPUT);
    }
}

void leddrv_ll_update(unsigned char leds_state[LEDDRV_LED_N]) {
    int i;

    for (i = 0; i < LEDDRV_LED_N; i++) {
        gpio_set(leds[i].gpio, leds[i].pin,
                leds_state[i] ? GPIO_PIN_HIGH : GPIO_PIN_LOW);
    }
}
In the mods.conf file, we need the configuration for our board. We add our modules to it:
    include iocontrol.modbus.http_admin
    include iocontrol.modbus.cmd.flash_settings
    include iocontrol.modbus.cmd.led_names
    include third_party.lib.libmodbus
    include iocontrol.modbus.cmd.modbus_server
    include iocontrol.modbus.cmd.led_driver

    include embox.service.cgi_cmd_wrapper(cmds_check=true, allowed_cmds="led_driver led_names flash_settings")

    include iocontrol.modbus.lib.libleddrv(leds_quantity=4)
    include iocontrol.modbus.lib.libleddrv_ll_stm32_f4_demo
In fact, the same modules as for ARM QEMU, with the exception of the driver, of course.
We collect, flash, launch. And with the help of the same modbus client, we control the LEDs. You just need to put the correct address, and do not forget that we have only 4 LEDs on the board.
The work on the stm32f4-discovery board can be seen in this short video: