Zabbix under lock and key: enable security options for Zabbix components for access from inside and outside
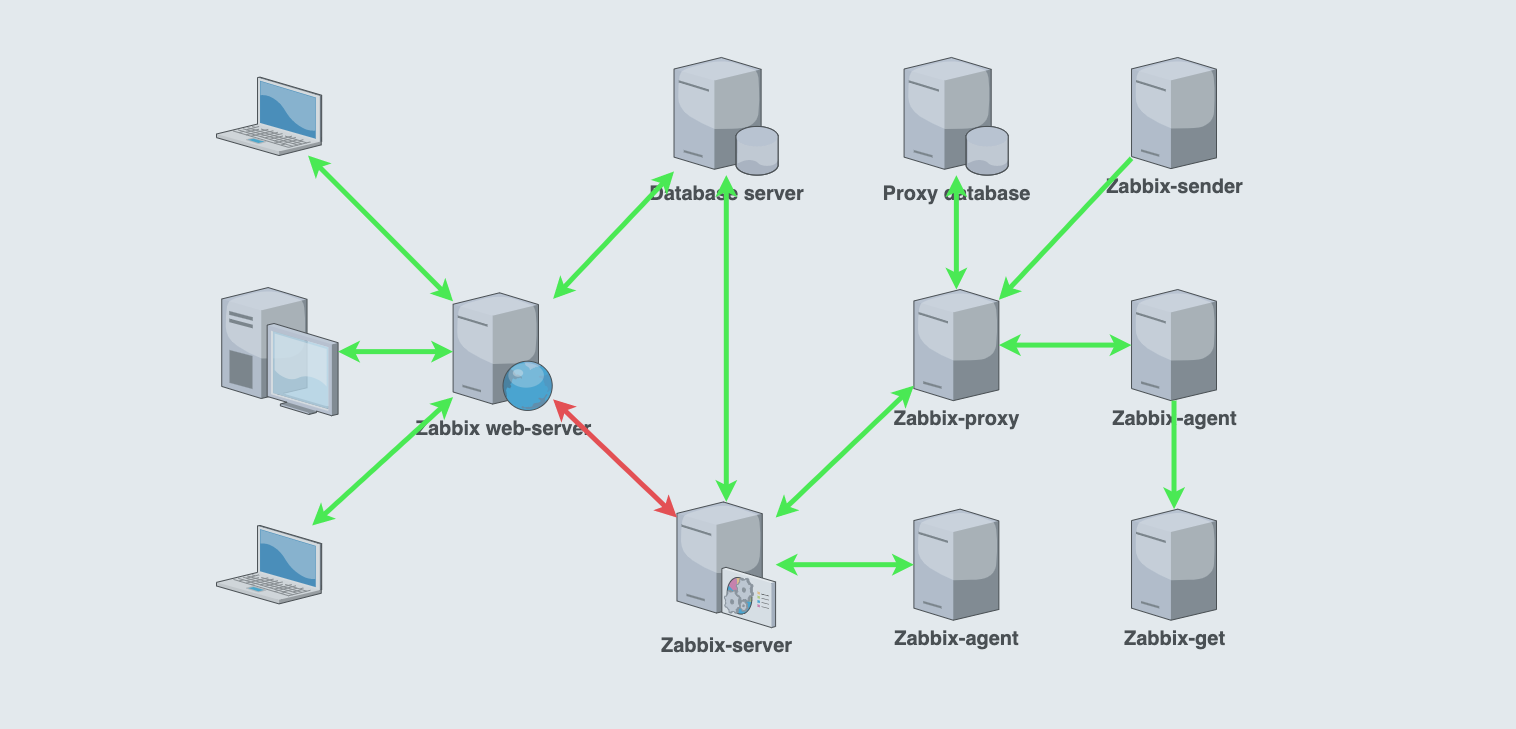
The diagram shows that almost all streams inside Zabbix can be encrypted. In this article, we will tell and show you how to do this, and also talk about the new Zabbix integration with the Hashicorp Vault secrets store. There you can store any sensitive information from login / password in the database to macro values. This will allow you to centrally manage authorization data, conduct auditing and not store them on the file system or in the Zabbix database. Such functionality appeared in the latest (at the time of publication of the article) version of Zabbix 5.2.
Interesting fact: enabling encryption on Zabbix components does not require opening additional ports on firewalls, Zabbix daemons support encrypted and unencrypted connections at the same time.
Zabbix has the following main information flows:
- User (web browser) <-> Zabbix web server. Zabbix configuration management, metrics view. Encryption is configured by means of a web server.
- Zabbix web server <-> Zabbix server. The web server checks if the Zabbix server is running, queries the current state of the queue, performs item tests and some other operations. The only stream that cannot be encrypted according to the Zabbix architecture. We won’t even try.
- Zabbix web server <-> Zabbix database. The web server updates the configuration in the database, retrieves data for visualization, deletes historical data (by clicking on Clear the history) and runs tasks Run now (Execute now). Can be configured during installation or later in the zabbix.conf.php configuration file. TLS key encryption is supported. You can use Vault to store the login and password for the database. Important Fact: Password protected certificates are not supported.
- Zabbix server <-> Zabbix database. The Zabbix server loads the configuration into its cache via the configuration syncer, writes the collected data to the database via the history syncer, clears the history (housekeeping) and performs some other operations. Encryption settings are performed by assigning values to special keys in the zabbix_server.conf configuration file.
- Zabbix server <-> Zabbix agent. Shared PSK and certificates are supported. The interaction of these components is divided into two parts: to the host (TLSAccept for passive checks) and from the host (TLSConnect for active checks).
- Zabbix server <-> Zabbix proxy. Shared PSK and certificates are supported. Settings are performed by assigning values to special keys in the zabbix_proxy.conf configuration file.
- Zabbix proxy <-> Zabbix agent. Shared PSK and certificates are supported. The interaction of these components is divided into two parts: to the host (TLSAccept for passive checks) and from the host (TLSConnect for active checks).
- Zabbix proxy <-> Zabbix proxy database. Settings are performed by assigning values to special keys in the zabbix_proxy.conf configuration file.
- Zabbix sender -> Zabbix proxy. Shared PSK and certificates are supported as parameters when invoked from the command line.
- Zabbix agent -> Zabbix get. Shared PSK and certificates are supported as parameters when invoked from the command line.
User (web browser) <-> Zabbix web server
Encryption of this communication is not supported by Zabbix, you need to configure it yourself on the Apache or Nginx side. In this article, we will look at configuring Nginx with a self-signed SSL certificate. we mainly use Nginx in our monitoring projects based on Zabbix. You can use a certificate from a trusted CA, such as the free one from Let’s Encrypt. This will avoid dreaded browser warnings. Please note that using a self-signed certificate does not diminish the reliability of the encrypted connection in any way, it will be as secure as when using a certificate from a trusted CA.
# mkdir -p /etc/ssl/private/

# chmod 0750 /etc/ssl/private

# openssl req

> -newkey rsa:2048 -nodes -keyout /etc/ssl/private/zabbix.key

> -x509 -days 365 -out /etc/ssl/certs/zabbix.crt

> -subj "/C=RU/ST=Russia/L=Moscow/O=Gals/OU=Gals_Dev/CN=gals.software/emailAddress=welcome@gals.software"

# chmod 0400 /etc/ssl/certs/zabbix.crt

# chmod 0400 /etc/ssl/private/zabbix.key

# mv /etc/nginx/conf.d/zabbix.conf /etc/nginx/conf.d/zabbix-ssl.conf

# vi /etc/nginx/conf.d/zbx-ssl.conf

listen 443 ssl default_server;

ssl on;

ssl_certificate /etc/ssl/certs/zabbix.crt;

ssl_certificate_key /etc/ssl/private/zabbix.key;

# vi /etc/nginx/conf.d/zabbix.conf

server {

listen 80;

return 301 https://$host$request_uri;

}

# systemctl restart nginx
A “lock” will appear in the browser and you can see the details of the certificate. The connection is encrypted.
Zabbix web server <-> Zabbix database
Before starting configuration on the Zabbix side, users and roles with attributes requiring encrypted connection must be created in the database.
mysql> CREATE USER
'zabbix_srv'@'%' IDENTIFIED WITH mysql_native_password BY '<strong_password>',
'zabbix_web'@'%' IDENTIFIED WITH mysql_native_password BY '<strong_password>'
REQUIRE SSL
PASSWORD HISTORY 5;
mysql> CREATE ROLE 'zabbix_srv_role', 'zabbix_web_role';
mysql> GRANT SELECT, UPDATE, DELETE, INSERT, CREATE, DROP, ALTER, INDEX, REFERENCES ON zabbix.* TO 'zabbix_srv_role';
mysql> GRANT SELECT, UPDATE, DELETE, INSERT ON zabbix.* TO 'zabbix_web_role';
mysql> GRANT 'zabbix_srv_role' TO 'zabbix_srv'@'%';
mysql> GRANT 'zabbix_web_role' TO 'zabbix_web'@'%';
mysql> SET DEFAULT ROLE 'zabbix_srv_role' TO 'zabbix_srv'@'%';
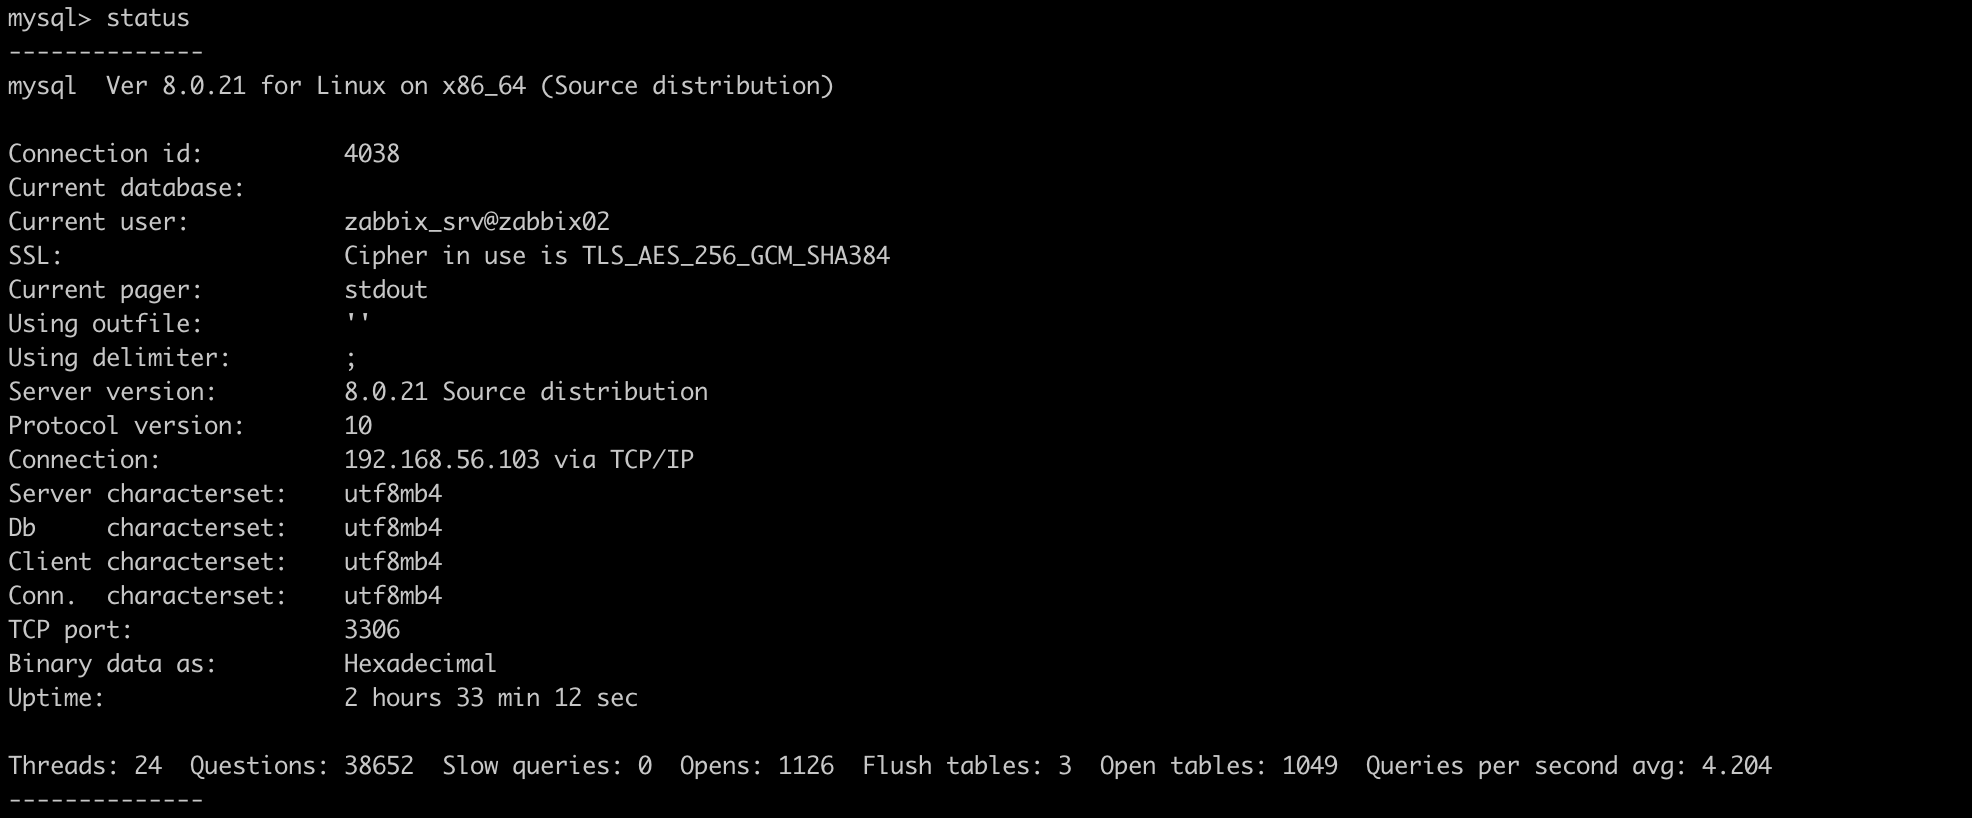
mysql> SET DEFAULT ROLE 'zabbix_web_role' TO 'zabbix_web'@'%';Calling the status will return, among other things, data on the encryption settings. Let’s make sure that the encryption algorithms are specified in the SSL line.
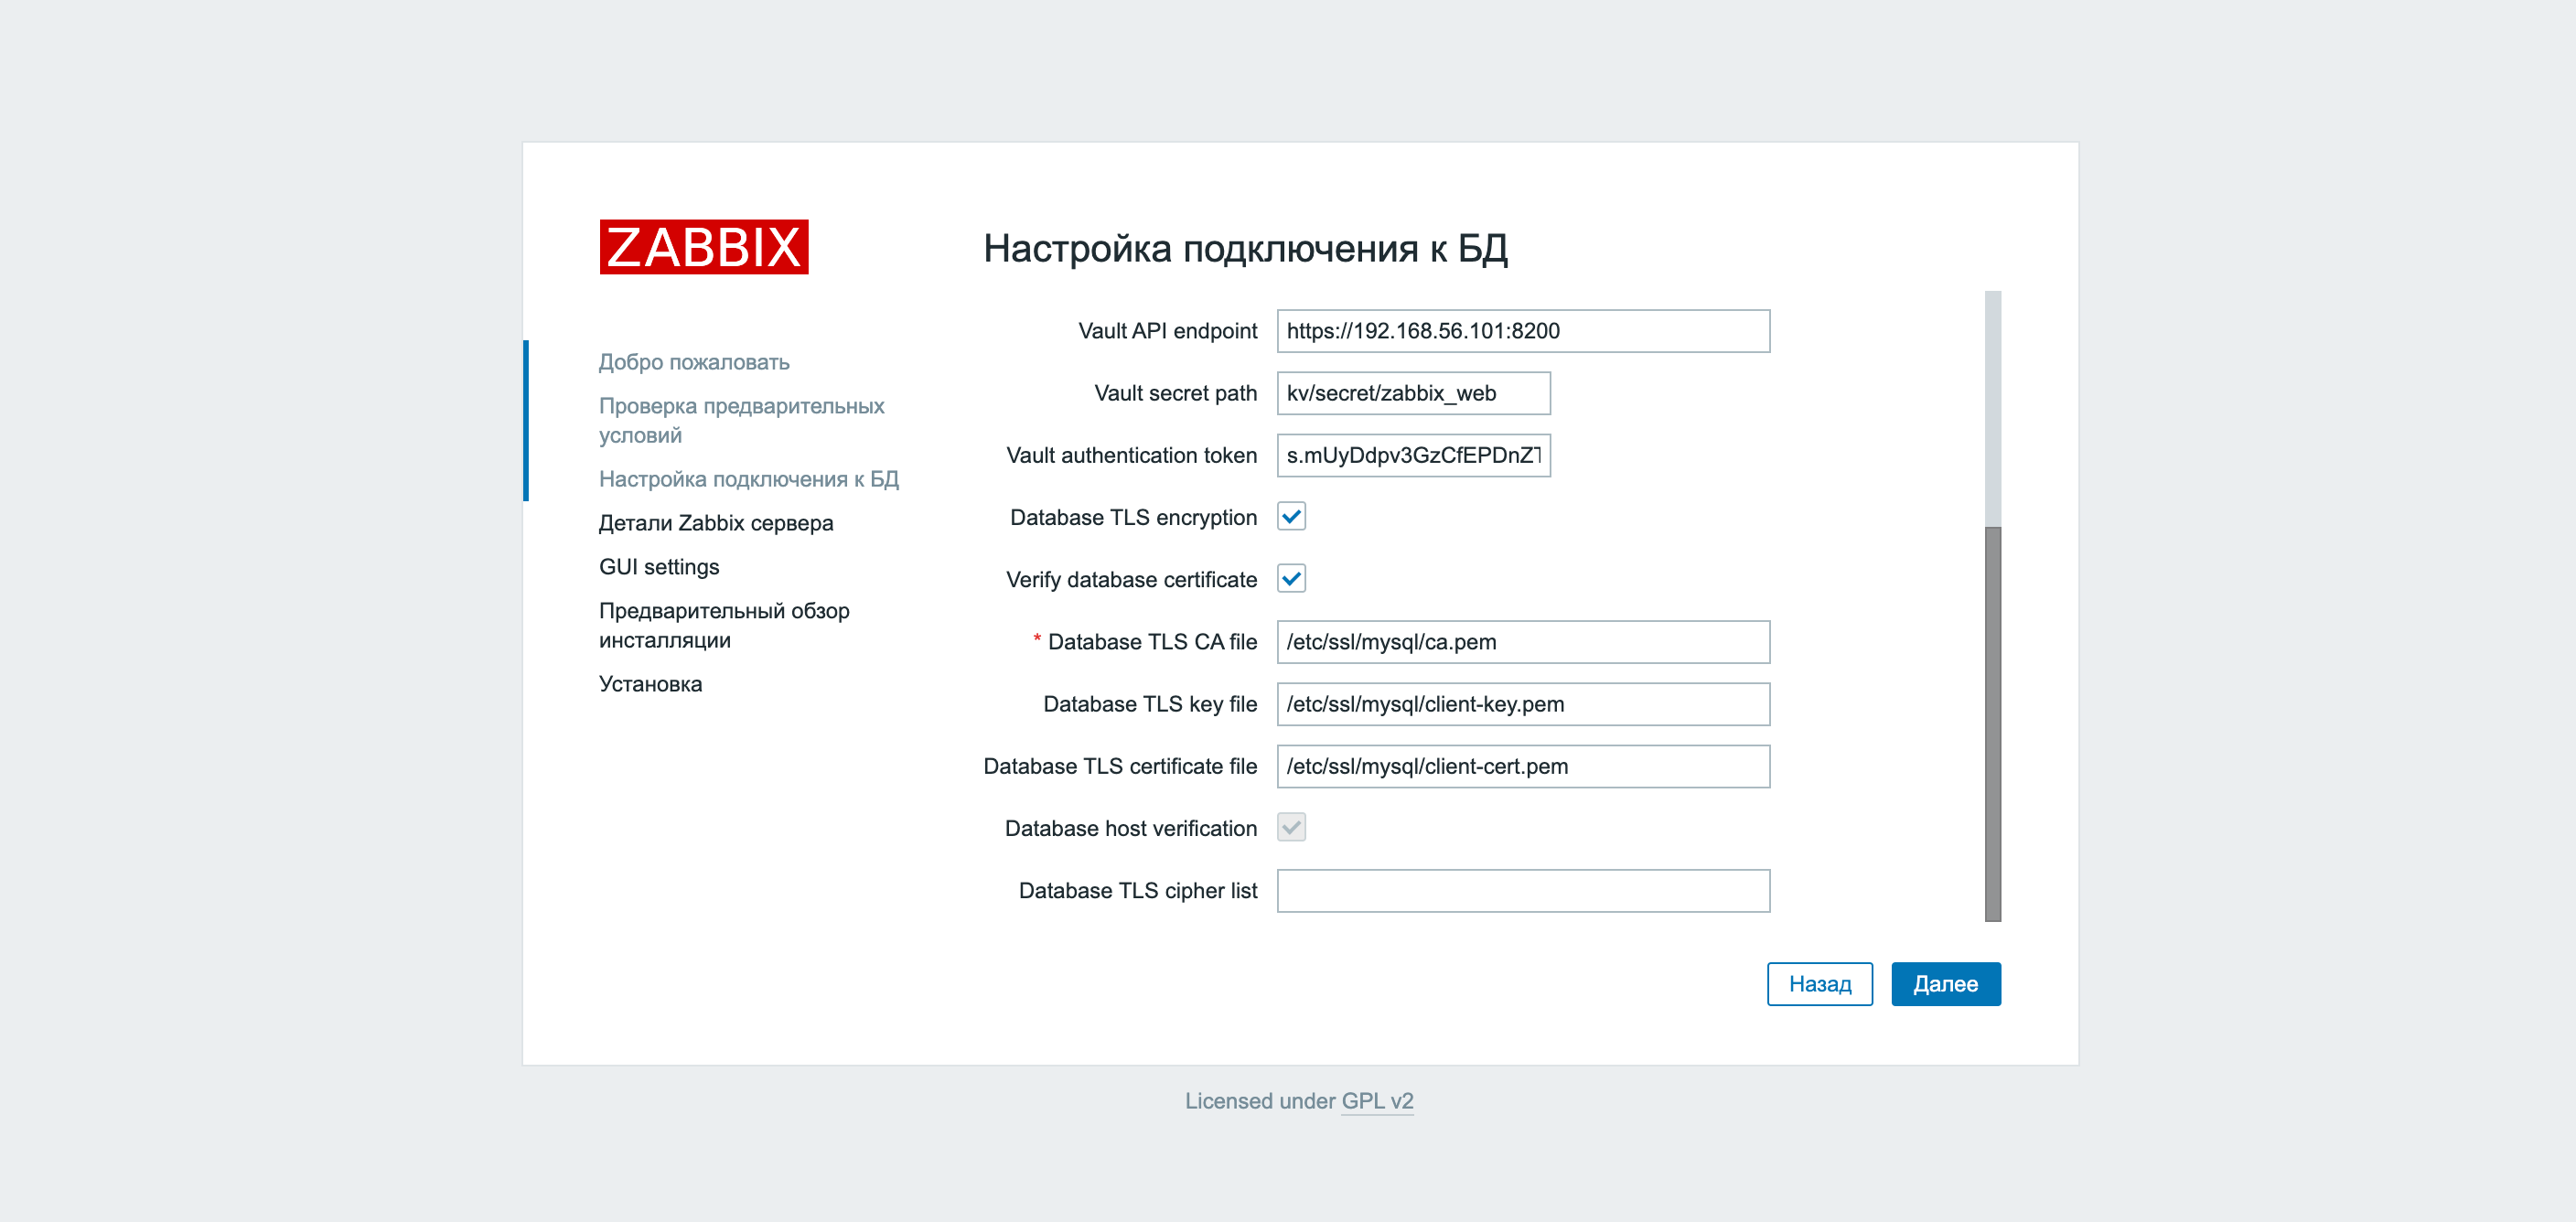
Configuring encryption between Zabbix and the database can be done immediately during the initial configuration of Zabbix via the web interface. Pay attention to the signature opposite Database TLS encryption… Due to the fact that socket file is used to connect to the local database, there is no way to configure an encrypted connection. Therefore, in the field Database host the IP address or name of the server with the database must be specified.
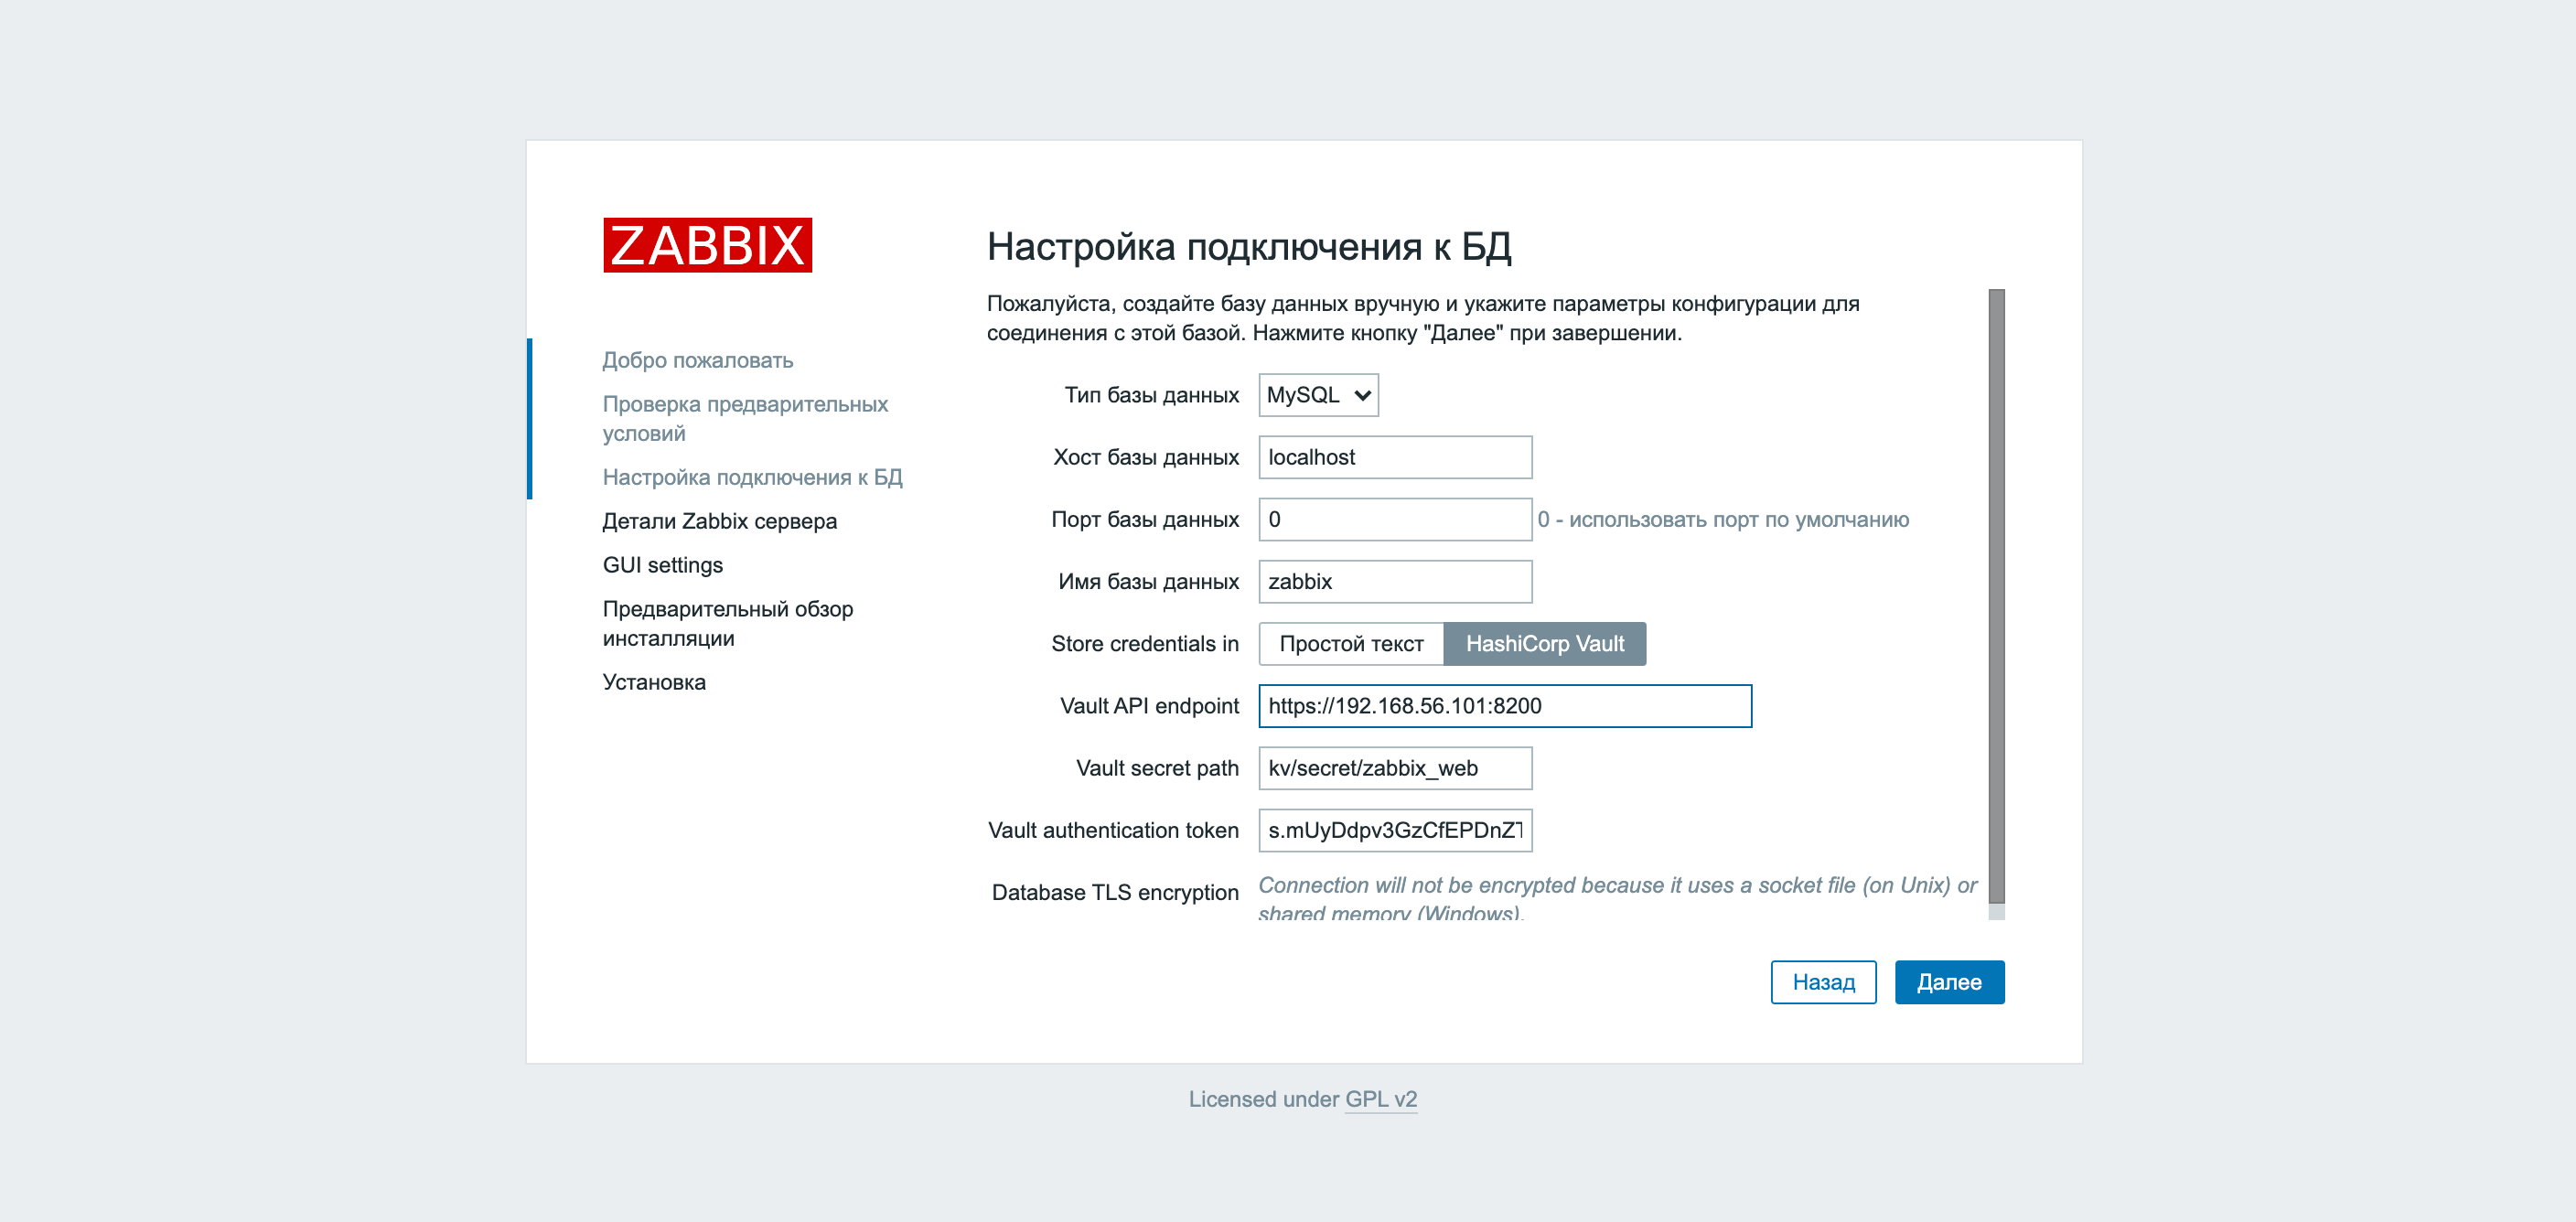
Change localhost to the server’s IP address and a checkbox appears.

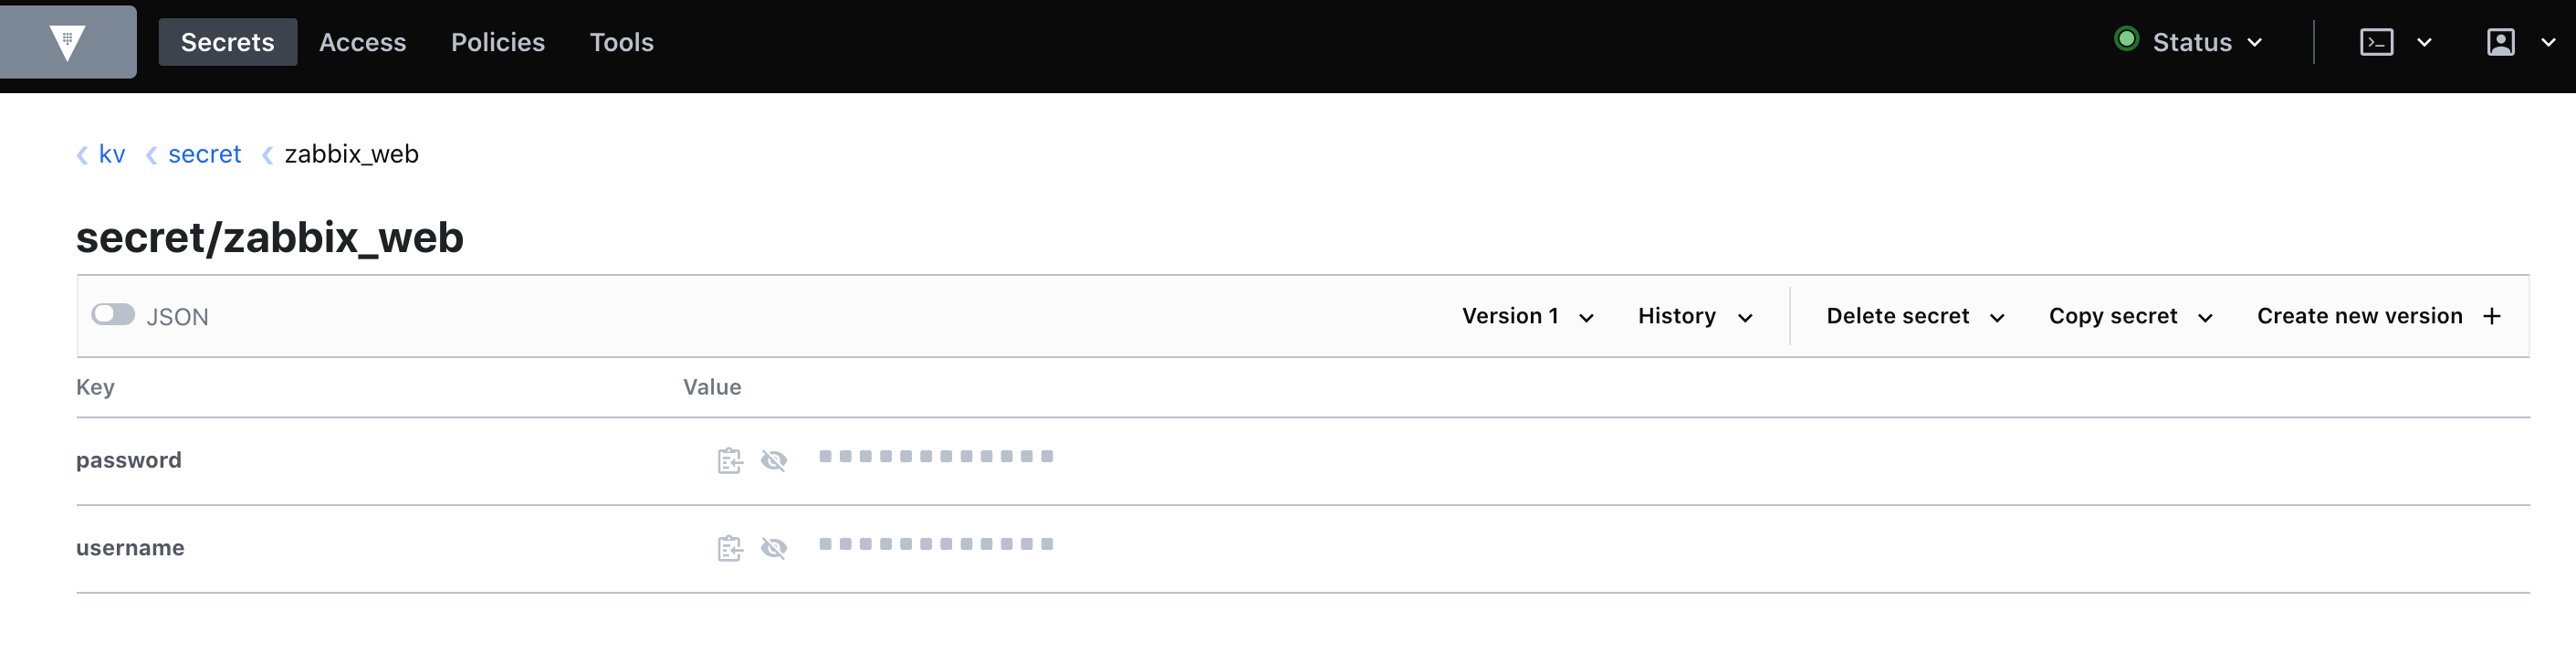
In the two screenshots above, you can see an innovation in Zabbix version 5.2 – support for integration with the Vault. Before starting Zabbix configuration, we created a key pair and credentials to connect to the database.
We take the MySQL client keys, fill in the required fields and click Further…
Another way to configure the same is the corresponding keys in the zabbix.conf.php configuration file.
$ DB[‘ENCRYPTION’] = true;
$ DB[‘KEY_FILE’] = ‘/etc/ssl/mysql/client-key.pem’;
$ DB[‘CERT_FILE’] = ‘/etc/ssl/mysql/client-cert.pem’;
$ DB[‘CA_FILE’] = ‘/etc/ssl/mysql/ca.pem’;
$ DB[‘VERIFY_HOST’] = true;
$ DB[‘CIPHER_LIST’] = ”;
Zabbix server <-> Zabbix database
In the previous step, we have already created a user for connection, there are client keys for connection too. It remains to write this data into the Zabbix server configuration file.
DBTLSConnect = required
DBTLSCAFile = / etc / ssl / mysql / ca.pem
DBTLSCertFile = / etc / ssl / mysql / client-key.pem
DBTLSKeyFile = / etc / ssl / mysql / client-cert.pem
DBTLSCipher = “”
After the settings have been made, the Zabbix server service must be restarted. We also store the login and password for connecting the Zabbix server to the database in Vault.

Using Vault requires adding values to the following variables in the Zabbix server configuration:
VaultDBPath = kv / secret / zabbix
VaultToken = s.Ev50RnGXNM3FmmcVBMRrR4Nz
VaultURL = http: //192.168.56.101: 8200
Variable VaultDBPath responsible for storing credentials for connecting to the database. You can learn more about encrypting database connections in Zabbix documentation…
Zabbix server <-> Zabbix proxy
As many Zabbix users know, there are two types of connections for transferring metrics in the system: passive and active. Passive means a request to the data source, while active means sending data from the source regardless of the receiver’s request. Likewise, the connection between the server and the proxy can be passive or active. In the screenshot below, an active proxy is configured, the connection with which is encrypted using PSK technology.
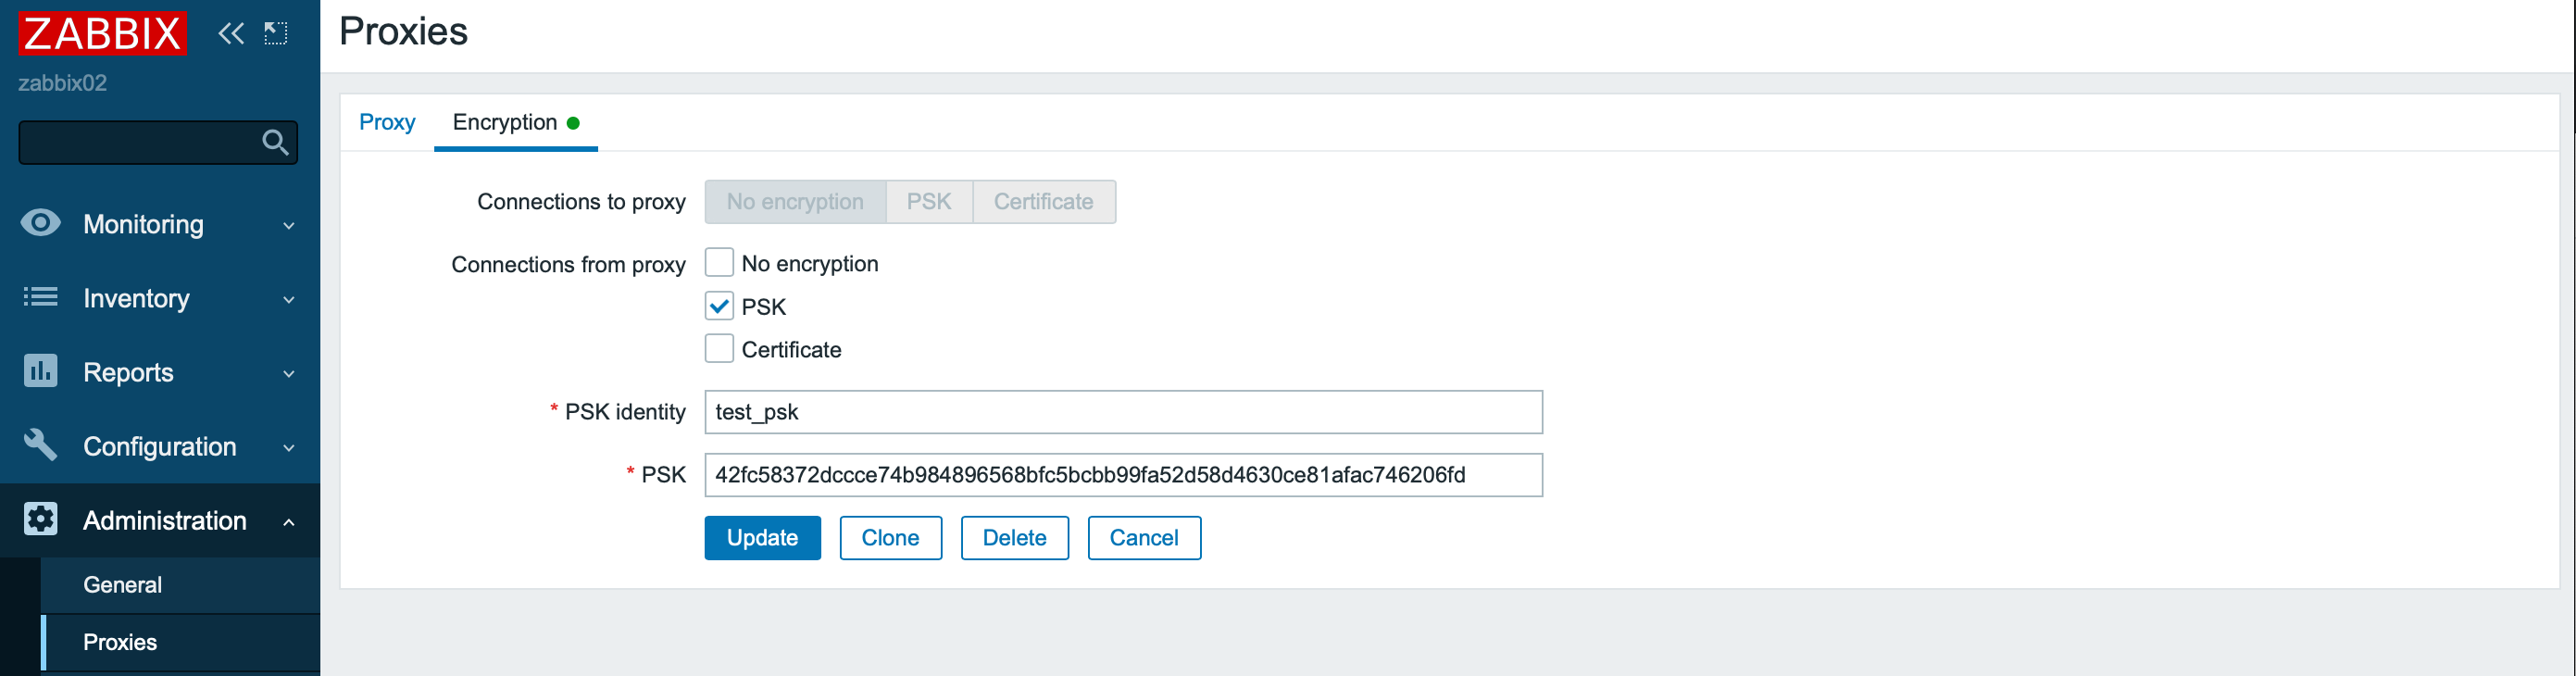
Please note that outgoing connections (passive) can be performed in one way to choose from, and combinations of options are available for incoming connections: no encryption, PSK, or certificate.
On the proxy side, all settings are made in the configuration file. For active checks:
TLSConnect = psk
TLSPSKIdentity = test_zabbix
TLSPSKFile = / var / zabbix / agentd.psk
For passive checks:
TLSAccept = psk
TLSPSKIdentity = test_zabbix
TLSPSKFile = / var / zabbix / agentd.psk
The second way to encrypt a connection is to use certificates. Note that for pre-shared key (PSK) and certificates, the private key is stored on the file system in cleartext.
More information is available in Zabbix documentation…
Zabbix server <-> Zabbix agent and Zabbix proxy <-> Zabbix agent
We will not repeat ourselves, configuring these connections is similar to configuring a server-proxy connection: one option is available for outgoing connections, one or several for incoming connections.
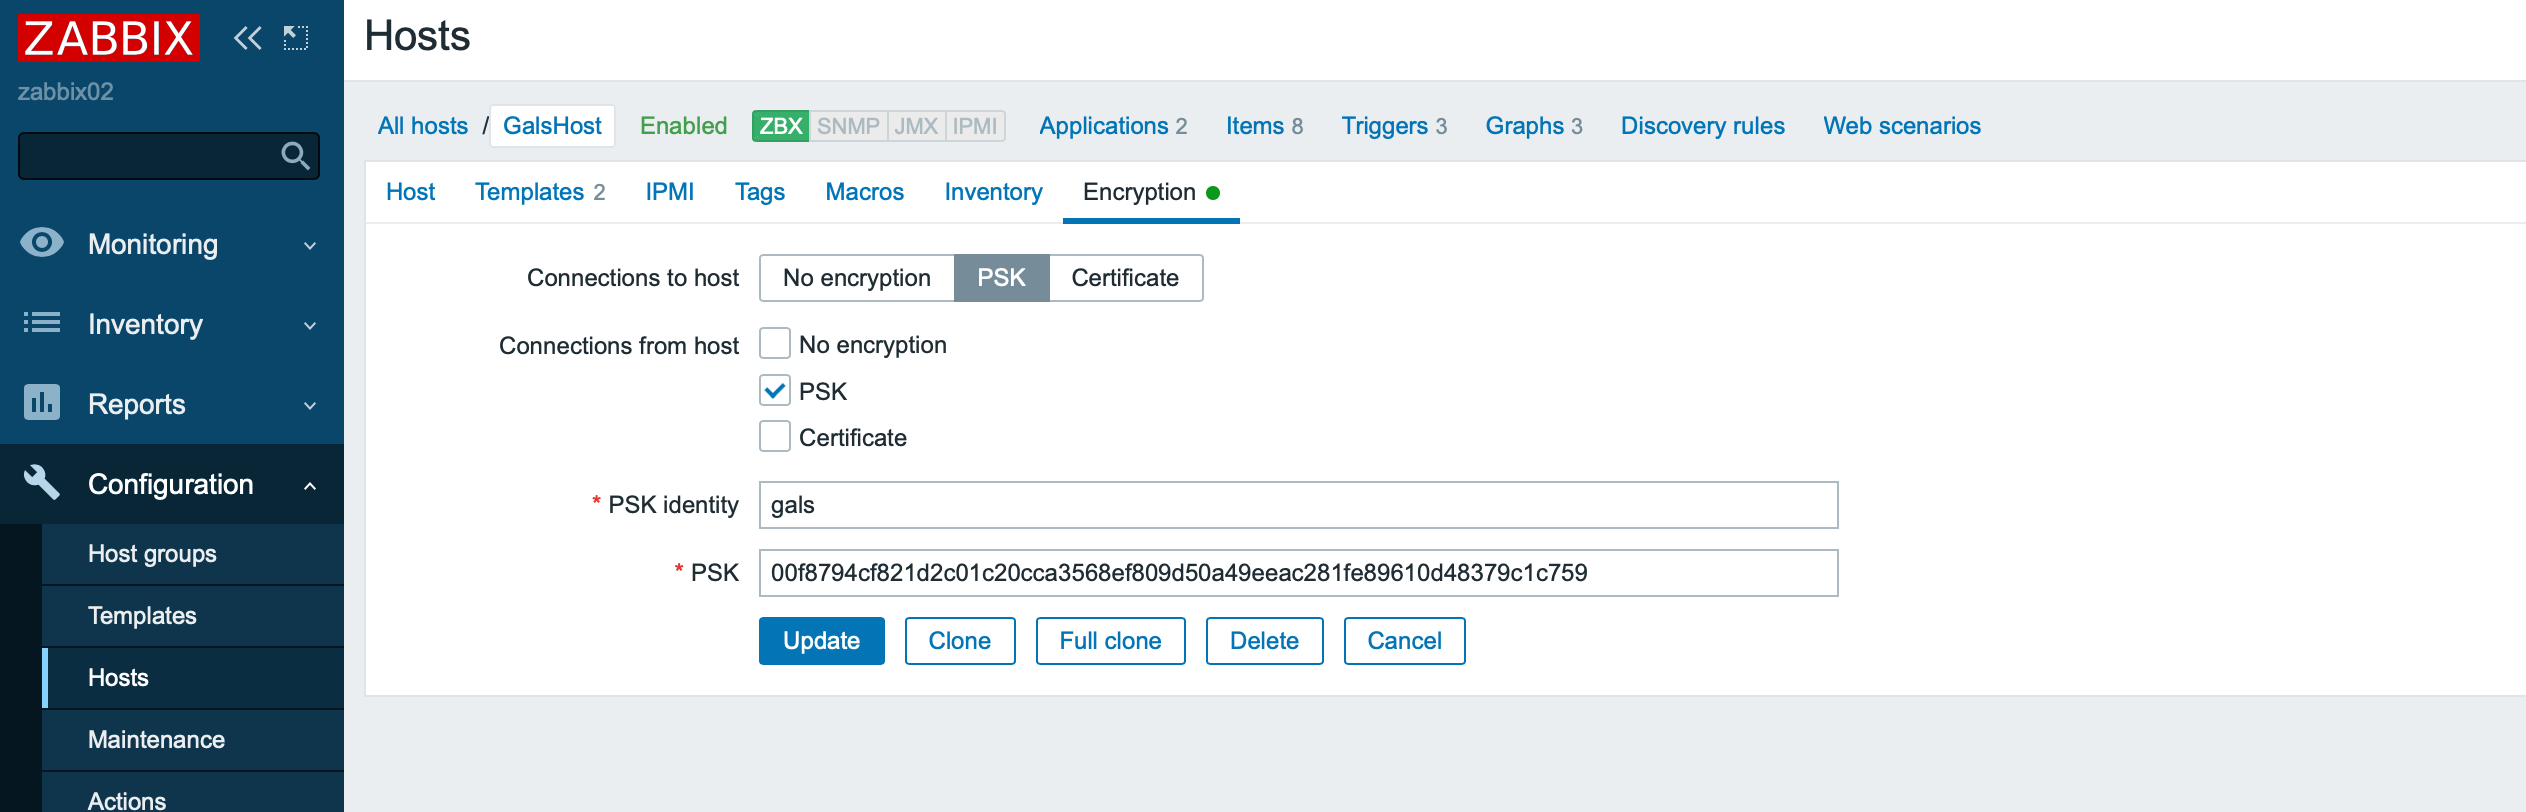
The names of the variables for configuring encryption on the agent side are completely similar to the variables in the proxy configuration.
Zabbix proxy <-> Zabbix proxy database
The approach to configuration is similar to configuring an encrypted connection between a Zabbix server and a database. The variable names are the same as specified in the Zabbix proxy configuration file.
Zabbix sender -> Zabbix proxy and Zabbix agent -> Zabbix get
Connection encryption with the Zabbix sender and Zabbix get utilities is performed using special parameters when calling the corresponding utilities.
zabbix_sender -z 127.0.0.1 -s zabbix02 -k Encrypt -o 18 –tls-connect psk –tls-psk-identity “test_zabbix” –tls-psk-file /etc/zabbix/keys/agent.psk
zabbix_get -s 127.0.0.1 -k agent.version
–tls-connect psk –tls-psk-identity “test_zabbix” –tls-psk-file /etc/zabbix/keys/agent.psk
Auto-registration with encryption
Encryption is also supported for the auto-registration process.
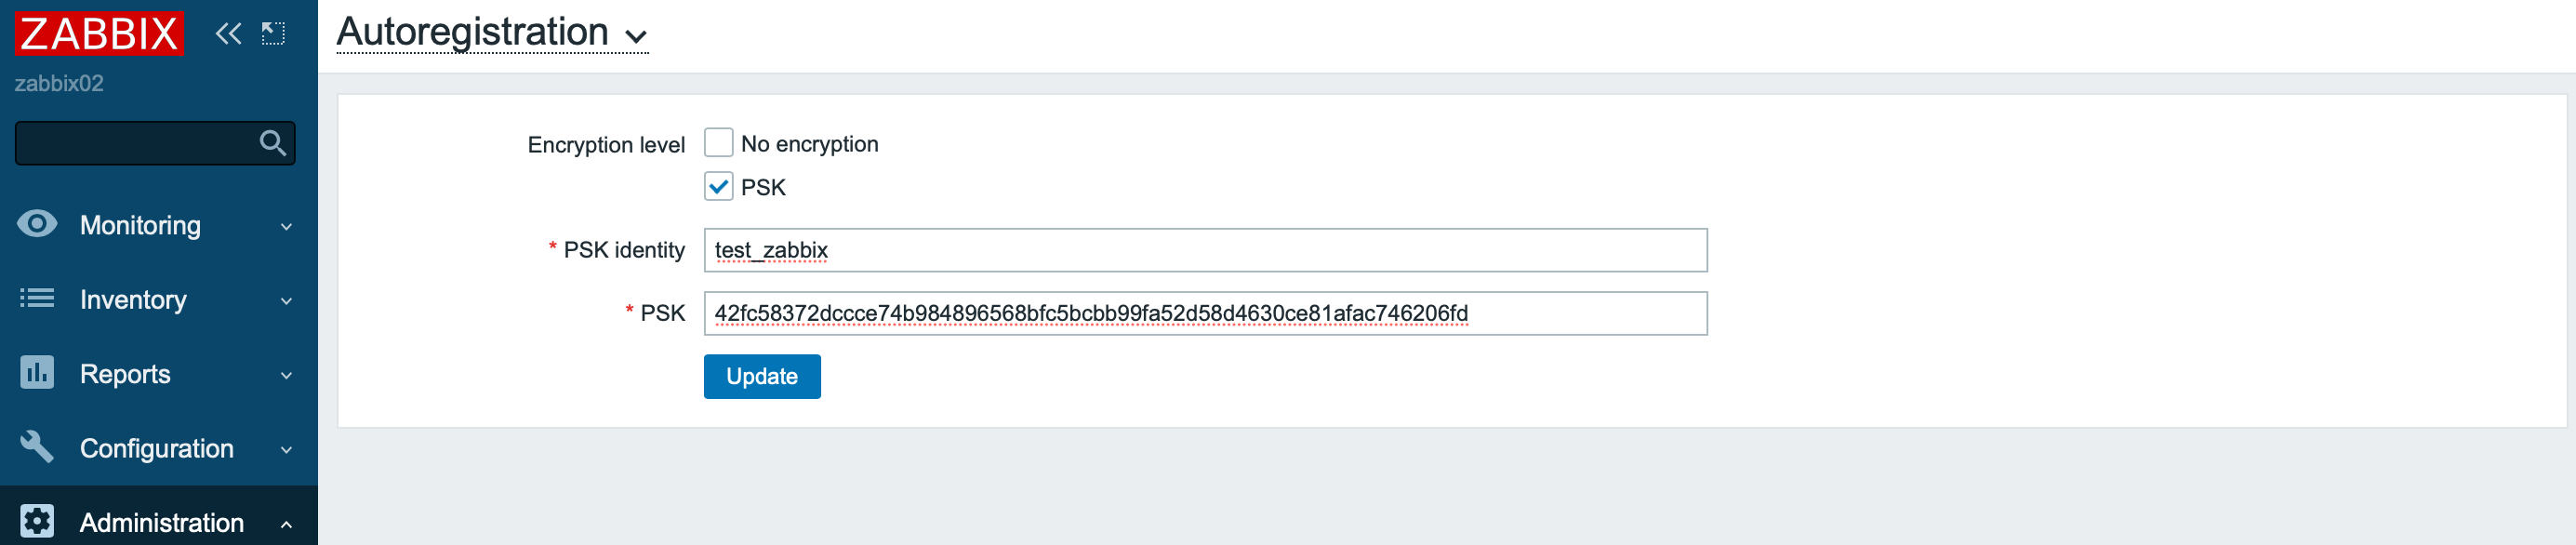
After auto-registration of a new node, the connection settings with it will be automatically configured to use PSK encryption.
Storing sensitive information in the Vault
A nice innovation that appeared in the Zabbix 5.2 version is support for the Vault storage. It can be used both for storing credentials for accessing the database and for macro values. This is how the macro values look in Vault:
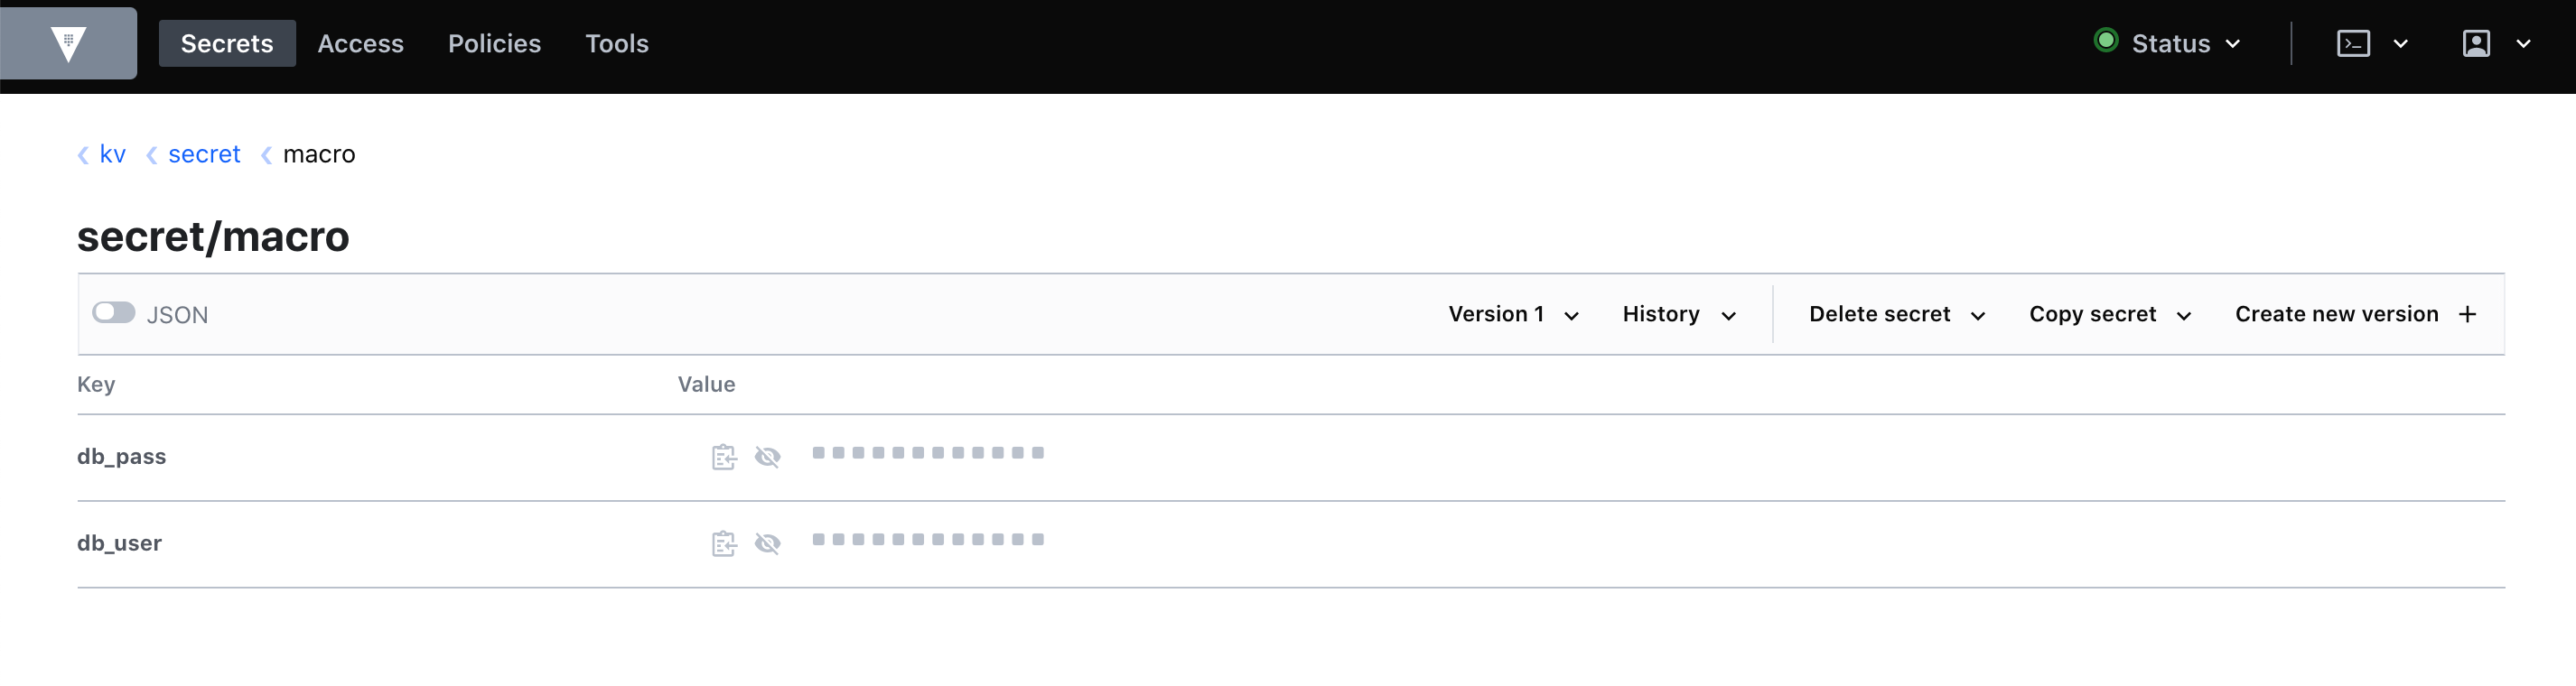
And so you can refer to them in the Zabbix interface:
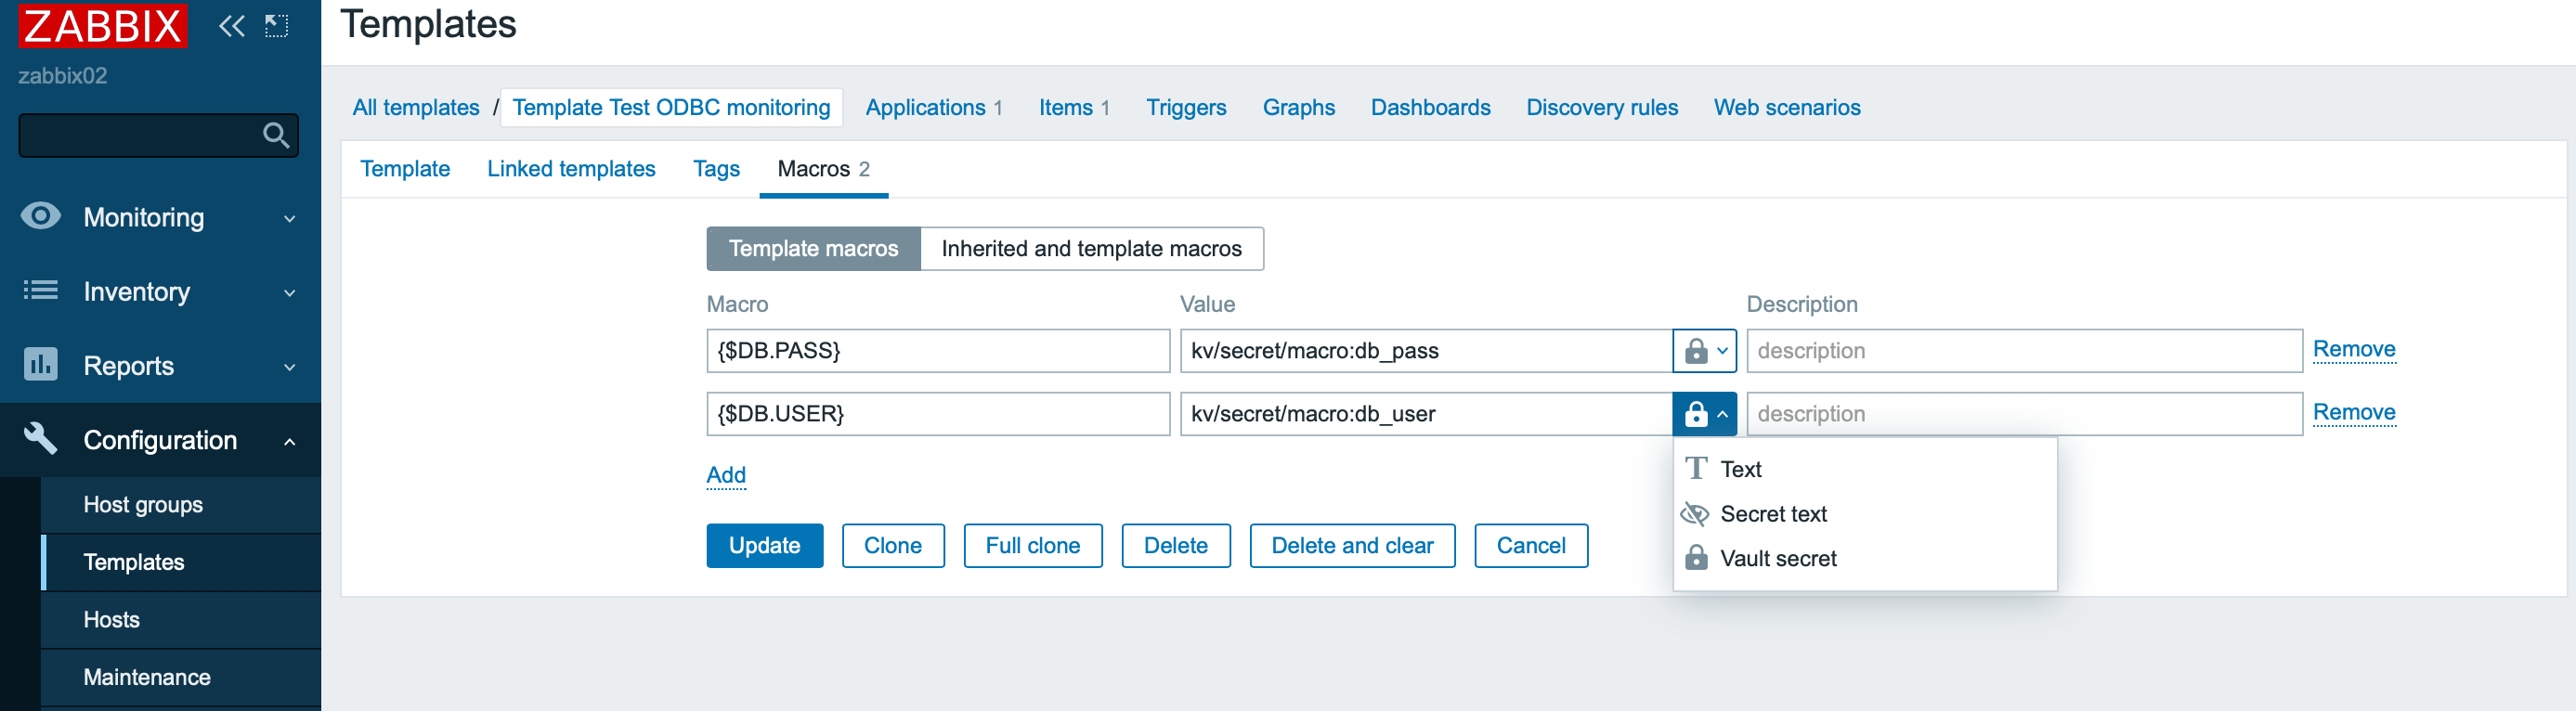
Storing macro values greatly simplifies the management of credentials for different templates, makes it easy to revoke credentials and conduct auditing. Of course, you can take the values of any macros from Vault and this adds another degree of freedom when automating monitoring in Zabbix.
Conclusion
In this article, we talked about the encryption capabilities in Zabbix. Before deciding to use encrypted connections, it is important to understand that this decreases the performance of the monitoring system and more utilizes hardware. You shouldn’t use encryption without a good reason.
We have been successfully working with Zabbix for a long time, if you have tasks for the development, maintenance or updating of the system, leave a request through feedback form or contact in another convenient way…
You can also read:
Add CMDB and geographic map to Zabbix
Printer monitoring is a noble cause
Structured monitoring system based on free solutions
Elastic under the lock: enabling security options for the Elasticsearch cluster for access from inside and outside
To handle events from Zabbix, Prometheus, Elastic and other systems, we recommend use Amixr (presentation on request).