Writing distributed storage in half an hour

Hi, my name is Igor and I work in the Tarantool team. When developing, I often need rapid prototyping of database applications, for example to test code or to create MVPs. Of course, I would like such a prototype to require minimal efforts for revision, if suddenly it will be decided to put it into operation.
I don’t like wasting time setting up a SQL database, thinking about how to manage data sharding, spending a lot of time studying connector interfaces. You just want to write a few lines of code and run it so that everything works out of the box. In the rapid development of distributed applications, Cartridge helps me – a framework for managing clustered applications based on the Tarantool NoSQL database.
Today I want to talk about how you can quickly write an application in Cartridge, cover it with tests and launch it. The article will be of interest to everyone who is tired of spending a lot of time prototyping applications, as well as to people who want to try the new NoSQL technology.
Content
In this article, you will learn about what Cartridge is and get acquainted with the principles of writing cluster business logic in it.
We will write a cluster application for storing data about the employees of a certain company, waiting for us:
- Creating an application from a template with cartridge-cli
- Describing your business logic in Lua in Cartridge clustered roles
- Data store
- Custom HTTP API
- Writing tests
- Launching and Configuring a Small Cluster Locally
- Loading configuration
- Failover setup
Cartridge
Cartridge is a framework for developing clustered applications, it manages multiple NoSQL instances of Tarantool database and shards data using the vshard module. Tarantool is a persistent in-memory database, it is very fast due to storing data in RAM, but at the same time reliable – Tarantool flushes all data to the hard disk and allows you to set up replication, and Cartridge takes care of configuring Tarantool nodes and sharding the cluster nodes. , so all the developer needs to do is write the business logic of the applications and configure the failover.
Сartridge advantages
- Out of the box sharding and replication
- Built-in failover
- NoSQL Cluster Query Language – CRUD
- Integration testing of the entire cluster
- Cluster management with ansible
- Cluster administration utility
- Monitoring tools
Building your first application
For this we need cartridge-cli Is a utility for working with cartridge applications. It allows you to create an application from a template, manage a locally running cluster, and connect to tarantula instances.
Install Tarantool and cartridge-cli
Installing on Debian or Ubuntu:
curl -L https://tarantool.io/fJPRtan/release/2.8/installer.sh | bash

sudo apt install cartridge-cli
Installing on CentOS, Fedora or ALT Linux:
curl -L https://tarantool.io/fJPRtan/release/2.8/installer.sh | bash

sudo yum install cartridge-cli
Installation on MacOS:
brew install tarantool

brew install cartridge-cli
Let’s create a templated application named myapp:
cartridge create --name myapp

cd myapp

tree .
We get the structure of the project with approximately the following content:
myapp
├── app
│ └── roles
│ └── custom.lua
├── test
├── init.lua
├── myapp-scm-1.rockspecinit.lua– the entry point of the application on the cartridge, here the configuration of the cluster is written and the functions that must be executed at the start of each node of the application are called.- in the directory
app/roles/stores “roles” that describe the business logic of the application. myapp-scm-1.rockspec– file for specifying dependencies
At this step, you will already have a ready-to-use hello world application. It can be started using the commands
cartridge build

cartridge start -d

cartridge replicasets setup --bootstrap-vshard
After that, at the address localhost:8081/hello we will see hello-world.
Let’s now write our own small application based on the template – a sharded storage with an HTTP API for filling and receiving data. To do this, we need an understanding of how the cluster business logic is written in Cartridge.
Writing business logic in Cartridge
At the heart of every cluster application are role – Lua modules, which describe the business logic of the application. For example, these can be modules that store data, provide an HTTP API, or cache data from Oracle. The role is assigned to a set of replicated instances (replicaset) and enabled on each of them. Different replicasets can have a different set of roles.
The cartridge has a cluster configurationwhich is stored on each of the cluster nodes. It describes the topology, and you can also add the configuration there, which will be used by your role. This configuration can be changed at runtime and influence the behavior of the role.
Each role has the following structure:
return {
    role_name="your_role_name",

    init = init,
    validate_config = validate_config,
    apply_config = apply_config,
    stop = stop,

    rpc_function = rpc_function,
    dependencies = {
        'another_role_name',
    },
}
Role life cycle
- The instance starts up.
- Role with a name
role_namewaits for all dependent roles specified independencies… - The function is called
validate_configwhich checks the validity of the role config. - The role initialization function is called
init, in which actions are performed that must be run once at the start of the role. - Called
apply_configwhich applies the config (if any).validate_configandapply_configare also called whenever the configuration of a role is changed. - The role enters the registry, from where it will be available for other roles on the same node using
cartridge.service_get('your_role_name')… - Functions declared in the role will be available for calling from other nodes using
cartridge.rpc_call('your_role_name', 'rpc_function')… - Before shutting down or restarting the role, the function runs
stop, which terminates the work of the role, for example, delete the fibers created by the role.
Clustered NoSQL queries
Cartridge has several options for writing cluster queries:
Function calls via the vshard API (this is a complex method, but very flexible):
vshard.router.callrw(bucket_id, 'app.roles.myrole.my_rpc_func', {...})- Simple function calls
crud.insert/get/replace/ … - Limited computation support
bucket_id - Roles must be dependent on
crud-router/crud-storage
- Simple function calls
Application diagram
Let’s imagine that we want a cluster with one router and two groups of stores of two instances. This topology is typical for both Redis Cluster and Mongodb clusters. Also, our cluster will have one instance – stateboard (in which stateful-failover will save the state of the current masters). When increased reliability is required, it is better to use an etcd cluster instead of a stateboard.
The router will distribute requests across the cluster, as well as manage the failover.

We write our roles
We need to write two of our roles, one for storing data, the other for the HTTP API.
Create two new files in the app / roles directory: app / roles / storage.lua and app / roles / api.lua
Data store
Let’s describe the role for storing data. In function init we will create a table and indexes for it, and add depending on crud-storage…
If you are used to SQL, the Lua code in the init function is equivalent to the following pseudo-SQL code:
CREATE TABLE employee(
    bucket_id unsigned,
    employee_id string,
    name string,
    department string,
    position string,
    salary unsigned
);
CREATE UNIQUE INDEX primary ON employee(employee_id);
CREATE INDEX bucket_id ON employee(bucket_id);
Let’s add the following code to the file app / roles / storage.lua :
local function init(opts)
    -- в opts хранится признак, вызывается функция на мастере или на реплике
    -- мы создаем таблицы только на мастере, на реплике они появятся автоматически
    if opts.is_master then
        -- Создаем таблицу с сотрудниками
        local employee = box.schema.space.create('employee', {if_not_exists = true})

        -- задаем формат
        employee:format({
            {name="bucket_id", type="unsigned"},
            {name="employee_id", type="string", comment="ID сотрудника"},
            {name="name", type="string", comment="ФИО сотрудника"},
            {name="department", type="string", comment="Отдел"},
            {name="position", type="string", comment="Должность"},
            {name="salary", type="unsigned", comment="Зарплата"}
        })

        -- Создаем первичный индекс
        employee:create_index('primary', {parts = {{field = 'employee_id'}},
            if_not_exists = true })

        -- Индекс по bucket_id, он необходим для шардирования
        employee:create_index('bucket_id', {parts = {{field = 'bucket_id'}},
            unique = false,
            if_not_exists = true })
    end

    return true
end

return {
    init = init,
    -- <<< не забываем про зависимость от crud-storage
    dependencies = {'cartridge.roles.crud-storage'},
}
We will not need the rest of the functions from the role API – our role has no configuration and does not allocate resources that need to be cleaned up after completion.
HTTP API
We need a second role to populate tables with data and retrieve that data on demand. It will access the HTTP server built into Cartridge and have a dependency on crud-router…
Let’s define a function for the POST request. The body of the request will receive the object that we want to write to the database.
local function post_employee(request)
    -- достаем объект из тела запроса
    local employee = request:json()

    -- записываем в БД
    local _, err = crud.insert_object('employee', employee)

    -- В случае ошибки пишем ее в лог и возвращаем 500
    if err ~= nil then
        log.error(err)
        return {status = 500}
    end
    return {status = 200}
end
The salary level of employees will be passed to the GET method, and as a response we will return JSON with a list of employees who have a salary higher than the specified one.
SELECT employee_id, name, department, position, salary
FROM employee
WHERE salary >= @salary
local function get_employees_by_salary(request)
-- достаем query-параметр salary
local salary = tonumber(request:query_param('salary') or 0)
-- отбираем данные о сотрудниках
local employees, err = crud.select('employee', {{'>=', 'salary', salary}})
-- В случае ошибки пишем ее в лог и возвращаем 500
if err ~= nil then
log.error(err)
return { status = 500 }
end
-- в employees хранится список строк, удовлетворяющих условию и формат спейса
-- unflatten_rows нужна, чтобы преобразовать строку таблицы в таблицу вида ключ-значение
employees = crud.unflatten_rows(employees.rows, employees.metadata)
employees = fun.iter(employees):map(function(x)
return {
employee_id = x.employee_id,
name = x.name,
department = x.department,
position = x.position,
salary = x.salary,
}
end):totable()
return request:render({json = employees})
endNow let’s write init-the role function. Here we turn to the registry Cartridge to get an HTTP server and use it to assign the HTTP endpoints to our application.
local function init()
-- получаем HTTP-сервер из registry Cartridge
local httpd = assert(cartridge.service_get('httpd'), "Failed to get httpd serivce")
-- прописываем роуты
httpd:route({method = 'GET', path="/employees"}, get_employees_by_salary)
httpd:route({method = 'POST', path="/employee"}, post_employee)
return true
endPutting it all together:
local cartridge = require('cartridge')
local crud = require('crud')
local log = require('log')
local fun = require('fun')
-- метод GET /employees будет возвращать список сотрудников с зарплатой больше заданной
local function get_employees_by_salary(request)
    -- достаем query-параметр salary
    local salary = tonumber(request:query_param('salary') or 0)

    -- отбираем данные о сотрудниках
    local employees, err = crud.select('employee', {{'>=', 'salary', salary}})

    -- В случае ошибки пишем ее в лог и возвращаем 500
    if err ~= nil then
        log.error(err)
        return { status = 500 }
    end

    -- в employees хранится список строк, удовлетворяющих условию и формат спейса
    -- unflatten_rows нужна, чтобы преобразовать строку таблицы в таблицу вида ключ-значение
    employees = crud.unflatten_rows(employees.rows, employees.metadata)

    employees = fun.iter(employees):map(function(x)
        return {
            employee_id = x.employee_id,
            name = x.name,
            department = x.department,
            position = x.position,
            salary = x.salary,
        }
    end):totable()
    return request:render({json = employees})
end
local function post_employee(request)
-- достаем объект из тела запроса
local employee = request:json()
-- записываем в БД
local _, err = crud.insert_object('employee', employee)
-- В случае ошибки пишем ее в лог и возвращаем 500
if err ~= nil then
log.error(err)
return {status = 500}
end
return {status = 200}
end
local function init()
-- получаем HTTP-сервер из registry Cartridge
local httpd = assert(cartridge.service_get('httpd'), "Failed to get httpd service")
-- прописываем роуты
httpd:route({method = 'GET', path="/employees"}, get_employees_by_salary)
httpd:route({method = 'POST', path="/employee"}, post_employee)
return true
end
return {
init = init,
-- добавляем зависимость от crud-router
dependencies = {'cartridge.roles.crud-router'},
}
init.lua
Let’s describe the file init.lua, which will be the entry point of the Cartridge application. In the init file of the cartridge, you need to call the function cartridge.cfg () to set up a cluster instance.
cartridge.cfg(<opts>, <box_opts>)
<opts>– default cluster parameters- list of available roles (you need to specify all roles, even permanent ones, otherwise they will not appear in the cluster)
- sharding parameters
- WebUI configuration
- and other
<box_opts>– Tarantool default parameters (which are passed to the box.cfg {} instance)
#!/usr/bin/env tarantool

require('strict').on()

-- указываем путь для поиска модулей
if package.setsearchroot ~= nil then
    package.setsearchroot()
end

-- конфигурируем Cartridge
local cartridge = require('cartridge')

local ok, err = cartridge.cfg({
    roles = {
        'cartridge.roles.vshard-storage',
        'cartridge.roles.vshard-router',
        'cartridge.roles.metrics',
        -- <<< Добавляем crud-роли
        'cartridge.roles.crud-storage',
        'cartridge.roles.crud-router',
        -- <<< Добавляем кастомные роли
        'app.roles.storage',
        'app.roles.api',
    },
    cluster_cookie="myapp-cluster-cookie",
})

assert(ok, tostring(err))
The last step is to describe the dependencies of our application in the file myapp-scm-1.rockspec…
package="myapp"
version = 'scm-1'
source  = {
    url="/dev/null",
}
-- Добавляем зависимости
dependencies = {
    'tarantool',
    'lua >= 5.1',
    'checks == 3.1.0-1',
    'cartridge == 2.7.3-1',
    'metrics == 0.11.0-1',
    'crud == 0.8.0-1',
}
build = {
    type="none";
}
The application code is already ready to run, but first we will write tests and make sure it works.
Writing tests
Any application needs testing. For unit tests, the usual luatest is enough, but if you want to write a good integration test, the cartridge.test-helpers module will help you. It comes with Cartridge and allows you to test a cluster of any composition that you need.
local cartridge_helpers = require('cartridge.test-helpers')
-- создаем тестовый кластер
local cluster = cartridge_helpers.Cluster:new({
    server_command = './init.lua', -- entrypoint тестового приложения
    datadir="./tmp", -- директория для xlog, snap и других файлов
    use_vshard = true, -- включение шардирования кластера
    -- список репликасетов:
    replicasets = {
        {
            alias="api",
            uuid = cartridge_helpers.uuid('a'),
            roles = {'app.roles.custom'}, -- список ролей, назначенных на репликасет
            -- список инстансов в репликасете:
            servers = {
                { instance_uuid = cartridge_helpers.uuid('a', 1), alias="api" },
                ...
            },
        },
        ...
    }
})
Let’s write an auxiliary module that we will use in integration tests. It creates a test cluster of two replica sets, each of which will have one instance:
Helper module code:
local fio = require('fio')
local t = require('luatest')
local cartridge_helpers = require('cartridge.test-helpers')

local helper = {}

helper.root = fio.dirname(fio.abspath(package.search('init')))
helper.datadir = fio.pathjoin(helper.root, 'tmp', 'db_test')
helper.server_command = fio.pathjoin(helper.root, 'init.lua')

helper.cluster = cartridge_helpers.Cluster:new({
    server_command = helper.server_command,
    datadir = helper.datadir,
    use_vshard = true,
    replicasets = {
        {
            alias="api",
            uuid = cartridge_helpers.uuid('a'),
            roles = {'app.roles.api'},
            servers = {
                { instance_uuid = cartridge_helpers.uuid('a', 1), alias="api" },
            },
        },
        {
            alias="storage",
            uuid = cartridge_helpers.uuid('b'),
            roles = {'app.roles.storage'},
            servers = {
                { instance_uuid = cartridge_helpers.uuid('b', 1), alias="storage" },
            },
        },
    }
})

function helper.truncate_space_on_cluster(cluster, space_name)
    assert(cluster ~= nil)
    for _, server in ipairs(cluster.servers) do
        server.net_box:eval([[
            local space_name = ...
            local space = box.space[space_name]
            if space ~= nil and not box.cfg.read_only then
                space:truncate()
            end
        ]], {space_name})
    end
end

function helper.stop_cluster(cluster)
    assert(cluster ~= nil)
    cluster:stop()
    fio.rmtree(cluster.datadir)
end

t.before_suite(function()
    fio.rmtree(helper.datadir)
    fio.mktree(helper.datadir)
    box.cfg({work_dir = helper.datadir})
end)

return helper
Integration test code:
local t = require('luatest')
local g = t.group('integration_api')

local helper = require('test.helper')
local cluster = helper.cluster

g.before_all = function()
    g.cluster = helper.cluster
    g.cluster:start()
end

g.after_all = function()
    helper.stop_cluster(g.cluster)
end

g.before_each = function()
    helper.truncate_space_on_cluster(g.cluster, 'employee')
end

g.test_get_employee = function()
    local server = cluster.main_server

    -- наполним хранилище данными через HTTP API:
    local response = server:http_request('post', '/employee',
        {json = {name="John Doe", department="Delivery", position = 'Developer',
        salary = 10000, employee_id = 'john_doe'}})
    t.assert_equals(response.status, 200)

    response = server:http_request('post', '/employee',
        {json = {name="Jane Doe", department="Delivery", position = 'Developer',
        salary = 20000, employee_id = 'jane_doe'}})
    t.assert_equals(response.status, 200)

    -- Делаем GET запрос и проверяем правильность выдаваемых данных
    response = server:http_request('get', '/employees?salary=15000.0')
    t.assert_equals(response.status, 200)
    t.assert_equals(response.json[1], {name="Jane Doe", department="Delivery", employee_id = 'jane_doe',
        position = 'Developer', salary = 20000
    })
end
Running tests
If you have already run the application
Stop it:
cartridge stop
Delete the data folder:
rm -rf tmp/
Let’s build the application and install the dependencies:
cartridge build

./deps.sh
Let’s start the linter:
.rocks/bin/luacheck .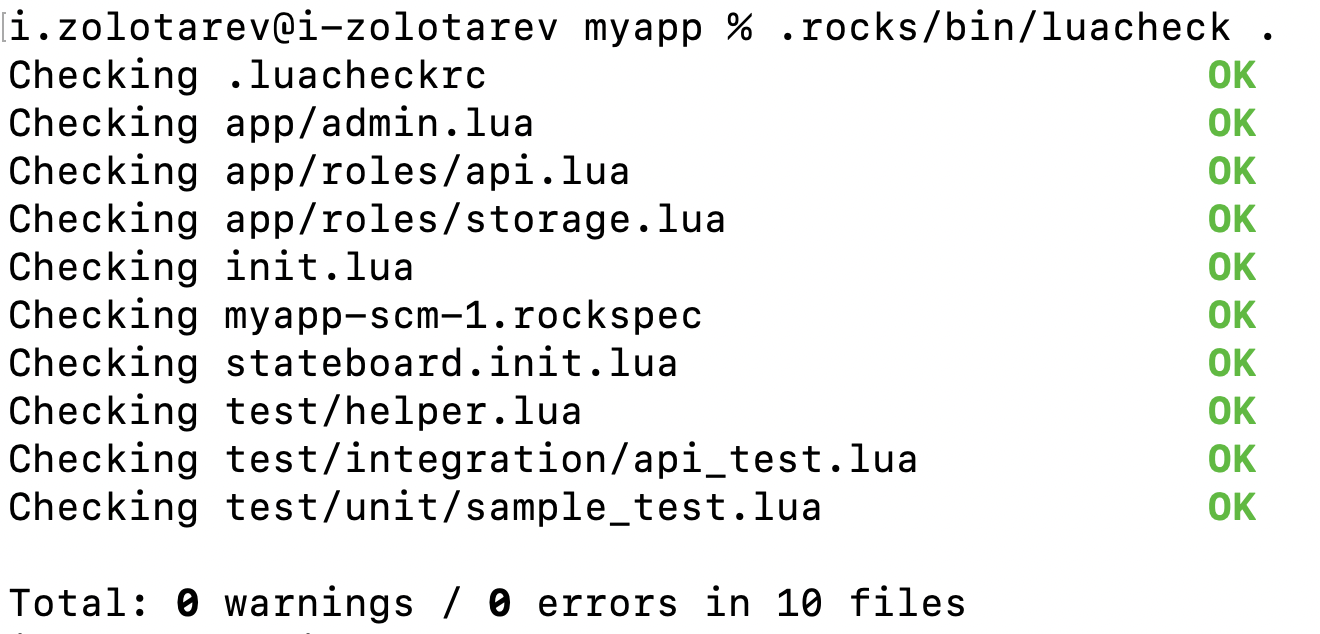
Let’s run tests with coverage record:
.rocks/bin/luatest --coverage
Let’s generate reports on test coverage and see the result:
.rocks/bin/luacov .
grep -A999 '^Summary' tmp/luacov.report.out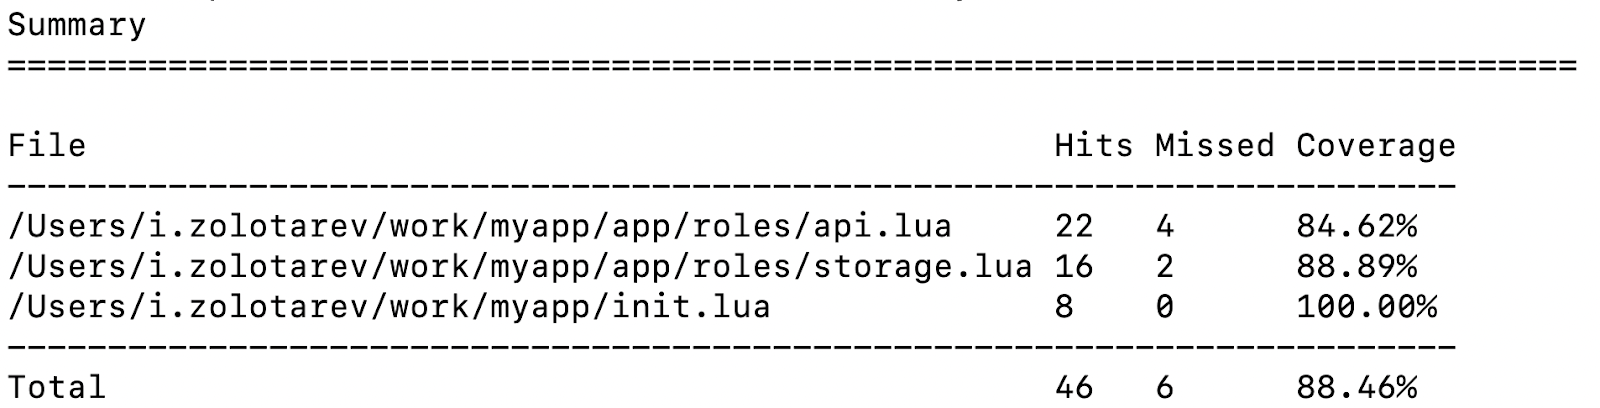
Local launch
To run applications locally, you can use cartridge-cli, but first you need to add the roles we have written to replicasets.yml:
router:
  instances:
  - router
  roles:
  - failover-coordinator
  - app.roles.api
  all_rw: false
s-1:
  instances:
  - s1-master
  - s1-replica
  roles:
  - app.roles.storage
  weight: 1
  all_rw: false
  vshard_group: default
s-2:
  instances:
  - s2-master
  - s2-replica
  roles:
  - app.roles.storage
  weight: 1
  all_rw: false
  vshard_group: default
The parameters of the launched instances can be found in instances.yml.
We start the cluster locally:
cartridge build
cartridge start -d
cartridge replicasets setup --bootstrap-vshard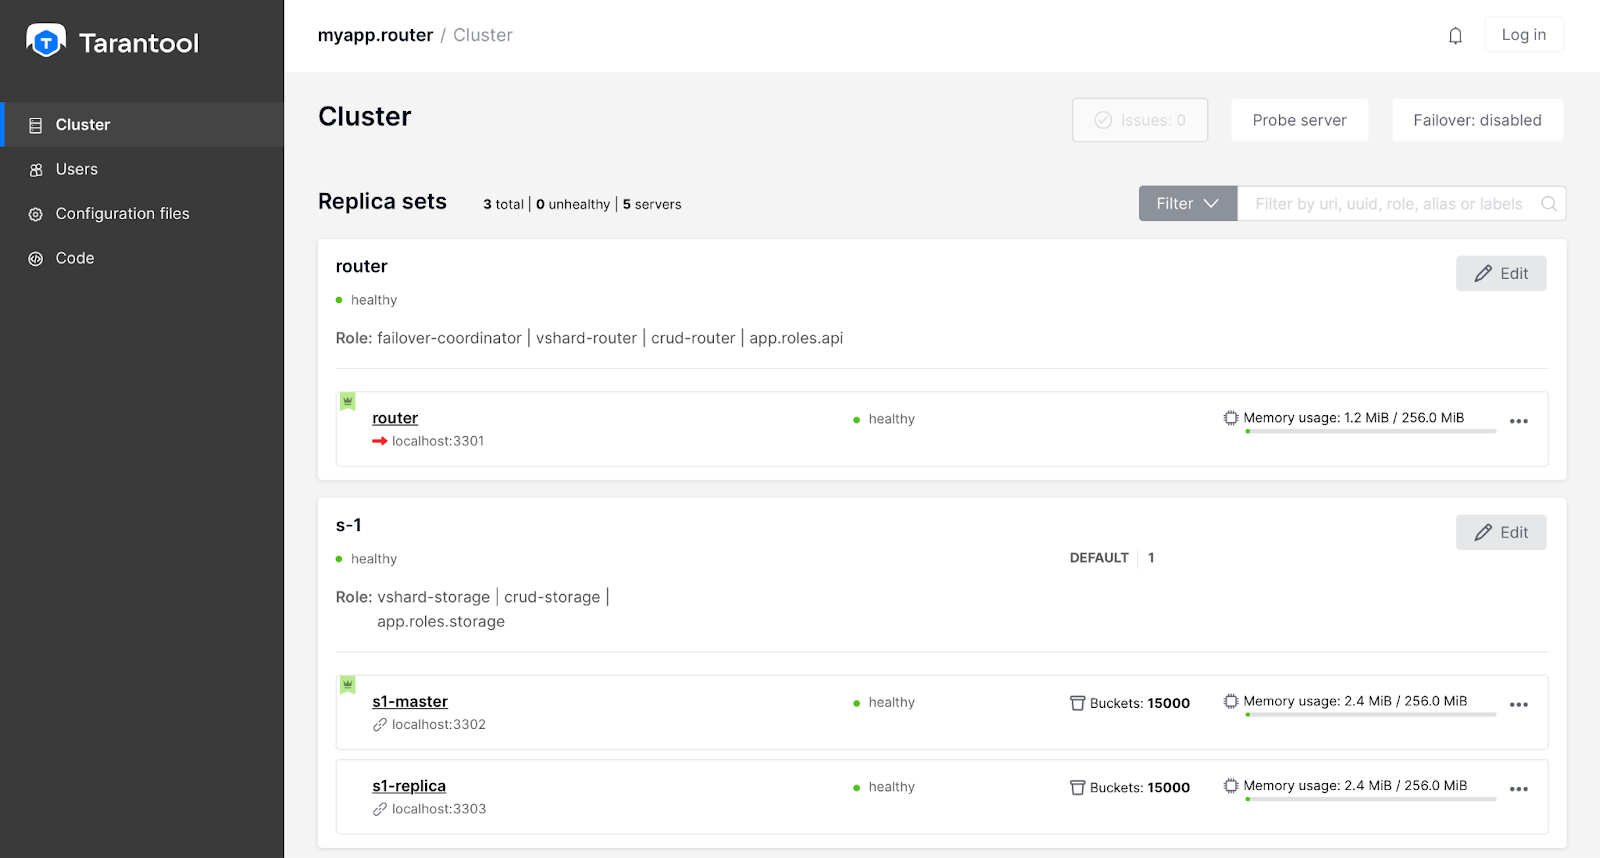
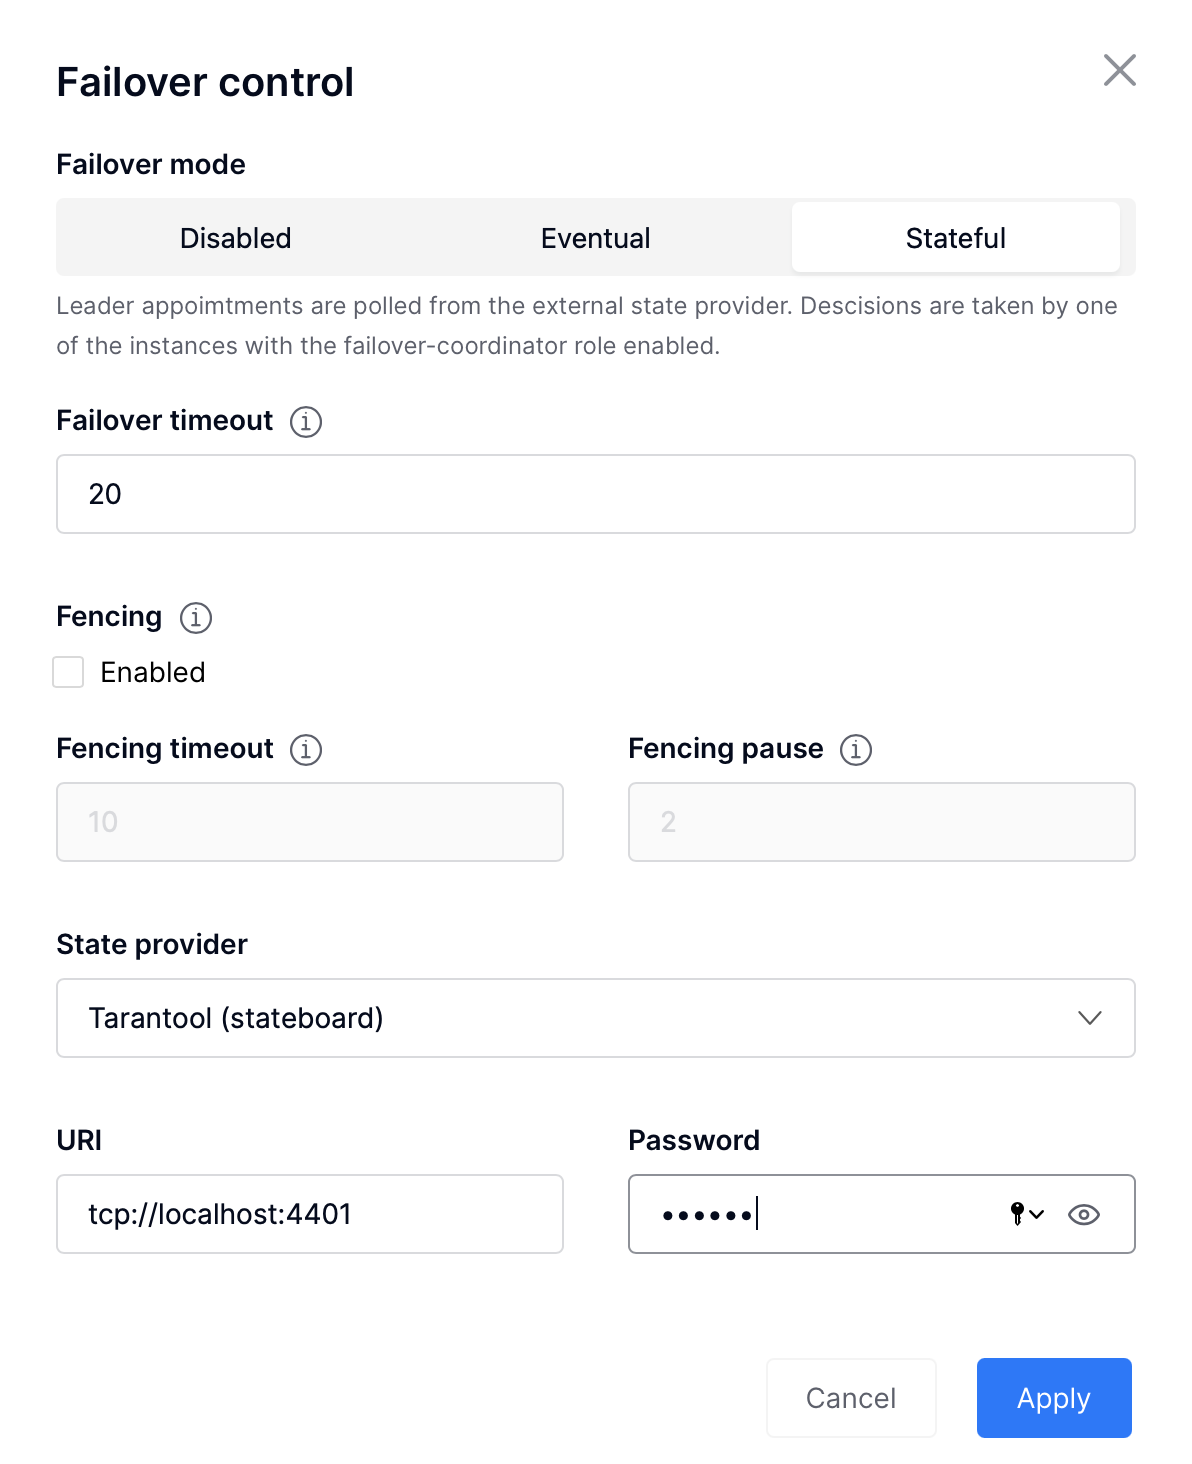
Now we can go to webui and load the role configuration, as well as configure the failover. To set up stateful failover, you must:
- click on the Failover button
- choose stateful
- register address and password:
Let’s take a look at how it works. Now in replicset s-1 leader is s1-master…

Let’s stop it:
cartridge stop s1-masterThe leader will switch to s1-replica:

We will restore s1-master:
cartridge start -d s1-masters1-master rose, but thanks to the stateful failover, the leader remains s1-replica:

Load the configuration for the role cartridge.roles.metrics, for this you need to go to the Code tab and create a metrics.yml file with the following content:
export:
  - path: '/metrics'
    format: prometheus
  - path: '/health'
    format: health
After we click on the Apply button, the metrics will be available on each node of the application by endpoint localhost:8081/metrics and health-check appears at localhost:8081/health…
This completes the basic setup of a small application: the cluster is ready for work and now we can write an application that will communicate with the cluster using the HTTP API or via a connector, and we can also extend the functionality of the cluster.
Conclusion
Many developers don’t like wasting time setting up a database. We want some framework to take over all the responsibilities for managing the cluster, and we only had to write code. To solve this problem, I use Cartridge, a framework that manages a cluster of multiple Tarantool instances.
In the article, I said:
- how to build a reliable clustered application using Cartridge and Tarantool,
- how to write code for a small application to store employee information,
- how to add tests,
- how to set up a cluster.
I hope my story was helpful and you will be using Cartridge to build apps. I would be glad to hear feedback on whether you managed to easily and quickly write an application in Cartridge, as well as questions on its use.