Taming the black dragon. Ethical hacking with Kali Linux. Part 8. Methods and means of foreign intelligence
Greetings, dear reader, in the eighth part of the series of articles “Taming the Black
dragon. Ethical hacking with Kali Linux.
The full list of articles is attached below, and will be supplemented as new ones appear.
Taming the black dragon. Ethical hacking with Kali Linux:
Part 1. Introduction. Preparation of the working stand.
Part 2. Attack phases.
Part 3. Footprinting. Intelligence and information gathering.
Part 4. Scanning and types of scanning. Dive into nmap.
Part 5. Methods for gaining access to the system.
Part 6. Post-exploitation. Methods for escalating privileges.
Part 7. Post-exploitation. Anchoring in the system.
Part 8. Methods and means of foreign intelligence.
In one of the previous parts, we touched on the first phase of any attack, called footprinting, and analyzed a few simple examples of collecting information about an object located on a local network. However, we have not considered in detail the methods and means for conducting foreign intelligence and collecting information. It’s time to fix it! Therefore, this article will be completely devoted to this topic.
I think that you often came across the abbreviation OSINT (open-source intelligence), which is a separate direction for the world, dedicated to collecting information from open sources. In this article, I will try to clearly demonstrate how the attacker conducts the initial collection of information from open sources about the target and what tools in Kali will help us with this. As an example, I will collect information about a commercial Bank with which I have an agreement.
The first thing we need to know about the goal is the name of the organization, its type of activity and the public domain to which a website or any other public resource can be linked. There are no comments here. Yandex, Google, DuckDuckGo… I don’t think it makes sense to teach a person reading an article on OSINT how to use search engines.
And so at the time of the beginning, we know about the purpose of all of the above, for manipulation the only thing that is available to us in the work is the domain name of the organization’s website (let it be blahblah.su). Tools to help us with this are WHOIS, TheHarvester, SpiderFoot, and recon-ng. All of them are included in Kali, which means we don’t have to pull anything from the GitHub repositories and deal with other nonsense. A little tedious digression for the sake of a better acquaintance with each of the above tools.
WHOIS – a simple and at the same time very powerful tool that allows you to get detailed information about both domain ownership and owners by a domain name or public IP address. The whois record contains all the contact information associated with the person, company, or other entity that has registered the domain name.
TheHarvester – which is a powerful framework for collecting e-mail addresses, subdomain names, virtual hosts, open ports / banners and names of company employees from various open sources.
SpiderFoot is an open source tool for automated intelligence. Its purpose is to automate the process of collecting information about a given goal.
There are three main areas where SpiderFoot can be useful:
1) If you are a penetration tester, SpiderFoot automates the target information gathering stage, giving you a rich set of data to help you define areas for testing.
2) To understand that your network / organization is open to the outside world. This information in the wrong hands can pose a significant risk.
3) SpiderFoot can also be used to collect information about suspicious malicious IPs that you may have seen in your logs or received through threat intelligence channels.
Recon-ng is a full featured web intelligence framework written in Python. Includes independent modules, database interaction, handy built-in functions, interactive help and command completion. Recon-ng provides a powerful environment in which reconnaissance based on open web sources can be done quickly and thoroughly.
After a brief introduction to our today’s toolkit, we can continue and our first tool will be whois to which we will simply pass in the domain name parameter (blahblah.su) and see what it gives us…

The search for data related to the domain name gave us the following results: The full name of the organization, the contact phone number of the employee to whom the domain name is registered (domain administrator), his email (which is fundamentally wrong, usually the work number of the technical department is indicated, and email type info@mail.blahblah.su). There is also information about hosting (jino.ru) and top-level domain registrar (.su)
Not so much to start with. Let’s move on and try out the next tool, theHarvester. In order to start the scan, in addition to the domain parameter, you must specify the system parameter through which the data will be collected. Some of them require API keys, but we will only consider those that work without an API.
For more information, you can type theHarvester -h

We use dnsdumpster, rapiddns and urlscan to get information about IP addresses and related domains. Let’s enter the commands one by one:
theHarvester –d blahblah.su –b dnsdumpster
theHarvester –d blahblah.su –b rapiddns
theHarvester –d blahblah.su –b urlscan


And here the picture becomes much more interesting. TheHarvester pulls out all the company’s resources associated with this domain: mail server, iBank client, and vmware horizon gate, as well as public IP addresses. Let’s move on and see what else we can find with the next SpiderFoot tool. Unlike all the tools that will be reviewed in this article, SpiderFoot allows you to work through a web interface, which may be more pleasant for fans of graphical shells.
First, let’s start SpiderFoot as a web server on the address of our Kali machine with the following command:
spiderfoot -l 127.0.0.1:8080

Now follow the link in the browse to field http://127.0.0.1:8080/
The following window will open before us:

In order to start a new scan, you need to go to the New Scan tab

Here we need to set the target name (the name of the organization or its domain name), as well as the public IP address or target domain. Below we have a choice of data collection type:
By mode of use:
All – a mode that includes all spiderfoot modules in order to get all possible data about the target (the same version of the “one-button” application on the principle of “do your best”). Due to the fact that this mode works very slowly and sometimes carries with it a bunch of unnecessary garbage, it is rarely necessary to use it.
Footprint – a mode that is suitable for classical reconnaissance and collecting data on the network perimeter, associated identifiers and other information. This method uses a large number of different web crawlers and search engines.
Investigate – this mode is more suitable in cases of incident investigation, when there is a suspicion that the target address/domain is malicious, but you need additional information about it. The advantage of this scanning mode is that it works with requests from blacklists and other sources that may contain information about the target resource’s malicious intent.
passive – passive collection of information about the target from open sources, used when there is a need to collect minimally useful data without using the aggressive scanning mode.
According to the requested data:
The list here is quite impressive, so I will list only a few parameters: IP addresses, domain names, postal addresses, company data (physical address, phone numbers, etc.).

By plugins:
It is worth paying attention to the fact that some of the modules require an API service key to work (for example, such as shodan, emailrep, focsec, etc.), but nevertheless, most of them are ready to work without the need to perform additional actions. If you wish, you can register on services such as shodan.io and get the API for free.

Well, let’s not dwell on getting acquainted with the SpiderFoot interface for a long time, and move on from words to deeds. Let’s select the Footprint scanning mode, set the target name and specify the domain (blahblah.su) as the target source, click Run Scan Now and go brew coffee while our “spider” weaves its threads …

As a result, returning to the computer with a steaming mug of hot coffee, we will find something like the following picture

Everything is beautiful, with graphs and sorted out, just double-click on the desired item (for example, go to Linked URL – Internal)

And then we burned CMS 1C Bitrix, on the basis of which the company’s website operates. Moreover, the path to the standard admin panel www.blahblah.su/bitrix/ turned out to be open

For greater convenience, we can change the display modes to Browse

Either Graph

Our next tool with which we will get acquainted within the framework of this topic will be the recon-ng framework. Of all the tools discussed, recon-ng is the only one that does not initially contain any modules in the composition. So the first duty is to install all the modules necessary for the full-fledged work of the framework and create a workspace.
To launch the framework itself, it is enough to write recon-ng in the console, and to get information about the available options, help.

Next, update the marketplace database with the marketplace refresh command and install all available components with the command
marketplace install all

After the installation is complete, we will create a new workspace and a database to store data for a specific domain. Type help to display the available commands create a new area with the command
workspaces create blahblah

and add the blahblah.su domain database
db insert

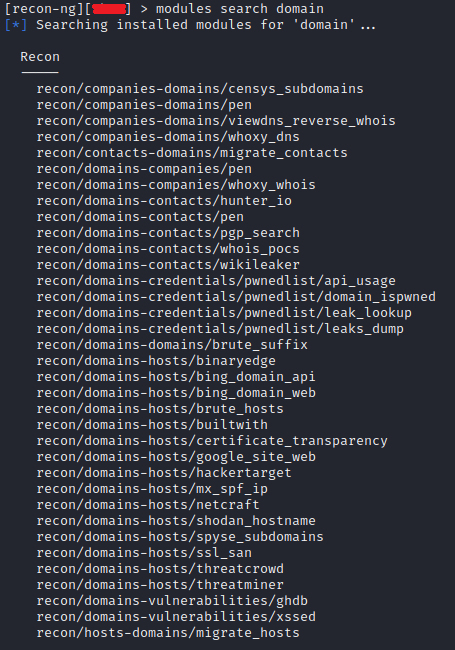
Now we are ready to start working. And first, let’s load the list of available modules for working with domains with the command
modules search domain
Load the module from the available list
modules load recon/domains-hosts/brute_hosts
and run it with the run command
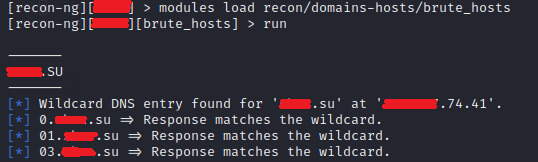


Here we see the same resource data and their public addresses as when working with theHarvester. For example, let’s go to one of the public addresses and get to the iBank application page.

Let’s try another module by returning to the previous menu with the back command

Let’s load the recon/domains-hosts/hackertarget module and see what it can pull out interesting

And so, let’s sum up. It all started with the fact that we only knew the name of the organization, its type of activity and the domain name of the website address. At the moment, we have information about all public resources of the organization (mailer, website, iBank application, vmware horizon gate address), we have information about the names of some employees, their corporate email addresses, work phone numbers. In the hands of experienced attackers, this is already enough to carry out successful social engineering scenarios, not to mention other methods. That is why it is very important to try to minimize the publication of this kind of information on the Internet. On this note, I say goodbye to you, dear reader, and see you in the new articles of the series “Taming the Black Dragon. Ethical hacking with Kali Linux.