Streaming multiple RTSP IP cameras to YouTube and / or Facebook
As you know, YouTube lacks the feature of capturing an RTSP stream. Perhaps this was not done by chance, but proceeding from naked pragmatism, so that people do not post static video surveillance of their entrances on YouTube and dispose of its channels, which, as it turned out during the pandemic, are not rubber at all. Recall that some time ago there were stories with a deterioration and limitation of the quality of streams to 240p. Or there is one more assumption: streams from IP cameras are evil for YouTube, because they have just over zero viewers, on which you won’t wind up a million ad views. One way or another, the feature is not presented, and we will try to fill this gap – to help YouTube make users happy.

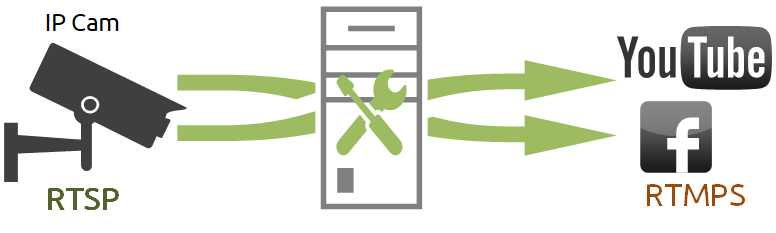
Let’s say we want to take a regular outdoor IP camera that sends an H.264 stream over RTSP and redirect it to YouTube. To do this, you need to receive an RTSP stream and convert it to an RTMPS stream that YouTube accepts. Why RTMPS and not RTMP? As you know, non-secret protocols die off. HTTP is persecuted, and its fate befell other protocols that do not have the letter S – for Secure at the end. RTMP stream was refused by Facebook, but thanks, left RTMPS. So, let’s convert RTSP to RTMPS. We do it in the Headless way (without using the UI), i.e. on server.
One RTSP stream will require one YouTube account to receive the stream. But what if there is not one, but many cameras?
Yes, you can manually create several YouTube accounts, for example, to cover a private plot with video surveillance. But this is highly likely to violate the terms of the user agreement. And if the cameras are not 10, but all 50? Create 50 accounts? And then what? Watch it how? In this case, you can come to the rescue mixerwhich will combine cameras into one stream.
Let’s see how it works with two RTSP cameras. Resulting stream mixer1 = rtsp1 + rtsp2. We send the stream mixer1 to YouTube. Everything works – both cameras are in the same stream. It should be noted here that mixing is a rather CPU-intensive operation.

At the same time, since we already have an RTSP stream on the server side, we can redirect this stream to other RTMP endpoints without incurring additional CPU and memory costs. We simply remove the traffic from the RTSP stream and replicate it on Facebook, Twitch, anywhere without additional RTSP capture and depacketization.

As a devops, my conscience will torment me if I do not script what could be scripted. Automation is facilitated by the presence of a REST API for controlling camera video capture and relaying.
For example, using a query:
/rtsp/startupyou can capture a video stream from an IP camera.
Inquiry:
/rtsp/find_allwill get a list of streams captured by the RTSP server.
The request to end the RTSP session looks like this:
/rtsp/terminateCapturing and relaying video streams can be controlled either using a simple browser and any convenient REST client, or using a minimum number of lines of code to embed the server control functionality into your web project.
Let’s take a closer look at how this can be done.
A small manual on how to organize a Live broadcast on YouTube and Facebook using a minimal code
As a server side, we use demo.flashphoner.com… To quickly deploy your WCS server use this instruction or run one of the virtual instances on Amazon, DigitalOcean or in Docker…
It assumes that you have a verified YouTube account and have already created a YouTube Studio stream and have created a live video stream on your Facebook account.
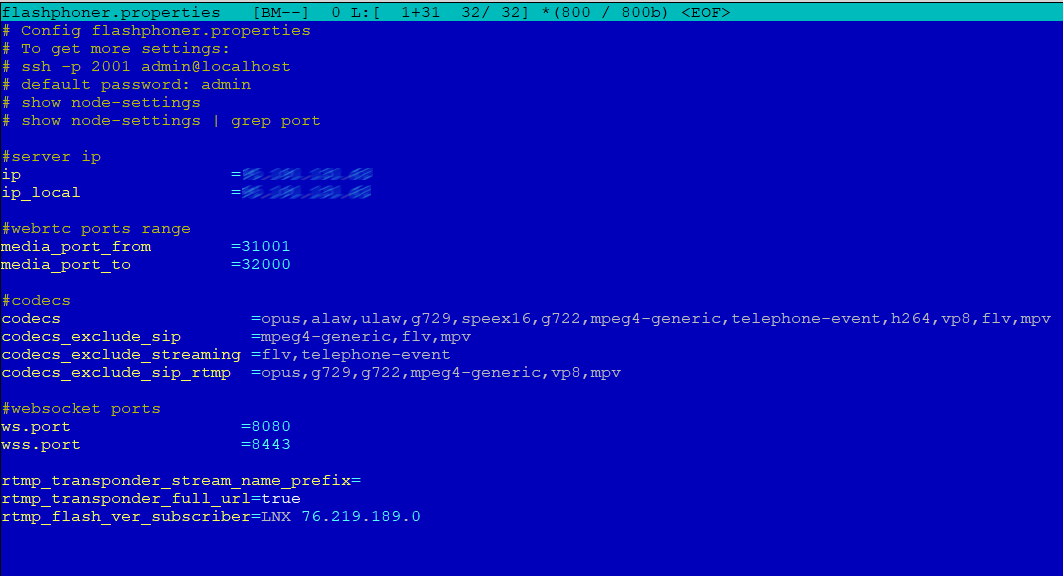
For Live broadcasts to work on YouTube and Facebook, you need to specify in the WCS settings file flashphoner.properties the following lines:
rtmp_transponder_stream_name_prefix= – Removes all prefixes for the relayed stream.
rtmp_transponder_full_url=true – If set to “true”, it ignores the “streamName” parameter and uses the RTMP address to relay the stream as specified by the user.
rtmp_flash_ver_subscriber=LNX 76.219.189.0 – to reconcile versions of the RTMP client between WCS and YouTube.
Now that all the preparatory steps have been completed, let’s move on to programming. Let’s place the minimum required elements in the HTML file:
We connect the scripts of the main API and the JS script for the live broadcast, which we will create a little later:
 <script type="text/javascript" src="https://habr.com/ru/company/flashphoner/blog/561362/flashphoner.js"></script>
 <script type="text/javascript" src="rtsp-to-rtmp-min.js"></script>
We initialize the API for loading the web page:
<body onload="init_page()">Add the necessary elements and buttons – fields for entering unique stream codes for YouTube and Facebook, a button for republishing an RTSP stream, a div element for displaying the current status of the program and a button for stopping republishing:
<input id="streamKeyYT" type="text" placeholder="YouTube Stream key"/>
<input id="streamKeyFB" type="text" placeholder="FaceBook Stream key"/>
<button id="repubBtn">Start republish</button>
<div id="republishStatus"></div>
<br>
<button id="stopBtn">Stop republish</button>
Then we move on to creating a JS script for RTSP republishing to work. The script is a mini REST client.
We create constants:
Constant “url”, into which we write the address for requests REST API … Replace “demo.flashphoner.com” with your WCS address.
Constant “rtspStream” – specify the RTSP address of the stream from the IP camera. For example, we use an RTSP stream from a virtual camera.
var url = "https://demo.flashphoner.com:8444/rest-api";
var rtspStream = "rtsp://wowzaec2demo.streamlock.net/vod/mp4:BigBuckBunny_115k.mov"
The init_page () function initializes the main API when the web page is loaded. Also in this function we write the correspondence of the buttons to the called functions and call the “getStream” function, which captures the RTSP video stream from the IP camera:
function init_page() {
	Flashphoner.init({});
	repubBtn.onclick = streamToYouTube;
	stopBtn.onclick = stopStream;
	getStream();
}
The “getStream ()” function sends a WCS REST request /rtsp/startup which captures the RTSP video stream whose address was written into a constant rtspStream
function getStream() {
    fetchUrl = url + "/rtsp/startup";
    const options = {
        method: "POST",
        headers: {
            "Content-Type": "application/json"
        },
        body: JSON.stringify({
            "uri": rtspStream
        }),
    }
    fetch(fetchUrl, options);
	console.log("Stream Captured");
}
The “streamToYouTube ()” function will republish the captured video stream to a Live broadcast on YouTube:
function streamToYouTube() {
	fetchUrl = url + "/push/startup";
	const options = {
        method: "POST",
        headers: {
            "Content-Type": "application/json"
        },
        body: JSON.stringify({
            "streamName": rtspStream,
						"rtmpUrl": "rtmp://a.rtmp.youtube.com/live2/"+document.getElementById("streamKeyYT").value
        }),
    }
  fetch(fetchUrl, options);
	streamToFB()
}
This function sends a call to WCS REST /push/startup in the parameters of which the following values are passed:
“streamName” is the name of the stream that we captured from the IP camera. The stream name corresponds to its RTSP address, which we wrote in the “rtspStream” constant
“rtmpUrl” – server URL + unique stream code. This data is provided when creating a Live stream in YouTube Studio. In our example, we hard-coded the URL in the code, you can add another field for it to your web page. The unique stream code is indicated in the “streamKeyYT” field on our Web page.
The “streamToFB” function republishes the captured video stream to a Live broadcast on Facebook:
function streamToFB() {
	fetchUrl = url + "/push/startup";
	const options = {
        method: "POST",
        headers: {
            "Content-Type": "application/json"
        },
        body: JSON.stringify({
            "streamName": rtspStream,
						"rtmpUrl": "rtmps://live-api-s.facebook.com:443/rtmp/"+document.getElementById("streamKeyFB").value
        }),
    }
  fetch(fetchUrl, options);
	document.getElementById("republishStatus").textContent = "Stream republished";
}
This function also sends a “/ push / startup” call to WCS REST, in the parameters of which the values are passed:
“streamName” is the name of the stream that we captured from the IP camera. The stream name corresponds to its RTSP address, which we wrote in the “rtspStream” constant
“rtmpUrl” – server URL + unique stream code. This data can be found on the Facebook Live Streaming page in the Live API section. We specified the server url in this function in the code, as well as for the YouTube republishing function. We take the unique stream code from the “streamKeyFB” field on the Web page.
The “stopStream ()” function sends an RTSP request “/ rtsp / terminate” which stops capturing the stream from the IP camera to WCS and, accordingly, stops publishing to YouTube and Facebook:
function stopStream() {
	fetchUrl = url + "/rtsp/terminate";
    const options = {
        method: "POST",
        headers: {
            "Content-Type": "application/json"
        },
        body: JSON.stringify({
            "uri": document.getElementById("rtspLink").value
        }),
    }
    fetch(fetchUrl, options);
	document.getElementById("captureStatus").textContent = null;
	document.getElementById("republishStatus").textContent = null;
	document.getElementById("stopStatus").textContent = "Stream stopped";
}
The complete codes of HTML and JS files will be discussed below.
So. We save the files and try to run.
Sequence of actions for testing
We create a live broadcast in YouTube Studio. Copy the unique code of the video stream:
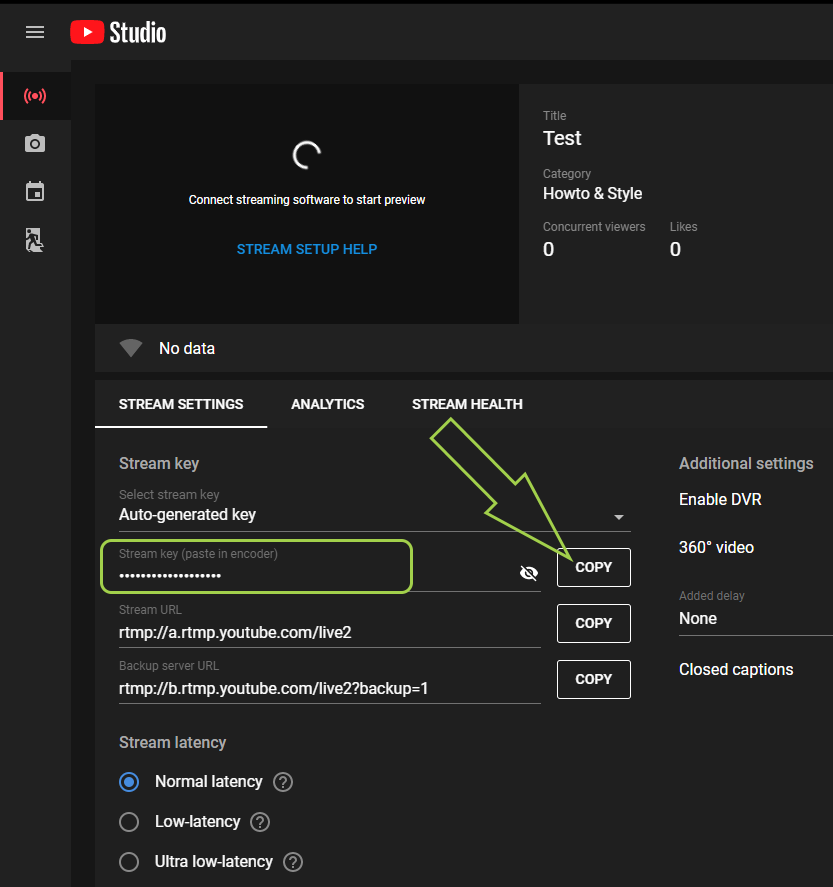
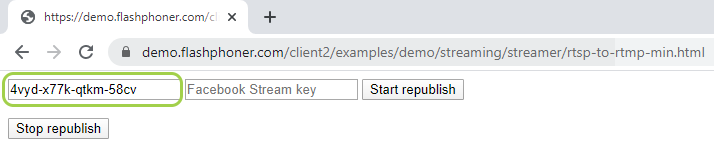
Open the previously created HTML page. We indicate in the first field the unique code of the video stream that we copied to YouTube:
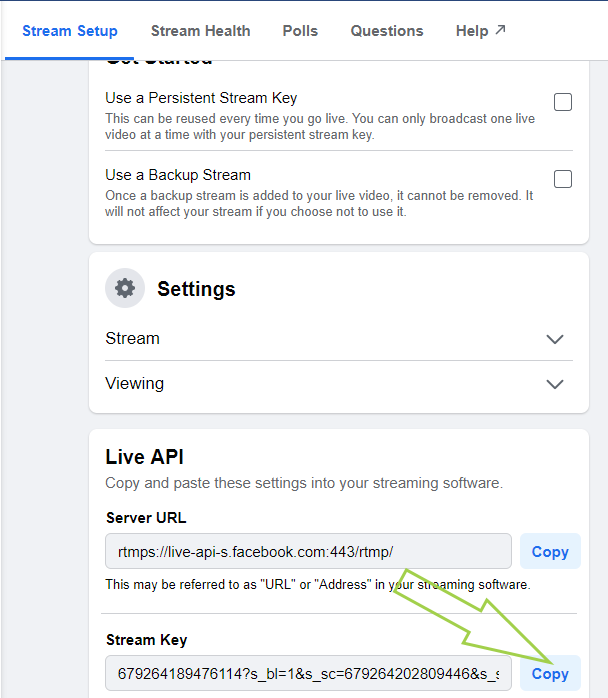
We create a Live broadcast on our Facebook account. Copy the unique code of the video stream.
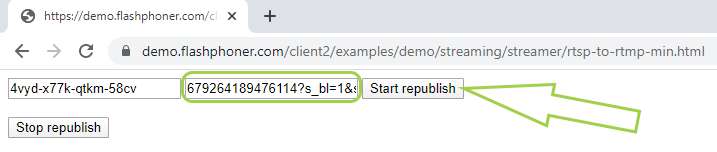
We return to our web page, paste the copied code into the second field and press the button “Start republish
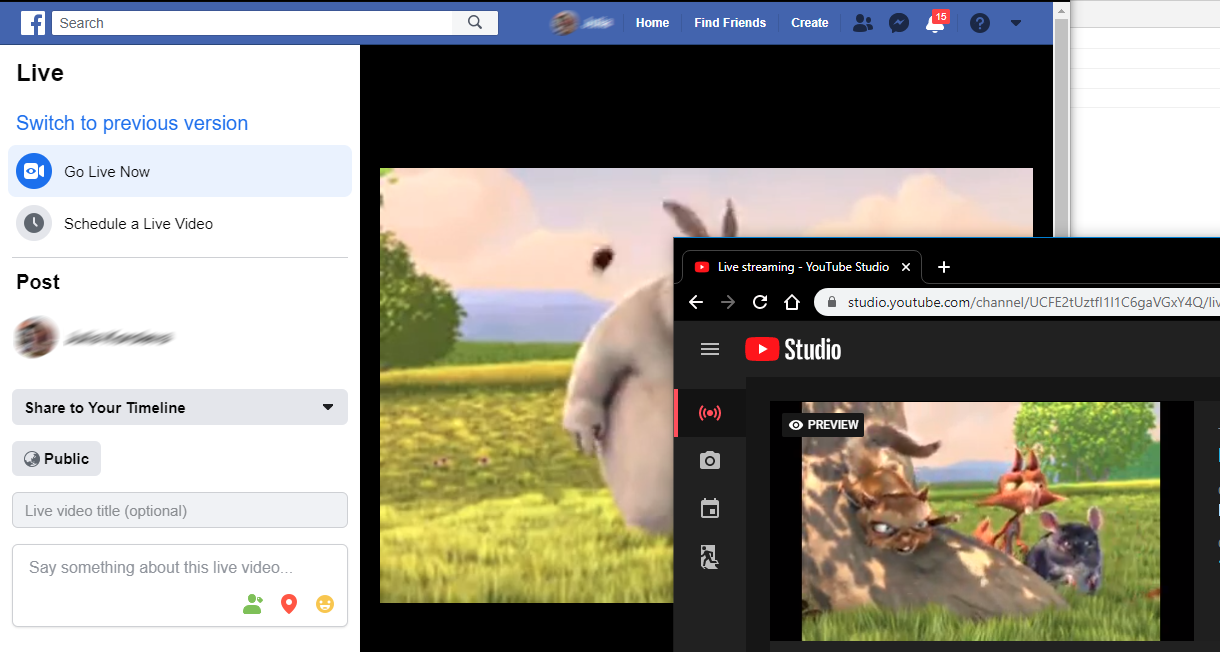
Now we check the work of our republishing. Go to YouTube Studio and Facebook again, wait a few seconds and get a preview of the stream.
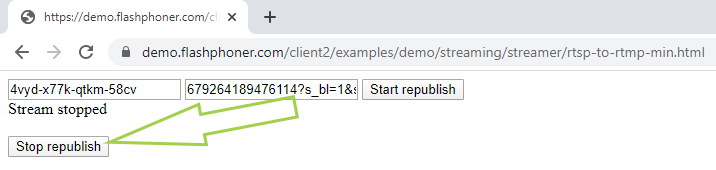
To complete the republishing, click the “Stop” button
Now, as promised, the source code for the example is complete:
Listing of the HTML file “rtsp-to-rtmp-min.html”
<!DOCTYPE html>
<html lang="en">
    <head>
        <script type="text/javascript" src="https://habr.com/ru/company/flashphoner/blog/561362/flashphoner.js"></script>
        <script type="text/javascript" src="rtsp-to-rtmp-min.js"></script>
    </head>
    <body onload="init_page()">
        <input id="streamKeyYT" type="text" placeholder="YouTube Stream key" /> <input id="streamKeyFB" type="text" placeholder="Facebook Stream key" /> <button id="repubBtn">Start republish</button>
        <div id="republishStatus"></div>
        <br />
        <button id="stopBtn">Stop republish</button>
    </body>
</html>
Listing of the JS file “rtsp-to-rtmp-min.js”:
var url = "https://demo.flashphoner.com:8444/rest-api";
var rtspStream = "rtsp://wowzaec2demo.streamlock.net/vod/mp4:BigBuckBunny_115k.mov"
function init_page() {
Flashphoner.init({});
repubBtn.onclick = streamToYouTube;
stopBtn.onclick = stopStream;
getStream();
}
function getStream() {
fetchUrl = url + "/rtsp/startup";
const options = {
method: "POST",
headers: {
"Content-Type": "application/json"
},
body: JSON.stringify({
"uri": rtspStream
}),
}
fetch(fetchUrl, options);
console.log("Stream Captured");
}
function streamToYouTube() {
fetchUrl = url + "/push/startup";
const options = {
method: "POST",
headers: {
"Content-Type": "application/json"
},
body: JSON.stringify({
"streamName": rtspStream,
"rtmpUrl": "rtmp://a.rtmp.youtube.com/live2/" + document.getElementById("streamKeyYT").value
}),
}
fetch(fetchUrl, options);
streamToFB()
}
function streamToFB() {
fetchUrl = url + "/push/startup";
const options = {
method: "POST",
headers: {
"Content-Type": "application/json"
},
body: JSON.stringify({
"streamName": rtspStream,
"rtmpUrl": "rtmps://live-api-s.facebook.com:443/rtmp/" + document.getElementById("streamKeyFB").value
}),
}
fetch(fetchUrl, options);
document.getElementById("republishStatus").textContent = "Stream republished";
}
function stopStream() {
fetchUrl = url + "/rtsp/terminate";
const options = {
method: "POST",
headers: {
"Content-Type": "application/json"
},
body: JSON.stringify({
"uri": rtspStream
}),
}
fetch(fetchUrl, options);
document.getElementById("republishStatus").textContent = "Stream stopped";
}For a minimal implementation, very little code is required. Of course, for the final implementation of the functionality, you will still need a little refinement with a file – add styles to the web page and various data validation checks in the JS script code. But it works.
Happy streaming!
Links
WCS on Amazon EC2 – Fast deployment of Amazon based WCS
WCS on DigitalOcean – Rapid deployment of WCS powered by DigitalOcean
WCS in Docker – Running WCS as a Docker container
Broadcasting a WebRTC video stream with conversion to RTMP – Server functions for converting WebRTC audio video stream to RTMP
Streaming video from a professional video capture device (Live Encoder) via RTMP protocol – Server functions for converting video streams from Live Encoder to RTMP
HTML5 broadcasts from RTSP-IP cameras – Server functions for playing RTSP video streams