Setting up an Android device to analyze application traffic
Introduction
From time to time, I need to analyze Android mobile applications, and each time the biggest problem is configuring mobile application traffic to be redirected to the BurpSuite proxy server so that all application requests are displayed in it.
This note is intended to systematize in a single source methods for bypassing restrictions on traffic redirection. Issues of bypassing Root detection, SSL pinning, and other security mechanisms will not be considered in this note.
To set up we need: BurpSuite, adb, apk tool, jarsignerAndroid device (or emulator).
Basic
To set up initial traffic redirection, we need to add the SSL certificate of our proxy server to the device’s trusted certificates, as well as configure the connection to the current Wi-Fi network. Let’s consider this process step by step.
Certificate export
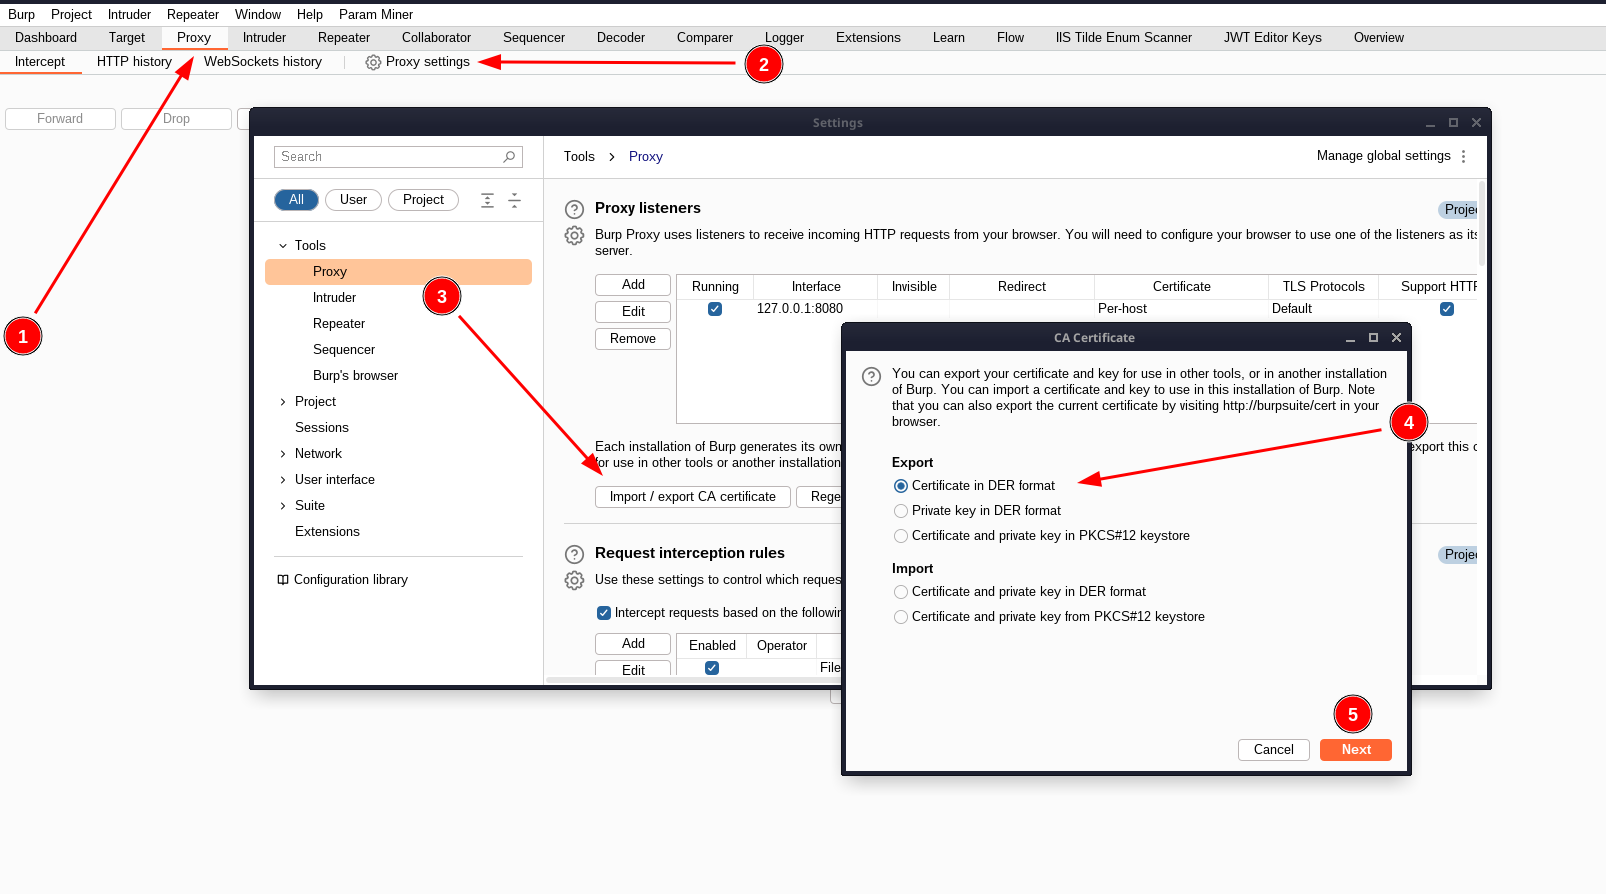
After installing BurpSuite, launch and create a new project. After opening the main BurpSuite window, go to the Proxy (1) -> Proxy Settings (2) -> Import/export CA certificate (3) tabs. In the window that opens, select “Certificate in DER Format” (4) and save the certificate to a file (5), for example, “burp.der”. Let’s rename the exported file to “burp.cer”. We move the resulting file to a mobile device, on which we will later test the target application.

Certificate Installation
In the settings of our Android device, select Settings -> Security & Location -> Advanced -> Encryption & credentials -> Trusted credentials / User credentials (this path may differ depending on the specific Android distribution). Select our “burp.cer” file and confirm its installation. To confirm the installation was successful, look for our certificate in the list of all installed device certificates.

Proxy Configuration
Open BurpSuite, go to Proxy (1) -> Proxy Settings (2) -> Proxy Listeners (3) -> Add (4) tabs. Specify any free port to listen on (for example, 8081) and specify “All interfaces” in the interface selection field. Alternatively, we have the option to select a specific interface to listen on (for example, connected to a Wi-Fi network).

Smartphone setup
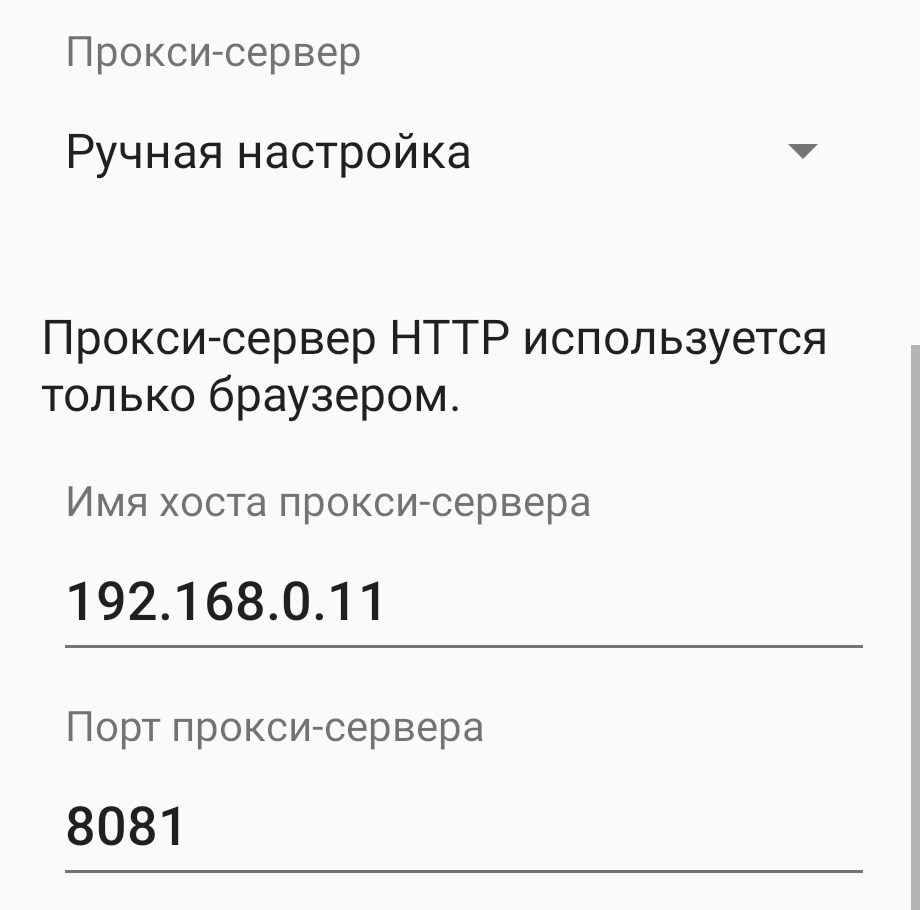
On an Android device, go to settings: Settings -> Network & Internet -> Wi-Fi. Select the current Wi-Fi network, go to advanced network settings. Specify the IP address of the device with BurpSuite, the previously selected port and save.

First results
At this stage, we can see the first requests from the Android device in BurpSuite. However, if we try to run the target mobile app, its traffic will not show up in BurpSuite. The reason for this is that in Android 7 Nougat (API version 24) there were global changes, as a result of which mobile applications began to trust only pre-installed system certificates, which do not include the one we installed. To bypass this protection mechanism, we need to take a few more steps.
Method 1
To implement this method, we need to patch the APK file of the target application. To do this, perform the following steps:
Getting the APK file of an app with ADB
To get the APK file from the device, use the following commands:
adb shell pm list package # найдем имя пакета (например - com.example.app)
adb shell pm path com.example.app # найдем путь до APK-файла приложения
# результат выполнения данной команды будет выглядеть примерно так:
# package:/data/app/com.example.someapp/base.apk
adb pull /data/app/com.example.someapp/base.apk ./ #выгрузим APK-файл на наше локальное устройство
Dissecting the APK file
Since an APK file is essentially an archive containing the compiled application code and its resources, in order to modify it, we need to extract its contents. We can do this using the apktool utility with the command apktool d app.apk -s. The “-s” flag prevents dex files from being disassembled (because there is no need for this). As a result, a directory will be created that has the name of our source APK file, and also contains all the files of the target application.
In the AndroidManifest.xml file, in the section
<application>add valueandroid:networkSecurityConfig="@xml/network_security_config".As a result, we should get something similar to:<application android:networkSecurityConfig="@xml/network_security_config">In the res/xml directory, let’s create a new file called network_security_config.xml. In the content of this file we write:
    <?xml version="1.0" encoding="utf-8"?>
    <network-security-config>
        <base-config>
            <trust-anchors>
                <!-- Trust preinstalled CAs -->
                <certificates src="https://habr.com/ru/post/719272/system" />
                <!-- Trust user added CAs -->
                <certificates src="https://habr.com/ru/post/719272/user" />
            </trust-anchors>
        </base-config>
    </network-security-config>
Signing and packaging the APK file
Now we need to build and sign our modified application. To build the application, use the command:
apktool b app-release -o modified.apkLet’s create a new keystore and key, and then sign the modified application with our key:
keytool -genkey -v -keystore test.keystore -storepass password -alias android -keypass password -keyalg RSA -keysize 2048 -validity 10000
jarsigner -verbose -keystore test.keystore -storepass password -keypass password modified.apk android
After completing the signing process, to install a new version of the application on our device, we will use the command adb install modified.apk.
Method 2
In the process of writing this note, an alternative way to bypass this protection mechanism was found in the official documentation of the Genymotion emulator, which does not require modification of the APK file. In this method, the certificate is added to the store of preinstalled device certificates, which are unconditionally trusted by any application. To implement this method, let’s prepare our burp.cer certificate exported from BurpSuite.
openssl x509 -inform DER -in burp.cer -out Burp_cert.pem
mv Burp_cert.pem $(openssl x509 -inform PEM -subject_hash_old -in Burp_cert.pem |head -1).0
As a result, we get a file with a name like hash value.0 (for example, 9a5ba575.0). Let’s place the prepared certificate in the storage of preinstalled device certificates.
adb remount
adb push 9a5ba575.0 /system/etc/security/cacerts/
adb shell chmod 664 /system/etc/security/cacerts/9a5ba575.0
We reboot the device and check that a new one with the name “Portswigger” has appeared in the list of certificates. Then we configure the proxy in BurpSuite in accordance with the “Proxy Configuration” item and enable traffic redirection:
adb shell settings put global http_proxy localhost:3333
adb reverse tcp:3333 tcp:8081
To disable redirection, use the command:
adb shell settings put global http_proxy :0PS Results
As a result of these manipulations, all traffic of the target mobile application will be redirected to the BurpSuite proxy server, where it can be subjected to further analysis for research purposes.
And even more useful material can be found in my telegram channel: https://t.me/pain_test


