Secure Wi-Fi in a hotel for the whole family on Raspberry Pi
Hi all! Today I want to talk about my “family” project on the Raspberry Pi. Traveling the world, I am constantly faced with the need to connect to a fast and, last but not least, secure internet.
Imagine the situation: you check into a hotel with your family, spend a couple of hours solving accommodation issues and, pretty tired, try to connect the whole family to the network: the children demand cartoons, the spouse wants to look for the nearest stores where you can shop, and you just need to work. To do this, you hook each device to the hotel’s access point and hope that at least some protection mechanisms are implemented in this network.
Common problems with open wireless networks include eavesdropping, web application response spoofing, and DNS spoofing if the network itself is already compromised. Therefore, in any public network, you need to behave as carefully as possible. One of the best ways to protect your traffic from outside interference is to use your own VPN.

In Russia, the situation with the security of wireless networks is even more or less. In other countries where I happened to visit, everything is not so rosy. What gives the use of your VPN? The ability to connect all family devices at once to the Internet via public networks, while still protecting traffic with a VPN. There is an excellent guide on setting up your own VPN at Youtube.
Actually, the idea is not new – I decided to make a small travel router for the family. You can, of course, use ready-made solutions, but I already had a “raspberry” and external adapters for it, so I didn’t have to buy anything to implement my idea. Plus, this tool can always be stored on a USB flash drive and used on family trips, and the rest of the time the “raspberry” has a different life.
I decided to prepare a step-by-step instruction for those who want to repeat my experience. I hope you find it useful.
Option one (router based on OpenWrt)

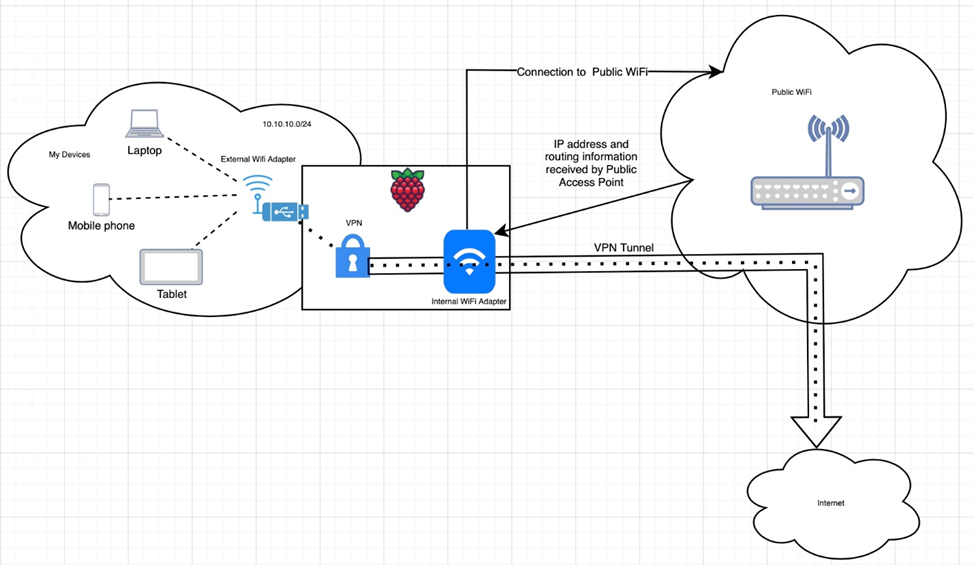
The essence of the connection scheme: we raise our access point on one external Wi-Fi interface of the “raspberry”, to which our wireless clients will always connect, and with the second adapter (built-in in my case, but if you wish, you can use the second external one) we connect to the public WiFi. In this case, all the traffic of our wireless devices will go through our VPN tunnel.
The project will require:
1) Raspberry Pi 4,
2) power adapter,
3) microSD card,
4) Ethernet cable,
5) external USB Wi-Fi adapter (I have an inexpensive AC-1200 from AliExpress on the MT7612U chipset).
Step one
Let’s upload the OpenWRT image to a microSD card. To do this, we need the following software: Raspberry Pi Imager (https://www.raspberrypi.com/software/), as well as the correct OpenWRT image. The required image for your “raspberry” can be found at https://openwrt.org/toh/raspberry_pi_foundation/raspberry_pi. So, we launch the Raspberry Pi Imager, specify the path to the file with the OpenWRT firmware, select our microSD card where we want to write the file, and click WRITE. We are waiting for the end of the recording and verification process, then we remove the microSD card.


step two
We insert a microSD card into our “raspberry” and connect it to power. Next, we connect it to our home router, to which our PC is connected, using an Ethernet cable. Important: for further configuration of our “raspberry”, it is necessary that the computer and the “raspberry” are on the same subnet. In my case it is 192.168.1.0/24 by default. After installing the latest OpenWRT firmware, the raspberry interface will have IP 192.168.1.1/24. Accordingly, to ensure network connectivity, your computer must be on the same subnet.
Step Three
To continue setting up our future router, you need to connect to it via SSH. You can consider the option through the GUI, but in my case I use the CLI, all actions can be repeated through the graphical interface, respectively.
SSH root@192.168.1.1

They will let us in without a password. However, we will not leave it like this, we will immediately set a secure password.
passwd

Next, a good solution would be to backup the files that we will edit in case something does not go according to plan 🙂

cd /etc/config/
cp firewall firewall.bk
cp network network.bk
cp wireless wireless.bk
Set up network interfaces.

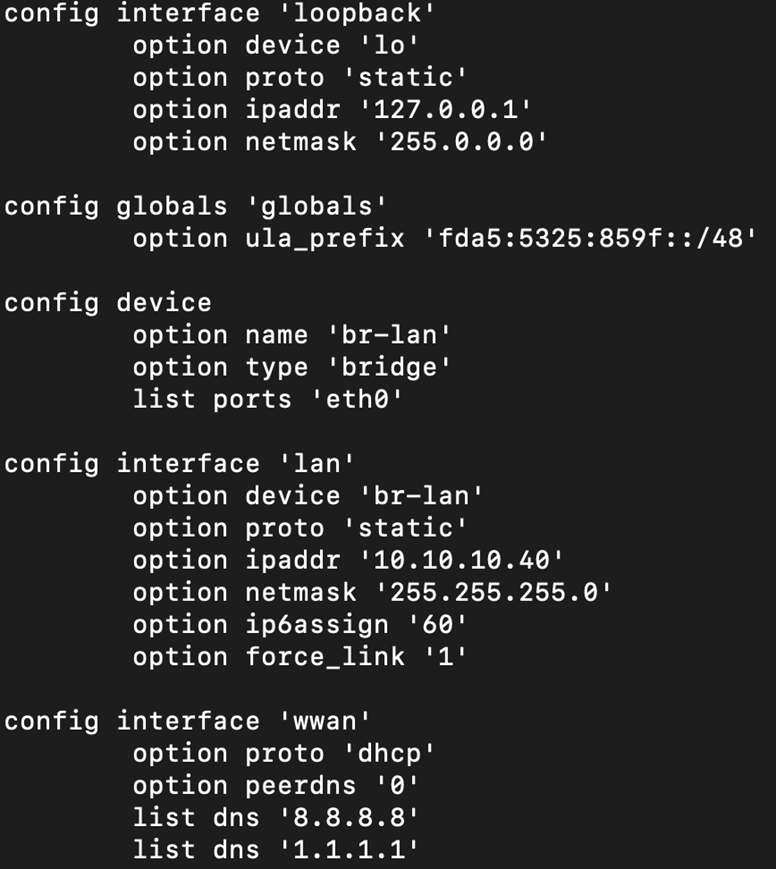
vi /etc/config/network
config interface 'loopback'
option device 'lo'
option proto 'static'
option ipaddr '127.0.0.1'
option netmask '255.0.0.0'
config globals 'globals'
option ula_prefix 'fd27:468f:224c::/48'
config device
option name 'br-lan'
option type 'bridge'
list ports 'eth0'
config interface 'lan'
option device 'br-lan'
option proto 'static'
option ipaddr '10.10.10.40'
option netmask '255.255.255.0'
option ip6assign '60'
option force_link '1'
config interface 'wwan'
option proto 'dhcp'
option peerdns '0'
option dns '8.8.8.8 1.1.1.1'
And also give access to the Internet to the LAN segment:
vi /etc/config/firewall (here we need to change only one value – set ACCEPT in the WAN option INPUT zone).
We reboot our raspberry and connect to the already changed IP address (in our case it is 10.10.10.40).
Next, we need to connect the Wi-Fi adapter. But first we need to install the drivers for this adapter. Therefore, first we connect the “raspberry” to our home Wi-Fi:
vi /etc/config/wireless
config wifi-device 'radio0'
option type 'mac80211'
option path 'platform/soc/fe300000.mmcnr/mmc_host/mmc1/mmc1:0001/mmc1:0001:1'
option channel '7'
option hwmode '11g'
option htmode 'HT20'
option disabled '0'
option short_gi_40 '0'
config wifi-iface 'default_radio0'
option device 'radio0'
option network 'lan'
option mode 'ap'
option ssid 'OpenWrt'
option encryption 'none'
uci commit wireless
wifi
Next, we continue the configuration through the GUI:
https://10.10.10.40/
We enter the same username and password with which we logged in via SSH.
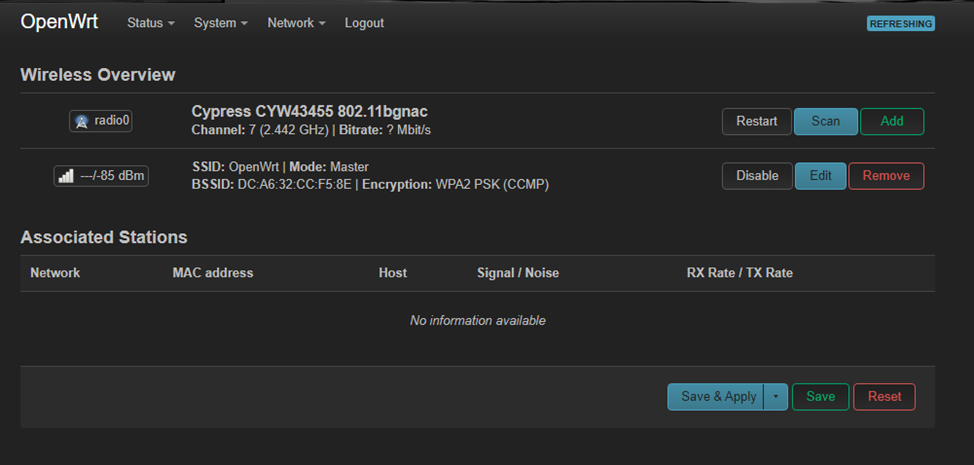
Go to the settings of wireless networks Network> Wireless
Click Scan and connect to your home wireless network to install the drivers for our Wi-Fi adapter.

After the “raspberry” has access to the Internet, we update the OpenWRT packages and install drivers for most adapters. However, you should proceed from the following points: the adapter chipset that you have must be compatible with OpenWRT (which chipsets are currently supported can be checked on the official OpenWrt website).
opkg update
opkg install kmod-mt76x2u kmod-rt2800-lib kmod-rt2800-usb kmod-rt2x00-lib kmod-rt2x00-usb kmod-usb-core kmod-usb-uhci kmod-usb-ohci kmod-usb2 usbutils nano
We make sure that the external adapter is installed correctly.
lsusb

ifconfig wlan1 up
If the interface has risen, then we are on the right track.

Next we need to raise our access point! To do this, you need to edit the file again:
nano /etc/config/wireless
config wifi-device 'radio1'
option type 'mac80211'
option path 'scb/fd500000.pcie/pci0000:00/0000:00:00.0/0000:01:00.0/usb2/2-1/2-1:1.0' < --путь сгенерится автоматом, его трогать не нужно
option channel '36'
option band '5g'
option htmode 'VHT80'
option disabled '0' <-- Не забыть включить
config wifi-iface 'default_radio1'
option device 'radio1'
option network 'lan'
option mode 'ap'
option ssid 'Название сети, к которой вы будете подключать все свои девайсы'
option encryption 'psk2'
option key 'Пароль для этой сети'
uci commit wireless
wifi
You now have a working travel router. Connect the whole family once to Wi-Fi on the “raspberry” and that’s it. In order for the Internet to be on all devices, you just need to connect to a public network. (Note: when connecting a Wi-Fi adapter, use the same USB connector, otherwise the interface may not start). However, your traffic is still transmitted over an insecure channel, so you need to set up a VPN.
In my case, I will be setting up a connection to my own VPN server. Setting up other VPN providers won’t be much different.
Our “raspberry” will be a client that, upon gaining access to the Internet, will automatically establish a connection with the VPN server, forming a secure tunnel, inside which all traffic will be transmitted.
Install the necessary packages for our VPN:
opkg update
opkg install wireguard-tools
opkg install luci-app-wireguard
Next, go through the GUI and add a new interface Network> Interfaces> Add New interface.
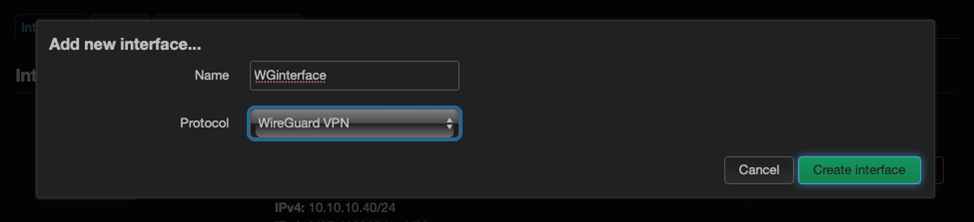
Give the interface a name and select the WireGuard VPN protocol.
Next, we import the configuration for adding a new client, which can be obtained from our VPN server.

Next, we need to configure the rules for the firewall as follows:
In the Network > Firewall tab, add a new zone and set the parameters:
Input-Reject
Output-Accept
Forward – Reject
Masquerading – Checked
MSS clamping – Checked
We select the interface that relates to the Wireguard tunnel, we look from which zone we are allowed to forward.
Next, select Save and Save&Apply.

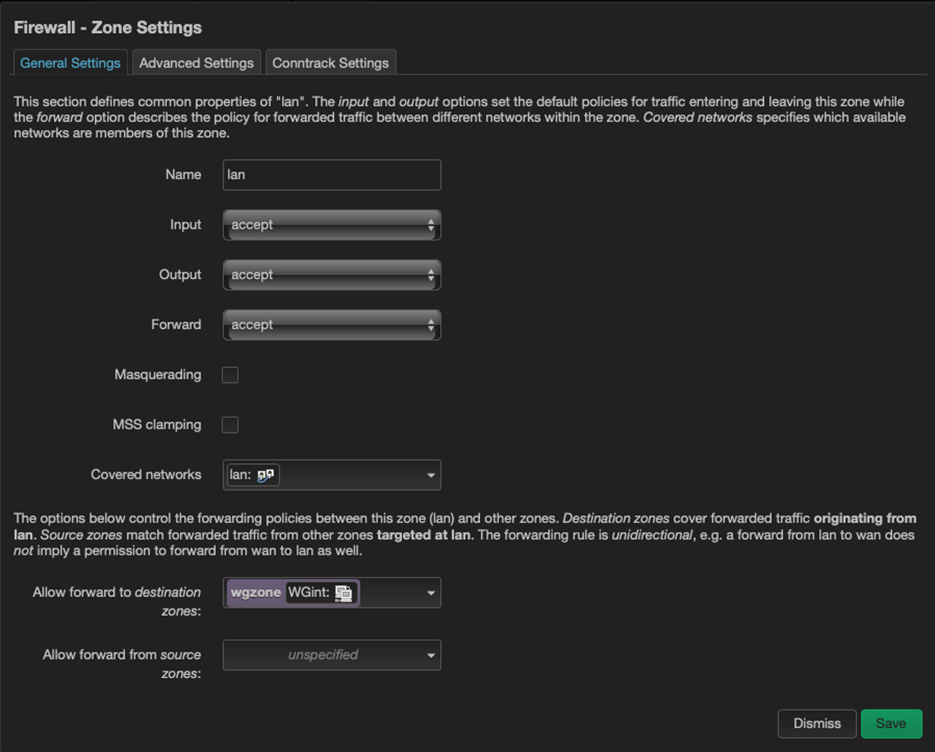
In order for all traffic to go only through our tunnel and nothing else, you can additionally adjust the firewall rule as follows: go to the settings of the Lan zone and set the Allow forward to destination zones parameter so that only the segment will be accessible from the Lan segment our tunnel.
This completes the setup of the Raspbery Pi-based travel router 🙂 Next, when you need to distribute Wi-Fi for the whole family in a new place, you will need to connect to the “raspberry”, go to Network> Wireless and connect to the new network.
This way of setting up a travel router is not simple, but it is highly reliable, allows you to use the main advantages of open firmware, and requires configuration only once. Then you can create an image and use it for quick deployment.
I will share the second way to turn a “raspberry” into a travel router in the next post so as not to overload this one)
Author: Evgeny Artemyev, Information Security Consultant, Jet Infosystems